ant design vue 使用upload自定义方法实现图片文件上传

 定义方法使用封装好的接口去上传图片,不是官方那样直接写道标签里面上传地址。应为上传接口需要token验证。我也不知道标签里面怎么写可以将token传过去过去,所以在方法里面写了。

html:

<a-upload
                  name="avatar"
                  list-type="picture-card"
                  :before-upload="beforeUpload"
                  :customRequest="uploadImage"
                  :file-list="fileList"
                  @preview="handlePreview"
                  @change="handleChange"
                >
                  <div v-if="fileList.length < 8">
                    <a-icon type="plus" />
                    <div class="ant-upload-text">点击上传</div>
                  </div>
                </a-upload>
              </div>
              <a-modal
                :visible="previewVisible"
                :footer="null"
                @cancel="handleCancel"
              >
                <img alt="example" style="width: 100%" :src="previewImage" />
              </a-modal>

js:

//该方法当上传列表新增上传和删除上传项都会执行,我们可以通过状态来获取最新的fileList内容,其中状/态有loading,removed,done。
    handleChange(data) {
      console.log(data);
      if (data.file.status == "removed") {
        this.fileList = data.fileList;
      }

      console.log(this.fileList);
    },
    // 上传头像前校验
    beforeUpload(file) {
      const isJpgOrPng =
        file.type === "image/jpeg" ||
        file.type === "image/jpg" ||
        file.type === "image/png";
      if (!isJpgOrPng) {
        this.$message.error("只能上传jpg/png格式的图片");
      }
      const isLt2M = file.size / 1024 / 1024 < 2;
      if (!isLt2M) {
        this.$message.error("图片不得大于2MB!");
      }
      return isJpgOrPng && isLt2M;
    },
    handleCancel() {
      this.previewVisible = false;
    },
    async handlePreview(file) {
      console.log(file);
      if (!file.url && !file.preview) {
        file.preview = await getBase64(file.originFileObj);
      }
      this.previewImage = file.url || file.preview;
      this.previewVisible = true;
    },
    uploadImage(file) {
      this.loading = true;
      const formData = new FormData();
      formData.append("file", file.file);
      this.saveFile(formData);
    },
    saveFile(file) {
      this.$http
        .post("/file/upload", file)
        .then((res) => {
          console.log("图片上传成功", res);
          if (res.code == 1) {
            // 存入列表
            this.fileList.push({
              uid: this.fileList.length + 1,
              name: res.data.name,
              status: "done",
              url: "https://passport.xg360.cc/" + res.data.filePath,
            });
          } else {
            this.$message.error("图片要小于1M,请压缩后上传");
          }
        })
        .catch(function (error) {
          console.log(error);
        });
    },

效果图:

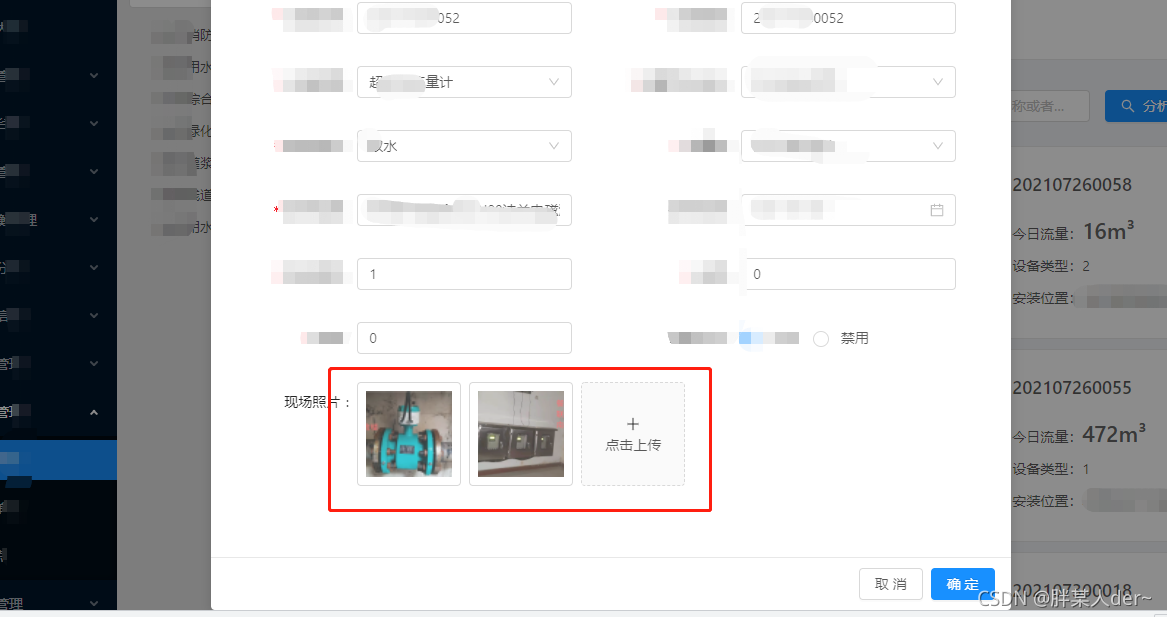
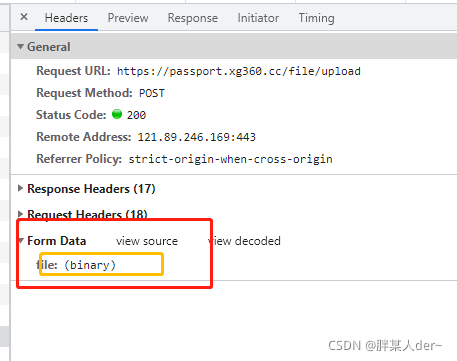
 总结:其实对接接口没那么顺利,后端写上传接口的大哥也是第一次写java,我是不确定到底给接口传什么值。最后确定了(下图),如果上传结果提示找不到某个文件夹(像upload/3465843758/...找不到,提示是英文的),这是后端的问题快速联系后端小哥就好了。


  • 5
    点赞
  • 20
    收藏
    觉得还不错? 一键收藏
  • 0
    评论
很高兴看到您对使用VueAnt Design Vue实现图片编辑器有兴趣。 首先,您需要安装VueAnt Design Vue,您可以使用以下命令安装它们: ``` npm install vue ant-design-vue --save ``` 然后,您可以创建一个Vue组件,该组件将作为您的图片编辑器。您可以使用Ant Design Vue的组件来构建您的编辑器,例如Upload组件和Modal组件。 以下是一个简单的示例: ```html <template> <div> <a-upload v-model="fileList" :before-upload="beforeUpload" :on-success="onSuccess" :on-error="onError" :list-type="'picture'" :show-upload-list="false" > <a-button> <a-icon type="upload" /> 上传图片 </a-button> </a-upload> <a-modal v-model="visible" title="编辑图片"> <img :src="imageUrl" alt="图片" /> <a-input v-model="caption" placeholder="添加标题" /> <a-button type="primary" @click="save">保存</a-button> <a-button @click="cancel">取消</a-button> </a-modal> </div> </template> <script> import { Upload, Modal, Button, Icon, Input } from 'ant-design-vue'; export default { components: { 'a-upload': Upload, 'a-modal': Modal, 'a-button': Button, 'a-icon': Icon, 'a-input': Input, }, data() { return { fileList: [], visible: false, imageUrl: '', caption: '', }; }, methods: { beforeUpload(file) { const isJpgOrPng = file.type === 'image/jpeg' || file.type === 'image/png'; if (!isJpgOrPng) { this.$message.error('只能上传 JPG/PNG 文件!'); } const isLt2M = file.size / 1024 / 1024 < 2; if (!isLt2M) { this.$message.error('图片大小不能超过 2MB!'); } return isJpgOrPng && isLt2M; }, onSuccess(response) { this.visible = true; this.imageUrl = response.url; }, onError(error) { console.log(error); }, save() { // 保存图片和标题 this.visible = false; }, cancel() { this.visible = false; }, }, }; </script> ``` 在这个例子中,我们使用Ant Design VueUpload和Modal组件。当用户上传图片时,我们会显示一个模态框,允许用户编辑图片的标题,并将其保存。 当用户点击保存按钮时,您可以执行一些操作,例如将图片和标题保存到数据库或将其发送到服务器。 这只是一个简单的例子,您可以根据您的需求进行扩展和调整。希望这可以帮助您开始使用VueAnt Design Vue构建您自己的图片编辑器。

“相关推荐”对你有帮助么?

  • 非常没帮助
  • 没帮助
  • 一般
  • 有帮助
  • 非常有帮助
提交
评论
添加红包

请填写红包祝福语或标题

红包个数最小为10个

红包金额最低5元

当前余额3.43前往充值 >
需支付:10.00
成就一亿技术人!
领取后你会自动成为博主和红包主的粉丝 规则
hope_wisdom
发出的红包
实付
使用余额支付
点击重新获取
扫码支付
钱包余额 0

抵扣说明:

1.余额是钱包充值的虚拟货币,按照1:1的比例进行支付金额的抵扣。
2.余额无法直接购买下载,可以购买VIP、付费专栏及课程。

余额充值