


WxJava开发微信支付、微信登录
前言
WxJava是微信Java开发工具包,支持包括微信支付、开放平台、公众号、企业微信/企业号、小程序等微信功能模块的后端开发。
准备工作
微信支付需要开通微信支付商户具体需要什么查看官网:https://pay.weixin.qq.com/docs/merchant/products/jsapi-payment/preparation.html
一、引入依赖
我这里使用的版本是4.5.0
<dependency>
    <groupId>com.github.binarywang</groupId>
    <artifactId>weixin-java-pay</artifactId>
    <version>${weixin-java.version}</version>
</dependency>
<dependency>
    <groupId>com.github.binarywang</groupId>
    <artifactId>weixin-java-miniapp</artifactId>
    <version>${weixin-java.version}</version>
</dependency>
二、修改配置文件
此处配置信息已经更改过不能直接使用
微信支付采用的是apiV3版本
证书路径可以是绝对路径也可以是classpath,我放到的项目的/resource/cert下
wx:
  miniapp:
    configs:
      - appid: wx2xxxxxxxx
        secret: f7bd3ed88cxxxxxxx222e1a7e4f722ad9
        msgDataFormat: JSON
  pay:
    appId: wx2d0f68xxx7f #微信公众号或者小程序等的appid
    mchId: 1650000080 #微信支付商户号
    apiV3Key: TWBQNkNwwjxxxxx2hN5oQ
    certSerialNo: 2078791B21788DC90E44xxxxxx7291FFD
    privateKeyPath: classpath:cert/apiclient_key.pem #apiclient_key.pem证书文件的绝对路径或者以classpath:开头的类路径
    privateCertPath: classpath:cert/apiclient_cert.pem #apiclient_cert.pem证书文件的绝对路径或者以classpath:开头的类路径
    notifyUrl: https://35fxxxxxpbf.guyubao.com/anonymous/wx/notify/order
三、小程序微信登录
1.登录流程时序
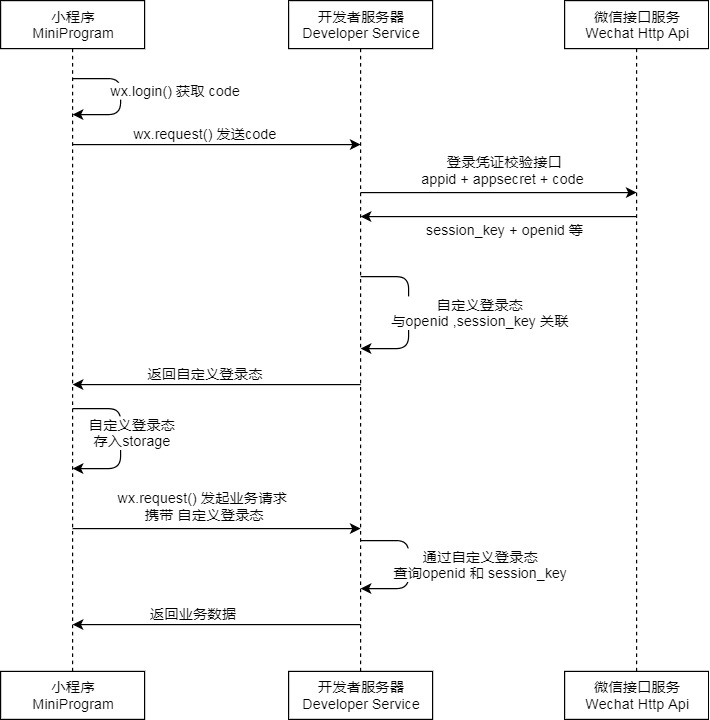
2.认识openid、unionid和code
1.openid
openid是用来唯一标识用户的一个字符串。在微信小程序中,每个用户的openid都是唯一的。通过openid,小程序可以获取用户的基本信息,如头像、昵称等。
注意:同一个用户在不同的小程序中拥有不同的openid。因此,在开发小程序时,不能使用openid来进行用户的唯一性判断。
2.unionid
unionid是在用户绑定同一微信开放平台账号下的多个应用时,用来唯一标识用户的一个字符串。如果用户在多个小程序中使用同一个微信号进行登录授权,那么这些小程序中的unionid都是相同的。
注意:用户的unionid只有在用户将多个应用绑定到同一个微信开放平台账号下时才会生成。因此,如果用户没有绑定多个应用,那么小程序将无法获取用户的unionid。
3. code
code是用户登录凭证,由微信服务器颁发给小程序。在用户授权登录后,小程序可以通过调用微信登录接口获取用户的code。然后,通过code向微信服务器请求用户的openid和session_key等信息。
注意:每个code只能使用一次,且有效期为5分钟。因此,在使用code进行登录时,需要及时将其转换成用户的openid和session_key等信息,以免出现code过期的情况
3.代码实现
1.在config目录下新增文件WxMaProperties
package com.ruoyi.xyhj.config;

import lombok.Data;
import org.springframework.boot.context.properties.ConfigurationProperties;

import java.util.List;

/**
 * @author <a href="https://github.com/binarywang">Binary Wang</a>
 */
@Data
@ConfigurationProperties(prefix = "wx.miniapp")
public class WxMaProperties {

    private List<Config> configs;

    @Data
    public static class Config {
        /**
         * 设置微信小程序的appid
         */
        private String appid;

        /**
         * 设置微信小程序的Secret
         */
        private String secret;

        /**
         * 设置微信小程序消息服务器配置的token
         */
        private String token;

        /**
         * 设置微信小程序消息服务器配置的EncodingAESKey
         */
        private String aesKey;

        /**
         * 消息格式,XML或者JSON
         */
        private String msgDataFormat;
    }

}
2.注入wxMaService
package com.ruoyi.xyhj.config;

import cn.binarywang.wx.miniapp.api.WxMaService;
import cn.binarywang.wx.miniapp.api.impl.WxMaServiceImpl;
import cn.binarywang.wx.miniapp.bean.WxMaKefuMessage;
import cn.binarywang.wx.miniapp.bean.WxMaSubscribeMessage;
import cn.binarywang.wx.miniapp.config.impl.WxMaDefaultConfigImpl;
import cn.binarywang.wx.miniapp.message.WxMaMessageHandler;
import cn.binarywang.wx.miniapp.message.WxMaMessageRouter;
import com.google.common.collect.Lists;
import lombok.extern.slf4j.Slf4j;
import me.chanjar.weixin.common.bean.result.WxMediaUploadResult;
import me.chanjar.weixin.common.error.WxErrorException;
import me.chanjar.weixin.common.error.WxRuntimeException;
import org.springframework.beans.factory.annotation.Autowired;
import org.springframework.boot.context.properties.EnableConfigurationProperties;
import org.springframework.context.annotation.Bean;
import org.springframework.context.annotation.Configuration;

import java.io.File;
import java.util.List;
import java.util.stream.Collectors;

/**
 * @author <a href="https://github.com/binarywang">Binary Wang</a>
 */
@Slf4j
@Configuration
@EnableConfigurationProperties(WxMaProperties.class)
public class WxMaConfiguration {
    private final WxMaProperties properties;

    @Autowired
    public WxMaConfiguration(WxMaProperties properties) {
        this.properties = properties;
    }

    @Bean("wxMaService")
    public WxMaService wxMaService() {
        List<WxMaProperties.Config> configs = this.properties.getConfigs();
        if (configs == null) {
            throw new WxRuntimeException("大哥,拜托先看下项目首页的说明(readme文件),添加下相关配置,注意别配错了!");
        }
        WxMaService maService = new WxMaServiceImpl();
        maService.setMultiConfigs(
            configs.stream()
                .map(a -> {
                    WxMaDefaultConfigImpl config = new WxMaDefaultConfigImpl();
//                WxMaDefaultConfigImpl config = new WxMaRedisConfigImpl(new JedisPool());
                    // 使用上面的配置时,需要同时引入jedis-lock的依赖,否则会报类无法找到的异常
                    config.setAppid(a.getAppid());
                    config.setSecret(a.getSecret());
                    config.setToken(a.getToken());
                    config.setAesKey(a.getAesKey());
                    config.setMsgDataFormat(a.getMsgDataFormat());
                    return config;
                }).collect(Collectors.toMap(WxMaDefaultConfigImpl::getAppid, a -> a, (o, n) -> o)));
        return maService;
    }

    @Bean
    public WxMaMessageRouter wxMaMessageRouter(WxMaService wxMaService) {
        final WxMaMessageRouter router = new WxMaMessageRouter(wxMaService);
        router
            .rule().handler(logHandler).next()
            .rule().async(false).content("订阅消息").handler(subscribeMsgHandler).end()
            .rule().async(false).content("文本").handler(textHandler).end()
            .rule().async(false).content("图片").handler(picHandler).end()
            .rule().async(false).content("二维码").handler(qrcodeHandler).end();
        return router;
    }

    private final WxMaMessageHandler subscribeMsgHandler = (wxMessage, context, service, sessionManager) -> {
        service.getMsgService().sendSubscribeMsg(WxMaSubscribeMessage.builder()
            .templateId("此处更换为自己的模板id")
            .data(Lists.newArrayList(
                new WxMaSubscribeMessage.MsgData("keyword1", "339208499")))
            .toUser(wxMessage.getFromUser())
            .build());
        return null;
    };

    private final WxMaMessageHandler logHandler = (wxMessage, context, service, sessionManager) -> {
        log.info("收到消息:" + wxMessage.toString());
        service.getMsgService().sendKefuMsg(WxMaKefuMessage.newTextBuilder().content("收到信息为:" + wxMessage.toJson())
            .toUser(wxMessage.getFromUser()).build());
        return null;
    };

    private final WxMaMessageHandler textHandler = (wxMessage, context, service, sessionManager) -> {
        service.getMsgService().sendKefuMsg(WxMaKefuMessage.newTextBuilder().content("回复文本消息")
            .toUser(wxMessage.getFromUser()).build());
        return null;
    };

    private final WxMaMessageHandler picHandler = (wxMessage, context, service, sessionManager) -> {
        try {
            WxMediaUploadResult uploadResult = service.getMediaService()
                .uploadMedia("image", "png",
                    ClassLoader.getSystemResourceAsStream("tmp.png"));
            service.getMsgService().sendKefuMsg(
                WxMaKefuMessage
                    .newImageBuilder()
                    .mediaId(uploadResult.getMediaId())
                    .toUser(wxMessage.getFromUser())
                    .build());
        } catch (WxErrorException e) {
            e.printStackTrace();
        }

        return null;
    };

    private final WxMaMessageHandler qrcodeHandler = (wxMessage, context, service, sessionManager) -> {
        try {
            final File file = service.getQrcodeService().createQrcode("123", 430);
            WxMediaUploadResult uploadResult = service.getMediaService().uploadMedia("image", file);
            service.getMsgService().sendKefuMsg(
                WxMaKefuMessage
                    .newImageBuilder()
                    .mediaId(uploadResult.getMediaId())
                    .toUser(wxMessage.getFromUser())
                    .build());
        } catch (WxErrorException e) {
            e.printStackTrace();
        }

        return null;
    };

}
3.调用
	@Resource
    private WxMaService wxMaService;

    public String wxLoginOrRegister(String code) {
        if (StringUtils.isBlank(code)) {
            return "empty jscode";
        }
        try {
            //根据code获取openid
            WxMaJscode2SessionResult session = wxMaService.getUserService().getSessionInfo(code);
        } catch (WxErrorException e) {
          throw new WxLoginException(e.getMessage());
        }finally {
            WxMaConfigHolder.remove();//清理ThreadLocal
        }
    }
更多请参考官方示例:https://github.com/binarywang/weixin-java-miniapp-demo或javadoc
四、小程序手机号快速验证
1.小程序端
<button open-type="getPhoneNumber" bindgetphonenumber="getPhoneNumber"></button>

Page({
  getPhoneNumber (e) {
    console.log(e.detail.code)  // 动态令牌
    console.log(e.detail.errMsg) // 回调信息(成功失败都会返回)
    console.log(e.detail.errno)  // 错误码(失败时返回)
  }
})
返回参数说明
| 参数 | 类型 | 说明 |
|---|---|---|
| code | String | 动态令牌。可通过动态令牌换取用户手机号。使用方法详情phonenumber.getPhoneNumber接口 |
2.Java端
WxMaPhoneNumberInfo 返回值说明
手机号验证官网
| 属性 | 类型 | 说明 |
|---|---|---|
| phoneNumber | string | 用户绑定的手机号(国外手机号会有区号) |
| purePhoneNumber | string | 没有区号的手机号 |
| countryCode | string | 区号 |
    public WxMaPhoneNumberInfo wxGetPhoneNumber(String code) throws WxErrorException {
        WxMaPhoneNumberInfo phoneNumberInfo = wxMaService.getUserService().getPhoneNoInfo(code);
        return phoneNumberInfo;
    }
五、获取小程序二维码
注意page参数前不需要加/,例/pages/index/index这是错误的
获取不限制的小程序码https://developers.weixin.qq.com/miniprogram/dev/OpenApiDoc/qrcode-link/qr-code/getUnlimitedQRCode.html)
调用示例:{ "page": "pages/index/index", "scene": "a=1", "check_path": true, "env_version": "release" }
1.配置yml文件
wx:
  qrcode:
    bindTeacherUrl: pages/user/index #绑定老师页面
    bindStudentUrl: pages/user/index #绑定家长页面
    envVersion: release #要打开小程序版本
    width: 430 #二维码宽度
    autoColor: true #默认true 自动配置线条颜色,如果颜色依然是黑色,则说明不建议配置主色调
    checkPath: true #默认true 检查 page 是否存在,为 true 时 page 必须是已经发布的小程序存在的页面(否则报错); 为 false 时允许小程序未发布或者 page 不存在,但 page 有数量上限(60000个)请勿滥用
    isHyaline: false #是否需要透明底色, is_hyaline 为true时,生成透明底色的小程序码
2.注入properties
import lombok.Data;
import org.springframework.boot.context.properties.ConfigurationProperties;
import org.springframework.stereotype.Component;

@Data
@ConfigurationProperties(prefix = "wx.qrcode")
@Component
public class WxQrcodeProperties {
    /**
     * 绑定老师url
     */
    private String bindTeacherUrl;
    /**
     * 绑定家长url
     */
    private String bindStudentUrl;
    /**
     * 要打开的小程序版本。正式版为 "release",体验版为 "trial",开发版为 "develop"。默认是正式版。
     */
    private String envVersion;

    /**
     * 二维码宽度
     */
    private Integer width;

    /**
     * 默认true 自动配置线条颜色,如果颜色依然是黑色,则说明不建议配置主色调
     */
    private Boolean autoColor;
    /**
     * 默认true 检查 page 是否存在,为 true 时 page 必须是已经发布的小程序存在的页面(否则报错); 为 false 时允许小程序未发布或者 page 不存在,但 page 有数量上限(60000个)请勿滥用
     */
    private Boolean checkPath;
    /**
     * 是否需要透明底色, is_hyaline 为true时,生成透明底色的小程序码
     */
    private Boolean isHyaline;


}
3.修改WxMaConfiguration 注入WxMaQrcodeService
    /**
     * 注入 二维码相关操作接口.
     * @return
     */
    @Bean("wxMaQrcodeService")
    public WxMaQrcodeService wxMaQrcodeService(){
        WxMaQrcodeService wxMaQrcodeService = new WxMaQrcodeServiceImpl(wxMaService());
        return wxMaQrcodeService;
    }
4.调用
public String generateWxaCodeUnlimit(String path, String query,String version) throws WxErrorException {
        byte[] unlimitBytes = wxMaQrcodeService.createWxaCodeUnlimitBytes(query, path, wxQrcodeProperties.getCheckPath(), version, wxQrcodeProperties.getWidth(), wxQrcodeProperties.getAutoColor(), (WxMaCodeLineColor)null, wxQrcodeProperties.getIsHyaline());
        return Base64.getEncoder().encodeToString(unlimitBytes);
    }
六、小程序微信支付
1.业务流程图
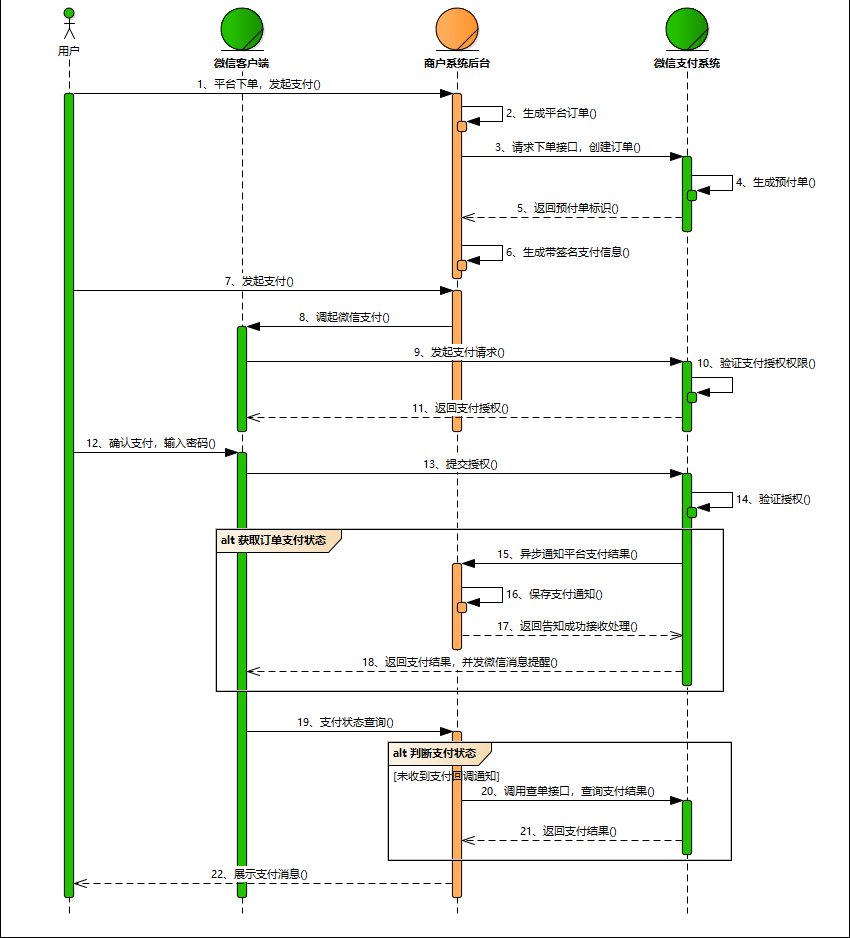
2.签名、私钥、证书、敏感信息加解密说明
1.签名格式
我们希望商户的技术开发人员按照当前文档约定的规则构造签名串。微信支付会使用同样的方式构造签名串。如果商户构造签名串的方式错误,将导致签名验证不通过。下面先说明签名串的具体格式。
签名串一共有五行,每一行为一个参数。结尾以\n(换行符,ASCII编码值为0x0A)结束,包括最后一行。如果参数本身以\n结束,也需要附加一个\n。
HTTP请求方法\n
URL\n
请求时间戳\n
请求随机串\n
请求报文主体\n
文档地址:
https://pay.weixin.qq.com/docs/merchant/development/interface-rules/signature-generation.html
2.私钥
商户申请商户 API 证书时,证书工具会生成商户私钥,并保存在本地证书文件夹的文件 apiclient_key.pem 中。私钥也可通过工具从商户的 p12 证书中导出。请妥善保管好商户私钥文件。
文档地址:
https://pay.weixin.qq.com/docs/merchant/development/interface-rules/privatekey-and-certificate.html
3.证书
商户API证书是指由商户申请的,包含商户的商户号、公司名称、公钥信息的证书。
微信支付 APIv3 使用由 证书授权机构(Certificate Authority,简称CA)签发的证书。商户可以自行生成证书请求串,也可以下载微信支付证书工具生成证书请求串。提交证书请求串至商户平台后,即可获得商户 API 证书文件。请注意安全保存私钥文件。
每个微信支付平台证书的有效期为5年。在证书过期之前,微信支付将逐步使用新的平台证书生成签名。为了避免缺少对应证书而验签失败,商户系统需支持多个微信支付平台证书,定期通过接口下载新证书并部署至服务器。请参阅我们的 证书更新指引 ,避免依赖人工更新证书,保证业务的连续运转。
文档地址:
https://pay.weixin.qq.com/docs/merchant/development/interface-rules/privatekey-and-certificate.html
4.加解密
为了保证通信过程中敏感信息字段(如用户的住址、银行卡号、手机号码等)的机密性,微信支付API v3要求商户对上送的敏感信息字段进行加密。与之相对应,微信支付会对下行的敏感信息字段进行加密,商户需解密后方能得到原文。下面详细介绍加解密的方式,以及如何进行相应的计算。
文档地址:
https://pay.weixin.qq.com/docs/merchant/development/interface-rules/sensitive-data-encryption.html
3.代码实现
1.在config目录下新增文件WxPayProperties
package com.ruoyi.xyhj.config;

import lombok.Data;
import org.springframework.boot.context.properties.ConfigurationProperties;

/**
 * wxpay pay properties.
 *
 * @author Binary Wang
 */
@Data
@ConfigurationProperties(prefix = "wx.pay")
public class WxPayProperties {
  /**
   * 设置微信公众号或者小程序等的appid
   */
  private String appId;

  /**
   * 微信支付商户号
   */
  private String mchId;

  /**
   * 微信支付商户V3密钥
   */
  private String apiV3Key;

  /**
   * 证书号
   */
  private String certSerialNo;

  /**
   * apiclient_key.pem证书文件的绝对路径或者以classpath:开头的类路径
   */
  private String privateKeyPath;

  /**
   * apiclient_cert.pem证书文件的绝对路径或者以classpath:开头的类路径
   */
  private String privateCertPath;

  /**
   * 回调地址
   */
  private String notifyUrl;

}
2.注入WxPayService
package com.ruoyi.xyhj.config;

import com.github.binarywang.wxpay.config.WxPayConfig;
import com.github.binarywang.wxpay.service.WxPayService;
import com.github.binarywang.wxpay.service.impl.WxPayServiceImpl;
import lombok.AllArgsConstructor;
import org.apache.commons.lang3.StringUtils;
import org.springframework.beans.factory.annotation.Autowired;
import org.springframework.boot.autoconfigure.condition.ConditionalOnClass;
import org.springframework.boot.autoconfigure.condition.ConditionalOnMissingBean;
import org.springframework.boot.context.properties.EnableConfigurationProperties;
import org.springframework.context.annotation.Bean;
import org.springframework.context.annotation.Configuration;

/**
 * @author Binary Wang
 */
@Configuration
@ConditionalOnClass(WxPayService.class)
@EnableConfigurationProperties(WxPayProperties.class)
@AllArgsConstructor
public class WxPayConfiguration {
  private WxPayProperties properties;

  @Bean("wxPayService")
  @ConditionalOnMissingBean
  public WxPayService wxService() {
    WxPayConfig payConfig = new WxPayConfig();
    payConfig.setAppId(StringUtils.trimToNull(this.properties.getAppId()));
    payConfig.setMchId(StringUtils.trimToNull(this.properties.getMchId()));
    payConfig.setApiV3Key(StringUtils.trimToNull(this.properties.getApiV3Key()));
    payConfig.setCertSerialNo(StringUtils.trimToNull(this.properties.getCertSerialNo()));
    payConfig.setPrivateKeyPath(StringUtils.trimToNull(this.properties.getPrivateKeyPath()));
    payConfig.setPrivateCertPath(StringUtils.trimToNull(this.properties.getPrivateCertPath()));
    payConfig.setNotifyUrl(StringUtils.trimToNull(this.properties.getNotifyUrl()));
    payConfig.setTradeType("JSAPI");
    payConfig.setSignType("MD5");
    WxPayService wxPayService = new WxPayServiceImpl();
    wxPayService.setConfig(payConfig);
    return wxPayService;
  }

}
3.创建预支付订单
注意我们使用的是v3版本所以创建对象或者调用wxpayService时需要调用v3版本的不然参数可能对不上
/**
* 创建预支付订单
*/
    @Override
    @Transactional
    public WxUnifiedOrderVo createOrder(PatriarchCreateOrderBo bo) throws WxPayException, IOException, SignatureException, NoSuchAlgorithmException, InvalidKeyException {

        //构建预支付订单对象
        WxPayUnifiedOrderV3Request orderV3Request = buildWxPayUnifiedOrderRequest(order, parentUser.getOpenid(), product.getName());
        WxPayUnifiedOrderV3Result wxPayUnifiedOrderV3Result = wxPayService.unifiedOrderV3(TradeTypeEnum.JSAPI, orderV3Request);
        //构建返回参数
        WxUnifiedOrderVo tokenJSAPI = WechatSignUtil.getTokenJSAPI(wxPayProperties.getAppId(), wxPayUnifiedOrderV3Result.getPrepayId(), wxPayProperties.getPrivateKeyPath());
        return tokenJSAPI;
    }
/**
     * 构建统一下单对象
     * @param order 订单对象
     * @param openId user openId
     * @param productName 产品名
     * @return
     */
    public WxPayUnifiedOrderV3Request buildWxPayUnifiedOrderRequest(TelOrder order, String openId,String productName){
        WxPayUnifiedOrderV3Request orderRequest = new WxPayUnifiedOrderV3Request();
        //设置订单号
        orderRequest.setOutTradeNo(order.getId().toString());
        //设置交易结束时间为24小时
        orderRequest.setTimeExpire(new SimpleDateFormat("yyyy-MM-dd'T'HH:mm:ssXXX").format(new Date()));
        //设置订单金额
        orderRequest.setAmount(new WxPayUnifiedOrderV3Request.Amount()
                        .setTotal(BaseWxPayRequest.yuanToFen(order.getAmount().toString())));
        //设置支付者信息
        orderRequest.setPayer(new WxPayUnifiedOrderV3Request.Payer().setOpenid(openId));
        //设置商品描述
        orderRequest.setDescription(productName);
        return orderRequest;
    }
4.签名工具类
package com.ruoyi.xyhj.utils;

import com.ruoyi.xyhj.domain.vo.WxUnifiedOrderVo;

import java.io.IOException;
import java.io.InputStream;
import java.security.*;
import java.security.spec.InvalidKeySpecException;
import java.security.spec.PKCS8EncodedKeySpec;
import java.util.Base64;
import java.util.HashMap;
import java.util.UUID;

public class WechatSignUtil {

    /**
     * 参考网站 https://pay.weixin.qq.com/wiki/doc/apiv3/apis/chapter3_5_4.shtml
     * 计算签名值
     *
     * @param appId
     * @param prepay_id
     * @return
     * @throws IOException
     * @throws SignatureException
     * @throws NoSuchAlgorithmException
     * @throws InvalidKeyException
     */
    public static WxUnifiedOrderVo getTokenJSAPI(String appId, String prepay_id, String privateKey) throws IOException, SignatureException, NoSuchAlgorithmException, InvalidKeyException {
        // 获取随机字符串
        String nonceStr = getNonceStr();
        // 获取微信小程序支付package
        String packagestr = "prepay_id=" + prepay_id;
        long timestamp = System.currentTimeMillis() / 1000;
        //签名,使用字段appId、timeStamp、nonceStr、package计算得出的签名值
        String message = buildMessageTwo(appId, timestamp, nonceStr, packagestr);
        //获取对应的签名
        String signature = sign(message.getBytes("utf-8"),privateKey);
        // 组装返回
        WxUnifiedOrderVo vo = new WxUnifiedOrderVo();
        vo.setAppId(appId);
        vo.setTimeStamp(String.valueOf(timestamp));
        vo.setNonceStr(nonceStr);
        vo.setPackageStr(packagestr);
        vo.setSignType("RSA");
        vo.setPaySign(signature);
        return vo;
    }

    /**
     * 生成随机数
     * @return
     */
    public static String getNonceStr(){
        return UUID.randomUUID().toString()
                .replaceAll("-", "")
                .substring(0, 32);
    }
    /**
     * 拼接参数
     *
     * @return
     */

    public static String buildMessageTwo(String appId, long timestamp, String nonceStr, String packag) {
        return appId + "\n"
                + timestamp + "\n"
                + nonceStr + "\n"
                + packag + "\n";
    }
    /**
     * 生成签名
     *
     * @return
     */
    public static String sign(byte[] message,String privateKey) throws NoSuchAlgorithmException, SignatureException, IOException, InvalidKeyException {
        Signature sign = Signature.getInstance("SHA256withRSA"); //SHA256withRSA
        sign.initSign(getPrivateKey(privateKey));
        sign.update(message);
        return Base64.getEncoder().encodeToString(sign.sign());
    }
    /**
     * 获取私钥
     * @param filename 私钥文件路径  (required)
     * @return 私钥对象
     */
    public static PrivateKey getPrivateKey(String filename) throws IOException {
        System.out.println("filename:" + filename);
        filename = filename.replace("classpath:", "");
        WechatSignUtil wechatSignUtil = new WechatSignUtil();
        InputStream resourceAsStream = wechatSignUtil.getClass().getClassLoader().getResourceAsStream(filename);
        byte[] bytes = new byte[0];
        bytes = new byte[resourceAsStream.available()];
        resourceAsStream.read(bytes);
        String content = new String(bytes);
//        String content = new String(Files.readAllBytes(Paths.get(resource.getPath())), "utf-8");
        try {
            String privateKey = content.replace("-----BEGIN PRIVATE KEY-----", "")
                    .replace("-----END PRIVATE KEY-----", "")
                    .replaceAll("\\s+", "");

            KeyFactory kf = KeyFactory.getInstance("RSA");
            return kf.generatePrivate(new PKCS8EncodedKeySpec(Base64.getDecoder().decode(privateKey)));
        } catch (NoSuchAlgorithmException e) {
            throw new RuntimeException("当前Java环境不支持RSA", e);
        } catch (InvalidKeySpecException e) {
            throw new RuntimeException("无效的密钥格式");
        }
    }
}
5.回调接口
 @ApiOperation(value = "支付回调通知处理")
    @PostMapping("/wx/notify/order")
    public void parseOrderNotifyResult(@RequestBody String resultData) throws WxPayException {
        WxPayOrderNotifyV3Result notifyV3Result = wxPayService.parseOrderNotifyV3Result(resultData,null);
        log.info("回调:{}",notifyV3Result.getResult());
        orderService.wxNotify(notifyV3Result.getResult());
    }


 583
583

 被折叠的 条评论
为什么被折叠?
被折叠的 条评论
为什么被折叠?
 到【灌水乐园】发言


