


农历选择器
iOS 农历选择器,根据本地的数据,和自定义的UIPickerView实现
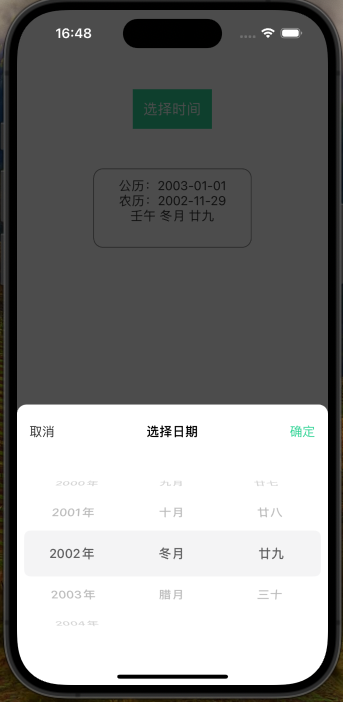
效果
数据
基础数据
农历的数据其实我们只需要知道对应年份有多少个月,闰月数据,和每个月的天数,就可以获取到任意一天的农历。
任意一年只会有一个闰月,所有我们可以用一个uint8_t来表示一年中闰月的月数,如果为0,说明该年没有闰月。
因为农历每个月只有29天或者30天,所以我们可以用一位来表示每个月的天数,比如某一位为1,说明这个月有30天,为0,说明只有29天。这样我们就可以用一个uint16_t来表示一年中所有月份的天数字。
具体代码如下
static const int YEAR_BASE = 1901;  // 起始年限
static const int YEAR_NUM = 150;    // 年数

// 数组中每一个元素存放1901~2050期间每一年的闰月月份,取值范围0~12(0表示该年没有闰月
static const uint8_t hw_leapMonth[150] = {
    0x00, 0x00, 0x05, 0x00, 0x00, 0x04, 0x00, 0x00, 0x02, 0x00, //1910
    0x06, 0x00, 0x00, 0x05, 0x00, 0x00, 0x02, 0x00, 0x07, 0x00, //1920
    0x00, 0x05, 0x00, 0x00, 0x04, 0x00, 0x00, 0x02, 0x00, 0x06, //1930
    0x00, 0x00, 0x05, 0x00, 0x00, 0x03, 0x00, 0x07, 0x00, 0x00, //1940
    0x06, 0x00, 0x00, 0x04, 0x00, 0x00, 0x02, 0x00, 0x07, 0x00, //1950
    0x00, 0x05, 0x00, 0x00, 0x03, 0x00, 0x08, 0x00, 0x00, 0x06, //1960
    0x00, 0x00, 0x04, 0x00, 0x00, 0x03, 0x00, 0x07, 0x00, 0x00, //1970
    0x05, 0x00, 0x00, 0x04, 0x00, 0x08, 0x00, 0x00, 0x06, 0x00, //1980
    0x00, 0x04, 0x00, 0x0A, 0x00, 0x00, 0x06, 0x00, 0x00, 0x05, //1990
    0x00, 0x00, 0x03, 0x00, 0x08, 0x00, 0x00, 0x05, 0x00, 0x00, //2000
    0x04, 0x00, 0x00, 0x02, 0x00, 0x07, 0x00, 0x00, 0x05, 0x00, //2010
    0x00, 0x04, 0x00, 0x09, 0x00, 0x00, 0x06, 0x00, 0x00, 0x04, //2020
    0x00, 0x00, 0x02, 0x00, 0x06, 0x00, 0x00, 0x05, 0x00, 0x00, //2030
    0x03, 0x00, 0x0B, 0x00, 0x00, 0x06, 0x00, 0x00, 0x05, 0x00, //2040
    0x00, 0x02, 0x00, 0x07, 0x00, 0x00, 0x05, 0x00, 0x00, 0x03, //2050
};

// 数组中每一个元素存放1901~2050期间每一年的12个月或13个月(有闰月)的月天数
// 数组元素的低12位或13位(有闰月)分别对应着这12个月或13个月(有闰月),最低位对应着最小月(1月)
// 如果月份对应的位为1则表示该月有30天,否则表示该月有29天。
// (注:农历中每个月的天数只有29天或者30天)
static const uint16_t hw_monthDay[150] = {
    0x0752, 0x0EA5, 0x164A, 0x064B, 0x0A9B, 0x1556, 0x056A, 0x0B59, 0x1752, 0x0752, //1910
    0x1B25, 0x0B25, 0x0A4B, 0x12AB, 0x0AAD, 0x056A, 0x0B69, 0x0DA9, 0x1D92, 0x0D92, //1920
    0x0D25, 0x1A4D, 0x0A56, 0x02B6, 0x15B5, 0x06D4, 0x0EA9, 0x1E92, 0x0E92, 0x0D26, //1930
    0x052B, 0x0A57, 0x12B6, 0x0B5A, 0x06D4, 0x0EC9, 0x0749, 0x1693, 0x0A93, 0x052B, //1940
    0x0A5B, 0x0AAD, 0x056A, 0x1B55, 0x0BA4, 0x0B49, 0x1A93, 0x0A95, 0x152D, 0x0536, //1950
    0x0AAD, 0x15AA, 0x05B2, 0x0DA5, 0x1D4A, 0x0D4A, 0x0A95, 0x0A97, 0x0556, 0x0AB5, //1960
    0x0AD5, 0x06D2, 0x0EA5, 0x0EA5, 0x064A, 0x0C97, 0x0A9B, 0x155A, 0x056A, 0x0B69, //1970
    0x1752, 0x0B52, 0x0B25, 0x164B, 0x0A4B, 0x14AB, 0x02AD, 0x056D, 0x0B69, 0x0DA9, //1980
    0x0D92, 0x1D25, 0x0D25, 0x1A4D, 0x0A56, 0x02B6, 0x05B5, 0x06D5, 0x0EC9, 0x1E92, //1990
    0x0E92, 0x0D26, 0x0A56, 0x0A57, 0x14D6, 0x035A, 0x06D5, 0x16C9, 0x0749, 0x0693, //2000
    0x152B, 0x052B, 0x0A5B, 0x155A, 0x056A, 0x1B55, 0x0BA4, 0x0B49, 0x1A93, 0x0A95, //2010
    0x052D, 0x0AAD, 0x0AAD, 0x15AA, 0x05D2, 0x0DA5, 0x1D4A, 0x0D4A, 0x0C95, 0x152E, //2020
    0x0556, 0x0AB5, 0x15B2, 0x06D2, 0x0EA9, 0x0725, 0x064B, 0x0C97, 0x0CAB, 0x055A, //2030
    0x0AD6, 0x0B69, 0x1752, 0x0B52, 0x0B25, 0x1A4B, 0x0A4B, 0x04AB, 0x055B, 0x05AD, //2040
    0x0B6A, 0x1B52, 0x0D92, 0x1D25, 0x0D25, 0x0A55, 0x14AD, 0x04B6, 0x05B5, 0x0DAA, //2050
};
数据提供代码封装
数据有了,只需要给它封装一些方法就可以方便我们使用了。
@interface CMLundarCalendarDB : NSObject
/// 获取某一年的闰月 返回0说明没有闰月 -1说明参数超出范围
/// @param year 年
+ (NSInteger)getLeapMonthInYear:(NSInteger)year;

/// 获取某一年的月数量 返回-1说明参数超出范围
/// @param year 年
+ (NSInteger)getMonthNumInYear:(NSInteger)year;

/// 获取某一个月有多少天 返回-1说明参数有错
/// @param year 年
/// @param month 月
+ (NSInteger)getMonthDaysInYear:(NSInteger)year month:(NSInteger)month;

/// 获取一年有多少天 返回 -1说明参数超出范围
/// @param year 年
+ (NSInteger)getYearDaysInYear:(NSInteger)year;
@end
以获取某个农历年有多少天为例子,方法的实现如下
static uint16_t hw_yearDay[150] = {0};

+ (NSInteger)getYearDaysInYear:(NSInteger)year {
    if(!judgeYearLegal(year)) { return -1; } // 首先检查年份是否在数据范围内
    uint16_t yearDayNum = hw_yearDay[year - YEAR_BASE]; // 年份减去起始年份获取在数组中的下标 hw_yearDay是个缓存数组,避免每次计算
    if(yearDayNum) { return yearDayNum; }   // 缓存中有,直接返回

    uint16_t num = hw_monthDay[year - YEAR_BASE];   // 获取年份中每月天数的数据
    // 计算num的二进制位中“1”的个数
    num = ((num >> 1) & 0x5555) + (num & 0x5555);
    num = ((num >> 2) & 0x3333) + (num & 0x3333);
    num = ((num >> 4) & 0x0F0F) + (num & 0x0F0F);
    num = ((num >> 8) & 0x00FF) + (num & 0x00FF);

    int monthNum = 12 + (hw_leapMonth[year - YEAR_BASE] ? 1 : 0);
    yearDayNum = monthNum * 29 + num; // 29*月份数量,再加上天数据 中有多少个1 得到年份天数
    hw_yearDay[year - YEAR_BASE] = yearDayNum;  // 放到缓存数组中
    return yearDayNum;
}
因为是准备给UIPickerView使用的,所有需要一些更高级的封装,来符合UIPickerView的数据结构
定义对应的 年、月、份的模型
@interface CMLundarCalendarDayModel : NSObject
@property (nonatomic, assign) NSUInteger year;
@property (nonatomic, assign) NSUInteger month;
@property (nonatomic, assign) NSUInteger day;
@property (nonatomic, copy) NSString *dayStr;   // 农历中文
@property (nonatomic, copy) NSString *yearStr;  // 农历年
@property (nonatomic, copy) NSString *monthStr; // 农历中文 比如润二月
@property (nonatomic, assign) NSTimeInterval time;
@end

@interface CMLundarCalendarMonthModel : NSObject
@property (nonatomic, assign) NSUInteger year;
@property (nonatomic, assign) NSUInteger month;
@property (nonatomic, assign) NSUInteger dayNum;
@property (nonatomic, copy) NSString *monthStr; // 农历中文 比如润二月
@property (nonatomic, assign) BOOL isLeap;  // 是否是闰月

@property (nonatomic, strong) NSArray<CMLundarCalendarDayModel *> *dayArr;
@end

@interface CMLundarCalendarYearModel : NSObject
@property (nonatomic, assign) NSUInteger year;
@property (nonatomic, assign) NSUInteger lundarYear;
@property (nonatomic, assign) NSUInteger monthNum;
@property (nonatomic, copy) NSString *yearStr;  // 农历年
@property (nonatomic, strong) NSArray<CMLundarCalendarMonthModel *> *monthArr;
@end
定义一个CMLundarCalendarManager
@interface CMLundarCalendarManager : NSObject
/// 获取某一个时间段
+ (NSArray<CMLundarCalendarYearModel *> *)yearsFromBeginTime:(NSTimeInterval )beginTime endTime:(NSTimeInterval)endTime;
/// 获取农历的所有数据 公元1901年2月19日到公元2051年2月10日期间的公历日期
+ (NSArray<CMLundarCalendarYearModel *> *)getAllLundarCalendar;
/// 获取某个时间戳的农历
+ (CMLundarCalendarDayModel *)getLundarDayInTime:(NSTimeInterval)time;
/// 获取某一天 不合法的话会返回nil
+ (CMLundarCalendarDayModel *)dayFor:(NSInteger)year month:(NSInteger)month day:(NSInteger)day;

/// 从时间段数据中获取某一天的下标 数组中一定会有三个元素 safe 如果daymodel没有在时间段中 下标会返回 0
+ (NSArray<NSNumber *> *)safeIndexOfDay:(CMLundarCalendarDayModel *)dayModel inYears:(NSArray<CMLundarCalendarYearModel *> *)years;
// 同上 如果如果daymodel没有在时间段中 对应的下标会返回 -1
+ (NSArray<NSNumber *> *)indexOfDay:(CMLundarCalendarDayModel *)dayModel inYears:(NSArray<CMLundarCalendarYearModel *> *)years;
@end
具体的代码可以在文章末尾的github仓库中查看,这里就不贴出来了
时间的计算
当我们获取一个农历的某一天之后,我们并不能知道它具体的时间。实际需求中,往往需要和公历时间相互转换的。所以得想办法获取到对应的时间戳。
获取的方式是以一个已知时间戳的农历,计算其他农历日期和这一天的天数差值,然后用已知的时间戳,计算出新的时间戳就行了。
代码中是以农历 2000.1.1 为锚点,对应的时间戳为949680000。
可以把计算方法放到 之前定义的CMLundarCalendarDayModel模型中
- (NSTimeInterval)time {
    if(!_time) {
        CMLundarCalendarDayModel *ref = [[CMLundarCalendarDayModel alloc] initWithYear:2000 month:1 day:1];
        NSTimeInterval refTime = 949680000;
        NSTimeInterval gapTime = [self dayNumGapWith:ref]*(60*60*24);
        if([self IsPrior:ref]) {
            _time = refTime - gapTime;
        } else {
            _time = refTime + gapTime;
        }
    }
    return _time;
}


/// 是否在指定日期之前
- (BOOL)IsPrior:(CMLundarCalendarDayModel *)ref {
    return _year < ref.year || (_year == ref.year && (_month < ref.month || (_month == ref.month && _day < ref.day)));
}

/// 两天之间的差距
- (NSInteger)dayNumGapWith:(CMLundarCalendarDayModel *)ref {
    CMLundarCalendarDayModel *begin;
    CMLundarCalendarDayModel *end;
    if([self IsPrior:ref]) {
        begin = self;
        end = ref;
    } else {
        begin = ref;
        end = self;
    }
    NSInteger days = 0;
    for(NSUInteger i=begin.year; i<end.year; i++) {
        days += [CMLundarCalendarDB getYearDaysInYear:i];
    }
    days -= [begin dayNumOfYear];
    days += [end dayNumOfYear];
    return days;
}
UI
提供数据的方法有了,一般日期选择是使用UIPickerView。我们可以自己定义一个UIPickerView实现需求。
picker分成3列,每一列的选中变化时,会改变后面两列的数据。在最开始实现时候,老是会出现下标越界的crash。所以在我的实现中,自己维护了一个各当前选中的下标。
首先类似于原本的UIPickerView,声明一个协议,让delegate提供数据,和响应数据变化。
@protocol CMPickerViewDelegate <NSObject>

- (NSInteger)pickerView:(CMPickerView *)pickerView numberOfRowsInComponent:(NSInteger)component;
@optional
/// 没有注册过。就会调用该代理 返回文案
- (NSString *)pickerView:(CMPickerView *)pickerView strForRow:(NSInteger)row forComponent:(NSInteger)component;
/// 注册过的列 会调用这个代理 更新reusingView返回
- (UIView *)pickerView:(CMPickerView *)pickerView viewForRow:(NSInteger)row forComponent:(NSInteger)component reusingView:(UIView *)view;
/// 选中某一列的回调
- (void)pickerView:(CMPickerView *)pickerView didSelectRow:(NSInteger)row inComponent:(NSInteger)component;
/// 确认按钮的回调 参数为 选中的下标数组
- (void)pickerView:(CMPickerView *)pickerView confirmWithSelectData:(NSArray<NSNumber *> *)selectIndexArr;

@end
CMPickerView 也需要给外部暴露一些方法,比如自定义每一个小选项的cell,选中某个数据,reloadComponent刷新某一列。
在日期选择中,当第一列选中时候,需要外部去调用 reloadComponent去刷新后两列。因为CMPickerView是通用的,是否刷新后两列交给外部决定。
在CMPickerView实现UIPickerView的代理协议
- (NSInteger)numberOfComponentsInPickerView:(UIPickerView *)pickerView {
    return self.componentNum;
}

- (NSInteger)pickerView:(UIPickerView *)pickerView numberOfRowsInComponent:(NSInteger)component {
    if([self judgeDelegeteSelector:@selector(pickerView:numberOfRowsInComponent:)]) {
        return [self.delegate pickerView:self numberOfRowsInComponent:component];
    }
    return 0;
}

- (CGFloat)pickerView:(UIPickerView *)pickerView rowHeightForComponent:(NSInteger)component {
    return 56;
}

- (UIView *)pickerView:(UIPickerView *)pickerView viewForRow:(NSInteger)row forComponent:(NSInteger)component reusingView:(UIView *)view {
    Class customClass = [self.classDic objectForKey:@(component)];

    if(!customClass) {
        view = view ? view : [_CMPickerBaseCell new];
        if([self judgeDelegeteSelector:@selector(pickerView:strForRow:forComponent:)]) {
            ((_CMPickerBaseCell *)view).text = [self.delegate pickerView:self strForRow:row forComponent:component];
        }
    } else {
        view = view ? view : [[customClass alloc] init];
        if([self judgeDelegeteSelector:@selector(pickerView:viewForRow:forComponent:reusingView:)]){
            view = [self.delegate pickerView:self viewForRow:row forComponent:component reusingView:view];
        }
    }
    return view;
}

- (void)pickerView:(UIPickerView *)pickerView didSelectRow:(NSInteger)row inComponent:(NSInteger)component {
    [self.selectIndexDic setObject:@(row) forKey:@(component)];
    if([self judgeDelegeteSelector:@selector(pickerView:didSelectRow:inComponent:)]) {
        [self.delegate pickerView:self didSelectRow:row inComponent:component];
    }
}
然后实现暴露给外部的方法,来刷新UIPickerView
- (void)reloadAllComponents {
    for(NSInteger i=0; i<_componentNum; i++) {
        NSInteger rowNumOfComponent = 0;
        if([self judgeDelegeteSelector:@selector(pickerView:numberOfRowsInComponent:)]) {
            rowNumOfComponent = [self.delegate pickerView:self numberOfRowsInComponent:i];
        }
        NSInteger curSelectIdnex = [self.selectIndexDic objectForKey:@(i)].integerValue;
        NSInteger selectIndex = MIN(curSelectIdnex, rowNumOfComponent - 1);

        [self.selectIndexDic setObject:@(selectIndex) forKey:@(i)];
    }
    [self.pickerView reloadAllComponents];
}

- (void)reloadComponent:(NSInteger)component {
    for(NSInteger i=component; i<_componentNum; i++) {
        NSInteger rowNumOfComponent = 0;
        if([self judgeDelegeteSelector:@selector(pickerView:numberOfRowsInComponent:)]) {
            rowNumOfComponent = [self.delegate pickerView:self numberOfRowsInComponent:i];
        }
        NSInteger curSelectIdnex = [self.selectIndexDic objectForKey:@(i)].integerValue;
        NSInteger selectIndex = MIN(curSelectIdnex, rowNumOfComponent - 1);

        [self.selectIndexDic setObject:@(selectIndex) forKey:@(i)];
    }
    [self.pickerView reloadComponent:component];
}

- (void)selectRow:(NSInteger)row inComponent:(NSInteger)component animated:(BOOL)animated {
    [self.pickerView selectRow:row inComponent:component animated:animated];
    [self pickerView:_pickerView didSelectRow:row inComponent:component];
}
农历选择器的最后实现
目前数据和UI控件都有了,就可以完成农历选择的需求了
- 首先声明一个数据的属性,调用
CMLundarCalendarManager的类方法,获取需要展示的时间范围的所有农历数据。
@property (nonatomic, strong) NSArray<CMLundarCalendarYearModel *> *lundarDateData;

- (NSArray<CMLundarCalendarYearModel *> *)lundarDateData {
    if(!_lundarDateData) {
        // 展示从1901到今天为止的时间
        CMLundarCalendarDayModel *beginDayModel = [CMLundarCalendarManager dayFor:1901 month:1 day:1];
        _lundarDateData = [CMLundarCalendarManager yearsFromBeginTime:beginDayModel.time endTime:[NSDate new].timeIntervalSince1970];
    }
    return _lundarDateData;
}
- 声明一个
datePicker,实现它的代理方法
- (CMPickerView *)datePicker {
    if(!_datePicker) {
        _datePicker = [CMPickerView new];
        _datePicker.componentNum = 3;
        _datePicker.title = @"选择日期";
        _datePicker.delegate = self;
    }
    return _datePicker;
}

#pragma mark -Delegate
- (NSInteger)pickerView:(CMPickerView *)pickerView numberOfRowsInComponent:(NSInteger)component {
    NSUInteger numOfRow = 0;
    if(component == 0) {
        numOfRow = self.lundarDateData.count;
    } else if(component == 1){
        NSInteger yearIndex = [pickerView selectedRowInComponent:0];
        numOfRow = self.lundarDateData[yearIndex].monthArr.count;
    } else if(component == 2) {
        NSInteger yearIndex = [pickerView selectedRowInComponent:0];
        NSInteger monthIndex = [pickerView selectedRowInComponent:1];
        numOfRow = self.lundarDateData[yearIndex].monthArr[monthIndex].dayArr.count;
    }
    return numOfRow;
}

- (NSString *)pickerView:(CMPickerView *)pickerView strForRow:(NSInteger)row forComponent:(NSInteger)component{
    if(component == 0) {    // 年
        return [NSString stringWithFormat:@"%ld年", self.lundarDateData[row].year];
    } else if(component == 1) { // 月
        NSInteger yearIndex = [pickerView selectedRowInComponent:0];
        if(row >= self.lundarDateData[yearIndex].monthArr.count) { return @""; }
        return self.lundarDateData[yearIndex].monthArr[row].monthStr;
    } else if(component == 2) {
        NSInteger yearIndex = [pickerView selectedRowInComponent:0];
        NSInteger monthIndex = [pickerView selectedRowInComponent:1];
        return self.lundarDateData[yearIndex].monthArr[monthIndex].dayArr[row].dayStr;
    }
    return @"";
}

- (void)pickerView:(CMPickerView *)pickerView didSelectRow:(NSInteger)row inComponent:(NSInteger)component {
    if(component == 0) {
        [pickerView reloadComponent:1];
        [pickerView reloadComponent:2];
    } else if(component == 1){
        [pickerView reloadComponent:2];
    }
    [self updateSelectData];
}

- (void)pickerView:(CMPickerView *)pickerView confirmWithSelectData:(NSArray<NSNumber *> *)selectIndexArr {
    if(selectIndexArr.count < 3) { return; }
    self.selectData = self.lundarDateData[selectIndexArr[0].integerValue].monthArr[selectIndexArr[1].integerValue].dayArr[selectIndexArr[2].integerValue];
    [self updateSelectData];
}
- 给每一列选中默认的下标,展示
datePicker
- (void)showDatePicker {
    NSArray<NSNumber *> * indexArr = [CMLundarCalendarManager safeIndexOfDay:self.selectData inYears:self.lundarDateData];
    [self.datePicker selectRow:indexArr[0].integerValue inComponent:0 animated:NO];
    [_datePicker selectRow:indexArr[1].integerValue inComponent:1 animated:NO];
    [_datePicker selectRow:indexArr[2].integerValue inComponent:2 animated:NO];
    [_datePicker showInView:nil];
}
最终效果就跟文章开头一样了。
所有代码都上传到了github,有帮助的话可以点个Star。


 1万+
1万+

 被折叠的 条评论
为什么被折叠?
被折叠的 条评论
为什么被折叠?
 到【灌水乐园】发言


