


Nacos实现服务间的调用

前言
之前的文章讲诉了Nacos的具体功能,那么有了理论肯定是不够的,这一次我们来利用Nacos实现简单的服务之间简单的调用,对于Nacos不是很了解可以先去看看 【微服务】 Nacos的入门级使用 后端程序猿必经之路。
话不多说,开整开整

工具
IDEA,Nacos客户端(linux和windows都可以,这里以windows作为讲解)
开发流程
Nacos客户端的启动
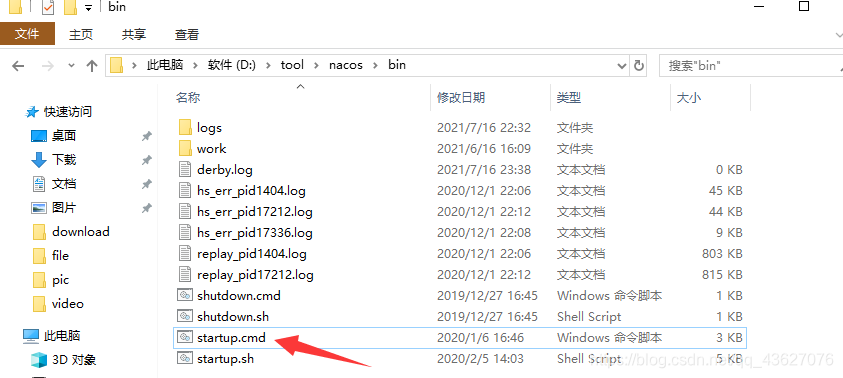
来到Nacos的解压目录下,来到bin目录,双击startup.cmd即可
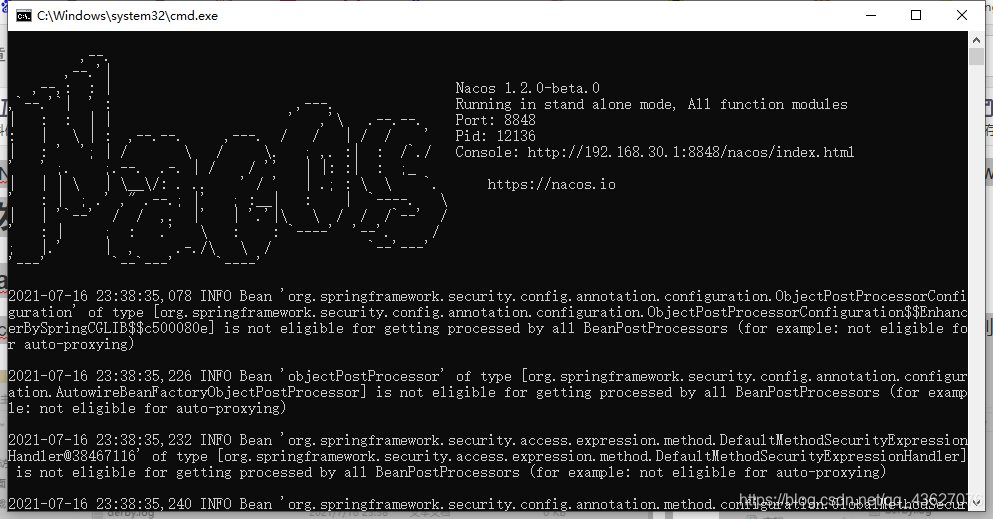
如下图,则启动成功
代码编写
建立一个maven项目
建立项目
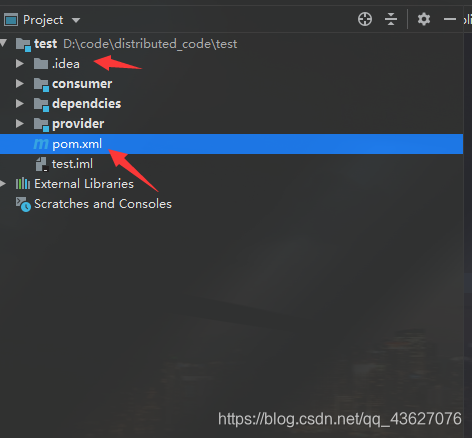
直接使用Idea建立一个maven项目即可,src之类的文件夹不需要留下,只留一个pom.xml即可,如下图所示,只留下红色箭头所指内容即可,其他全部删除。该maven项目作为总项目,作用就是方便各个子模块之间的依赖版本统一。
pom.xml内容
<?xml version="1.0" encoding="UTF-8"?>
<project xmlns="http://maven.apache.org/POM/4.0.0"
         xmlns:xsi="http://www.w3.org/2001/XMLSchema-instance"
         xsi:schemaLocation="http://maven.apache.org/POM/4.0.0 http://maven.apache.org/xsd/maven-4.0.0.xsd">
    <modelVersion>4.0.0</modelVersion>

    <groupId>com.xiaow</groupId>
    <artifactId>test</artifactId>
    <version>1.0-SNAPSHOT</version>
    <modules>
        <module>dependcies</module>
        <module>provider</module>
        <module>consumer</module>
    </modules>
    <properties>
        <java.version>1.8</java.version>
        <project.build.sourceEncoding>UTF-8</project.build.sourceEncoding>
        <project.reporting.outputEncoding>UTF-8</project.reporting.outputEncoding>
        <spring-boot.version>2.2.5.RELEASE</spring-boot.version>
    </properties>
    <packaging>pom</packaging>


    <profiles>
        <profile>
            <!-- 开发环境 -->
            <id>dev</id>
            <properties>
                <env>dev</env>
            </properties>
            <activation>
                <!-- 默认激活该profile节点-->
                <activeByDefault>true</activeByDefault>
            </activation>
            <build>
                <resources>
                    <resource>
                        <directory>src/main/resources_env/dev</directory>
                    </resource>
                    <resource>
                        <directory>src/main/resources</directory>
                    </resource>
                </resources>
            </build>
        </profile>
        <profile>
            <!-- 测试环境 -->
            <id>qa</id>
            <properties>
                <env>qa</env>
            </properties>
            <build>
                <resources>
                    <resource>
                        <directory>src/main/resources_env/qa</directory>
                    </resource>
                    <resource>
                        <directory>src/main/resources</directory>
                    </resource>
                </resources>
            </build>
        </profile>
        <profile>
            <!-- 生产环境 -->
            <id>online</id>
            <properties>
                <env>online</env>
            </properties>
            <build>
                <resources>
                    <resource>
                        <directory>src/main/resources_env/online</directory>
                    </resource>
                    <resource>
                        <directory>src/main/resources</directory>
                    </resource>
                </resources>
            </build>
        </profile>
    </profiles>

    <dependencyManagement>
        <dependencies>
            <dependency>
                <groupId>org.springframework.boot</groupId>
                <artifactId>spring-boot-dependencies</artifactId>
                <version>${spring-boot.version}</version>
                <type>pom</type>
                <scope>import</scope>
            </dependency>
            <dependency>
                <groupId>com.xiaow</groupId>
                <artifactId>dependcies</artifactId>
                <version>${project.version}</version>
                <type>pom</type>
                <scope>import</scope>
            </dependency>
        </dependencies>
    </dependencyManagement>

<!--maven仓库的配置-->
    <repositories>
        <repository>
            <id>aliyun-repos</id>
            <name>Aliyun Repository</name>
            <url>http://maven.aliyun.com/nexus/content/groups/public</url>
            <releases>
                <enabled>true</enabled>
            </releases>
            <snapshots>
                <enabled>false</enabled>
            </snapshots>
        </repository>

        <repository>
            <id>sonatype-repos</id>
            <name>Sonatype Repository</name>
            <url>https://oss.sonatype.org/content/groups/public</url>
            <releases>
                <enabled>true</enabled>
            </releases>
            <snapshots>
                <enabled>false</enabled>
            </snapshots>
        </repository>
        <repository>
            <id>sonatype-repos-s</id>
            <name>Sonatype Repository</name>
            <url>https://oss.sonatype.org/content/repositories/snapshots</url>
            <releases>
                <enabled>false</enabled>
            </releases>
            <snapshots>
                <enabled>true</enabled>
            </snapshots>
        </repository>

        <repository>
            <id>spring-snapshots</id>
            <name>Spring Snapshots</name>
            <url>https://repo.spring.io/snapshot</url>
            <snapshots>
                <enabled>true</enabled>
            </snapshots>
        </repository>
        <repository>
            <id>spring-milestones</id>
            <name>Spring Milestones</name>
            <url>https://repo.spring.io/milestone</url>
            <snapshots>
                <enabled>false</enabled>
            </snapshots>
        </repository>
    </repositories>

    <build>
        <plugins>
            <plugin>
                <groupId>org.apache.maven.plugins</groupId>
                <artifactId>maven-compiler-plugin</artifactId>
                <version>3.8.1</version>
                <configuration>
                    <source>1.8</source>
                    <target>1.8</target>
                    <encoding>UTF-8</encoding>
                </configuration>
            </plugin>
        </plugins>
    </build>

</project>
建立统一的依赖管理模块
这个模块的作用其实就是使得总项目的pom.xml看着整洁一点,并且实现整个项目的依赖管理
也是一样,建立一个maven的module,只留一个pom.xml即可
内容如下
<?xml version="1.0" encoding="UTF-8"?>
<project xmlns="http://maven.apache.org/POM/4.0.0"
         xmlns:xsi="http://www.w3.org/2001/XMLSchema-instance"
         xsi:schemaLocation="http://maven.apache.org/POM/4.0.0 http://maven.apache.org/xsd/maven-4.0.0.xsd">
    <groupId>com.xiaow</groupId>
    <version>1.0-SNAPSHOT</version>
    <modelVersion>4.0.0</modelVersion>
    <artifactId>dependcies</artifactId>
    <packaging>pom</packaging>

    <properties>
        <spring-cloud-version>Hoxton.SR4</spring-cloud-version>
        <spring-cloud-alibaba-version>2.2.2.RELEASE</spring-cloud-alibaba-version>
    </properties>
    <developers>
        <developer>
            <id>1</id>
            <name>xiaow</name>
        </developer>
    </developers>
    <dependencyManagement>
        <dependencies>
            <dependency>
                <groupId>org.springframework.cloud</groupId>
                <artifactId>spring-cloud-dependencies</artifactId>
                <version>${spring-cloud-version}</version>
                <type>pom</type>
                <scope>import</scope>
            </dependency>
            <dependency>
                <groupId>com.alibaba.cloud</groupId>
                <artifactId>spring-cloud-alibaba-dependencies</artifactId>
                <version>${spring-cloud-alibaba-version}</version>
                <type>pom</type>
                <scope>import</scope>
            </dependency>
            <dependency>
                <groupId>org.springframework.cloud</groupId>
                <artifactId>spring-cloud-starter-alibaba-nacos-discovery</artifactId>
                <version>0.9.0.RELEASE</version>
            </dependency>
            <dependency>
                <groupId>org.springframework.cloud</groupId>
                <artifactId>spring-cloud-alibaba-nacos-config</artifactId>
                <version>0.9.0.RELEASE</version>
            </dependency>

            <dependency>
                <groupId>org.springframework.cloud</groupId>
                <artifactId>spring-cloud-starter-alibaba-sentinel</artifactId>
                <version>0.9.0.RELEASE</version>
            </dependency>
        </dependencies>
    </dependencyManagement>

    <repositories>
        <repository>
            <id>central</id>
            <name>Central Repository</name>
            <url>https://repo.maven.apache.org/maven2</url>
            <layout>default</layout>
            <snapshots>
                <enabled>false</enabled>
            </snapshots>
        </repository>
    </repositories>
</project>
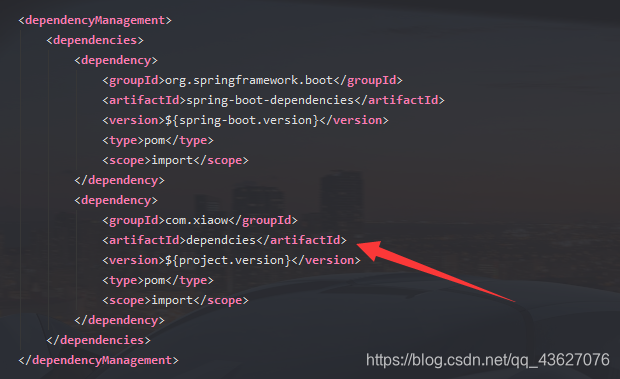
在主项目的pom.xml中需要在dependencyManagement中将其引入,如下图所示
到现在为止,我么已经完成了整个环境的搭建。
生产者服务
生产者服务,顾名思义,该服务的作用就是供消费者服务进行消费的,那么类比到服务之间的关系应该叫做调用。
建立一个maven模块
建立一个maven模块,这一次要留下src这个文件夹。
pom.xml
<?xml version="1.0" encoding="UTF-8"?>
<project xmlns="http://maven.apache.org/POM/4.0.0"
         xmlns:xsi="http://www.w3.org/2001/XMLSchema-instance"
         xsi:schemaLocation="http://maven.apache.org/POM/4.0.0 http://maven.apache.org/xsd/maven-4.0.0.xsd">
    <parent>
        <artifactId>test</artifactId>
        <groupId>com.xiaow</groupId>
        <version>1.0-SNAPSHOT</version>
    </parent>
    <modelVersion>4.0.0</modelVersion>

    <artifactId>provider</artifactId>

    <properties>
        <java.version>1.8</java.version>
    </properties>

    <!--	<dependencies>-->
    <!-- 配置依赖关系 -->
    <dependencies>
        <!-- web启动器 -->
        <dependency>
            <groupId>org.springframework.boot</groupId>
            <artifactId>spring-boot-starter-web</artifactId>
        </dependency>

        <!-- lombok -->
        <dependency>
            <groupId>org.projectlombok</groupId>
            <artifactId>lombok</artifactId>
        </dependency>
        <!--        </dependencies>-->
        <dependency>
            <groupId>org.springframework.boot</groupId>
            <artifactId>spring-boot-starter-web</artifactId>
        </dependency>
        <dependency>
            <groupId>org.springframework.boot</groupId>
            <artifactId>spring-boot-starter-actuator</artifactId>
        </dependency>
        <dependency>
            <groupId>org.springframework.boot</groupId>
            <artifactId>spring-boot-starter-test</artifactId>
        </dependency>

        <dependency>
            <groupId>org.springframework.cloud</groupId>
            <artifactId>spring-cloud-starter-alibaba-nacos-discovery</artifactId>
        </dependency>


    </dependencies>

    <build>
        <plugins>
            <plugin>
                <groupId>org.apache.maven.plugins</groupId>
                <artifactId>maven-compiler-plugin</artifactId>
                <version>3.8.1</version>
                <configuration>
                    <source>1.8</source>
                    <target>1.8</target>
                    <encoding>UTF-8</encoding>
                </configuration>
            </plugin>
            <plugin>
                <groupId>org.springframework.boot</groupId>
                <artifactId>spring-boot-maven-plugin</artifactId>
                <version>2.3.7.RELEASE</version>
                <configuration>
                    <mainClass>com.xiaow.test.Provider8001</mainClass>
                </configuration>
                <executions>
                    <execution>
                        <id>repackage</id>
                        <goals>
                            <goal>repackage</goal>
                        </goals>
                    </execution>
                </executions>
            </plugin>
        </plugins>
    </build>
</project>
建立接口供消费者服务调用
这里只是简单写了一个接口,返回一个字符串
package com.xiaow.test.controller;

import org.springframework.web.bind.annotation.GetMapping;
import org.springframework.web.bind.annotation.RestController;

@RestController
public class TestController {
    @GetMapping("/test")
    public String test() {
        return "调用成功";
    }
}
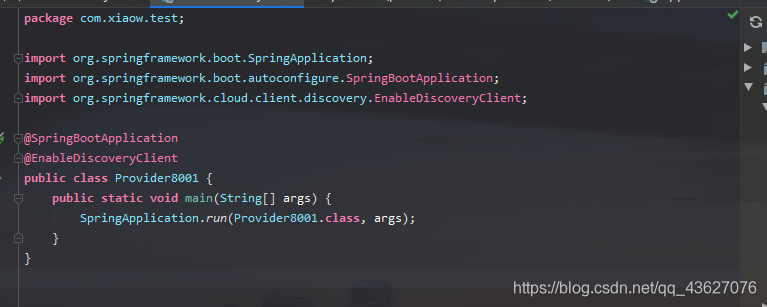
启动类配置
在启动类上加上@EnableDiscoveryClient注解。如下图所示,这里要注意,建立的maven项目是没有启动类的,是需要我们自己手写的或则复制。
application.yml
这里要配置我们要注册的nacos的地址
spring:
  application:
    name: provider
  cloud:
    nacos:
      discovery:
        server-addr: http://192.168.30.1:8848/
server:
  port: 8001

management:
  endpoints:
    web:
      exposure:
        include: "*"
最终项目结构

测试是否成功
启动一下该生产者是否成功注册到Nacos,来到Nacos的工作台,如下图所示
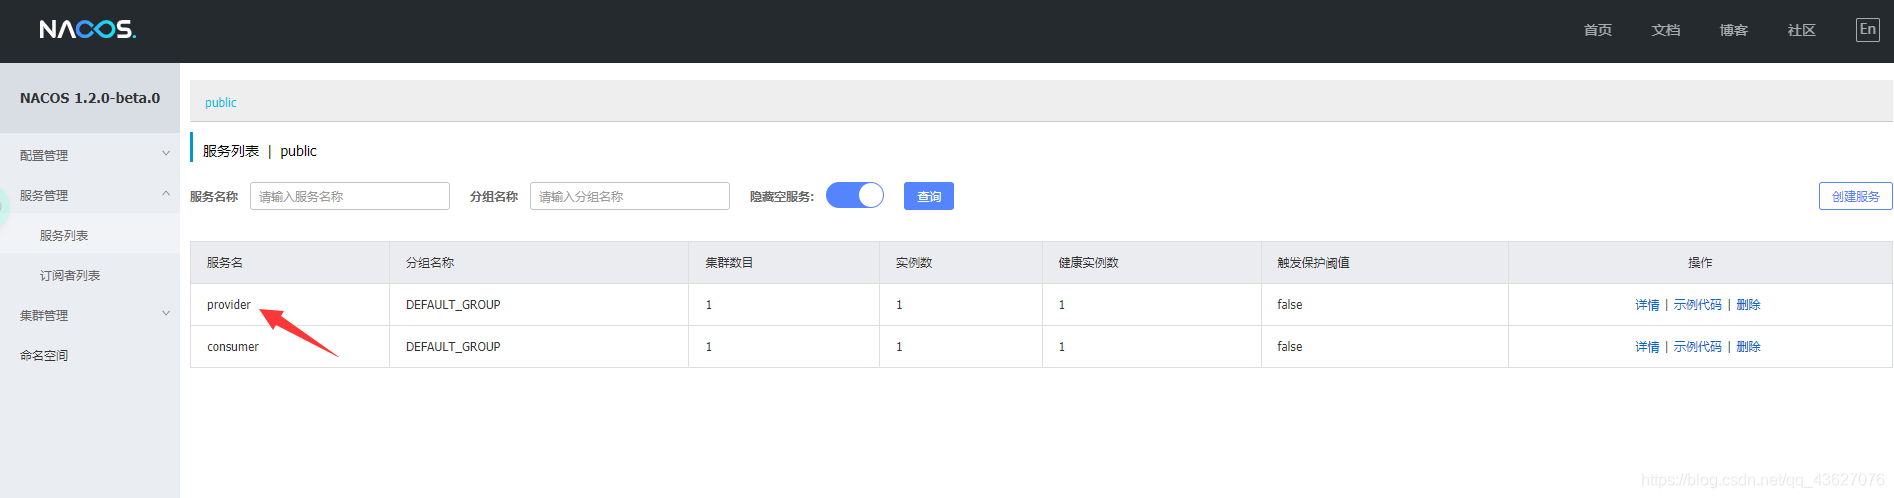
观察到provider已经注册进来,说明生产者服务已经成功写好。
消费者服务
和生产者一样需要建立一个maven的Moudule,这里就不赘述了,我们本次消费者调用生产者服务的方式是openfegin方式。
pom.xml
消费者和生产者的pom文件有一些小小的不同,主要就是在openfegin这里
<?xml version="1.0" encoding="UTF-8"?>
<project xmlns="http://maven.apache.org/POM/4.0.0"
         xmlns:xsi="http://www.w3.org/2001/XMLSchema-instance"
         xsi:schemaLocation="http://maven.apache.org/POM/4.0.0 http://maven.apache.org/xsd/maven-4.0.0.xsd">
    <parent>
        <artifactId>test</artifactId>
        <groupId>com.xiaow</groupId>
        <version>1.0-SNAPSHOT</version>
    </parent>
    <modelVersion>4.0.0</modelVersion>

    <artifactId>consumer</artifactId>
    <dependencies>
        <dependency>
            <groupId>org.springframework.boot</groupId>
            <artifactId>spring-boot-starter-web</artifactId>
        </dependency>
        <dependency>
            <groupId>org.springframework.boot</groupId>
            <artifactId>spring-boot-starter-actuator</artifactId>
        </dependency>
        <dependency>
            <groupId>org.springframework.boot</groupId>
            <artifactId>spring-boot-starter-test</artifactId>
        </dependency>

        <dependency>
            <groupId>org.springframework.cloud</groupId>
            <artifactId>spring-cloud-starter-alibaba-nacos-discovery</artifactId>
        </dependency>

        <dependency>
            <groupId>org.springframework.cloud</groupId>
            <artifactId>spring-cloud-starter-openfeign</artifactId>
        </dependency>
    </dependencies>
    <build>
        <plugins>
            <plugin>
                <groupId>org.apache.maven.plugins</groupId>
                <artifactId>maven-compiler-plugin</artifactId>
                <version>3.8.1</version>
                <configuration>
                    <source>1.8</source>
                    <target>1.8</target>
                    <encoding>UTF-8</encoding>
                </configuration>
            </plugin>
            <plugin>
                <groupId>org.springframework.boot</groupId>
                <artifactId>spring-boot-maven-plugin</artifactId>
                <version>2.3.7.RELEASE</version>
                <configuration>
                    <mainClass>com.xiaow.consumer.Consumer9001</mainClass>
                </configuration>
                <executions>
                    <execution>
                        <id>repackage</id>
                        <goals>
                            <goal>repackage</goal>
                        </goals>
                    </execution>
                </executions>
            </plugin>
        </plugins>
    </build>


</project>
application.yml
spring:
  application:
    name: consumer
  cloud:
    nacos:
      discovery:
        server-addr: http://192.168.30.1:8848/
server:
  port: 9001

management:
  endpoints:
    web:
      exposure:
        include: "*"
启动类的配置
需要加入@EnableDiscoveryClient,@EnableFeignClients这两个注解
package com.xiaow.consumer;

import org.springframework.boot.SpringApplication;
import org.springframework.boot.autoconfigure.SpringBootApplication;
import org.springframework.cloud.client.discovery.EnableDiscoveryClient;
import org.springframework.cloud.openfeign.EnableFeignClients;

@SpringBootApplication
@EnableDiscoveryClient
@EnableFeignClients
public class Consumer9001 {
    public static void main(String[] args) {
        SpringApplication.run(Consumer9001.class,args);
    }
}
调用生产者服务接口的service
这里的service就是可以直接调用生产者的接口,其中@GetMapping("/test")中的/test要与生产者接口的mapping相对应。
package com.xiaow.consumer.service;

import com.xiaow.consumer.service.impl.TestServiceImpl;
import org.springframework.cloud.openfeign.FeignClient;
import org.springframework.web.bind.annotation.GetMapping;

@FeignClient(name = "provider",fallback = TestServiceImpl.class)
public interface TestSerice {
    @GetMapping("/test")
    public String test();

}
TestServiceImpl实在调用生产者接口出现错误时才会被调用,具体使用等以后整合sentinel时在仔细说一下。
package com.xiaow.consumer.service.impl;

import com.xiaow.consumer.service.TestSerice;

public class TestServiceImpl implements TestSerice {
    @Override
    public String test() {
        return null;
    }
}
消费者接口
使用controller来调用TestService,从而实现对生产者服务的调用
package com.xiaow.consumer.controller;

import com.xiaow.consumer.service.TestSerice;
import org.springframework.beans.factory.annotation.Autowired;
import org.springframework.web.bind.annotation.GetMapping;
import org.springframework.web.bind.annotation.RestController;

@RestController
public class TestController {
    @Autowired
    TestSerice testSerice;

    @GetMapping("/consumertest")
    public String consumertest() {
        return testSerice.test();
    }
}
测试

成功调用,到此,一个基本的nacos使用就完成了
总结
目录些许有些乱,大家有什么问题可以随时交流,欢迎各位大佬指点。
整个完整项目已上传码云 有兴趣的可以看一下
码云地址


 574
574


 被折叠的 条评论
为什么被折叠?
被折叠的 条评论
为什么被折叠?
 到【灌水乐园】发言


