


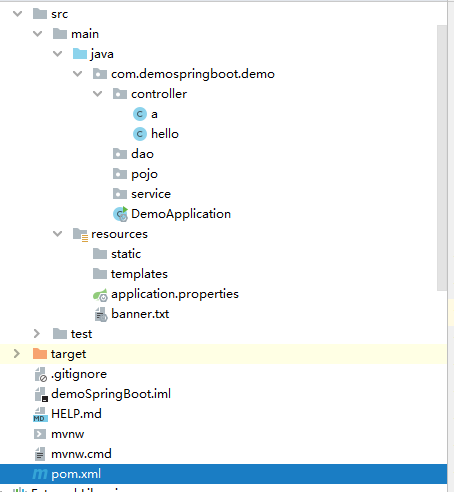
1. hello world
pom.xml:
<dependencies>
        <!--集成依赖 web依赖    -->
        <dependency>
            <groupId>org.springframework.boot</groupId>
            <artifactId>spring-boot-starter-web</artifactId>
        </dependency>
        <!--单元测试-->
        <dependency>
            <groupId>org.springframework.boot</groupId>
            <artifactId>spring-boot-starter-test</artifactId>
            <scope>test</scope>
        </dependency>
    </dependencies>

    <build>
<!--        jar包插件-->
        <plugins>
            <plugin>
                <groupId>org.springframework.boot</groupId>
                <artifactId>spring-boot-maven-plugin</artifactId>
            </plugin>
        </plugins>
    </build>
主程序入口

package com.demospringboot.demo;

import org.springframework.boot.SpringApplication;
import org.springframework.boot.autoconfigure.SpringBootApplication;

@SpringBootApplication
public class DemoApplication {

    public static void main(String[] args) {
        SpringApplication.run(DemoApplication.class, args);
    }

}
helloworld:
package com.demospringboot.demo.controller;

import org.springframework.web.bind.annotation.RequestMapping;
import org.springframework.web.bind.annotation.RestController;

/**
 * @author LiZeyuan
 * @date 2022/1/14 11:10
 */
@RestController
public class hello {
    @RequestMapping("/hello")
    public String hello(){
        return "hello world";
    }
}

修改端口号:application.properties里面

applecation.yaml:
#端口号更改
server:
  port: 8081
修改banner:
2. 原理
pom.xml
spring-boot-starter-parent
- spring-boot-dependencies:依赖与父工程
- 引入依赖时候不需要指定版本,dependence里面有仓库
启动器
<dependency>
    <groupId>org.springframework.boot</groupId>
    <artifactId>spring-boot-starter</artifactId>
</dependency>
-
springboot的启动场景
-
若加载spring-boot-starter-web 自动加载web环境依赖
-
springboot的功能场景都是一个个启动器
-
使用什么功能就找什么启动器 starter
主程序
package com.demospringboot.demo;

import org.springframework.boot.SpringApplication;
import org.springframework.boot.autoconfigure.SpringBootApplication;

//@SpringBootApplication 标注这个类是springboot 应用
@SpringBootApplication
public class DemoApplication {

    public static void main(String[] args) {
        //application类
        //run方法
        //参数1:应用入口类,参数2:命令行参数
        SpringApplication.run(DemoApplication.class, args);
    }

}
- springboot所有的配置都是在启动的时候扫描并加载,
 此处的配置文件,但是不一定立即生效,只有导入了对应的start,才会生效。
 - 整合JavaEE 解决方案和自动配置都在spring-boot-autoconfigure-2.6.2.jar包下
run 方法:
- 推断项目类型是普通项目还是web项目
- 查找并加载所有可用的初始化器,设置到initializer(初始化)属性中
- 查找出所有监听器,设置到initializer属性中
- 推断并设置main方法,记载主类


关于springboot:
- 自动装配
- run方法
3. SpringBoot配置
SpringBoot使用一个全局的配置文件 , 配置文件名称是固定的
-
application.properties
-
- 语法结构 :key=value
-
application.yml
-
- 语法结构 :key:空格 value
application.yaml
#xxx.properties:
# key=value
#xxx.yaml:
# key: value
# name: 李泽源

# yaml存对象:
student:
  name: Lizeyuan
  age: 20
# 行内写法:
stu: {name: Lizeyuan,age: 20}

# 数组:
pets:
  - cat
  - dog
college: [USTL,Tinghua]
#对空格的要求高
#可以注入到配置类

#端口号更改
server:
  port: 8081

#可以配置的东西:
#原理:
-
yaml可以给实体类赋值
#person:
person:
  name: lizeyuan
  age: 20
  birth: 2001/04/09
  happy: false
  maps: {K1: v1,K2: v2}
  list:
    - code
    - music
    - girl
  animal:
    dog: wangcai
    cat: xiaomao
/** * @author LiZeyuan * @date 2022/1/14 16:04 */ @Component//注册bean @ConfigurationProperties(prefix = "person") /* @configurationProperties作用: 将配置文件中配置的每一个属性的值,映射到这个组件中; 告诉springBoot将本类中的所有属性和配置文件中相关的配置进行绑定 参数 prefix ="person":将配置文件中的person下面的所有属性——对应 只有这个组件是容器中的组件,才能使用容器提供的econfigurationProperties功能 */ public class Person { private String name; private Integer age; private Date birth; private boolean happy; private Map<String ,Object> map; private List<Object> list; private Animal animal; }这里报红不影响运行
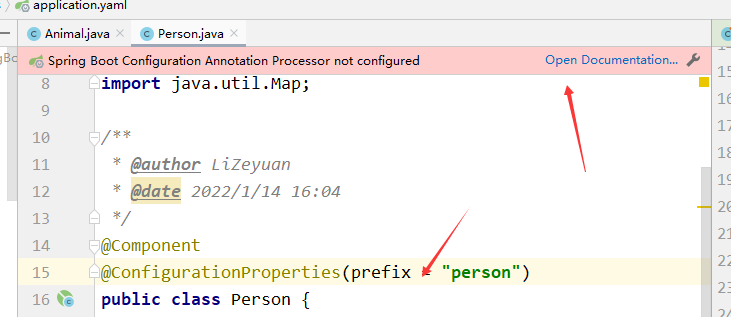
去官网解决在pom.xml加代码段:
@PropertySource(value = "classpass:test.properties")
//加载指定的配置文件
class {
    @Value("${name}")
    private String name;
}
test.properties:
name=李泽源
-
yaml可以这样写:
-
#person: person: name: lizeyuan${random.uuid} age: ${random.int(1000)} birth: 2001/04/09 happy: false map: {K1: v1,K2: v2} list: - code - music - girl animal: dog: ${person.happy:false}_滚蛋旺财 cat: xiaomao -
输出结果:
-
person{name=‘lizeyuane71bc759-538a-4070-a2be-334447768f0a’, age=827, birth=Mon Apr 09 00:00:00 CST 2001, happy=false, map={K1=v1, K2=v2}, list=[code, music, girl], animal=animal{dog=‘false_滚蛋旺财’, cat=‘xiaomao’}}
@ConfigurationProperties和spring的@Value比较

松散绑定:
last-name = lastName
-
在业务中只需要绑定某个配置文件中的某个值,可用@value
-
专门编写JavaBean来和配置文件映射,就直接使用
@ConfigurationProperties(prefix = "xxxx")
4. JSR303
//pom.xml配置spring-boot-starter-validation
@Validated
class {
    @Email()
    private String email;
}
<dependency>
        <groupId>org.springframework.boot</groupId>
        <artifactId>spring-boot-starter-validation</artifactId>
</dependency>
- 试用数据校验可保证数据的准确性
常用数据校验参数
@NotNull(message="名字不能为空")
private String userName;
@Max(value=120,message="年龄最大不能查过120")
private int age;
@Email(message="邮箱格式错误")
private String email;

//空检查
@Null       //验证对象是否为null
@NotNull    //验证对象是否不为null, 无法查检长度为0的字符串
@NotBlank   //检查约束字符串是不是Null还有被Trim的长度是否大于0,只对字符串,且会去掉前后空格.
@NotEmpty   //检查约束元素是否为NULL或者是EMPTY.

//Booelan检查
@AssertTrue     //验证 Boolean 对象是否为 true
@AssertFalse    //验证 Boolean 对象是否为 false

//长度检查
@Size(min=, max=) /*验证对象 */(Array,Collection,Map,String)//长度是否在给定的范围之内
@Length(min=, max=) string is between min and max included.

日期检查
@Past       //验证 Date 和 Calendar 对象是否在当前时间之前
@Future     //验证 Date 和 Calendar 对象是否在当前时间之后
@Pattern    //验证 String 对象是否符合正则表达式的规则

//.......等等
//除此以外,我们还可以自定义一些数据校验规则
5. 多环境配置及文件位置
配置文件位置
file:/config/..根目录下的config文件夹,此优先级最高file:/.根目录,此优先级次之classpath/config/..类目录下的config,优先级第三classpath/..类目录下,优先级最低
多环境配置
- 默认环境 开发环境 测试环境等 application.properties的配置文件不同
- 如:
application.properties/application-dev.properties/application-test.properties等
- yml可以分为多个部分 不用创建多个配置文件,部分之间用
---分割
server:
  port: 8081

##使用dev端口
spring:
  profiles:
    active: dev
---
server:
  port: 8082
spring:
  config:
    activate:
      on-profile: dev
---
server:
  port: 8083
spring:
  config:
    activate:
      on-profile: test
---
实际开发yaml建议也分开写,例如:
application.yaml:
server:
  port: 8081

##使用dev端口
spring:
  profiles:
    active: test
application-test.yaml:
server:
  port: 8083
spring:
  config:
    activate:
      on-profile: test


配置文件到底能写什么:
-
在spingboot核心中有一个spring.factories文件:

-
此文件存在大量的
xxxxAutoConfiguration
-
其中有默认值:
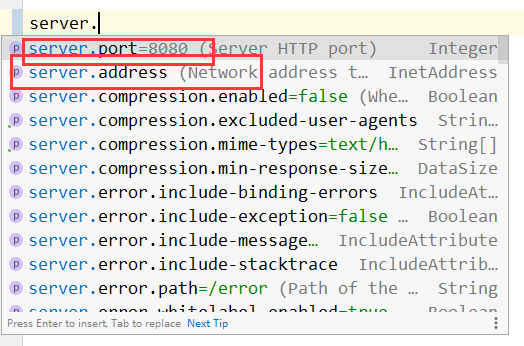
//上图中的源码 //表示这是一个配置类 @Configuration(proxyBeanMethods = false) //自动配置属性 @EnableConfigurationProperties(ServerProperties.class) //判断条件存在才加载 @ConditionalOnWebApplication(type = ConditionalOnWebApplication.Type.SERVLET) @ConditionalOnClass(CharacterEncodingFilter.class) @ConditionalOnProperty(prefix = "server.servlet.encoding", value = "enabled", matchIfMissing = true) public class HttpEncodingAutoConfiguration { private final Encoding properties; //此处的ServerProperties就是配置类,见下个源码 public HttpEncodingAutoConfiguration(ServerProperties properties) { this.properties = properties.getServlet().getEncoding(); } @Bean @ConditionalOnMissingBean public CharacterEncodingFilter characterEncodingFilter() { CharacterEncodingFilter filter = new OrderedCharacterEncodingFilter(); filter.setEncoding(this.properties.getCharset().name()); filter.setForceRequestEncoding(this.properties.shouldForce(Encoding.Type.REQUEST)); filter.setForceResponseEncoding(this.properties.shouldForce(Encoding.Type.RESPONSE)); return filter; }ServerProperties.java: @ConfigurationProperties(prefix = "server", ignoreUnknownFields = true) public class ServerProperties { /** * Server HTTP port. */ //port这个属性就可以写配置,下面同理 private Integer port; /** * Network address to which the server should bind. */ private InetAddress address; @NestedConfigurationProperty private final ErrorProperties error = new ErrorProperties(); /** * Strategy for handling X-Forwarded-* headers. */ private ForwardHeadersStrategy forwardHeadersStrategy; /** * Value to use for the Server response header (if empty, no header is sent). */ private String serverHeader; /** * Maximum size of the HTTP message header. */ private DataSize maxHttpHeaderSize = DataSize.ofKilobytes(8); /** * Type of shutdown that the server will support. */ private Shutdown shutdown = Shutdown.IMMEDIATE; @NestedConfigurationProperty private Ssl ssl; @NestedConfigurationProperty private final Compression compression = new Compression(); @NestedConfigurationProperty private final Http2 http2 = new Http2();此处的配置正好对应上面的各个封装的bean
-
xxxxPropeties正好和配置文件绑定
总结:
- springboot自动配置好了各种类,这些类通过
xxxProperties进行默认配置,而这个类里面的每一个类都和配置文件进行绑定,因此可以通过修改配置文件来进行修改一些自己想要的内容

6. Spring Boot web 开发
6.1静态资源导入
application.yml:
spring:
  mvc:
    static-path-pattern: ""
webjars:
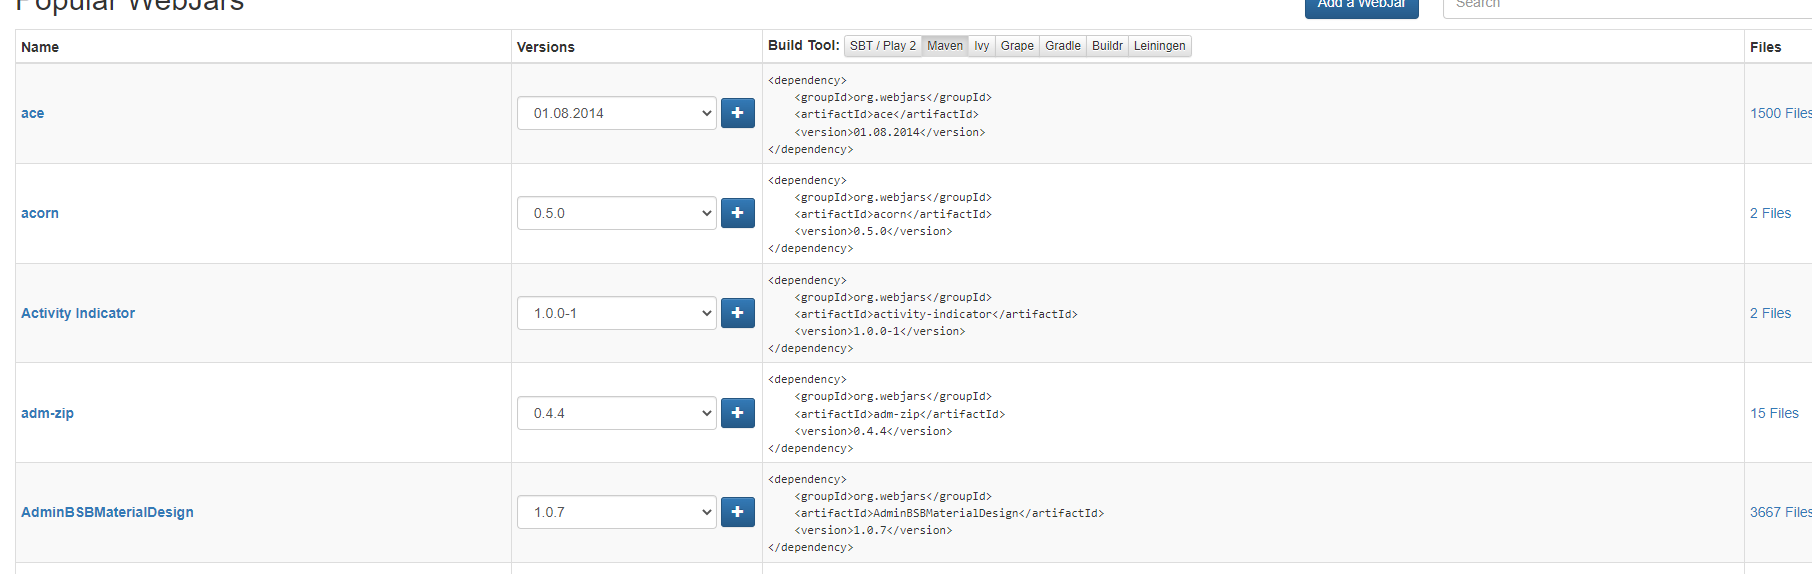
以maven的方式引入 诸如jq之类的框架?
@Override
public void addResourceHandlers(ResourceHandlerRegistry registry) {
   if (!this.resourceProperties.isAddMappings()) {
      logger.debug("Default resource handling disabled");
      return;
   }
   addResourceHandler(registry, "/webjars/**", "classpath:/META-INF/resources/webjars/");
   });
addResourceHandler(registry, this.mvcProperties.getStaticPathPattern(), (registration) -> {
   registration.addResourceLocations(this.resourceProperties.getStaticLocations());
   if (this.servletContext != null) {
      ServletContextResource resource = new ServletContextResource(this.servletContext, SERVLET_LOCATION);
      registration.addResourceLocations(resource);
   }
this.resourceProperties.getStaticLocations()`:
public static class Resources {

   private static final String[] CLASSPATH_RESOURCE_LOCATIONS = { "classpath:/META-INF/resources/",
         "classpath:/resources/", "classpath:/static/", "classpath:/public/" };

   /**
    * Locations of static resources. Defaults to classpath:[/META-INF/resources/,
    * /resources/, /static/, /public/].
    */
   private String[] staticLocations = CLASSPATH_RESOURCE_LOCATIONS;

   /**
    * Whether to enable default resource handling.
    */
   private boolean addMappings = true;

   private boolean customized = false;

   private final Chain chain = new Chain();

   private final Cache cache = new Cache();

   public String[] getStaticLocations() {
      return this.staticLocations;
   }
- 由第二行
private static final String[] CLASSPATH_RESOURCE_LOCATIONS = { "classpath:/META-INF/resources/", "classpath:/resources/", "classpath:/static/", "classpath:/public/" };可见可读取的静态资源范围,只要是在这四个目录下的都能直接读取,四个优先级依次降低,一般在public目录下放公共资源,static放静态资源例如图片,resouse放自己上传的资源
总结:
在springboot中我们用以下方式处理静态资源
- webjars
映射到localhost:8080/webjars/ - WEB_INF.resouces ,resources,static,public
映射到localhost:8080/
6.2 首页和图标定制
private Resource getWelcomePage() {
			for (String location : this.resourceProperties.getStaticLocations()) {
				Resource indexHtml = getIndexHtml(location);
				if (indexHtml != null) {
					return indexHtml;
				}

			}
其中 Resource indexHtml = getIndexHtml(location) 转到了
private Resource getWelcomePage() {
			for (String location : this.resourceProperties.getStaticLocations()) {
				Resource indexHtml = getIndexHtml(location);
				if (indexHtml != null) {
					return indexHtml;
				}
			}
中的resourceProperties.getStaticLocations())
即上文提到的四个目录
如果index放在templates目录下, 必须通过Controller才能跳转! 并且需要模板引擎thymeleaf的支持!!
图标已被弃用
直接HTML导入静态资源就行了
6.3 模板引擎
前端交给我们的页面,是html页面。如果是我们以前开发,我们需要把他们转成jsp页面,jsp好处就是当我们查出一些数据转发到JSP页面以后,我们可以用jsp轻松实现数据的显示,及交互等。
jsp支持非常强大的功能,包括能写Java代码,但是呢,我们现在的这种情况,SpringBoot这个项目首先是以jar的方式,不是war,像第二,我们用的还是嵌入式的Tomcat,他现在默认是不支持jsp的

导入thymeleaf:
<!--thymeleaf-->
<dependency>
    <groupId>org.springframework.boot</groupId>
    <artifactId>spring-boot-starter-thymeleaf</artifactId>
</dependency>
源码:
@ConfigurationProperties(prefix = "spring.thymeleaf")
public class ThymeleafProperties {

   private static final Charset DEFAULT_ENCODING = StandardCharsets.UTF_8;

   public static final String DEFAULT_PREFIX = "classpath:/templates/";

   public static final String DEFAULT_SUFFIX = ".html";
前端页面写道templates里面 ,可以通过controller转到页面
6.4 Spring MVC 配置原理
spring mvc 支持的东西想接着用,就配置一个
@Configuration类,继承于 WebMvcConfigurer接口,而且这个类不能添加@EnableWebMvc注解
官方文档:https://docs.spring.io/spring-boot/docs/2.2.5.RELEASE/reference/htmlsingle/#boot-features-spring-mvc-auto-configuration

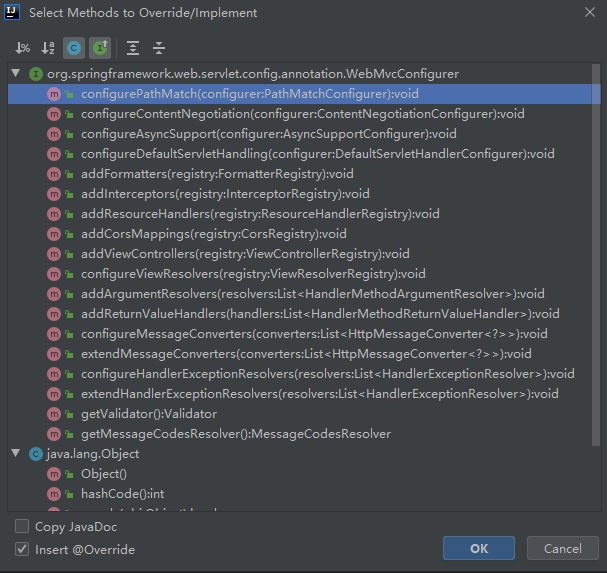
这个类可以重写WebMvcConfiguration中的方法:
//扩展SpringMvc
//如果定制化一些功能,使用这个组件然后@Bean 交给SpringBoot,其能自动装配
@Configuration
public class MyMvcConfig implements WebMvcConfigurer {

    //注册到容器
    @Bean
    public ViewResolver myViewResolver() {
        return new MyViewResolver();
    }

    //自定义一个视图解析器,重写VieResolver方法:
    public static class MyViewResolver implements ViewResolver {

        @Override
        public View resolveViewName(String viewName, Locale locale) throws Exception {
            return null;
        }
    }
}
onfiguration中的方法:
[外链图片转存中…(img-z7y9Tpnv-1644555247295)]
//扩展SpringMvc
//如果定制化一些功能,使用这个组件然后@Bean 交给SpringBoot,其能自动装配
@Configuration
public class MyMvcConfig implements WebMvcConfigurer {

    //注册到容器
    @Bean
    public ViewResolver myViewResolver() {
        return new MyViewResolver();
    }

    //自定义一个视图解析器,重写VieResolver方法:
    public static class MyViewResolver implements ViewResolver {

        @Override
        public View resolveViewName(String viewName, Locale locale) throws Exception {
            return null;
        }
    }
}


 3144
3144


 被折叠的 条评论
为什么被折叠?
被折叠的 条评论
为什么被折叠?
 到【灌水乐园】发言


