


文章目录
准备
JDK17
电脑要装有jdk17。对于有多个jdk需求的开发者来说。推荐使用jdk版本管理工具。
使用jabba在Windows上管理多个版本的JDK-详细教程
api key
前期需要准备一个api key。
没有的可以申请一个免费的。github上有免费的可以自己去申请。
创建项目
打开IDEA新建项目。

添加web和OpenAI的依赖。

编写配置文件
创建配置文件application.yaml,注意替换成自己的key和url。
spring:
  ai:
    openai:
      api-key: sk-xxxxx
      base-url: https://api.xxx.tech
创建controller
示例使用官网文档里面的就行。
Spring AI 官方文档
下面是我手动修改了一部分的代码。
@RestController
@RequestMapping("/ai")
public class ChatController {

    private final ChatClient chatClient;

    public ChatController(ChatClient.Builder chatClientBuilder) {
        this.chatClient = chatClientBuilder.build();
    }


    @GetMapping("/chat")
    String generation(@RequestParam(value = "message") String message ) {
        return this.chatClient.prompt()
                .user(message)
                .call()
                .content();
    }
}
启动并测试
可以看到测试是成功的。
 接下来是一些扩展的东西了。
角色预设
角色预设可以使用配置类进行全局预设,也可以单独预设。
1、全局预设
编写配置类
@Configuration
class Config {

    @Bean
    ChatClient chatClient(ChatClient.Builder builder) {
        return builder.defaultSystem("你现在是一个资深的游戏专家")
                .build();
    }

}
再修改一下controller 的 ChatClient 的注入方式。
@RestController
@RequestMapping("/ai")
public class ChatController {

    @Resource
    private  ChatClient chatClient;

    @GetMapping("/chat")
    String generation(@RequestParam(value = "message") String message ) {
        return this.chatClient.prompt()
                .user(message)
                .call()
                .content();
    }
}
增加了角色预设之后的结果。好像有了角色预设确实专业一点点。

2、单独预设
在call调用之前,调用system方法就能预设。
    @GetMapping("/chat")
    String chat(@RequestParam(value = "message") String message ) {
        return this.chatClient.prompt()
                .user(message)
                .system("你是游戏测评大师") // 单独预设角色
                .call()
                .content();
    }
流式响应\异步响应
让stream您获得异步响应,如下所示
    @GetMapping("/streamChat")
    Flux<String> streamChat(@RequestParam(value = "message") String message ) {
        Flux<String> output = chatClient.prompt()
                .user(message)
                .stream()
                .content();
        return output;
    }
在 1.0.0 M2 中,我们将提供一种便捷方法,让您使用反应式stream()方法返回 Java 实体。(当前使用的还是M1,M2还没出来)
在浏览器测试的话可能会出现乱码,解决方法是GetMapping注解增加produces属性。在PostMan测试并没有乱码。
@GetMapping(value = "/streamChat",produces = "text/html;charset=UTF-8")
ChatModel(聊天模型)
上面使用的是chatClient是AI模型最基本的功能,所以SpringAI对其做了封装,chatClient是和大模型是解耦的,不管使用哪个大模型,client都是能够使用的。而ChatModel接口确是大模型厂商自己实现的,当你引入starter时,它对应的AutoConfiguration会将ChatModel自动注入到Spring容器。
每个厂商的ChatOptions可能不一样,对应的需要去官网查看。
    @Resource
    private ChatModel chatModel;

    @GetMapping("/chat/model")
    String chatModel(@RequestParam(value = "message") String message ) {
        ChatResponse response = chatModel.call(
                new Prompt(
                        message,
                        OpenAiChatOptions.builder()
                                .withModel("gpt-4o")
                                .withTemperature(0.4f)
                                .build()
                ));
        return response.getResult().getOutput().getContent();
    }
ImageModel(文生图)
    @Resource
    private OpenAiImageModel openAiImageModel;

    @GetMapping("/text2Image")
    String text2Image(@RequestParam(value = "message") String message ){
        ImageResponse response = openAiImageModel.call(
                new ImagePrompt(message,
                        OpenAiImageOptions.builder()
                                .withQuality("hd") // hd表示高清
                                .withN(1) // 图片数量
                                .withHeight(1024) // 图片高度
                                .withWidth(1024).build()) // 图片宽度

        );
        return response.getResult().getOutput().getUrl(); // 支持返回base64格式的图片
    }
文生语音
和上面一样的套路,我直接把官网文档搬过来。
OpenAiAudioSpeechOptions speechOptions = OpenAiAudioSpeechOptions.builder()
    .withModel("tts-1")
    .withVoice(OpenAiAudioApi.SpeechRequest.Voice.ALLOY)
    .withResponseFormat(OpenAiAudioApi.SpeechRequest.AudioResponseFormat.MP3)
    .withSpeed(1.0f)
    .build();

SpeechPrompt speechPrompt = new SpeechPrompt("Hello, this is a text-to-speech example.", speechOptions);
SpeechResponse response = openAiAudioSpeechModel.call(speechPrompt);
语言翻译
OpenAiAudioApi.TranscriptResponseFormat responseFormat = OpenAiAudioApi.TranscriptResponseFormat.VTT;

OpenAiAudioTranscriptionOptions transcriptionOptions = OpenAiAudioTranscriptionOptions.builder()
    .withLanguage("en")
    .withPrompt("Ask not this, but ask that")
    .withTemperature(0f)
    .withResponseFormat(responseFormat)
    .build();
AudioTranscriptionPrompt transcriptionRequest = new AudioTranscriptionPrompt(audioFile, transcriptionOptions);
AudioTranscriptionResponse response = openAiTranscriptionModel.call(transcriptionRequest);
多模态
模态是指模型同时理解和处理来自各种来源的信息的能力,包括文本、图像、音频和其他数据格式。
Spring AI Message API 提供了支持多模式 LLM 所需的所有抽象。
 代码如下,可以上传图片问问题。
byte[] imageData = new ClassPathResource("/multimodal.test.png").getContentAsByteArray();

var userMessage = new UserMessage(
	"Explain what do you see in this picture?", // content
	List.of(new Media(MimeTypeUtils.IMAGE_PNG, imageData))); // media

ChatResponse response = chatModel.call(new Prompt(List.of(userMessage)));
Function Calling (函数调用第三方API)
人工智能模型中功能支持的集成,允许模型请求执行客户端功能,从而根据需要动态访问必要的信息或执行任务。
可以借助Function Calling实现动态的数据的获取,通过api接口返回的数据参与对话。
 想要使用Function,首先需要定义Function,并注册为Bean。
在下面的Function中我定义了一个三方接口,用来获取最新的彩票开奖号码。
package com.sifan.springai.function;


import com.fasterxml.jackson.annotation.JsonClassDescription;
import org.json.JSONObject;
import org.springframework.context.annotation.Description;
import org.springframework.http.ResponseEntity;
import org.springframework.stereotype.Component;
import org.springframework.web.client.RestTemplate;

import java.util.List;
import java.util.function.Function;

//@Description作用是可帮助 AI 模型确定要调用哪个客户端函数
@Description("获取最新通用中奖号码信息")
// Bean的名字是lotteryFunction
@Component(value = "lotteryFunction")
public class LotteryFunction implements Function<LotteryFunction.Request, LotteryFunction.Response>  {

    // 密封类,相当于加了Lombok的@Data注解的POJO类
    @JsonClassDescription("目前提供八种彩种,ssq:双色球,qlc:七乐彩,fc3d:福彩3D,cjdlt:超级大乐透,qxc:七星彩,pl3:排列3,pl5:排列(5),kl8:快乐8")
    public record Request(String code){}
    public record Response(String openCode){}

    @Override
    public Response apply(Request request) {
        // 判空
        if(request.code.equals("")){
            return new Response("参数为空,请输入彩票种类标识");
        }
        List<String> codeList = List.of("ssq", "qlc", "fc3d", "cjdlt", "qxc", "pl3", "pl5", "kl8");
        // 判断code是否在codeList中
        if(!codeList.contains(request.code)){
            return new Response("请输入正确的彩票种类标识,只支持:"+codeList);
        }
        String openCode = getOpenCode(request.code);
        return new Response(openCode);
    }

    /**
     * api接口文档地址:https://www.mxnzp.com/doc/detail?id=3
     *获取最新通用本期中奖号码
     * @param code 彩票种类标识,目前提供八种彩种,ssq:双色球,qlc:七乐彩,fc3d:福彩3D,cjdlt:超级大乐透,qxc:七星彩,pl3:排列3,pl5:排列(5),kl8:快乐8
     * @return
     */
    private String getOpenCode(String code){
        String url = String.format(
                "https://www.mxnzp.com/api/lottery/common/latest?code=%s&app_secret=%s&app_id=%s",
                code, getAppSecret(), getAppId());
        RestTemplate restTemplate = new RestTemplate();
        ResponseEntity<String> responseEntity = restTemplate.getForEntity(url, String.class);
        String body = responseEntity.getBody();
        JSONObject bodyJson = new JSONObject(body);
        JSONObject data =bodyJson.getJSONObject("data");
        return data.getString("openCode");
    }

    private String getAppSecret(){
        return "xxxxxx"; // 换成自己的
    }
    private String getAppId(){
        return "xxxxx";  // 换成自己的
    }
}
Controller层如何使用呢,在控制层只需要调用withFunction并且指定Bean名字就行。代码如下。
    @Resource
    private ChatModel chatModel;
    @GetMapping("/chat/model/fc")
    String chatModelFC(@RequestParam(value = "message") String message ) {
        ChatResponse response = chatModel.call(
                new Prompt(
                        message,
                        OpenAiChatOptions.builder()
                                .withFunction("lotteryFunction") // 这里指定Bean名字
                                .withModel("gpt-3.5-turbo")
                                .withTemperature(0.4f)
                                .build()
                ));
        return response.getResult().getOutput().getContent();
    }
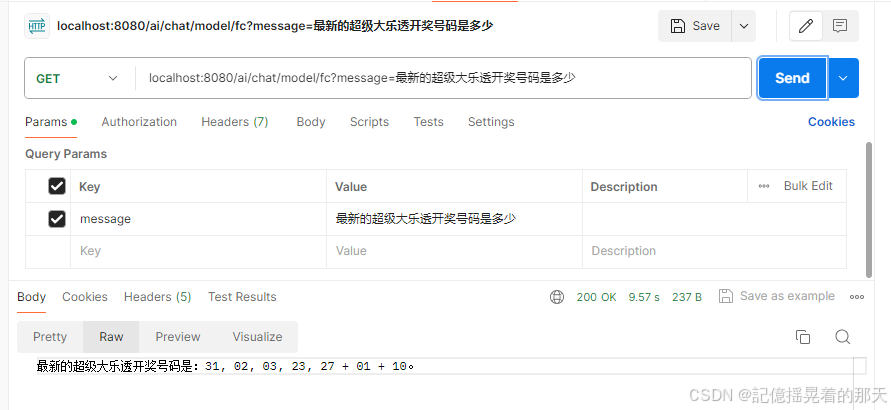
下面来测试一下。


 98
98

 被折叠的 条评论
为什么被折叠?
被折叠的 条评论
为什么被折叠?
 到【灌水乐园】发言


