


springBoot已经帮我们自动配好了各种组件当然也包括国际化资源文件的组件,当我们拓展使用时只需要重新注册组件即可
实现步骤
1.idea要设置properties的文件格式
2.创建国际化的配置文件
3.重新注册组件,并且使用
具体实现
第一步:设置properties的文件格式
如图,找到file->Settings 进行搜索file Encoding,这一步即可设置好当前的项目文件格式,为了一劳永逸然后继续设置OtherSetting->New for…->file Encoding。为以后创建新项目做准备。
 2.创建国际化的配置文件
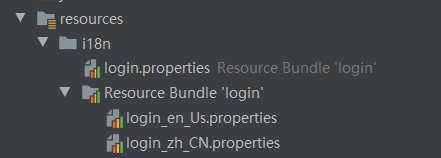
首先创建一个在resources中创建 i18n 文件夹,然后创建国际化的文件,如图
注意:最新版的idea2019.3已经不在是三个文件夹在一起了,而是默认文件在Resource Bundle "名称"之外,并且applicationConfig.properties也会根据此文件进行查找,务必保证该文件正确
文件内容
 3.重新注册组件,并且使用
1)、首先将前端页面设置好
 2)、进行引用,在applicationConfig.properties,一定要检查好路径有没有错,默认login.properties文件名称有没有错。本人因为名称错误导致的??Login_zh_CN??错误
spring.messages.basename=i18n.login
3)、重新编写组件并注册
 一定要看准确了,实现了那个接口,接口别写错了,别少个e
public class MyLocalResolver implements LocaleResolver {
    @Override
    public Locale resolveLocale(HttpServletRequest request) {
        String l = request.getParameter("l");
        Locale locale = Locale.getDefault();//根据浏览器默认
        if(!StringUtils.isEmpty(l)){
            String[] s = l.split("_");
            locale = new Locale(s[0],s[1]);
        }
        return locale;
    }
    @Override
    public void setLocale(HttpServletRequest httpServletRequest, HttpServletResponse httpServletResponse, Locale locale) {

    }
}
4)、进行注册
springboot2.x是这样写的,使用的implements Webconfigurer
@Configuration
public class MyConfig implements WebMvcConfigurer {
    @Bean
    public LocaleResolver localeResolver() {
        return new MyLocalResolver();
    }
}
springboot1.X 继承的是 WebMvcConfigurerAdapter
@Configuration
public class MyMvcConfig extends WebMvcConfigurerAdapter {
    @Bean
    public LocaleResolver localeResolver(){
        return new MyLocaleResolver();
    }
}
根据自己版本继承相应的即可


 941
941


 被折叠的 条评论
为什么被折叠?
被折叠的 条评论
为什么被折叠?
 到【灌水乐园】发言


