


在 Spring Boot 里使用 WebSocket
0 WebSocket 介绍
0.1 是什么
WebSocket是一种网络传输协议,可在单个TCP连接上进行全双工通信,位于OSI模型的应用层。WebSocket协议在2011年由IETF标准化为RFC 6455,后由RFC 7936补充规范。Web IDL中的WebSocket API由W3C标准化。
WebSocket使得客户端和服务器之间的数据交换变得更加简单,允许服务端主动向客户端推送数据。在WebSocket API中,浏览器和服务器只需要完成一次握手,两者之间就可以建立持久性的连接,并进行双向数据传输。
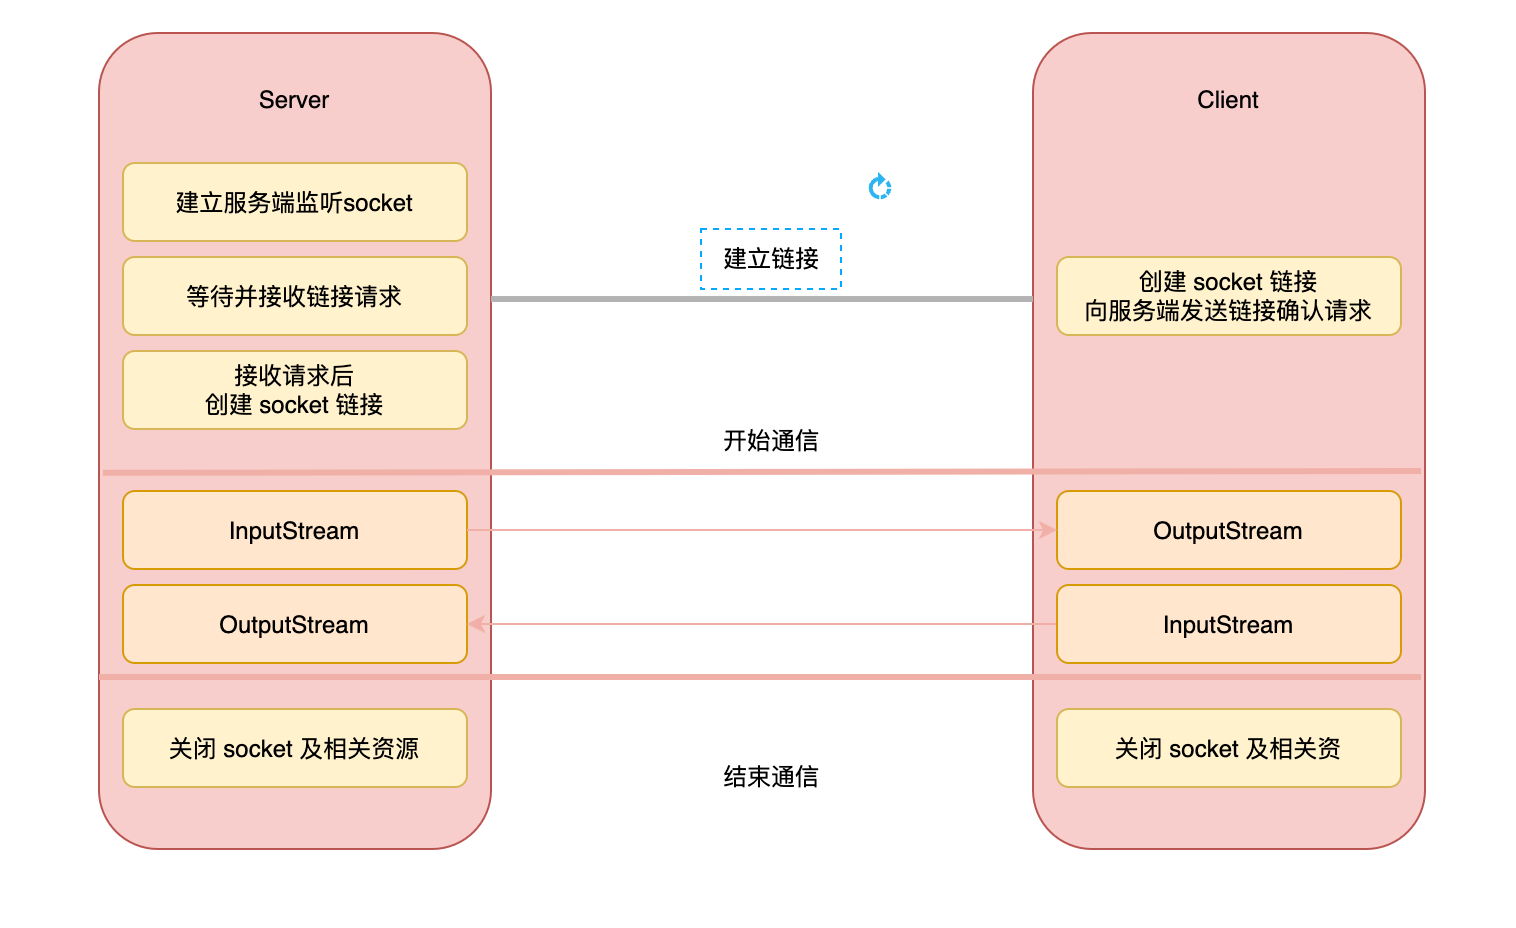
Socket 通信模型
0.2 有什么用
我们常使用它的两个功能:
-
全双工
全双工的特性使它支持从服务器向客户端主动的发送消息
-
长链接
不同于 http 协议一次交互建立一次链接的短链接,webSocket 的链接是长期有效的,我们可以在数据发送变化时,主动、及时的通知客户端进行处理
1 使用
引入依赖
<dependency>
       <groupId>org.springframework.boot</groupId>
       <artifactId>spring-boot-starter-websocket</artifactId>
</dependency>
编写配置类,开启 WebSocket
@Configuration
@EnableWebSocket
public class WebSocketConfig {

    @Bean
    public ServerEndpointExporter serverEndpointExporter() {
        return new ServerEndpointExporter();
    }
}
接入点类
/**
 * @ServerEndpoint 注解是一个类层次的注解,它的功能主要是将目前的类定义成一个 webSocket 服务器端,
 * 注解的值将被用于监听用户连接的终端访问 URL 地址,客户端可以通过这个 URL 来连接到 webSocket 服务器端(类似于@PostMapping)
 */
@ServerEndpoint("/websocket/{userId}")
@Slf4j
public class WebSocketTest {

    private static ConcurrentHashMap<String, CopyOnWriteArraySet<WebSocketTest>> userWebSocketMap = new ConcurrentHashMap<String, CopyOnWriteArraySet<WebSocketTest>>();

    private static ConcurrentHashMap<String, Integer> count = new ConcurrentHashMap<String, Integer>();

    private String userId;


    /*
     * 与某个客户端的连接会话,需要通过它来给客户端发送数据
     */
    private Session session;

    /**
     * 连接建立成功时被调用的方法
     *
     * @param session 可选的参数。session为与某个客户端的连接会话,需要通过它来给客户端发送数据
     */
    @OnOpen
    public void onOpen(Session session, @PathParam("userId") final String userId) {
        this.session = session;
        this.userId = userId;
        if (!exitUser(userId)) {
            initUserInfo(userId);
        } else {
            CopyOnWriteArraySet<WebSocketTest> webSocketTestSet = getUserSocketSet(userId);
            webSocketTestSet.add(this);
            userCountIncrease(userId);
        }
        log.info("有" + userId + "新连接加入!当前在线人数为" + getCurrUserCount(userId));
    }


    /**
     * 连接关闭时被调用的方法
     */
    @OnClose
    public void onClose() {
        CopyOnWriteArraySet<WebSocketTest> webSocketTestSet = userWebSocketMap.get(userId);
        // 从 set 中删除
        webSocketTestSet.remove(this);
        // 在线数减1
        userCountDecrement(userId);
        log.info("有一连接关闭!当前在线人数为" + getCurrUserCount(userId));
    }

    /**
     * 收到客户端消息后被调用的方法
     *
     * @param message 客户端发送过来的消息
     * @param session 可选的参数
     */
    @OnMessage
    public void onMessage(String message, Session session) {
        CopyOnWriteArraySet<WebSocketTest> webSocketSet = userWebSocketMap.get(userId);
        System.out.println("来自客户端" + userId + "的消息:" + message);
        // 群发消息
        for (WebSocketTest item : webSocketSet) {
            try {
                item.sendMessage(message);
            } catch (IOException e) {
                log.error(e.printStackTrace());
                continue;
            }
        }
    }

    /**
     * 发生错误时被调用
     *
     * @param session
     * @param error
     */
    @OnError
    public void onError(Session session, Throwable error) {
        System.out.println("发生错误");
        log.error(e.printStackTrace());
    }

    public void sendMessage(String message) throws IOException {
        this.session.getBasicRemote().sendText(message);
    }


    public boolean exitUser(String userId) {
        return userWebSocketMap.containsKey(userId);
    }

    public CopyOnWriteArraySet<WebSocketTest> getUserSocketSet(String userId) {
        return userWebSocketMap.get(userId);
    }

    public void userCountIncrease(String userId) {
        if (count.containsKey(userId)) {
            count.put(userId, count.get(userId) + 1);
        }
    }


    public void userCountDecrement(String userId) {
        if (count.containsKey(userId)) {
            count.put(userId, count.get(userId) - 1);
        }
    }

    public void removeUserConunt(String userId) {
        count.remove(userId);
    }

    public Integer getCurrUserCount(String userId) {
        return count.get(userId);
    }

    private void initUserInfo(String userId) {
        CopyOnWriteArraySet<WebSocketTest> webSocketTestSet = new CopyOnWriteArraySet<WebSocketTest>();
        webSocketTestSet.add(this);
        userWebSocketMap.put(userId, webSocketTestSet);
        count.put(userId, 1);
    }

}
标注 @OnOpen、@OnClose、@OnMessage、@OnError 几个注解的方法会由 tomcat 在对应的时候主动调用。
CopyOnWriteArraySet<WebSocketTest> 保存了同一个用户的不同 WebSocket 连接实例和对应的 Session 对象,即客户打开的多个标签页或浏览器。保证了每个用户享有自己的 Session 记录表,所有的 Session 都能收到相同的消息。
2 注入 Spring 管理的 Bean
Spring 默认对 Bean 的管理都是单例(singleton),和 websocket (多对象)相冲突。
项目启动时初始化,会初始化 WebSocket (非用户连接的),Spring 同时会为其注入 Bean,该对象的 Bean 不是 null,被成功注入。但是,由于 Spring 默认管理的是单例,所以只会注入一次 Bean。当用户建立新的连接时,系统又会创建一个新的 WebSocket 对象,这时不会再次注入了,所以导致只要是用户连接创建的 WebSocket 对象,都不能再注入了,后面的注入均为 null。
通过使用 static 关键字加 set 注入
@ServerEndpoint("/websocket/{userId}")
@Slf4j
@Component // @1
public class WebSocketTest {
    private static UserService userService; // @2

    @Autowired  // @3
    public void setUserService (UserService userService){
        WebSocketTest.userService = userService;
    }
   // 略去其他代码...
}
通过使用 static 关键字加 @PostConstruct 注入
@ServerEndpoint("/websocket/{userId}")
@Component  // @1
public class WebSocket {

    @Autowired
    private UserService userService;

    private static WebSocketTest webSocketTest; // @2

    @PostConstruct  // @3
    public void init(){
        WebSocketTest = this;
    }
    // 略去其他代码...
}
通过 WebSocketConfig 注入
@ServerEndpoint("/websocket/{userId}")
@Slf4j
@Component // @1
public class WebSocketTest {
    private static UserService userService; // @2

    @Autowired  // @3
    public void setUserService (UserService userService){
        WebSocketTest.userService = userService;
    }
   // 略去其他代码...
}
@Configuration
@EnableWebSocket
public class WebSocketConfig {
    @Bean
    public ServerEndpointExporter serverEndpointExporter() {
      return new ServerEndpointExporter();
    }
    @Autowired
    public void setUserService(UserService userService) {
      WebSocketTest.userService = userService;
    }
}
通过 Aware 注入
@ServerEndpoint("/websocket/{userId}")
@Component  // @1
public class WebSocket {

    private static UserService userService =  SpringContextHolder.getBean(UserService.class); // @2

    //略去其他代码...
}
@Component
public class SpringContextHolder implements ApplicationContextAware, DisposableBean {

    private static ApplicationContext applicationContext = null;


    /**
     * 取得存储在静态变量中的 ApplicationContext.
     */
    public static ApplicationContext getApplicationContext() {
        assertContextInjected();
        return applicationContext;
    }

    /**
     * 从静态变量 applicationContext 中取得 Bean, 自动转型为所赋值对象的类型.
     */
    @SuppressWarnings("unchecked")
    public static <T> T getBean(String name) {
        assertContextInjected();
        return (T) applicationContext.getBean(name);
    }

    /**
     * 从静态变量 applicationContext 中取得 Bean, 自动转型为所赋值对象的类型.
     */
    public static <T> T getBean(Class<T> requiredType) {
        assertContextInjected();
        return applicationContext.getBean(requiredType);
    }

    /**
     * 清除 SpringContextHolder 中的 ApplicationContext 为 Null.
     */
    public static void clearHolder() {
        applicationContext = null;
    }

    /**
     * 实现 ApplicationContextAware 接口, 注入 Context 到静态变量中.
     */
    @Override
    public void setApplicationContext(ApplicationContext appContext) {
        applicationContext = appContext;
    }

    /**
     * 实现 DisposableBean 接口, 在 Context 关闭时清理静态变量.
     */
    @Override
    public void destroy() throws Exception {
        SpringContextHolder.clearHolder();
    }

    /**
     * 检查 ApplicationContext 不为空.
     */
    private static void assertContextInjected() {
        Validate.validState(applicationContext != null, "applicaitonContext 属性未注入, 请在 applicationContext.xml 中定义 SpringContextHolder.");
    }
}


 2010
2010

 被折叠的 条评论
为什么被折叠?
被折叠的 条评论
为什么被折叠?
 到【灌水乐园】发言


