


目录
1.配置上传目录;
在SpringBoot项目中;
在application.yml中配置需要上传到本地磁盘的目录:

图1-1
upload:
  directory: D:\Pictures\
# 这里需要注意的是:因为是要在该目录下保存文件,要在目录的最后加上一个反斜杠,不要忘记;
2.编写一个可以上传图片的接口;
编写上传图片文件的接口:
@RestController
public class FileUploadController {

    @Value("${upload.directory}") // 使用Spring框架的注解@Value获取(参数一般都是EL表达式),配置文件中规定的上传目录;
    private String  uploadDirectory; // 将注解获取的上传目录,保存在uploadDirectory变量中;

    @PostMapping("/upload/image")
    @CrossOrigin // 支持跨域;
    public ResponseEntity<String> uploadImage(@RequestParam("image") MultipartFile image) {
                                                                    // 接收上传文件的类型为 MultipartFile;
        if (image.isEmpty()) {
            return ResponseEntity.badRequest().body("请选择要上传的文件");
        }

        try {
            // 保存文件到指定目录
            String fileName = image.getOriginalFilename();
            String upFileDate = new SimpleDateFormat("yyyy-MM-dd_HH-mm-ss").format(new Date());
            Path filePath = Paths.get(uploadDirectory + upFileDate + fileName);
            Files.copy(image.getInputStream(), filePath);

            // 返回文件访问URL
            String fileUrl = "http://192.168.1.101:8181/image?imageName=" + upFileDate + fileName; // 修改为你的文件访问URL
            return ResponseEntity.ok().body("{\"url\": \"" + fileUrl + "\"}");
        } catch (IOException e) {
            e.printStackTrace();
            return ResponseEntity.status(500).body("文件上传失败: " + e.getMessage());
        }
    }
}
3.编写一个可以访问已上传图片的接口;
访问上传文件:
@GetMapping(value = "/image", produces = MediaType.IMAGE_JPEG_VALUE) // 注意注解的参数,produces = MediaType.IMAGE_JPEG_VALUE
@SneakyThrows // 抛出异常;
public byte[] getImage(String imageName) {
        // 图片文件路径
//        String imagePath = uploadDirectory + "/cat.jpg"; // √
//        String imagePath = uploadDirectory + "/dynamic_pic.gif"; // √ img标签也支持返回本地磁盘路径和图片的访问方式;
        String imagePath = uploadDirectory + imageName; // √ img标签也支持返回本地磁盘路径和图片的访问方式;

        // 读取图片文件并返回字节数组
        File file = new File(imagePath);
        // log.info("Reading image file: {}", file.getAbsolutePath()); // Reading image file: D:\Pictures\Camera Roll\cat.jpg
        // log.info("Reading image file content: {}", Files.readAllBytes(file.toPath())); // Reading image file content: [-1, -40, -1, -32, 0, 16, 74 ... ]
        return Files.readAllBytes(file.toPath());
    }
4.使用postman工具测试;
使用postman测试:

图1-2
如图1-2所示:
使用Post方法上传图片,URL写好之后,要注意Body选项中的选择;
选择form-data,参数和上传接口定义的参数名一样image;
特别的,这里的参数类型要选择File;之后可以在参数后面选择要上传的图片。
如果服务器上面使用了鉴权,需要在Authorization选项下面添加token;
点击Send按钮,如果逻辑没有问题,后端会返回一个json对象,
对应的url值可以访问图片;
如图1-3所示:
可以通过服务器访问上传到服务器的图片;
直接点击如上图1-2的url值,postman会打开一个标签,创建一个Get请求访问图片;
这是使用工具给我们带来的便利;
最后在postman创建的请求标签里面点击Send即可访问;
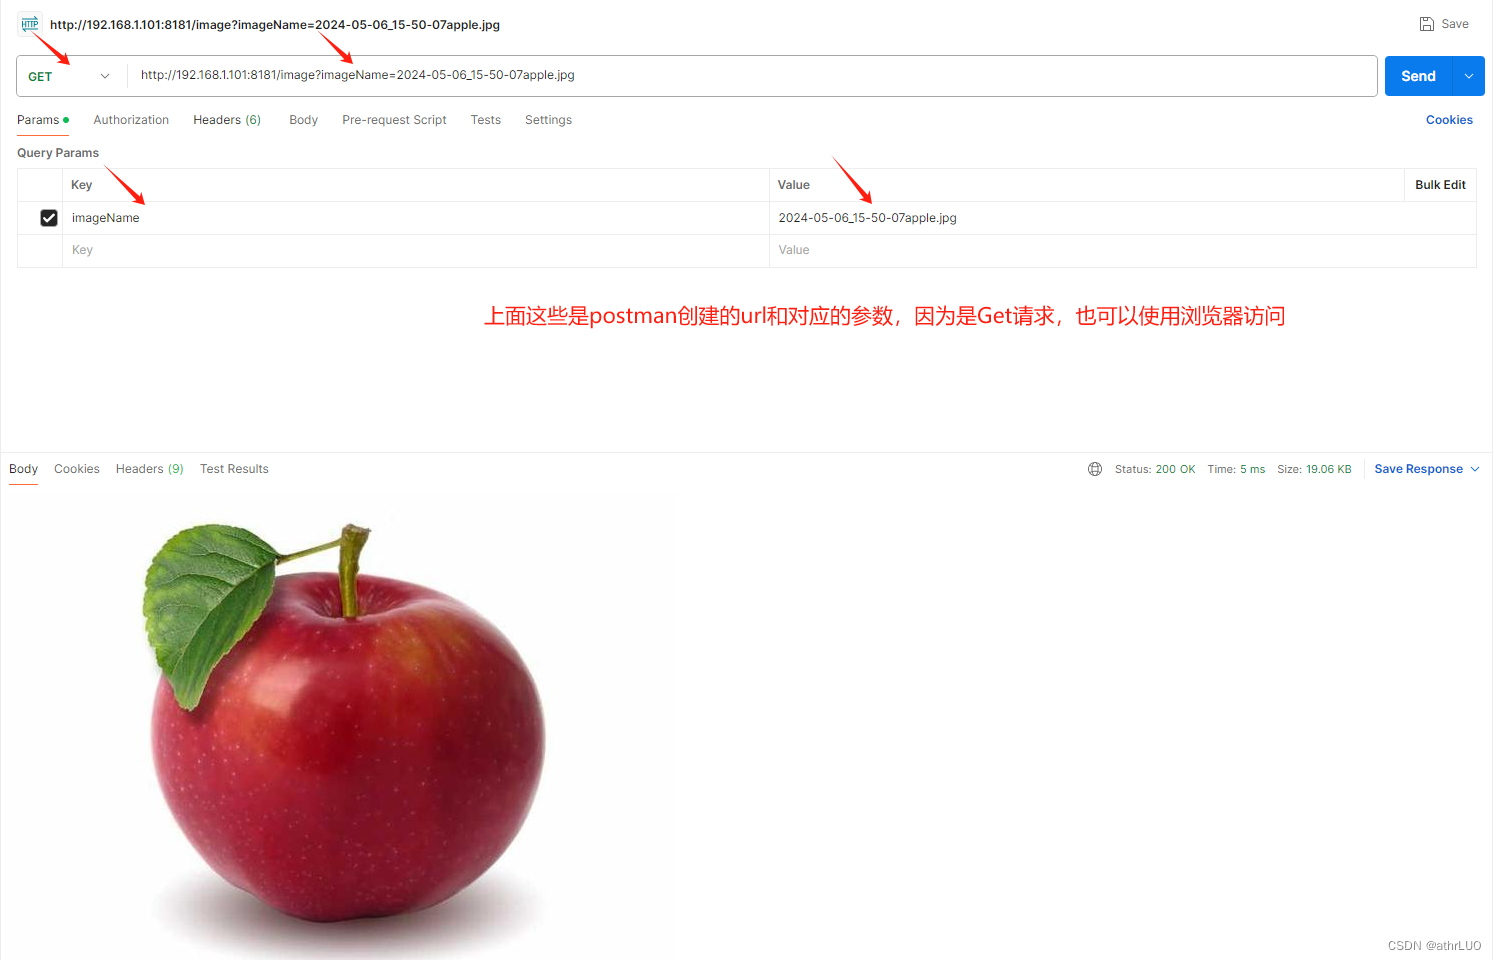
图1-3
5.使用浏览器访问;
使用浏览器访问:

6.对比之前的目录文件;
最后我们查看上传到对应目录的图片:

图1-4
比较图1-1和1-4,容易发现我们正确的上传了指定的图片到规定的目录下;
至此,我们完整的实现了上传图片到服务器,并访问图片的功能;


 1809
1809


 被折叠的 条评论
为什么被折叠?
被折叠的 条评论
为什么被折叠?
 到【灌水乐园】发言


