


【注解解释】
@Configuration   //表示这是一个config配置文件
@ConfigurationProperties(prefix = "spring.datasource")  //自动把yml文件中的配置信息set进去
prefix = "spring.datasource"这个是有yml中的前缀


同时也可以这样进行配置,一般情况下不推荐

1.https配置
1.打开cmd窗口,输入如下命令
/** server是自己起的别名
keytool -genkey -alias tomcat -keyalg RSA -keystore ./server.keystore

2.创建完成后,可在用户根目录查看生成的keystore文件

3.新建完成后,配置yml文件

server.port=443
server.ssl.key-store=server.keystore   //自己起的别名
server.ssl.key-alias=tomcat
server.ssl.enabled=true
server.ssl.key-store-password=123456   //自己的密码
server.ssl.key-store-type=JKS
4.将keystore文件复制到根目录下和pom同级

5.注意点
若是Controller层有东西需要删除或者注释

6.页面显示

2.http访问自动转https访问
注入两个bin
  @Bean
    public Connector connector(){
        Connector connector=new Connector("org.apache.coyote.http11.Http11NioProtocol");
        connector.setScheme("http");
        connector.setPort(80);
        connector.setSecure(false);
        connector.setRedirectPort(443);
        return connector;
    }

@Bean
public TomcatServletWebServerFactory tomcatServletWebServerFactory(Connector connector){
    TomcatServletWebServerFactory tomcat=new TomcatServletWebServerFactory(){
        @Override
        protected void postProcessContext(Context context) {
            SecurityConstraint securityConstraint=new SecurityConstraint();
            securityConstraint.setUserConstraint("CONFIDENTIAL");
            SecurityCollection collection=new SecurityCollection();
            collection.addPattern("/*");
            securityConstraint.addCollection(collection);
            context.addConstraint(securityConstraint);
        }
    };
    tomcat.addAdditionalTomcatConnectors(connector);
    return tomcat;
}
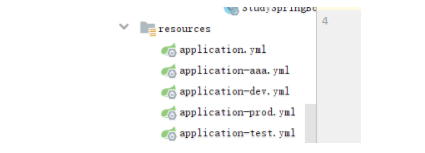
2.spring-boot-profiles多环境配置
server:
  port: 8080    //每个yml端口不一样

application.yml用来测试
根据启动的yml不同端口不同,这里显示的端口也不同

在一个yml中匹配
spring:
profiles:
active: test
---
server:
port: 8080
spring:
profiles: dev
---
server:
port: 8081
spring:
profiles: prod
---
server:
port: 8082
spring:
profiles: test
---
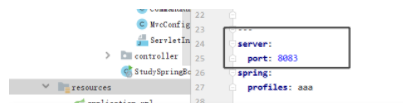
server:
port: 8083
spring:
profiles: aaa
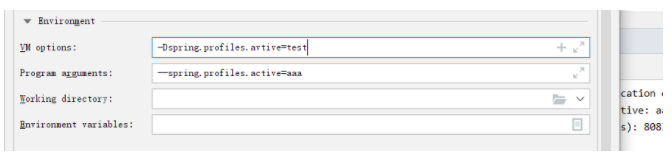
激活指定 Profile

--spring.profiles.active=aaa   //此处为--
Program arguments优先级高于VM
3.SpringBoot与整合Mybatis
- 添加Mybatis的起步依赖
<!--mybatis起步依赖-->
<dependency>
    <groupId>org.mybatis.spring.boot</groupId>
    <artifactId>mybatis-spring-boot-starter</artifactId>
    <version>2.1.2</version>
</dependency>
<!-- MySQL连接驱动 -->
<dependency>
    <groupId>mysql</groupId>
    <artifactId>mysql-connector-java</artifactId>
</dependency>
<dependency>
    <groupId>org.projectlombok</groupId>
    <artifactId>lombok</artifactId>
</dependency>
- 添加数据库连接信息
在application.properties中添加数据量的连接信息
#DB Configuration:
spring:
  datasource:
   url: jdbc:mysql://127.0.0.1:3306/ssm?characterEncoding=utf8&useSSL=false&serverTimezone=UTC&rewriteBatchedStatements=true
   driver-class-name: com.mysql.cj.jdbc.Driver
   username: root
   password: root
整合项目步骤
1.配置pom
<!--mybatis起步依赖-->
<dependency>
    <groupId>org.mybatis.spring.boot</groupId>
    <artifactId>mybatis-spring-boot-starter</artifactId>
    <version>2.1.2</version>
</dependency>
<!-- MySQL连接驱动 -->
<dependency>
    <groupId>mysql</groupId>
    <artifactId>mysql-connector-java</artifactId>
    <version>5.1.37</version>
</dependency>
<dependency>
    <groupId>org.projectlombok</groupId>
    <artifactId>lombok</artifactId>
</dependency>
2.配置application.yml
【注意】
mapper-locations必须加s
#DB Configuration:
spring:
  datasource:
    url: jdbc:mysql://127.0.0.1:3306/xinzhishopa?characterEncoding=utf8&useSSL=false&serverTimezone=UTC&rewriteBatchedStatements=true
    driver-class-name: com.mysql.jdbc.Driver
    username: root
    password: Root123456
mybatis:
  mapper-locations: mapper/*.xml
  type-aliases-package: com.xinzhi.studyspringboot.entity
3.构建entity
package com.xinzhi.studyspringboot.entity;

import lombok.AllArgsConstructor;
import lombok.Data;
import lombok.NoArgsConstructor;

import java.io.Serializable;

/**
 * @author LZP
 * @create 2020/6/11
 */
@Data
@AllArgsConstructor
@NoArgsConstructor
public class User implements Serializable {
    private int id;
    private String username;
    private String password;
}
4.构建dao层
package com.xinzhi.studyspringboot.dao;

import com.xinzhi.studyspringboot.entity.User;
import org.apache.ibatis.annotations.Mapper;
import java.util.List;

/**
 * @author LZP
 * @create 2020/6/11
 */
@Mapper
public interface UserMapper {
    /**
     * 查询用户
     * @return
     */
    List<User> queryUserList();
}
5.新建service层接口IUserService和impl
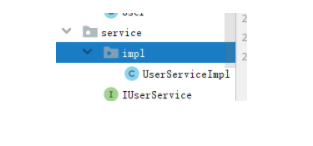
实现
package com.xinzhi.studyspringboot.service.impl;

import com.xinzhi.studyspringboot.dao.UserMapper;
import com.xinzhi.studyspringboot.entity.User;
import com.xinzhi.studyspringboot.service.IUserService;
import org.springframework.stereotype.Service;

import javax.annotation.Resource;
import java.util.List;

/**
 * @author LZP
 * @create 2020/6/11
 */
@Service
public class UserServiceImpl implements IUserService {
    @Resource
    private UserMapper userMapper;

    @Override
    public List<User> queryUserList() {
        return userMapper.queryUserList();
    }
}
接口
package com.xinzhi.studyspringboot.service;

import com.xinzhi.studyspringboot.entity.User;
import org.springframework.stereotype.Service;

import java.util.List;

/**
 * @author LZP
 * @create 2020/6/11
 */
public interface IUserService {
    /**
     * 查询用户
     *
     * @return
     */
    List<User> queryUserList();
}
6.建立mapper层
<?xml version="1.0" encoding="utf-8" ?>
<!DOCTYPE mapper PUBLIC "-//mybatis.org//DTD Mapper 3.0//EN"
        "http://mybatis.org/dtd/mybatis-3-mapper.dtd" >
<mapper namespace="com.xinzhi.studyspringboot.dao.UserMapper">
    <select id="queryUserList" resultType="com.xinzhi.studyspringboot.entity.User">
        select * from user
    </select>
</mapper>
7.建立controlller层
package com.xinzhi.studyspringboot.controller;

import com.xinzhi.studyspringboot.entity.User;
import com.xinzhi.studyspringboot.service.IUserService;
import org.springframework.stereotype.Controller;
import org.springframework.web.bind.annotation.GetMapping;
import org.springframework.web.bind.annotation.RequestMapping;
import org.springframework.web.bind.annotation.ResponseBody;

import javax.annotation.Resource;
import java.util.List;

/**
 * @author LZP
 * @create 2020/6/10
 */
@Controller
@RequestMapping("/user")
public class UserController {

    @Resource
    private IUserService userService;

    @GetMapping
    @ResponseBody
    public List<User> getUsers(){
        return userService.queryUserList();
    }
}
nice 我成功了 你给我点个赞不好么?

扫包


4.整合德鲁伊数据源
1.pom
<!--德鲁伊-->
<dependency>
    <groupId>com.alibaba</groupId>
    <artifactId>druid</artifactId>
    <version>1.1.18</version>
</dependency>
2.yml配置
【注意】:子级目录必须对齐,比如username和password是同级所以必须对齐
#DB Configuration:
spring:
  datasource:
      username: root
      password: Root123456
      driver-class-name: com.mysql.jdbc.Driver
      url: jdbc:mysql://127.0.0.1:3306/xinzhishopa?characterEncoding=utf8&useSSL=false&serverTimezone=UTC&rewriteBatchedStatements=true
      type: com.alibaba.druid.pool.DruidDataSource
      #   数据源其他配置
      initialSize: 5
      minIdle: 5
      maxActive: 20
      maxWait: 60000
      timeBetweenEvictionRunsMillis: 60000
      minEvictableIdleTimeMillis: 300000
      validationQuery: SELECT 1 FROM DUAL
      testWhileIdle: true
      testOnBorrow: false
      testOnReturn: false
      poolPreparedStatements: true
      #   配置监控统计拦截的filters,去掉后监控界面sql无法统计,'wall'用于防火墙
      filters: stat,wall
      maxPoolPreparedStatementPerConnectionSize: 20
      useGlobalDataSourceStat: true
      connectionProperties: druid.stat.mergeSql=true;druid.stat.slowSqlMillis=500
说明德鲁伊启动了

/**
     * 配置监控
     * @return
     */
    @Bean
    public ServletRegistrationBean statViewServlet(){
        ServletRegistrationBean bean = new ServletRegistrationBean(new StatViewServlet(), "/druid/*");
        HashMap<String, String> map = new HashMap<>(2);
        map.put("loginUsername","xinzhi");   //账号和密码是可以自己设置的
        map.put("loginPassword","123456");
        bean.setInitParameters(map);
        return bean;
    }

    @Bean
    public FilterRegistrationBean webStatFilter(){
        FilterRegistrationBean<Filter> bean = new FilterRegistrationBean<>();
        bean.setFilter(new WebStatFilter());
        HashMap<String, String> map = new HashMap<>(8);
        map.put("exclusions","*.js");
        bean.setInitParameters(map);
        bean.setUrlPatterns(Arrays.asList("/*"));
        return bean;
    }

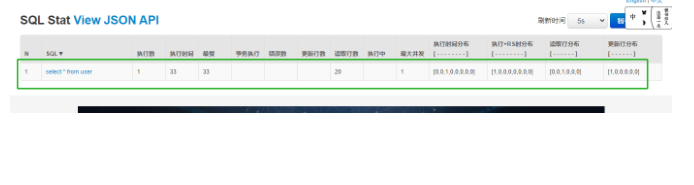
当你执行的时候比如说mapper sql。


 505
505


 被折叠的 条评论
为什么被折叠?
被折叠的 条评论
为什么被折叠?
 到【灌水乐园】发言


