


第一步
登陆高德开放平台,申请密钥
第二步
安装高德地图加载器
npm i @amap/amap-jsapi-loader --save第三步
在index.html中引入
 <!-- 解决逆地理编码,根据经纬度获取地址信息 -->
    <script type="text/javascript">
      window._AMapSecurityConfig = {
        securityJsCode: '你的安全密钥', //所申请的安全密钥 注意这是安全密钥而不是key
      }
    </script>
第四步
点标记获取详细地址和天气信息
<template>
  <div id="container" class="container"></div>
  <div class="weather">
    <a-card title="实时天气" v-if="state.weather">
      <p>城市/区:{{ state.weather?.province + '/' + state.weather?.city }}</p>
      <p>天气:{{ state.weather?.weather }}</p>
      <p>温度:{{ state.weather?.temperature }}℃</p>
      <p>风向:{{ state.weather?.windDirection }}</p>
      <p>风力:{{ state.weather?.windPower }}级</p>
      <p>空气湿度:{{ state.weather?.humidity }}</p>
      <p>发布时间:{{ state.weather?.reportTime }}</p>
    </a-card>
  </div>
  <div class="toolbar">
    <a-card title="点击获取经纬度">
      <div class="toolbar-item">
        <a-input :value="state.point[0]" addon-before="lng" />
        <a-input :value="state.point[1]" addon-before="lat" />
      </div>
      <a-input :value="state.address" addon-before="地址" />
    </a-card>
  </div>
</template>

<script setup lang="ts">
import AMapLoader from '@amap/amap-jsapi-loader'
import { message } from 'ant-design-vue'
import { onMounted, reactive } from 'vue'

const state = reactive<any>({
  center: [116.397778, 39.908472], // 地图中心点
  point: [116.397778, 39.908472], // 经纬度-lng lat
  map: null, // 地图实例
  marker: null, // 地图icon
  geocoder: null, // 逆解析实例
  address: '北京市东城区东华门街道天安门-城楼', // 地址
  weatherCity: '东城区',
  weather: null,
})

onMounted(() => {
  initMap()
})

/**
 * DOM初始化完成进行地图初始化
 */
const initMap = () => {
  AMapLoader.load({
    key: '你的key', // 申请好的Web端开发者Key,首次调用 load 时必填
    version: '2.0', // 指定要加载的 JSAPI 的版本,缺省时默认为 1.4.15
    // 需要使用的的插件列表
    plugins: [
      'AMap.Geocoder', // 逆向地理解码插件
      'AMap.Marker', // 点标记插件
    ],
  })
    .then((AMap) => {
      state.map = new AMap.Map('container', {
        viewMode: '3D', // 地图视图模式,默认为‘2D’,可选’3D’,选择‘3D’会显示 3D 地图效果。
        zoom: 12, // 地图显示的缩放级别
        center: state.center, // 初始化地图中心点位置
      })
      // 如果父组件传入了有效值 回显一个icon
      if (state.point.length > 0) {
        addMarker(AMap)
      }
      // 获取天气
      getWeather(AMap)
      // 监听用户的点击事件
      state.map.on('click', (e: any) => {
        state.point = [e.lnglat.lng, e.lnglat.lat]
        // 增加点标记
        addMarker(AMap)
        // 获取地址
        getAddress(AMap)
      })
    })
    .catch((e) => {
      message.error(e)
    })
}

/**
 * 增加点标记
 * @param AMap AMap
 */
const addMarker = (AMap: any) => {
  // 清除其他icon
  if (state.marker) {
    state.marker.setMap(null)
    state.marker = null
  }
  // 重新渲染icon
  state.marker = new AMap.Marker({
    icon: '//a.amap.com/jsapi_demos/static/demo-center/icons/poi-marker-default.png',
    size: new AMap.Size(53, 68), // 图标大小
    imageSize: new AMap.Size(53, 68),
    position: state.point, // icon经纬度
    offset: new AMap.Pixel(-28, -60), // icon中心点的偏移量
  })
  state.marker.setMap(state.map) // 设置icon
}

/**
 * 将经纬度转换为地址
 * @param AMap AMap
 */
const getAddress = (AMap: any) => {
  // 这里通过高德 SDK 完成。
  state.geocoder = new AMap.Geocoder({
    city: '全国', // 地理编码时,设置地址描述所在城市; 默认全国; 可选值:城市名(中文或中文全拼)、citycode、adcode
    radius: 3000, // 逆地理编码时,以给定坐标为中心点; 默认1000; 取值范围(0-3000)
    extensions: 'all', // 逆地理编码时,返回信息的详略; 默认值:base,返回基本地址信息; 默认值:base,返回基本地址信息
  })
  // 调用逆解析方法 个人开发者调用量上限5000(次/日)
  state.geocoder.getAddress(state.point, function (status: any, result: any) {
    if (status === 'complete' && result.regeocode) {
      state.address = result.regeocode.formattedAddress
      AMap.plugin('AMap.Weather', function () {
        if (
          result.info === 'OK' &&
          result.regeocode.addressComponent.district
        ) {
          state.weatherCity = result.regeocode.addressComponent.district
          // 获取天气
          getWeather(AMap)
        } else {
          message.error('根据地址查询天气失败,请重新选择!')
        }
      })
    } else {
      message.error('根据地址查询位置失败,请重新选择!')
    }
  })
}

/**
 * 获取天气
 * @param AMap AMap
 */
const getWeather = (AMap: any) => {
  AMap.plugin('AMap.Weather', function () {
    const weather = new AMap.Weather()
    // 执行实时天气信息查询
    weather.getLive(state.weatherCity, function (err: any, data: any) {
      if (data) {
        state.weather = data
      } else {
        message.error(err)
      }
    })
  })
}
</script>

<style lang="less" scoped>
.container {
  position: relative;
  width: 100%;
  height: 100%;
  border: 10px solid #ececec;
}
.toolbar {
  position: absolute;
  right: 10px;
  bottom: 10px;
  z-index: 99;
  max-width: 500px;
  .toolbar-item {
    display: flex;
    margin-bottom: 15px;
  }
}
.weather {
  position: absolute;
  right: 10px;
  bottom: 210px;
  z-index: 99;
}
</style>
效果图如下:

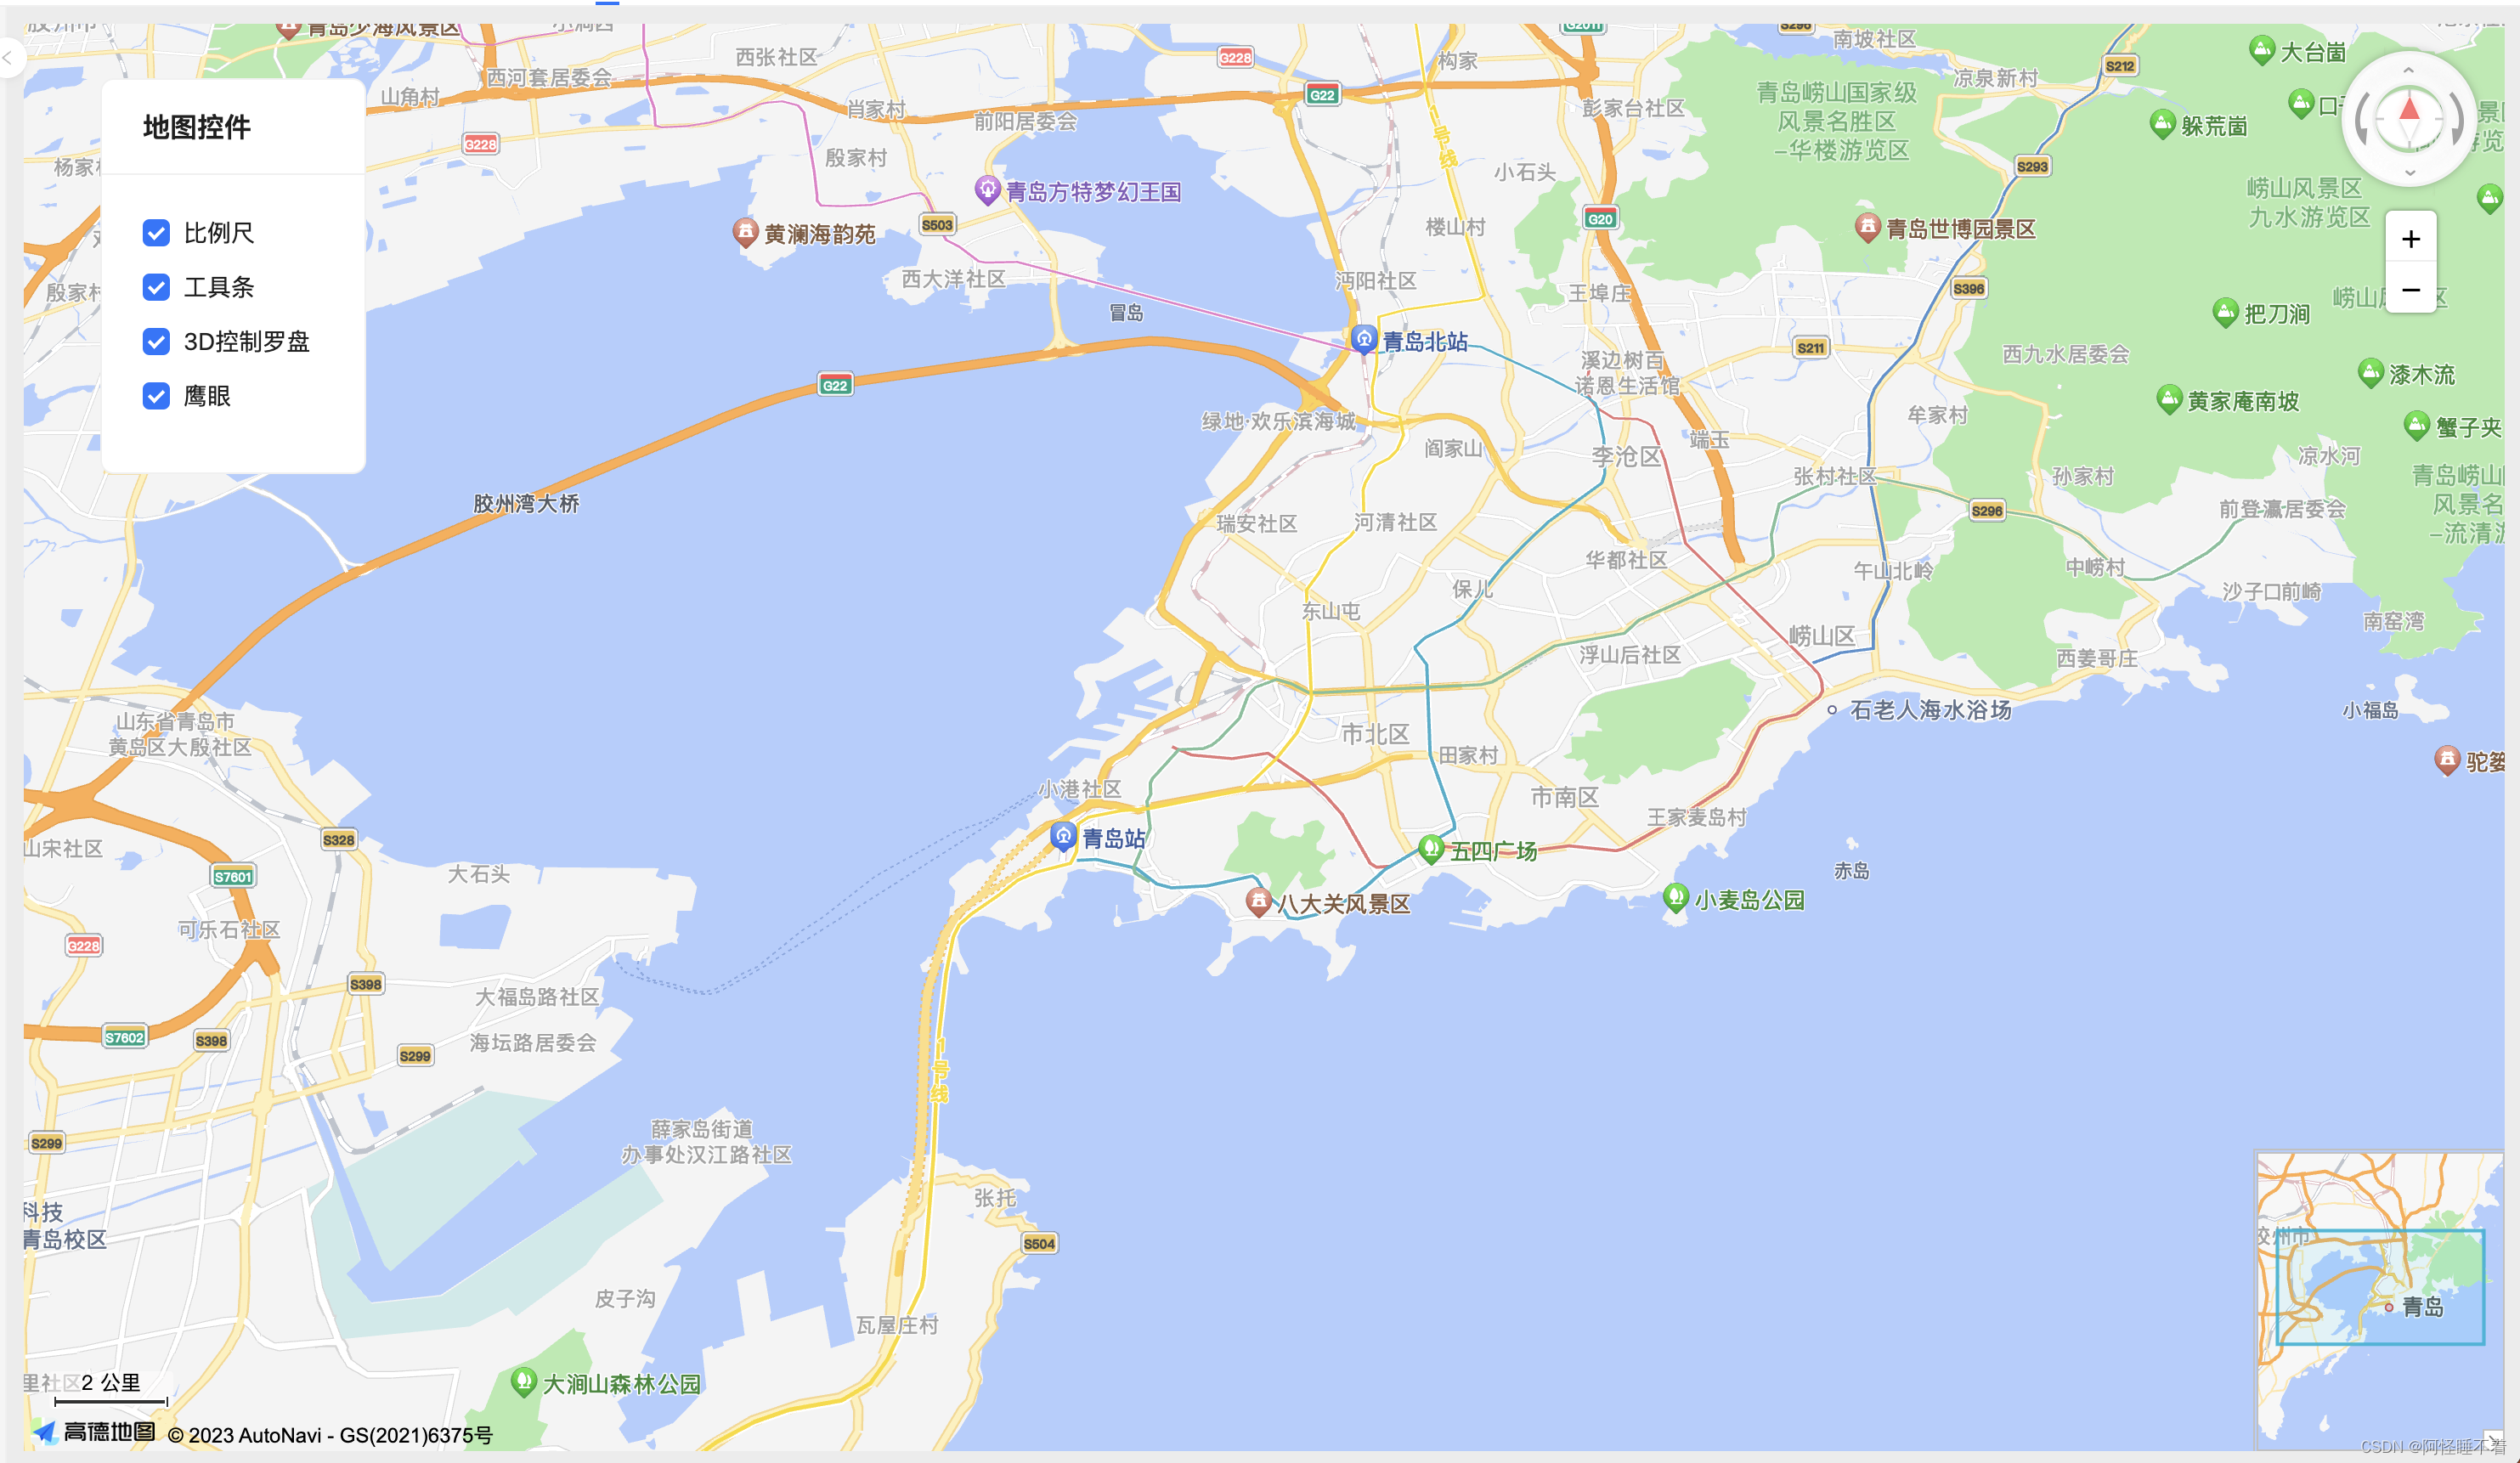
地图控件
<template>
  <div id="container" class="container"></div>
  <div class="control-item">
    <a-card title="地图控件">
      <div class="control">
        <a-checkbox
          v-model:checked="state.scaleStatus"
          @change="changeScaleStatus"
        >
          比例尺
        </a-checkbox>
        <a-checkbox
          v-model:checked="state.toolBarStatus"
          @change="changeToolBarStatus"
        >
          工具条
        </a-checkbox>
        <a-checkbox
          v-model:checked="state.controlBarStatus"
          @change="changeControlBarStatus"
        >
          3D控制罗盘
        </a-checkbox>
        <a-checkbox
          v-model:checked="state.overViewStatus"
          @change="changeOverViewStatus"
        >
          鹰眼
        </a-checkbox>
      </div>
    </a-card>
  </div>
</template>

<script setup lang="ts">
import AMapLoader from '@amap/amap-jsapi-loader'
import { message } from 'ant-design-vue'
import { onMounted, reactive } from 'vue'

const state: any = reactive({
  map: null,
  scale: null,
  toolBar: null,
  controlBar: null,
  overView: null,
  scaleStatus: true,
  toolBarStatus: true,
  controlBarStatus: true,
  overViewStatus: true,
})

onMounted(() => {
  initMap()
})

/**
 * DOM初始化完成进行地图初始化
 */
const initMap = () => {
  AMapLoader.load({
    key: '你的key', // 申请好的Web端开发者Key,首次调用 load 时必填
    version: '2.0', // 指定要加载的 JSAPI 的版本,缺省时默认为 1.4.15
    // 需要使用的的插件列表
    plugins: [
      'AMap.ControlBar', // 3D控制罗盘
      'AMap.ToolBar', // 工具条
      'AMap.Scale', // 比例尺
      'AMap.HawkEye', // 鹰眼
    ],
  })
    .then((AMap) => {
      getPositioning(AMap)
      state.map = new AMap.Map('container', {
        viewMode: '3D', // 地图视图模式,默认为‘2D’,可选’3D’,选择‘3D’会显示 3D 地图效果。
        zoom: 12, // 地图显示的缩放级别
        pitch: 30, // 俯仰角度,默认0
      })
      state.scale = new AMap.Scale()
      state.toolBar = new AMap.ToolBar({
        position: {
          top: '110px',
          right: '40px',
        },
      })
      state.controlBar = new AMap.ControlBar({
        position: {
          top: '10px',
          right: '10px',
        },
      })
      state.overView = new AMap.HawkEye({
        opened: false,
      })
      // 给地图添加控件
      // 比例尺
      state.map.addControl(state.scale)
      // 工具条
      state.map.addControl(state.toolBar)
      // 3D控制罗盘
      state.map.addControl(state.controlBar)
      // 鹰眼
      state.map.addControl(state.overView)
    })
    .catch((e) => {
      message.error(e)
    })
}

/**
 * 获取定位
 * @param AMap AMap
 */
const getPositioning = (AMap: any) => {
  AMap.plugin('AMap.Geolocation', function () {
    const geolocation = new AMap.Geolocation({
      enableHighAccuracy: true, // 是否使用高精度定位,默认:true
      timeout: 1000, // 设置定位超时时间,默认:无穷大
      offset: [10, 20], // 定位按钮的停靠位置的偏移量
      zoomToAccuracy: true, //  定位成功后调整地图视野范围使定位位置及精度范围视野内可见,默认:false
      position: 'RB', //  定位按钮的排放位置,  RB表示右下
    })
    geolocation.getCurrentPosition(function (status: any, result: any) {
      if (status == 'complete') {
        console.log(result)
      } else {
        message.error(result.message)
      }
    })
  })
}

/**
 * 比例尺
 */
const changeScaleStatus = () => {
  if (state.scaleStatus) {
    state.scale.show()
  } else {
    state.scale.hide()
  }
}

/**
 * 工具条
 */
const changeToolBarStatus = () => {
  if (state.toolBarStatus) {
    state.toolBar.show()
  } else {
    state.toolBar.hide()
  }
}

/**
 * 3D控制罗盘
 */
const changeControlBarStatus = () => {
  if (state.controlBarStatus) {
    state.controlBar.show()
  } else {
    state.controlBar.hide()
  }
}

/**
 * 鹰眼
 */
const changeOverViewStatus = () => {
  if (state.overViewStatus) {
    state.overView.show()
  } else {
    state.overView.hide()
  }
}
</script>

<style lang="less" scoped>
.container {
  position: relative;
  width: 100%;
  height: 100%;
  border: 10px solid #ececec;
}
.control-item {
  position: absolute;
  top: 70px;
  margin: 10px 50px 10px;
  padding: 10px 5px;
  .control {
    display: flex;
    flex-direction: column;
    :deep(.ant-checkbox-wrapper) {
      margin-bottom: 10px;
    }
  }
}
</style>
效果图如下:


 1万+
1万+


 被折叠的 条评论
为什么被折叠?
被折叠的 条评论
为什么被折叠?
 到【灌水乐园】发言


