


Spring入门程序
第一步:引入对应依赖:spring-context,junit, log4j<?xml version="1.0" encoding="UTF-8"?>
<project xmlns="http://maven.apache.org/POM/4.0.0"
xmlns:xsi="http://www.w3.org/2001/XMLSchema-instance"
xsi:schemaLocation="http://maven.apache.org/POM/4.0.0 http://maven.apache.org/xsd/maven-4.0.0.xsd">
<modelVersion>4.0.0</modelVersion>
<groupId>com.powernode</groupId>
<artifactId>spring6-003-spring</artifactId>
<version>1.0-SNAPSHOT</version>
<properties>
<maven.compiler.source>17</maven.compiler.source>
<maven.compiler.target>17</maven.compiler.target>
<project.build.sourceEncoding>UTF-8</project.build.sourceEncoding>
</properties>
<!-- 引入SpringContext依赖 -->
<dependencies>
<dependency>
<groupId>org.springframework</groupId>
<artifactId>spring-context</artifactId>
<version>6.1.8</version>
</dependency>
<dependency>
<groupId>junit</groupId>
<artifactId>junit</artifactId>
<version>4.13.2</version>
<scope>test</scope>
</dependency>
<!-- https://mvnrepository.com/artifact/org.apache.logging.log4j/log4j-core -->
<dependency>
<groupId>org.apache.logging.log4j</groupId>
<artifactId>log4j-core</artifactId>
<version>3.0.0-beta2</version>
</dependency>
<!-- https://mvnrepository.com/artifact/org.apache.logging.log4j/log4j-slf4j2-impl -->
<dependency>
<groupId>org.apache.logging.log4j</groupId>
<artifactId>log4j-slf4j2-impl</artifactId>
<version>3.0.0-beta2</version>
<scope>test</scope>
</dependency>
</dependencies>
</project>
第二步:创建实体类
package com.powernode.bean;

/**
 * @Author:
 * @Description: 定义实体类
 * @DateTime: 2024/9/23 10:32
 */
public class User {

    public User(){
        System.out.println("User的无参构造方法正在执行.....");
    }
}
第三步:实现Spring配置文件,spring6.xml
<?xml version="1.0" encoding="UTF-8"?>
<beans xmlns="http://www.springframework.org/schema/beans"
       xmlns:xsi="http://www.w3.org/2001/XMLSchema-instance"
       xsi:schemaLocation="http://www.springframework.org/schema/beans http://www.springframework.org/schema/beans/spring-beans.xsd">

    <!--
        bean对应的就是注册到Spring IoC容器中的对象
            其中id是这个bean对象的唯一标识
            class是要注册的对象的全限定类名
        如此,就把User这个类交给了Spring IoC管理,使用userBean获取对象
    -->
    <bean id="userBean" class="com.powernode.bean.User"/>
</beans>
第四步:测试
package powernode;

import com.powernode.bean.User;
import org.springframework.context.ApplicationContext;
import org.springframework.context.support.ClassPathXmlApplicationContext;

/**
 * @Author:
 * @Description: TODO
 * @DateTime: 2024/9/23 9:58
 */

public class Test {

    @org.junit.Test
    public void Test(){
        // ApplicationContext 翻译为:应用上下文对象,ApplicationContext是一个接口
        // ClassPathXmlApplicationContext是ApplicationContext的一个实现类,ApplicationContext接口存在很多实现类
        // ClassPathXmlApplicationContext 是专门从类路径加载 spring 的xml配置文件一个是spring上下问对象
        ApplicationContext beans = new ClassPathXmlApplicationContext("spring6.xml");

        // 获取bean,beanName对应的是xml中bean标签的id
        User userBean = (User) beans.getBean("userBean");
        System.out.println(userBean);
        //User的无参构造方法正在执行.....
        //com.powernode.bean.User@58fb7731
    }
}
Spring程序剖析
✅bean标签的两个重要属性:id:是这个bean的身份证号,不能重复,是唯一标识
class:必须填写类的全路径,全限定类名
✅Spring bean的使用
第一步:获取Spring容器对象
第二步:根据bean的id从Spring容器中获取这个对象
Spring是怎么实例化对象的:默认情况下Sring会通过反射机制,调用类的<font style="color:#DF2A3F;">无参数构造方法</font>来实例化对象
Class clazz = Class.forName(com.powernode.spring6.bean.User);
clazz.newInstance();
✅Bean在Spring容器中是怎么存储的
Bean在Spring容器中是使用Map数据结构存储的,具体如图:
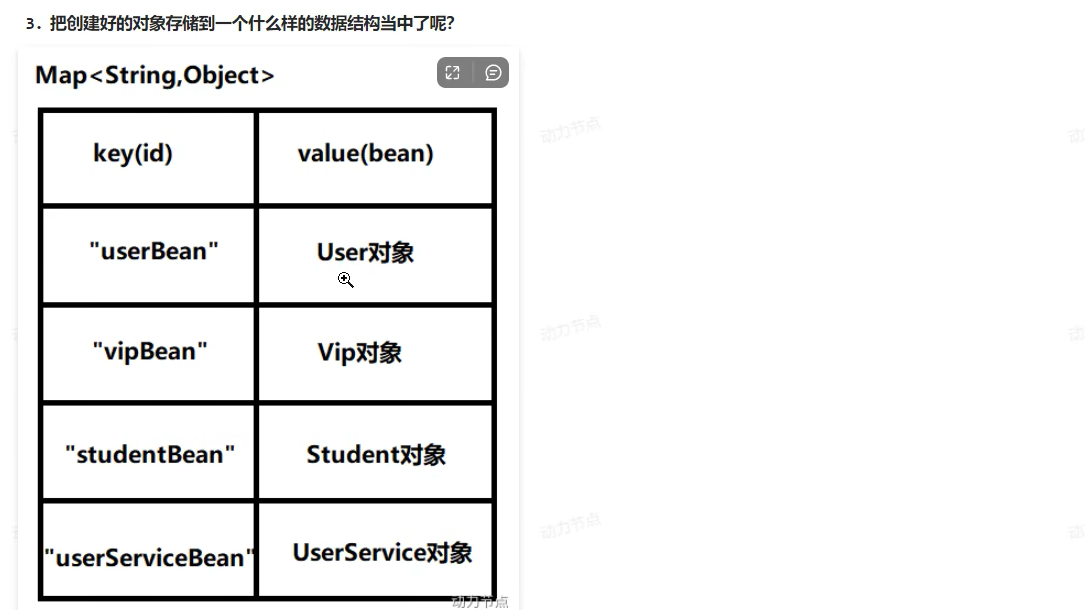
依据:

✅Spring的xml文件可以随意命名吗,Spring可以存在多个SpringConfig.xml吗
可以随意命名,Spring的配置文件名可以随意命名,并且可以存在多个配置文件。
依据:

✅Spring可以定义Java原生的Api吗?
Spring是可以定义Java原生的Api的,原则上只要能够拿到类的全限定类名,都可以定义
<?xml version="1.0" encoding="UTF-8"?>
<beans xmlns="http://www.springframework.org/schema/beans"
       xmlns:xsi="http://www.w3.org/2001/XMLSchema-instance"
       xsi:schemaLocation="http://www.springframework.org/schema/beans http://www.springframework.org/schema/beans/spring-beans.xsd">

    <!--  Spring定义JDK原生API,以日期为例-->
    <bean id="dataBean" class="java.util.Date"/>
</beans>
package powernode;

import com.powernode.bean.User;
import org.springframework.context.ApplicationContext;
import org.springframework.context.support.ClassPathXmlApplicationContext;

import java.util.Date;


/**
 * @Author:
 * @Description: TODO
 * @DateTime: 2024/9/23 9:58
 */

public class Test {

    @org.junit.Test
    public void Test(){
        ApplicationContext beans = new ClassPathXmlApplicationContext("spring6.xml");
        // 定义JDK原生bean
        Date dataBean = (Date) beans.getBean("dataBean");
        System.out.println(dataBean);
        //Mon Sep 23 11:33:08 CST 2024
    }
}
✅getBean指定一个不存在的bean时,会怎么样(报异常)
@Test
public void NullBeanTest(){
    // 获取bean容器
    ApplicationContext beans = new ClassPathXmlApplicationContext("spring6.xml");

    // 获取一个不存在的bean
    Object nullBean = beans.getBean("NullBean");
    System.out.println(nullBean);
}

✅BeanFactory是IoC容器的顶级接口
BeanFactory是Spring容器的超级接口,ApplicationContext是BeanFactory的子接口
Spring启动Log4j2日志框架
第一步:引入Log4j2依赖第二步:在类的根路径下提供的log4j2.xml配置文件(文件名固定为:log4j2.xml,文件必须放到类根路径下)
<?xml version="1.0" encoding="UTF-8" ?>

<configuration>
    <loggers>
        <root level="INFO">
            <appender-ref ref="spring6log"/>
        </root>
    </loggers>

    <appenders>
        <console name="spring6log" target="SYSTEM_OUT">
            <PatternLayout pattern="%d{yyyy-MM-dd HH:mm:ss SSS} [%t] %-3level %logger{1024} - %msg%n"/>
        </console>
    </appenders>
</configuration>
第三步:使用日志框架
@org.junit.Test
public void LogTest(){
    ApplicationContext beans = new ClassPathXmlApplicationContext("spring6.xml");

    User userBean = (User) beans.getBean("userBean");
    logger.info("userBean:{}", userBean);

    Date dataBean = (Date) beans.getBean("dataBean");
    logger.info("dataBean:{}", dataBean);
}


 1847
1847

 被折叠的 条评论
为什么被折叠?
被折叠的 条评论
为什么被折叠?
 到【灌水乐园】发言


