


shiro
- 快速掌握SpringBoot与Shiro安全框架的整合使用
一 、 Shiro框架简介
- Apache Shiro是一个强大且易用的Java安全框架,执行身份验证、授权、密码学和会话管理。使用Shiro的易于理解的API,您可以快速、轻松地获得任何应用程序,从最小的移动应用程序到最大的网络和企业应用程序。
- Apache Shiro 体系结构
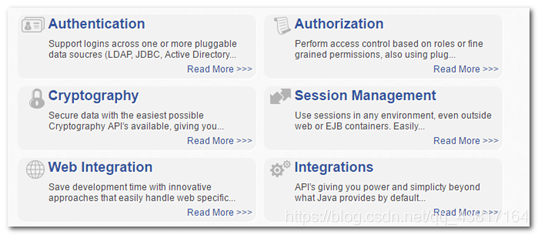
- Authentication 认证 ---- 用户登录
- Authorization 授权 — 用户具有哪些权限
- Cryptography 安全数据加密
- Session Management 会话管理
- Interations 集成其它应用,spring、缓存框架
二 、3. Spring Boot快速入门
1、 建立项目,spring initial快速搭建
- 创建Controller编写userController类测试
2、 引入thymeleaf依赖
<!-- thymeleaf -->
  <dependency>
			<groupId>org.springframework.boot</groupId>
			<artifactId>spring-boot-starter-thymeleaf</artifactId>
</dependency>
- 测试thymeleaf
- 在Controller添加测试方法
@RequestMapping("/testThymeleaf")
   public String testThymeleaf(Model model){
   	//把数据存入model
   	model.addAttribute("name", "xiaohei");
   	//返回test.html
   	return "test";
   }
- 在src/main/resource目录下创建templates目录,然后创建test.html页面
<!DOCTYPE html>
<html lang="en"  xmlns:th="http://www.thymeleaf.org">
<head>
<meta charset="UTF-8">
<title>测试Thymeleaf的使用</title>
</head>
<body>
<h3 th:text="${name}"></h3>
</body>
</html>
二 、Spring Boot与Shiro整合实现用户认证
1. 分析Shiro的核心API
- Subject: 用户主体(把操作交给SecurityManager)
- SecurityManager:安全管理器(关联Realm)
- Realm:Shiro连接数据的桥梁
2. Spring Boot整合Shiro
- 导入shiro与spring整合依赖
<!-- shiro与spring整合依赖 -->
		<dependency>
			<groupId>org.apache.shiro</groupId>
			<artifactId>shiro-spring</artifactId>
			<version>1.4.0</version>
		</dependency>
3. 自定义Realm类
package person.wjy.shiro;

import org.apache.shiro.authc.AuthenticationException;
import org.apache.shiro.authc.AuthenticationInfo;
import org.apache.shiro.authc.AuthenticationToken;
import org.apache.shiro.authz.AuthorizationInfo;
import org.apache.shiro.realm.AuthorizingRealm;
import org.apache.shiro.subject.PrincipalCollection;

//自定义的Realm
public class UserRealm extends AuthorizingRealm {

    //执行授权逻辑
    @Override
    protected AuthorizationInfo doGetAuthorizationInfo(PrincipalCollection principalCollection) {
        System.out.println("执行授权逻辑");
        return null;
    }

    //执行认证逻辑
    @Override
    protected AuthenticationInfo doGetAuthenticationInfo(AuthenticationToken authenticationToken) throws AuthenticationException {
        System.out.println("执行认证逻辑");
        return null;
    }
}
4.编写Shiro配置类(*)
package person.wjy.shiro;

import org.apache.shiro.spring.web.ShiroFilterFactoryBean;
import org.apache.shiro.web.mgt.DefaultWebSecurityManager;
import org.springframework.beans.factory.annotation.Qualifier;
import org.springframework.context.annotation.Bean;
import org.springframework.context.annotation.Configuration;

/**
 * Shiro的配置类
 */
@Configuration
public class ShiroConfig {

     // 1. 创建ShiroFilterFactoryBean
     public ShiroFilterFactoryBean getShiroFilterFactoryBean(@Qualifier("securityManager")DefaultWebSecurityManager dwsm){
         ShiroFilterFactoryBean sffb = new ShiroFilterFactoryBean();
         //设置安全管理器
         sffb.setSecurityManager(dwsm);
         return  sffb;
     }
     // 2. 创建DefaultWebSecurityManager
     @Bean(name="securityManager")
    public DefaultWebSecurityManager getDefaultWebSecurityManager(@Qualifier("userRealm") UserRealm userRealm){
        DefaultWebSecurityManager dwsm = new DefaultWebSecurityManager();
        //关联realm
        dwsm.setRealm(userRealm);
        return  dwsm;
    }
     // 3. 创建Realm
   //创建Realm
    @Bean(name="userRealm")
    public UserRealm getRealm(){
        return new UserRealm();
    }
}
5.使用Shiro内置过滤器实现页面拦截
- 在ShiroConfig配置类中的getShiroFilterFactoryBean中添加如下代码:
@Bean
    public ShiroFilterFactoryBean getShiroFilterFactoryBean(@Qualifier("securityManager")DefaultWebSecurityManager dwsm){
        ShiroFilterFactoryBean sffb = new ShiroFilterFactoryBean();
        //设置安全管理器
        sffb.setSecurityManager(dwsm);

        //添加Shiro内置过滤器
        /**
         * Shiro内置过滤器,可以实现权限相关的拦截器
         *    常用的过滤器:
         *       anon: 无需认证(登录)可以访问
         *       authc: 必须认证才可以访问
         *       user: 如果使用rememberMe的功能可以直接访问
         *       perms: 该资源必须得到资源权限才可以访问
         *       role: 该资源必须得到角色权限才可以访问
         */
        Map<String,String> filterMap = new LinkedHashMap<String,String>();
//         filterMap.put("/add","authc");
//         filterMap.put("/update","authc");
       //让某些放行
       filterMap.put("/testThymeleaf","anon");
       //使用同配拦截
       filterMap.put("/*","authc");

       // 修改无权跳转登录页
       sffb.setLoginUrl("/toLogin");

        sffb.setFilterChainDefinitionMap(filterMap);

        return  sffb;
    }
5. 实现用户认证(登录)操作
- 创建一个简单的登录页
<!DOCTYPE html>
<html lang="en"  xmlns:th="http://www.thymeleaf.org">
<head>
<meta charset="UTF-8">
<title>登录页面</title>
</head>
<body>
<h3>登录</h3>
<h3 th:text="${msg}" style="color: red"></h3>

<form method="post" action="login">
	用户名:<input type="text" name="name"/><br/>
	密码:<input type="password" name="password"/><br/>
	<input type="submit" value="登录"/>
</form>
</body>
</html>
- 在userController编写方法
      //登录逻辑处理
    @RequestMapping("/login")
    public String login(String name,String password,Model model){
   	 	 //使用Shiro编写认证操作
        //1.获取Subject
        Subject subject = SecurityUtils.getSubject();

        //2.封装用户数据
        UsernamePasswordToken token = new UsernamePasswordToken(name,password);

        //3.执行登录方法
        try {
            subject.login(token);

             //登录成功(没有任何异常)
            //跳转到test.html
            return "redirect:/testThymeleaf";
        } catch (UnknownAccountException e) {
            //e.printStackTrace();
            //登录失败:用户名不存在(有任何异常)
            model.addAttribute("msg", "用户名不存在");
            return "login";
        }catch (IncorrectCredentialsException e) {
            //e.printStackTrace();
            //登录失败:密码错误
            model.addAttribute("msg", "密码错误");
            return "login";
        }
    }
- 编写Realm的判断逻辑(Realm类)
  //执行认证逻辑
    @Override
    protected AuthenticationInfo doGetAuthenticationInfo(AuthenticationToken authenticationToken) throws AuthenticationException {
        System.out.println("执行认证逻辑");
        //假设数据库的用户名和密码
        String name = "admin";
        String password = "admin";

        //编写shiro判断逻辑,判断用户名和密码
        //1.判断用户名
        UsernamePasswordToken token =(UsernamePasswordToken)authenticationToken;
        if( !token.getUsername().equals(name)){
            //用户名不存在
            return null;//shiro底层会抛出UnKnowAccountException
        }
        //1.判断密码
        return new SimpleAuthenticationInfo("",password,"");
    }
三、整合MyBatis实现登录
- 导入依赖
<!-- 导入mybatis相关的依赖 -->
		<dependency>
			<groupId>com.alibaba</groupId>
			<artifactId>druid</artifactId>
			<version>1.0.9</version>
		</dependency>
		<!-- mysql -->
		<dependency>
			<groupId>mysql</groupId>
			<artifactId>mysql-connector-java</artifactId>
		</dependency>
		<!-- SpringBoot的Mybatis启动器 -->
		<dependency>
			<groupId>org.mybatis.spring.boot</groupId>
			<artifactId>mybatis-spring-boot-starter</artifactId>
			<version>1.1.1</version>
		</dependency>
- 配置application.properties
spring.datasource.driverClassName=com.mysql.jdbc.Driver
spring.datasource.url=jdbc:mysql://localhost:3306/test
spring.datasource.username=root
spring.datasource.password=123
spring.datasource.type=com.alibaba.druid.pool.DruidDataSource
mybatis.type-aliases-package=person.wjy.domain
- 编写User实体
- 编写UserMapper接口
@Data
public class User {
   private Integer id;
   private String name;
   private String password;
   private String perms;
   }
- 编写UserMapper.xml映射文件
public interface UserMapper {

   @Select("SELECT  username,password FROM user where username = #{name}")
   public User findByName(String name);

   @Select("SELECT  USERNAME,PASSWORD FROM user where uid = #{id}")
   public User findById(Integer id);
}
</mapper>
- 编写业务接口和实现
接口
import person.wjy.domain.User;

public interface UserService {

   public User findByName(String name);

   public User findById(Integer id);
}
实现
import org.springframework.beans.factory.annotation.Autowired;
import org.springframework.stereotype.Service;
import org.springframework.transaction.annotation.Transactional;

import person.wjy.domain.User;
import person.wjy.mapper.UserMapper;
import person.wjy.service.UserService;

@Service
public class UserServiceImpl implements UserService {

   //注入Mapper接口
   @Autowired
   private UserMapper userMapper;

   @Override
   public User findByName(String name) {
   	return userMapper.findByName(name);
   }

   @Override
   public User findById(Integer id) {
   	return userMapper.findById(id);
   }


}
- 在启动类添加@MapperScan注解
@MapperScan("person.wjy.mapper")
- 修改UserRealm
 //执行认证逻辑
    @Override
    protected AuthenticationInfo doGetAuthenticationInfo(AuthenticationToken authenticationToken) throws AuthenticationException {
        System.out.println("执行认证逻辑");
        //编写shiro判断逻辑,判断用户名和密码
        //1.判断用户名
        UsernamePasswordToken token = (UsernamePasswordToken)authenticationToken;

        User user = userSerivce.findByName(token.getUsername());

        if(user==null){
            //用户名不存在
            return null;//shiro底层会抛出UnKnowAccountException
        }

        //2.判断密码
        return new SimpleAuthenticationInfo(user,user.getPassword(),"");
    }
四 、Spring Boot与Shiro整合实现用户授权
1. 使用Shiro内置过滤器拦截资源
  // 1. 创建ShiroFilterFactoryBean
    @Bean
     public ShiroFilterFactoryBean getShiroFilterFactoryBean(@Qualifier("securityManager")DefaultWebSecurityManager dwsm){
         ShiroFilterFactoryBean sffb = new ShiroFilterFactoryBean();
         //设置安全管理器
         sffb.setSecurityManager(dwsm);

         //添加Shiro内置过滤器
         /**
          * Shiro内置过滤器,可以实现权限相关的拦截器
          *    常用的过滤器:
          *       anon: 无需认证(登录)可以访问
          *       authc: 必须认证才可以访问
          *       user: 如果使用rememberMe的功能可以直接访问
          *       perms: 该资源必须得到资源权限才可以访问
          *       role: 该资源必须得到角色权限才可以访问
          */
         Map<String,String> filterMap = new LinkedHashMap<String,String>();
//         filterMap.put("/add","authc");
//         filterMap.put("/update","authc");
        //让某些放行
        filterMap.put("/testThymeleaf","anon");
        filterMap.put("/login","anon");
        //授权过滤器
        //注意:当前授权拦截后,shiro会自动跳转到未授权页面
        filterMap.put("/add", "perms[user:add]");
//        filterMap.put("/update", "perms[user:update]");

        //使用通配符拦截
        filterMap.put("/*","authc");

        // 修改无权跳转登录页
        sffb.setLoginUrl("/toLogin");

        //设置未授权提示页面
        sffb.setUnauthorizedUrl("/noAuth");

         sffb.setFilterChainDefinitionMap(filterMap);

         return  sffb;
     }
2. 完成Shiro的资源授权
  //执行授权逻辑
    @Override
    protected AuthorizationInfo doGetAuthorizationInfo(PrincipalCollection principalCollection) {
        System.out.println("执行授权逻辑");
        //给资源进行授权
        SimpleAuthorizationInfo info = new SimpleAuthorizationInfo();
        //添加资源的授权字符串
        info.addStringPermission("user:add");

        return info;
    }
五 、thymeleaf和shiro标签整合使用
1. 导入thymeleaf扩展坐标
<!-- thymel对shiro的扩展坐标 -->
		<dependency>
			<groupId>com.github.theborakompanioni</groupId>
			<artifactId>thymeleaf-extras-shiro</artifactId>
			<version>2.0.0</version>
		</dependency>
2. 配置ShiroDialect
- 在ShiroConfig类里面添加getShiroDialect方法
	/**
	 * 配置ShiroDialect,用于thymeleaf和shiro标签配合使用
	 */
	@Bean
	public ShiroDialect getShiroDialect(){
		return new ShiroDialect();
	}
- 页面代码
<!DOCTYPE html>
<html lang="en"  xmlns:th="http://www.thymeleaf.org">
<head>
<meta charset="UTF-8">
<title>测试Thymeleaf的使用</title>
</head>
<body>
<h3 th:text="${name}"></h3>

<hr/>
<div shiro:hasPermission="user:add">
进入用户添加功能: <a href="add">用户添加</a><br/>
</div>
<div shiro:hasPermission="user:update">
进入用户更新功能: <a href="update">用户更新</a><br/>
</div>
<a href="toLogin">登录</a>
</body>
</html>


 2631
2631


 被折叠的 条评论
为什么被折叠?
被折叠的 条评论
为什么被折叠?
 到【灌水乐园】发言


