


LaTeX学习笔记
我用的是texlive+texstudio来学习latex,安装稍微耗时。
texstudio
注释快捷键: CTRL+T
取消注释快捷键:CTRL+U
一个小例子:
\documentclass{article}%引入文档类

\usepackage{ctex}%引入ctex宏包,支持中文(UTF-8编码、默认编辑器:XeLateX)

\begin{document}%一个文档只有一个document
	你好,\LaTeX
\end{document}

LaTeX源文件基本结构
LaTeX源文件分为导言区和正文区
%导言区
\documentclass{article}%引入文档类,也有report、book、letter

\usepackage{ctex}%引入ctex宏包,支持中文(UTF-8编码、默认编辑器:XeLateX)

%正文区
\begin{document}%\begin ... \end设置环境,一个文档有且只有一个document环境
	你好,\LaTeX
\end{document}
%表示注释
latex导言区用于全局设置
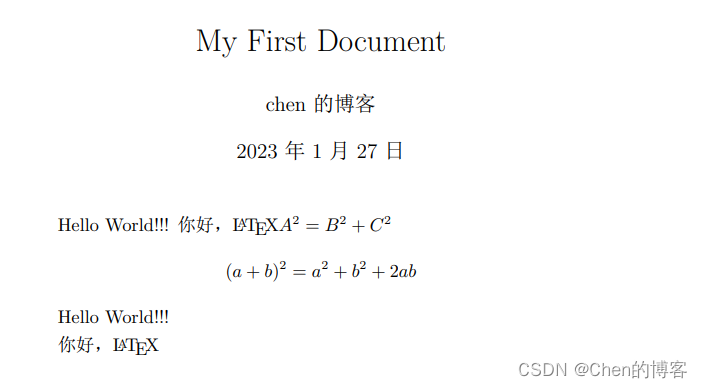
\title{My First Document}%文章标题
\author{chen的博客}%文章作者
\date{\today}%编辑时间,\today表示当前时间
为了使用设置的信息需要在正文区使用
\maketitle
来输出导言区信息
%导言区
\documentclass{article}%引入文档类,也有report、book、letter

\usepackage{ctex}%引入ctex宏包,支持中文(UTF-8编码、默认编辑器:XeLateX)
\title{My First Document}%文章标题
\author{chen的博客}%文章作者
\date{\today}%编辑时间,\today表示当前时间

%正文区
\begin{document}%\begin ... \end设置环境,一个文档有且只有一个document环境
	\maketitle
	你好,\LaTeX
\end{document}

可以使用不同的文档类来改变整个文档结构例如将article改为book、report、letter
编辑latex文档时,不用的命令一般%注释即可,不用直接删除,方便后期文档的编写
latex中换一行表示空格,加入一个空行表示重起一段(新段首行缩进),加入多个空行时latex只看成一个空行
可以用$$来编辑行内数学公式用$$ $$来编辑行间数学公式
%正文区
\begin{document}%\begin ... \end设置环境,一个文档有且只有一个document环境
	\maketitle
	Hello World!!!
	你好,\LaTeX
	$A^2=B^2+C^2$%行内公式
	$$(a+b)^2=a^2+b^2+2ab$$%行间公式

	Hello World!!!

	你好,\LaTeX

\end{document}
一个latex源文件包括导言区和正文区,在导言区进行全局设置,在正文区编写正文,一个latex源文件有且只有一个doucument环境。
LaTeX中文处理方法
在构建中查看默认编辑器是否为XeLaTeX,
编写含中文文档时选择XeLaTeX,编写全英文文档时选择PdfLaTeX

查看编辑器的编码格式是否为UTF-8
可以在引言区引入ctex宏包来编写中文
\usepackage{ctex}%引入ctex宏包,支持中文(UTF-8编码、默认编辑器:XeLateX)
这样在导言区和正文区就能使用中文了
使用\newcommand{}{}定义新命令
$$\angle C=90 \degree$$
\angle表示角度符号∠,而\degree未定义,如果直接运行会报错,需要在导言区先定义再使用
\newcommand{\degree}{^\circ}
%导言区
\documentclass{article}%引入文档类,也有report、book、letter

\usepackage{ctex}%引入ctex宏包,支持中文(UTF-8编码、默认编辑器:XeLateX)

\newcommand{\degree}{^\circ}
\title{My First Document}%文章标题
\author{chen的博客}%文章作者
\date{\today}%编辑时间,\today表示当前时间

%正文区
\begin{document}%\begin ... \end设置环境,一个文档有且只有一个document环境
	\maketitle
	$$\angle C=90 \degree$$

\end{document}

在编写中文时还可以指定字体的类型,例如\heiti、\kaishu放在文字前即可,引言区也能使用。
带编号的行间公式equation环境
	\begin{equation}%可以使用\lable{}命令

	\end{equation}
%导言区
\documentclass{article}%引入文档类,也有report、book、letter

\usepackage{ctex}%引入ctex宏包,支持中文(UTF-8编码、默认编辑器:XeLateX)
\title{My First Document}%文章标题
\author{chen的博客}%文章作者
\date{\today}%编辑时间,\today表示当前时间

%正文区
\begin{document}%\begin ... \end设置环境,一个文档有且只有一个document环境
	\maketitle
	你好,\LaTeX
	$$A^2=B^2+C^2$$
	\begin{equation}
		C^2=A^2-B^2
	\end{equation}
\end{document}

LaTeX字体设置
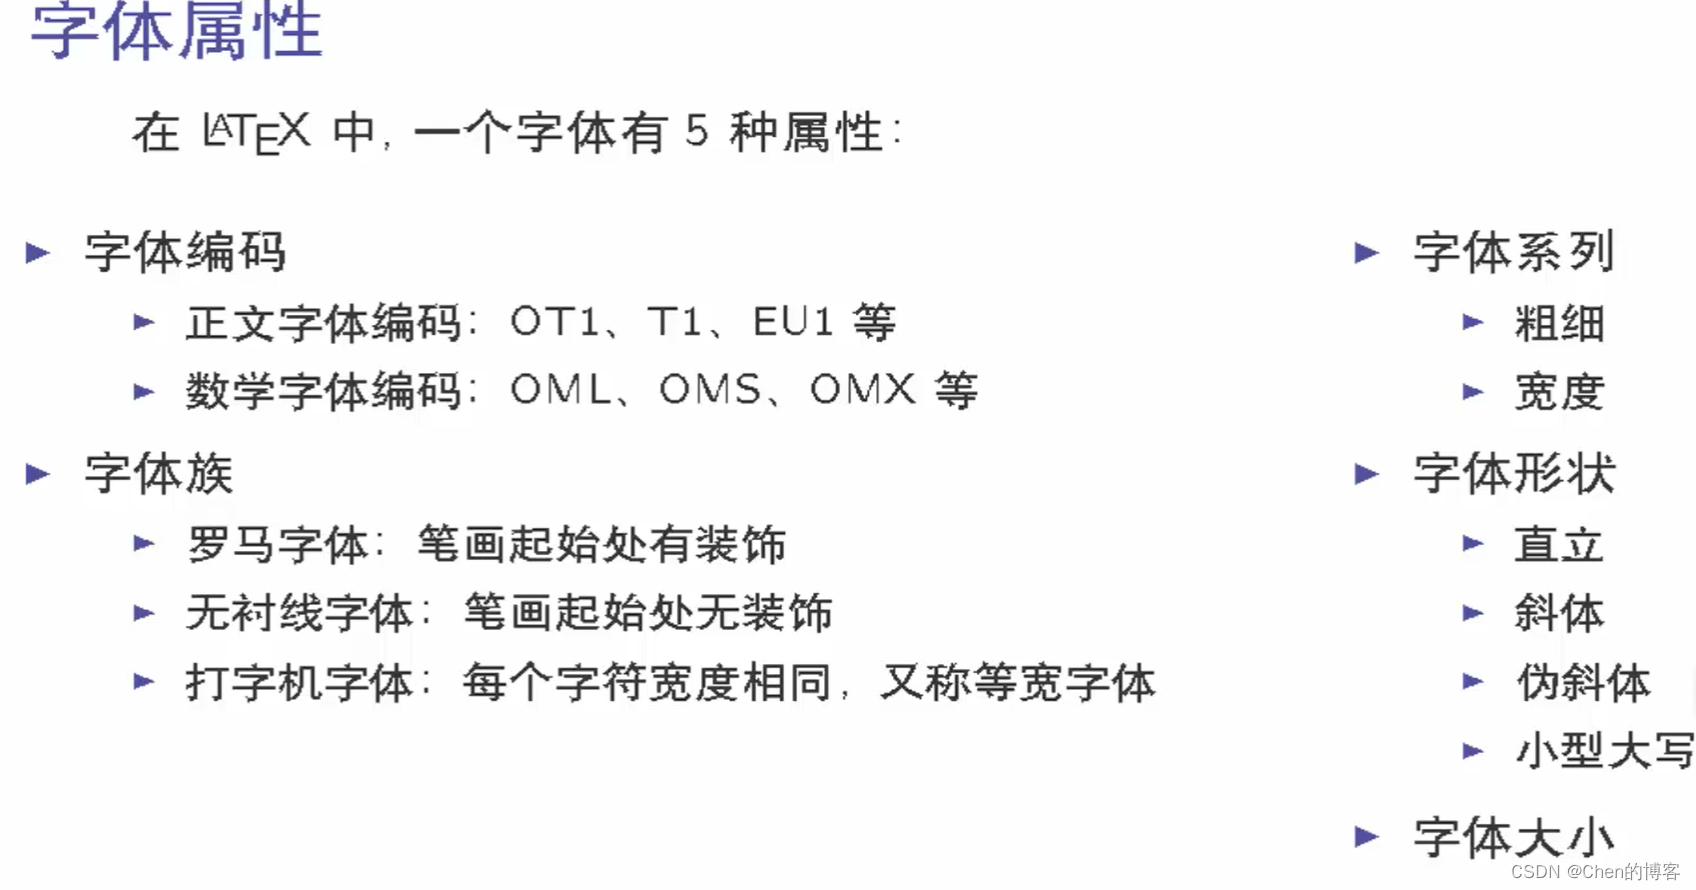
字体族设置(罗马字体、无衬线字体、打字机字体)
有两种设置方式
字体族设置(罗马字体、无衬线字体、打字机字体)
第一种:
\textrm{文本} \textsf{文本} \texttt{文本}
第二种:
{\rmfamily 文本} {\sffamily 文本} {\ttfamily 文本}
例如:
%导言区
\documentclass{article}%引入文档类,也有report、book、letter
\usepackage{ctex}%引入ctex宏包,支持中文(UTF-8编码、默认编辑器:XeLateX)
\title{My First Document}%文章标题
\author{chen的博客}%文章作者
\date{\today}%编辑时间,\today表示当前时间
%正文区
\begin{document}%\begin ... \end设置环境,一个文档有且只有一个document环境
\maketitle
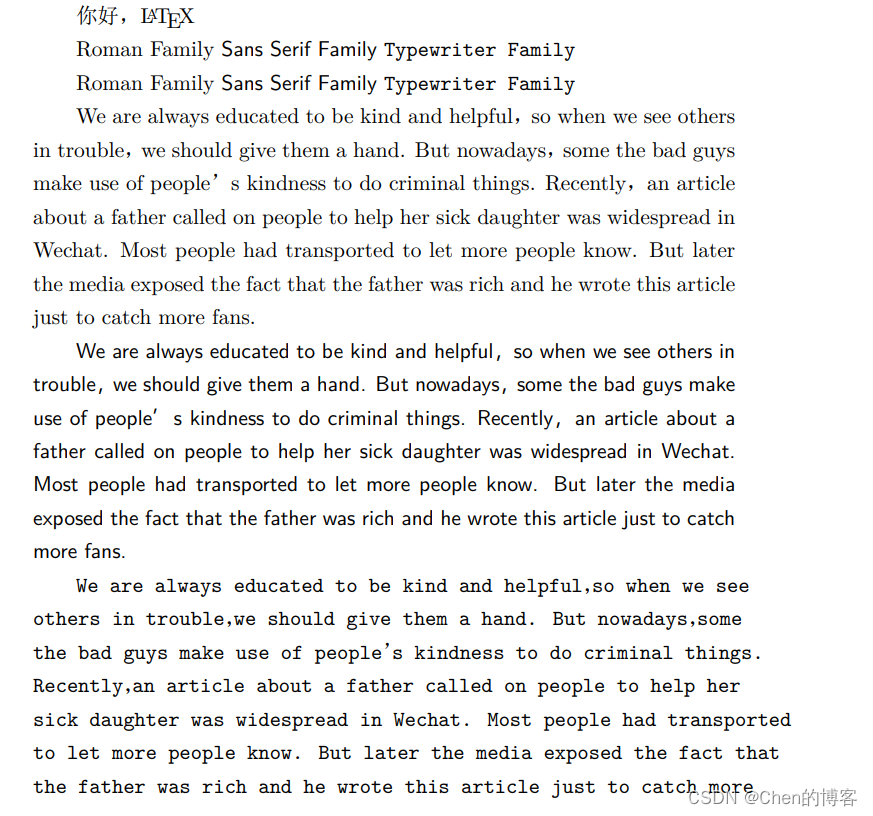
你好,\LaTeX
%字体族设置(罗马字体、无衬线字体、打字机字体)
\textrm{Roman Family} \textsf{Sans Serif Family} \texttt{Typewriter Family}
{\rmfamily Roman Family} {\sffamily Sans Serif Family} {\ttfamily Typewriter Family}
\end{document}

第二种不用大括号{}声明作用范围将会将后续文本都变为对应字体,直到遇到不同字体设置
例如:
%导言区
\documentclass{article}%引入文档类,也有report、book、letter

\usepackage{ctex}%引入ctex宏包,支持中文(UTF-8编码、默认编辑器:XeLateX)
\title{My First Document}%文章标题
\author{chen的博客}%文章作者
\date{\today}%编辑时间,\today表示当前时间

%正文区
\begin{document}%\begin ... \end设置环境,一个文档有且只有一个document环境
	\maketitle
	你好,\LaTeX

	%字体族设置(罗马字体、无衬线字体、打字机字体)
	\textrm{Roman Family} \textsf{Sans Serif Family} \texttt{Typewriter Family}

	{\rmfamily Roman Family} {\sffamily Sans Serif Family} {\ttfamily Typewriter Family}

	\rmfamily We are always educated to be kind and helpful, so when we see others in trouble, we should give them a hand. But nowadays, some the bad guys make use of people’s kindness to do criminal things. Recently, an article about a father called on people to help her sick daughter was widespread in Wechat. Most people had transported to let more people know. But later the media exposed the fact that the father was rich and he wrote this article just to catch more fans.

	\sffamily We are always educated to be kind and helpful, so when we see others in trouble, we should give them a hand. But nowadays, some the bad guys make use of people’s kindness to do criminal things. Recently, an article about a father called on people to help her sick daughter was widespread in Wechat. Most people had transported to let more people know. But later the media exposed the fact that the father was rich and he wrote this article just to catch more fans.

	\ttfamily We are always educated to be kind and helpful, so when we see others in trouble, we should give them a hand. But nowadays, some the bad guys make use of people’s kindness to do criminal things. Recently, an article about a father called on people to help her sick daughter was widespread in Wechat. Most people had transported to let more people know. But later the media exposed the fact that the father was rich and he wrote this article just to catch more fans.

\end{document}
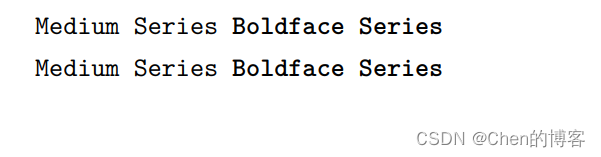
字体系列设置(粗细、宽度)
	%字体系列设置(粗细、宽度)
	第一种方法:
	\textmd{文本} \textbf{文本}
	第二种方法:
	{\mdseries 文本} {\bfseries 文本}
	%字体系列设置(粗细宽度)
	\textmd{Medium Series} \textbf{Boldface Series}

	{\mdseries Medium Series} {\bfseries Boldface Series}
字体形状设置(直立、斜体、伪斜体、小型大写)
	%字体形状设置(直立、斜体、伪斜体、小型大写)
	\textup{Upright Shape} \textit{Italic Shape} \textsl{Slanted Shape} \textsc{Small Caps Shape}

	{\upshape Upright Shape} {\itshape Italic Shape} {\slshape Slanted Shape} {\scshape Small Caps Shape}

中文字体设置
	%中文字体设置
	{\songti 宋体}\quad{\heiti 黑体}\quad{\fangsong 仿宋}\quad{\kaishu 楷书}

要使用ctex宏包
字体大小的设置
	%字体大小的设置
	{\tiny Hello World}\\
	{\scriptsize Hello World}\\
	{\footnotesize Hello World}\\
	{\small Hello World}\\
	{\normalsize Hello World}\\
	{\large Hello World}\\
	{\Large Hello World}\\
	{\LARGE Hello World}\\
	{\huge Hello World}\\
	{\Huge Hello World}\\

字体的大小是与\normalsize相对的大小,\normalsize的大小是由文档类的参数控制
例如设置\normalsize大小为10pt
%引言区
\docunmentclass[10pt]{article}
%只能设置10pt、11pt、12pt
中文字号设置命令
	%中文字号设置命令
	\zihao{0}你好!\\
	\zihao{1}你好!\\
	\zihao{2}你好!\\
	\zihao{3}你好!\\
	\zihao{4}你好!\\
	\zihao{5}你好!\\

可以使用\newcommand 来定义字体,方便使用
LaTeX文档基本结构
\section{}
\subsection{}
\subsubsection{}
%正文区
\begin{document}%\begin ... \end设置环境,一个文档有且只有一个document环境
	\maketitle
	你好,\LaTeX
	\section{引言}%使用\section{title}构建小结
	\section{实验方法}
	\section{实验结果}
	\subsection{数据}%用\subsection{title}构建子小结
	\subsection{图表}
	\subsubsection{实验条件}%用\subsubsection{title}构建子子小结
	\subsubsection{实验过程}
	\subsection{结果分析}
	\section{结论}
	\section{致谢}
\end{document}

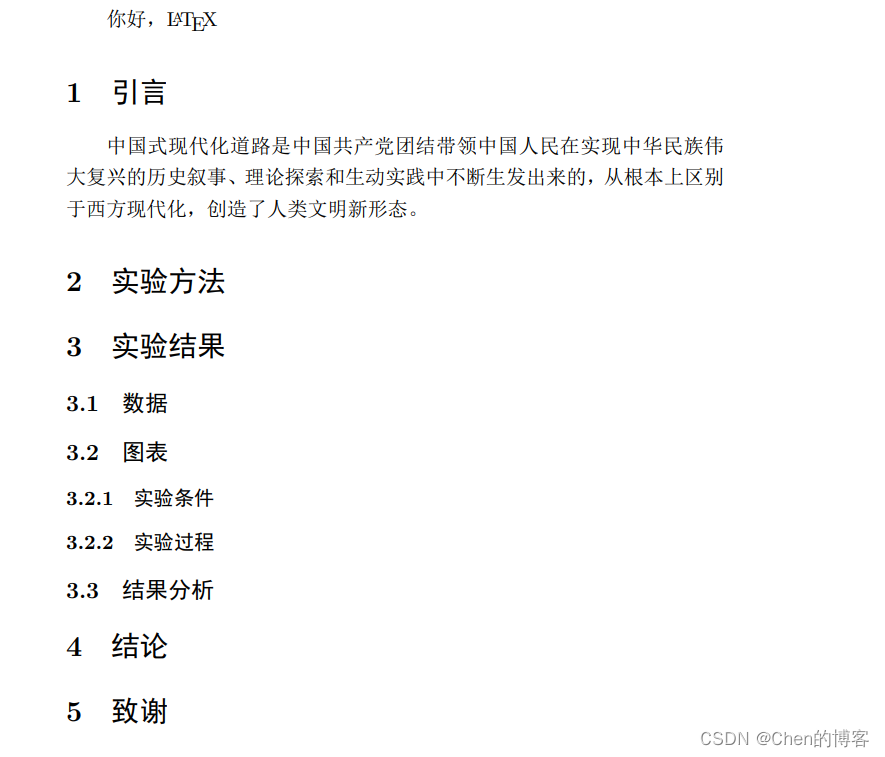
插入正文
%正文区
\begin{document}%\begin ... \end设置环境,一个文档有且只有一个document环境
	\maketitle
	你好,\LaTeX
	\section{引言}%使用\section{title}构建小结
	中国式现代化道路是中国共产党团结带领中国人民在实现中华民族伟大复兴的历史叙事、理论探索和生动实践中不断生发出来的,从根本上区别于西方现代化,创造了人类文明新形态。
	\section{实验方法}
	\section{实验结果}
	\subsection{数据}%用\subsection{title}构建子小结
	\subsection{图表}
	\subsubsection{实验条件}%用\subsubsection{title}构建子子小结
	\subsubsection{实验过程}
	\subsection{结果分析}
	\section{结论}
	\section{致谢}
\end{document}
分段与换行
\\表示换行,不重起一段(新行不缩进)
空一行表示重起一段(首行缩进)
\par 表示重起一段(首行缩进)
一般分段是通过插入空行来实现
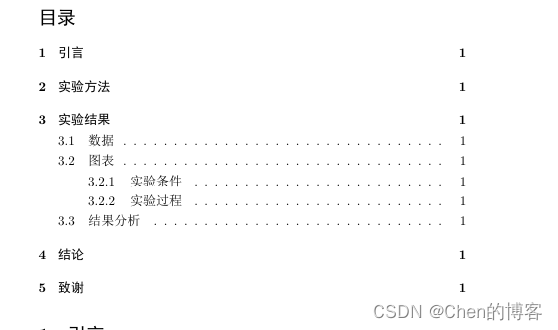
\tableofcontents 命令产生文档的目录
%正文区
\begin{document}%\begin ... \end设置环境,一个文档有且只有一个document环境
	\maketitle
	\tableofcontents
	\section{引言}%使用\section{title}构建小结
	中国式现代化道路是中国共产党团结带领中国人民在实现中华民族伟大复兴的历史叙事、理论探索和生动实践中不断生发出来的,从根本上区别于西方现代化,创造了人类文明新形态。
	\section{实验方法}
	\section{实验结果}
	\subsection{数据}%用\subsection{title}构建子小结
	\subsection{图表}
	\subsubsection{实验条件}%用\subsubsection{title}构建子子小结
	\subsubsection{实验过程}
	\subsection{结果分析}
	\section{结论}
	\section{致谢}
\end{document}
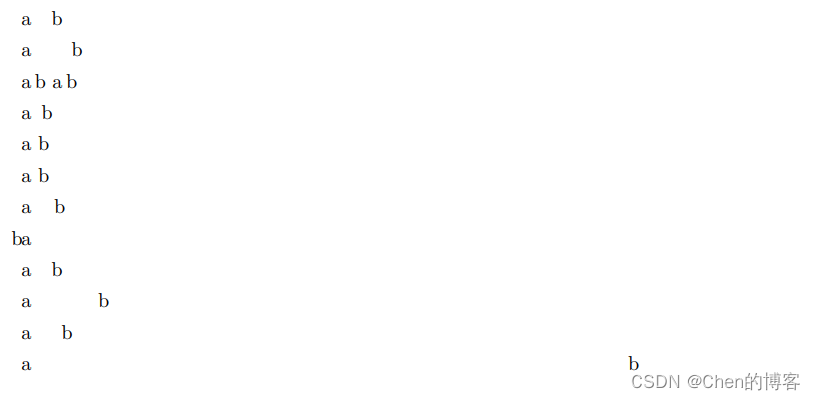
LaTeX中的特殊字符
LaTeX空行分段,多个空行等同于一个空行
每个段落首行缩进,不能用空格代替

英文中多个空格处理为1个空格,中文中空格将被忽略
中文与英文混合时,中文和英文中间会自动产生空格
汉字与其它字符的间距会自动由XeLaTeX处理
禁止使用中文全角空格
当需要空格时,可以靠输入命令产生
	%1em(当前字体中M的宽度)
	a\quad b

	% 2em
	a\qquad b

	% 约为1/6个em
	a\,b a\thinspace b

	% 0.5个em
	a\enspace b

	% 空格
	a\ b

	% 硬空格(不能分割)
	a~b

	%1pc=12pt=4.218mm
	a\kern 1pc b

	a\kern -1em b

	a\hskip 1em b

	a\hspace{35pt}b

	%占位宽度
	a\hphantom{xyz}b

	%弹性长度(充满整个空间)
	a\hfill b
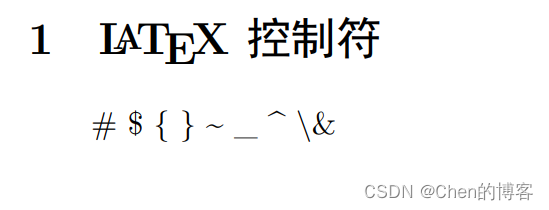
LaTeX中
# $ %都有特殊含义,输入时需要特殊处理,
\\表示换行,因此文本中表示\用\textbackslash
例如:
\# \$ \{ \} \~{} \_{} \^{} \textbackslash \&
排版时的特殊符号表示
\S \P \dag \ddag \copyright \pounds

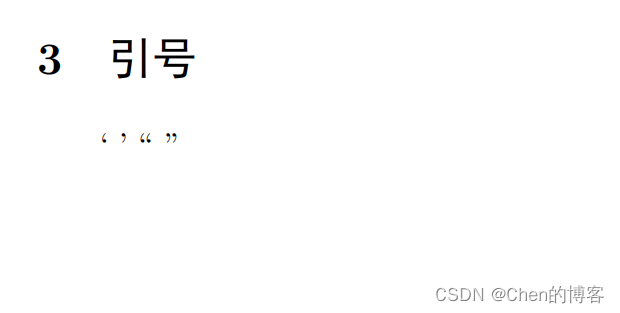
引号
` ' `` ''
`表示左单引号
'表示右单引号
``表示左双引号
''表示右双引号
连字符
- -- ---
短中长

LaTeX中的插图
LaTeX中通过graphicx宏包引入插图
%导言区:\usepackage{graphicx}
%语法:\includegraphics[<选项>]{<文件名>}
%格式:EPS、PDF、PNG、JPEG、BMP

\usepackage{graphicx}%LaTeX中通过graphicx宏包引入插图
\graphicspath{{tp/}}%图片在当前目录下的tp目录

\includegraphics{1}%插入图像1
\includegraphics{2}%插入图像2
%引入可选参数 缩放因子scale、高度height、宽度width不同参数之间用,分隔

\includegraphics[scale=0.5,height=2cm,width=2cm]{1}
\includegraphics[scale=0.2,height=0.1\textheight,width=0.1\textwidth]{2}
还可以指定旋转角度,例如:angle=45

LaTeX中的表格
LaTeX中使用tabular环境生成表格
\begin{tabular}

\end{tabular}
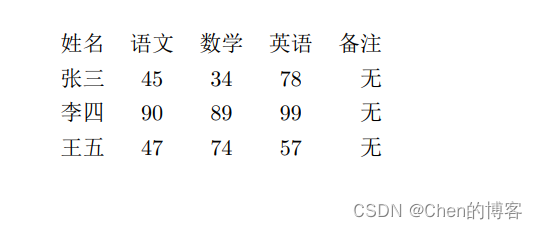
	\begin{tabular}{l c c c r}%指定排版格式 l左对齐 c居中 r右对齐
		姓名 & 语文 & 数学 & 英语 & 备注 \\%\\不同列用&分隔,用\\换行
		张三 & 45 & 34 &78 & 无\\
		李四 & 90 & 89 &99 & 无\\
		王五 & 47 & 74 &57 & 无\\
	\end{tabular}
在格式说明中用|产生表格竖线
{l|c|c|c|r}

使用hline命令产生表格横线
	\begin{tabular}{|l|c|c|c|r|}%指定排版格式 l左对齐 c居中 r右对齐
		\hline
		姓名 & 语文 & 数学 & 英语 & 备注 \\%\\不同列用&分隔,用\\换行
		\hline
		张三 & 45 & 34 &78 & 无\\
		\hline
		李四 & 90 & 89 &99 & 无\\
		\hline
		王五 & 47 & 74 &57 & 无\\
		\hline
	\end{tabular}
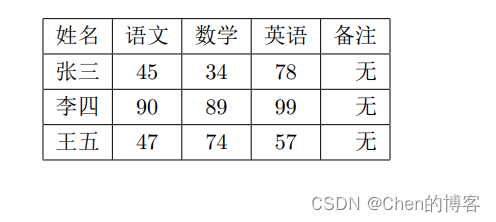
使用两个\hline命令产生双横线,两个|产生表格双竖线
	\begin{tabular}{|l|c|c||c|r|}%指定排版格式 l左对齐 c居中 r右对齐
		\hline
		姓名 & 语文 & 数学 & 英语 & 备注 \\%\\不同列用&分隔,用\\换行
		\hline\hline
		张三 & 45 & 34 &78 & 无\\
		\hline
		李四 & 90 & 89 &99 & 无\\
		\hline
		王五 & 47 & 74 &57 & 无\\
		\hline
	\end{tabular}

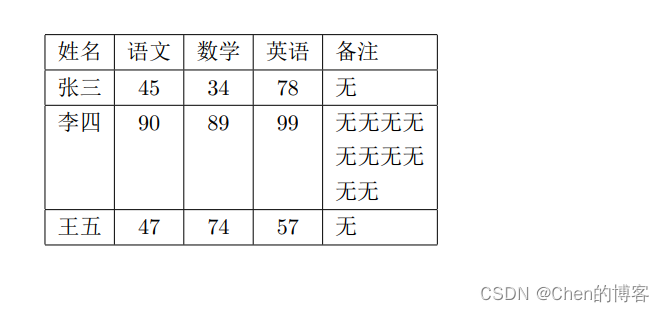
使用p{}产生指定宽度的列,表格内容超出时自动换行
	\begin{tabular}{|l|c|c|c|p{1.5cm}|}%指定排版格式 l左对齐 c居中 r右对齐
		\hline
		姓名 & 语文 & 数学 & 英语 & 备注 \\%\\不同列用&分隔,用\\换行
		\hline
		张三 & 45 & 34 &78 & 无\\
		\hline
		李四 & 90 & 89 &99 & 无无无无无无无无无无\\
		\hline
		王五 & 47 & 74 &57 & 无\\
		\hline
	\end{tabular}
LaTeX中的浮动体
灵活的对插入图片、制作表格的管理还需要使用浮动体环境
	\begin{figure}%figure浮动体
		内容...%导入图片
	\end{figure}

	\begin{table}%table浮动体
		内容...%制作的表格
	\end{table}
\begin{document}%\begin ... \end设置环境,一个文档有且只有一个document环境
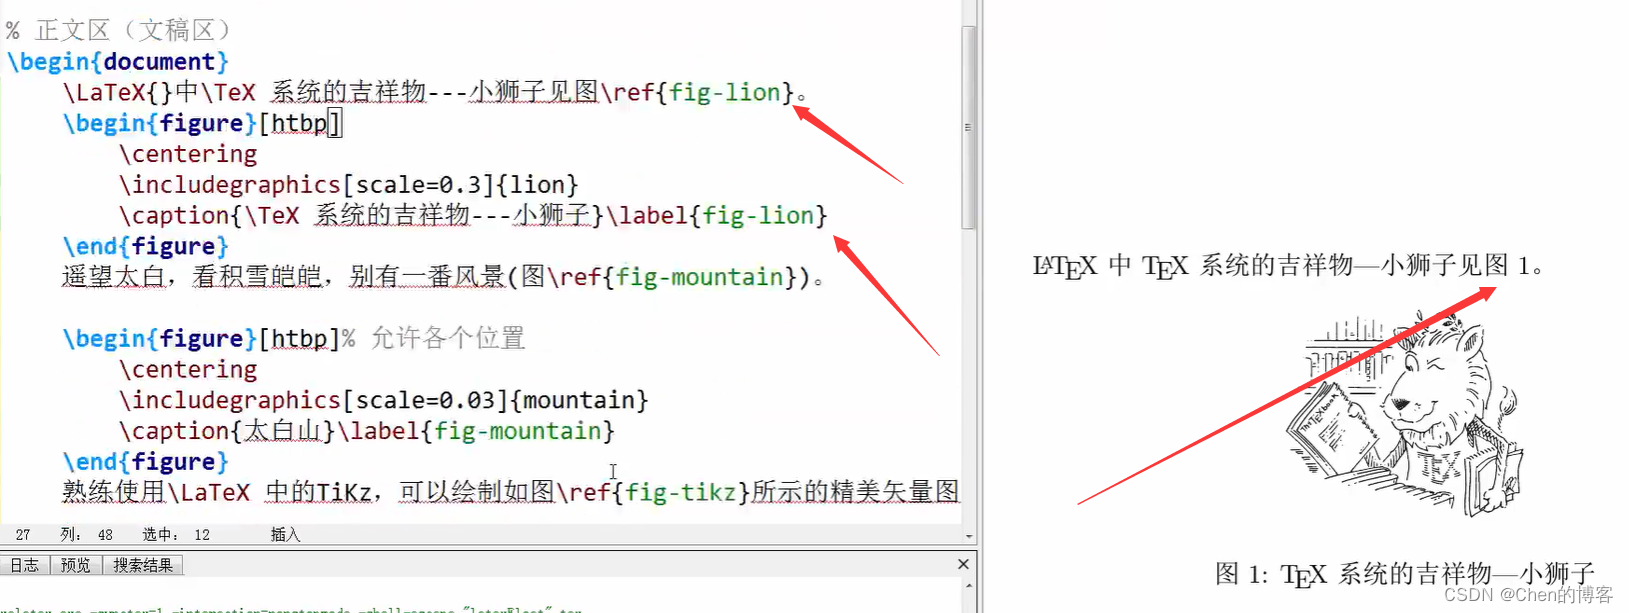
\LaTeX 中的插图:
\begin{figure}[h]%可选参数h、t、b、p,指定浮动体的排版位置
\centering%居中排版
\includegraphics[scale=0.3]{2}
\caption{\LaTeX 厨师}%设置插图标题
\end{figure}
\LaTeX 中的表格:
\begin{table}[h]
\centering%居中排版
\begin{tabular}{|l|c|c|c|r|}%指定排版格式 l左对齐 c居中 r右对齐
\hline
姓名 & 语文 & 数学 & 英语 & 备注 \\%\\不同列用&分隔,用\\换行
\hline
张三 & 45 & 34 &78 & 无\\
\hline
李四 & 90 & 89 &99 & 无\\
\hline
王五 & 47 & 74 &57 & 无\\
\hline
\end{tabular}
\end{table}
\end{document}
[htbp]指定浮动体的位置
h:此处(here)-代码所在的上下文
t:页顶(top)-代码所在页的顶部或者之后页的顶部
b:底页(botton)-代码所页的底部,或者下一页的底部
p:独立的一页(page)-浮动页面

\lable{}
\ref{}
标签-交叉引用
LaTeX数学公式
$ $行内公式
$$ $$行间公式
可以使用相应的命令生成希腊字母
公式和希腊字母可以从网上搜索,较为方便
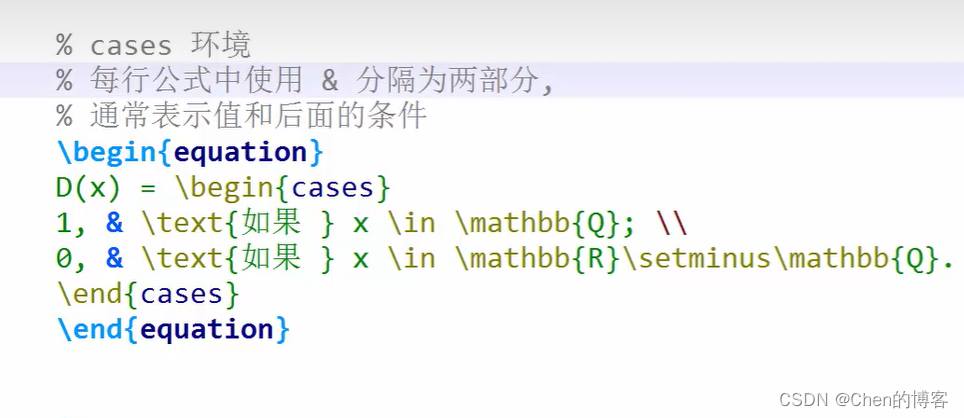
排版矩阵
	\[
	\begin{matrix}%与表格排版方式类似
	0 & 1 & 2 \\
	2 & 0 & 1
	\end{matrix}
	\]
需要引入`amsmath宏包
\usepackage{amsmath}
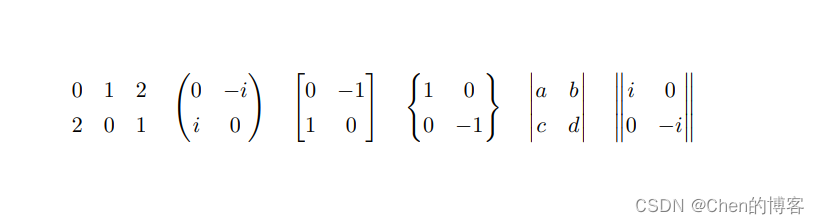
各种不同括号的矩阵
	\[
	\begin{matrix}%与表格排版方式类似
	0 & 1 & 2 \\
	2 & 0 & 1 \\
	\end{matrix}
	\quad
	\begin{pmatrix}
		 0 & -i \\
		 i & 0
	 \end{pmatrix}
 	\quad
	\begin{bmatrix}
		 0 & -1 \\
		  1 & 0
	  \end{bmatrix}
  	\quad
	\begin{Bmatrix}
		 1 & 0 \\
		 0 & -1
	 \end{Bmatrix}
 	\quad
	\begin{vmatrix}
		 a & b \\
		 c & d
	 \end{vmatrix}
 	\quad
	\begin{Vmatrix}
		 i & 0 \\
		 0 & -i
	 \end{Vmatrix}
    \]
矩阵中常用省略号
\dots 横向省略号
\vdots 斜省略号
\ddots 纵向省略号
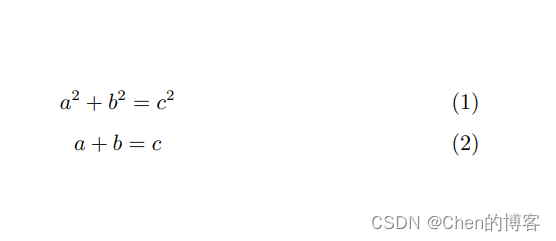
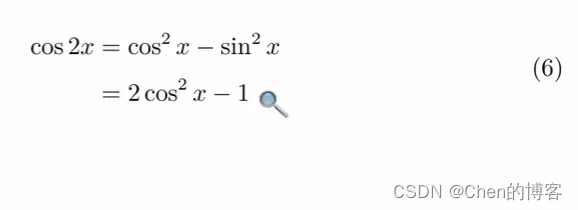
多行公式排版
	\begin{gather}
		a^2+b^2=c^2\\
		a+b=c
	\end{gather}
在\\前使用\notag阻止编号
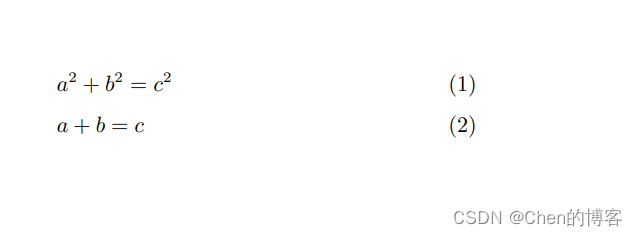
使用align对齐公式
	\begin{align}%用&控制对齐
		&a^2+b^2=c^2\\
		&a+b=c
	\end{align}


此外,可以使用\text{中文}在数学模式中处理中文
LaTeX中的参考文献—BibTex
一次管理,一次使用
	一次管理,一次使用
	参考文献格式:
	\begin{thebibliography}{编号样本}
		\bibitem[记号]{引用标志}文献条目1
		\bibitem[记号]{引用标志}文献条目2
		.......
	\end{thebibliography}
	其中文献条目包括:作者,题目,出版社,年代,版本,页码等。
	引用文献时候可以采用:\cite{引用标志1,引用标志2,...}
例如:
%	一次管理,一次使用
%	参考文献格式:
%	\begin{thebibliography}{编号样本}
%		\bibitem[记号]{引用标志}文献条目1
%		\bibitem[记号]{引用标志}文献条目2
%		.......
%	\end{thebibliography}
%	其中文献条目包括:作者,题目,出版社,年代,版本,页码等。
%	引用文献时候可以采用:\cite{引用标志1,引用标志2,...}
	引用一篇论文\cite{article1},引用一本书\cite{book1}
	\begin{thebibliography}{99}
		\bibitem{article1}陈立辉,苏伟,蔡川,陈晓云.\emph{基于\LaTeX 的Web数学公式提取方法研究}[J].计算机科学.2014(06)
		\bibitem{book1}William H. Press,Saul A. Teukolsky,William T. Vetterling,Brain P.Flannery,\emph{Numerical Recipes 3rd Edition: The Art of Scientific Computing}Cambridge University Press,New Yor,2007.
		\bibitem{latexGuide} Kopka Helmut, W. Daly Patrick,\emph{Guide tp \LaTeX},$4^{th}$ Edition.Available at \texttt{http://www.amazon.com}.
		\bibitem{latexMath} Graetzer George,\emph{Math Into \LaTeX},Birkh Boston; 3 edition (June 22,2000).
	\end{thebibliography}
%	\emph{text}来强调参考文献的某些内容
%	也可以使用\texttt{text}等命令
%	使用\cite{bibid}引用餐卡文献

一次管理多次使用
单独处理参考文献,实现一次管理多次使用

完成上面操作后创建一个新文件,编写文献信息

@book{%@booK指定这是一本书籍参考文献
mittelbach2004,%引用标志
title={The {{\LaTeX}} Companion},% ,分隔字段
publisher={Addison-Wesley},
year={2004},
author={Frank Mittelbach and Michel Goossens},
series={Tools and Techniques for Computer Typesetting},
address={Boston},
edition={Second}
}
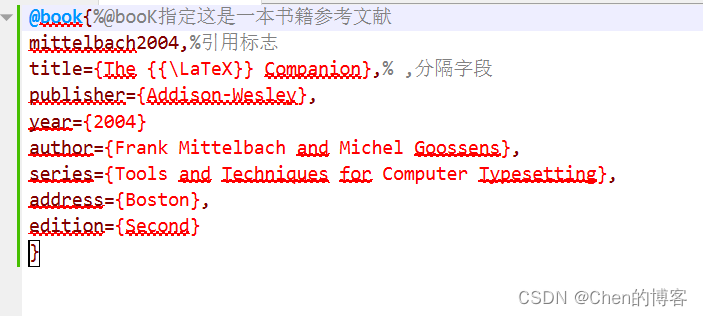
保存为.bib后缀文件

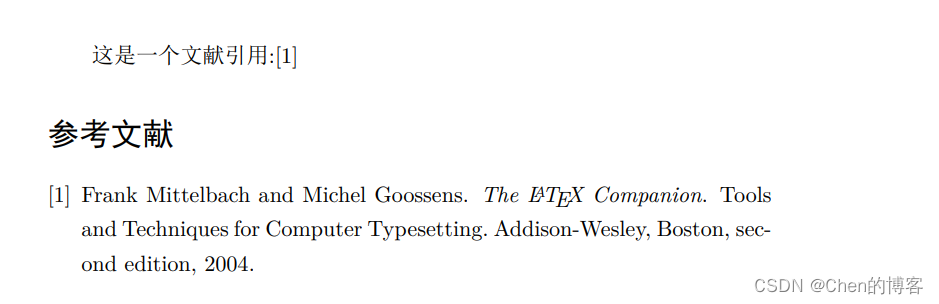
\bibliographystyle{plain}%设置在导言区,指定参考文献的排版样式
%正文区
\begin{document}%\begin ... \end设置环境,一个文档有且只有一个document环境
	这是一个文献引用:\cite{mittelbach2004}
	\bibliography{test}%导入参考文献
\end{document}
这样管理方便了一些,但还是需要手动输入,可以使用google学术,
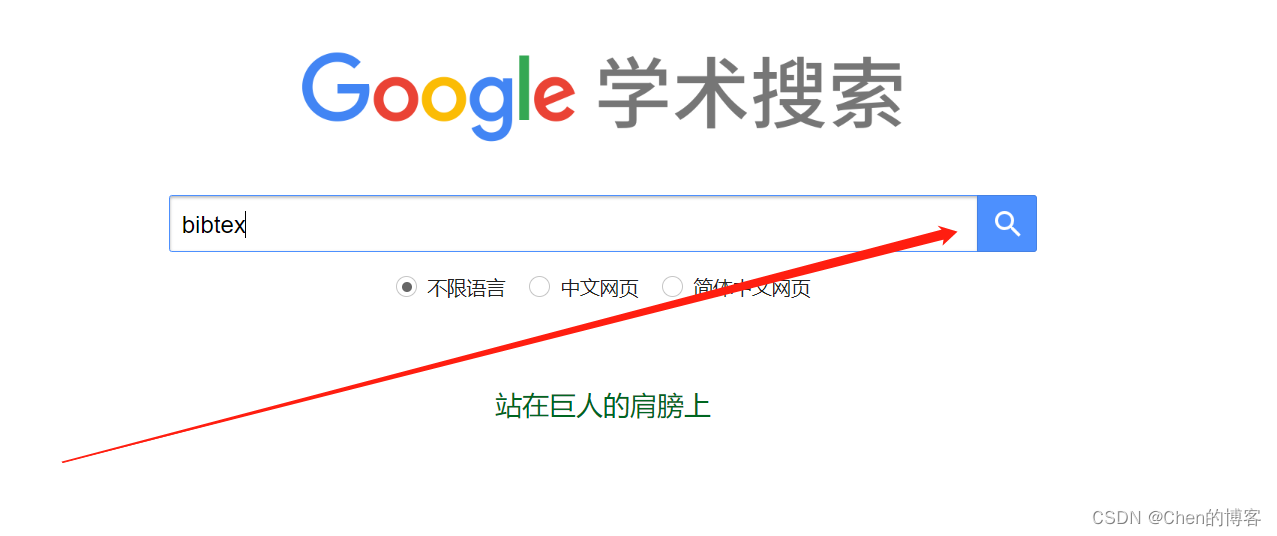

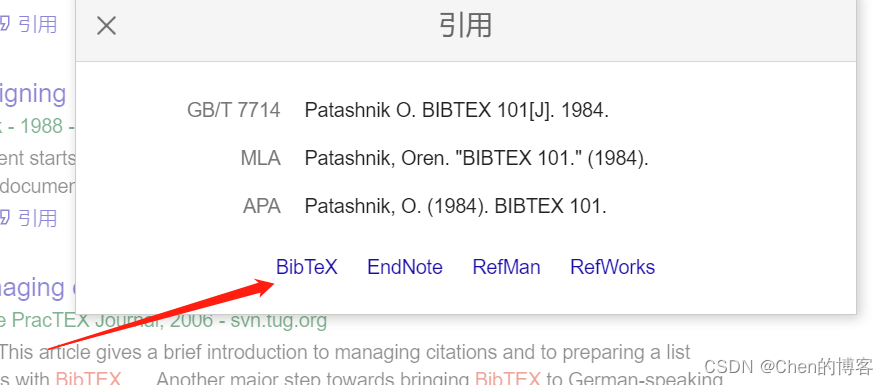

可以直接赋值粘贴到.bib文件中,这样就非常方便了
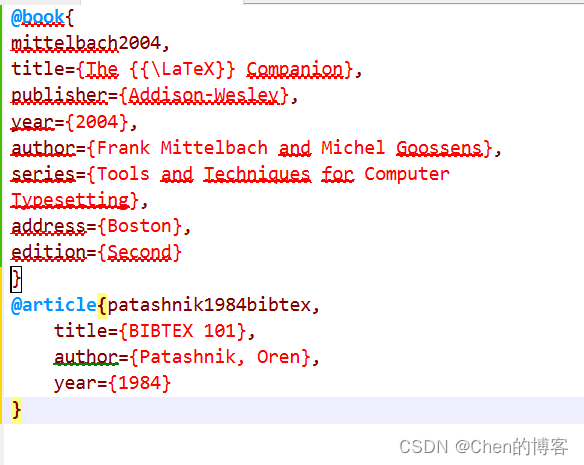
然后就可以引用文献了
\bibliographystyle{plain}%设置在导言区,指定参考文献的排版样式
%正文区
\begin{document}%\begin ... \end设置环境,一个文档有且只有一个document环境
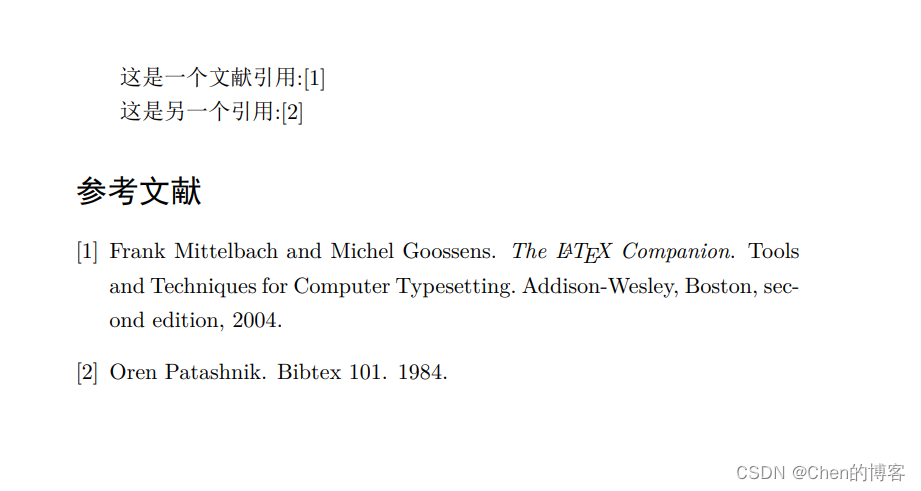
这是一个文献引用:\cite{mittelbach2004}
这是另一个引用:\cite{patashnik1984bibtex}
\bibliography{test}%导入参考文献
\end{document}
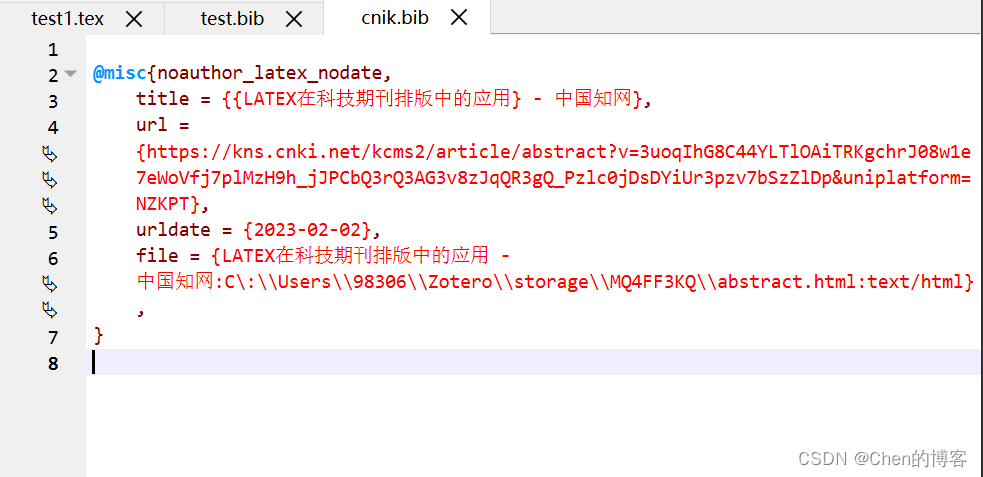
除了使用google学术也能使用Zotero来进行文献管理,导出.bib文件
需要先安装zotero
Zotero安装教程
Zotero使用教程
\bibliographystyle{plain}%设置在导言区,指定参考文献的排版样式
%正文区
\begin{document}%\begin ... \end设置环境,一个文档有且只有一个document环境
	这是一个文献引用:\cite{mittelbach2004}

	这是另一个引用:\cite{patashnik1984bibtex}

	这还是一个文献:\cite{noauthor_latex_nodate}
	\bibliography{test,cnik}%导入参考文献
\end{document}

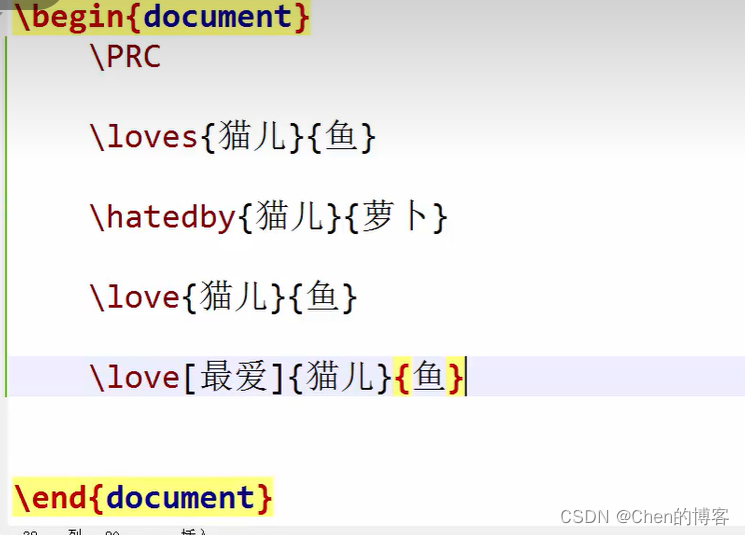
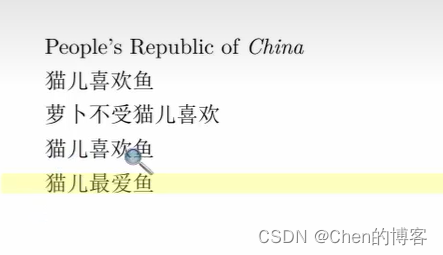
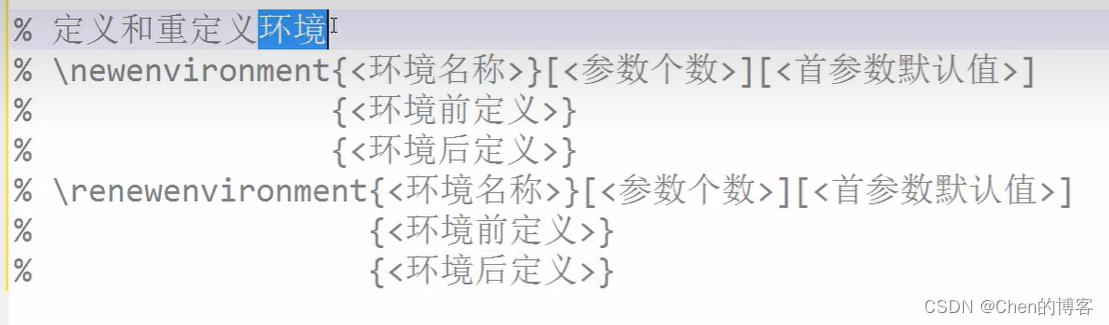
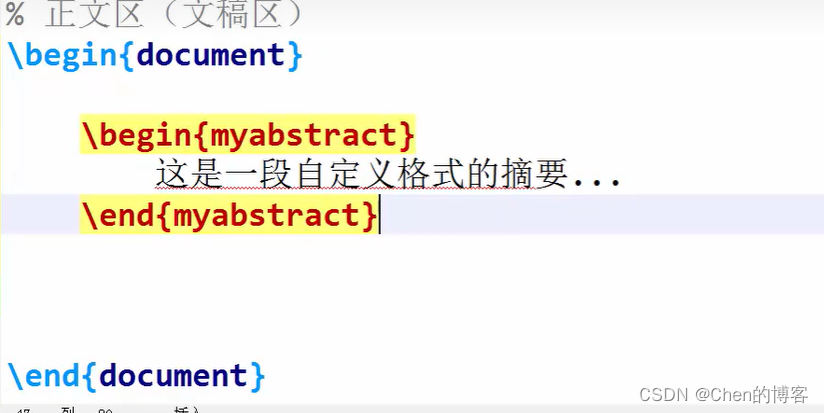
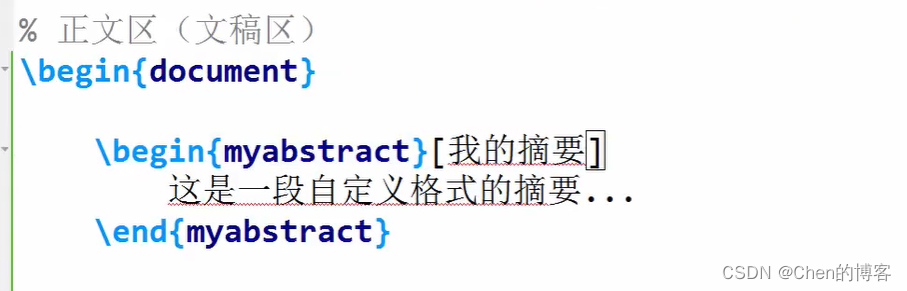
\newcommand自定义命令和环境


 6094
6094


 被折叠的 条评论
为什么被折叠?
被折叠的 条评论
为什么被折叠?
 到【灌水乐园】发言


