


1、目前我所了解到的activiti工作流想要在项目中使用分为两种:
一、一种较为简单,只需要使用idea的插件来画流程图。(我所使用的的插件是Activiti BPMN visualizer)

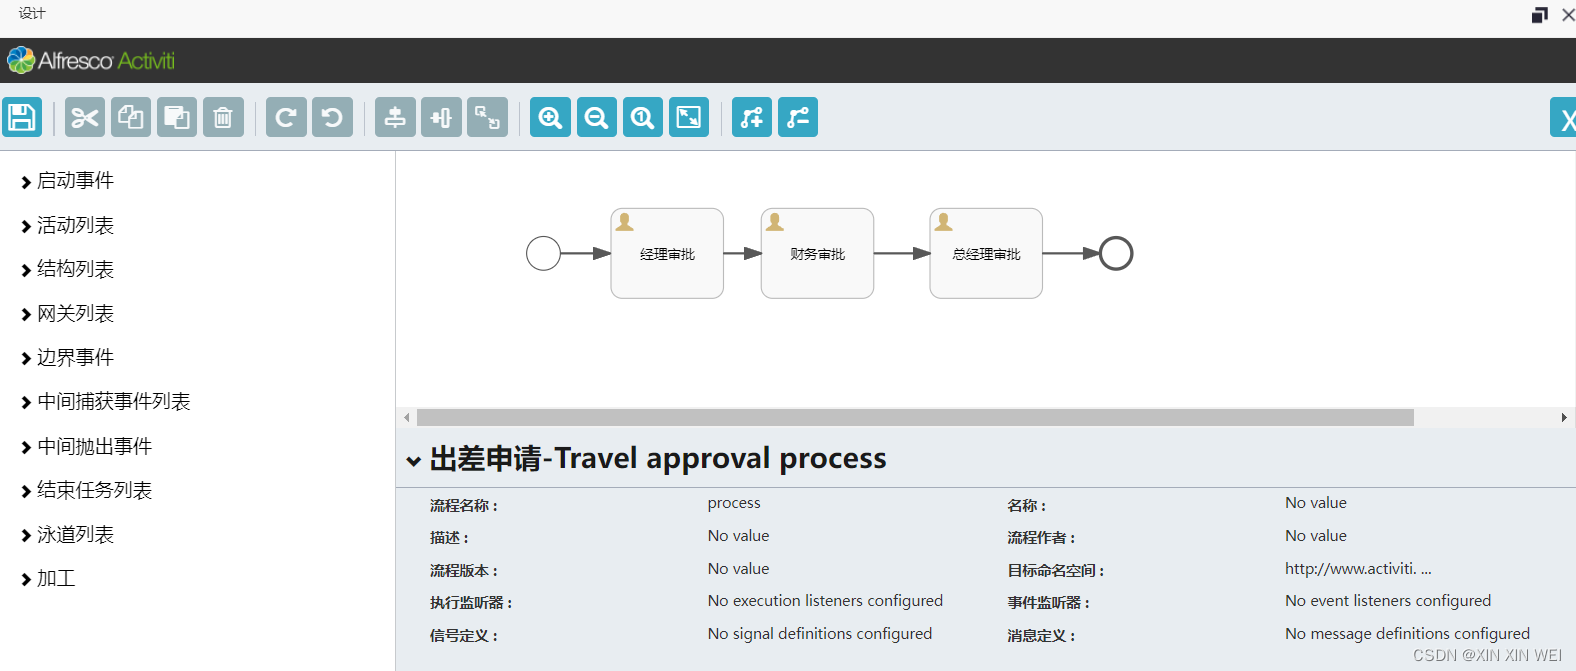
二、另一种就是可以使用(在线流程设计器)或者(页面设计器部署到自己项目中)来画流程图。
本文是将流程设计页面部署到了项目中
2、先来看看两种方式的效果吧,是否满足您所需要的结果。
一、使用idea的插件来画流程图。
二、流程设计页面画流程图。 
3、那么现在开始实现上面两种流图以及部署启动流程
一、先来第一种方式(比较简单)好入手,对于第一次接触的可以很好的去了解到这个Activiti流程引擎的过程。
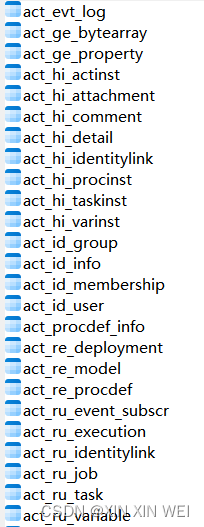
首先你需要了解activiti的 25张表(这里就不多说了,网上很好找到)
1)、先导入相关的activiti依赖(一定要注意版本号)
<dependencies>
        <dependency>
            <groupId>org.activiti</groupId>
            <artifactId>activiti-spring-boot-starter-basic</artifactId>
            <version>5.22.0</version>
        </dependency>
        <dependency>
            <groupId>org.activiti</groupId>
            <artifactId>activiti-rest</artifactId>
            <version>5.22.0</version>
        </dependency>
        <dependency>
            <groupId>org.activiti</groupId>
            <artifactId>activiti-diagram-rest</artifactId>
            <version>5.22.0</version>
        </dependency>
        <dependency>
            <groupId>org.activiti</groupId>
            <artifactId>activiti-spring</artifactId>
            <version>5.22.0</version>
        </dependency>
        <dependency>
            <groupId>org.activiti</groupId>
            <artifactId>activiti-json-converter</artifactId>
            <version>5.22.0</version>
        </dependency>
    </dependencies>
2)、配置相关 activiti.xml 文件连接数据库,用来生成 25张表
需要注意(xml文件名和xml中id="processEngineConfiguration"不要乱改)
<?xml version="1.0" encoding="UTF-8"?>
<beans xmlns="http://www.springframework.org/schema/beans"
       xmlns:xsi="http://www.w3.org/2001/XMLSchema-instance"
       xmlns:context="http://www.springframework.org/schema/context"
       xmlns:tx="http://www.springframework.org/schema/tx"
       xsi:schemaLocation="http://www.springframework.org/schema/beans
                    http://www.springframework.org/schema/beans/spring-beans.xsd
http://www.springframework.org/schema/contex
http://www.springframework.org/schema/context/spring-context.xsd
http://www.springframework.org/schema/tx
http://www.springframework.org/schema/tx/spring-tx.xsd">

    <!-- 这里可以使用 链接池 dbcp-->
    <bean id="dataSource" class="org.apache.commons.dbcp.BasicDataSource">
        <property name="driverClassName" value="com.mysql.cj.jdbc.Driver" />
        <property name="url" value="jdbc:mysql://localhost:3306/activiti?serverTimezone=Asia/Shanghai"/>
        <property name="username" value="*****" />
        <property name="password" value="*****" />
        <property name="maxActive" value="3" />
        <property name="maxIdle" value="1" />
    </bean>

    <bean id="processEngineConfiguration"
          class="org.activiti.engine.impl.cfg.StandaloneProcessEngineConfiguration">
        <property name="dataSource" ref="dataSource" />
        <property name="databaseSchemaUpdate" value="true"/>
    </bean>

</beans>
3)、配置好需要测试类启动生成表
package com.atxinxin;

import org.activiti.engine.ProcessEngine;
import org.activiti.engine.ProcessEngineConfiguration;
import org.junit.jupiter.api.Test;

/**
 * @author weixinxin 2023-06-28
 **/
public class TestCreateTable {

    @Test
    public void testCreat(){
        ProcessEngineConfiguration processEngineConfiguration =
                ProcessEngineConfiguration.createProcessEngineConfigurationFromResource("activiti.xml","processEngineConfiguration");
        ProcessEngine processEngine = processEngineConfiguration.buildProcessEngine();
        System.out.println("processEngine = " + processEngine);
    }
}
4)、结构目录

5)、生成的数据表
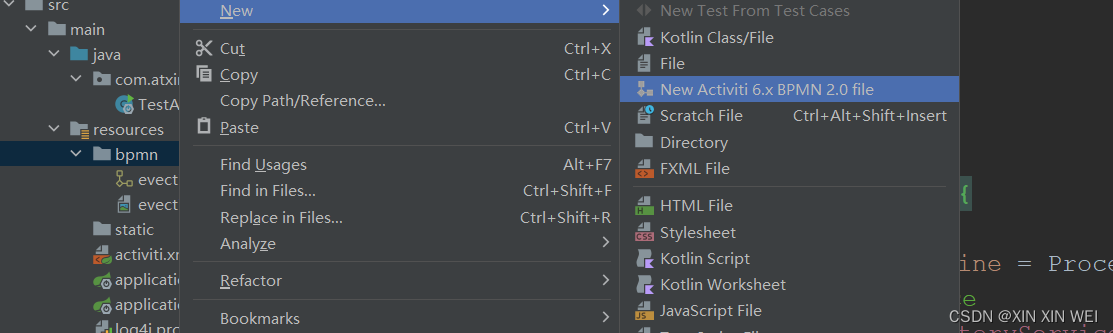
6)、接下来需要画流程图,插件开头已经提过,这里不说了,在resources包下创建一个bpmn包用来放流程图的xml文件和bpmn文件,右键新建一个文件例如(activiti.bpmn20.xml)
7)、右键最下面打开Diagram界面
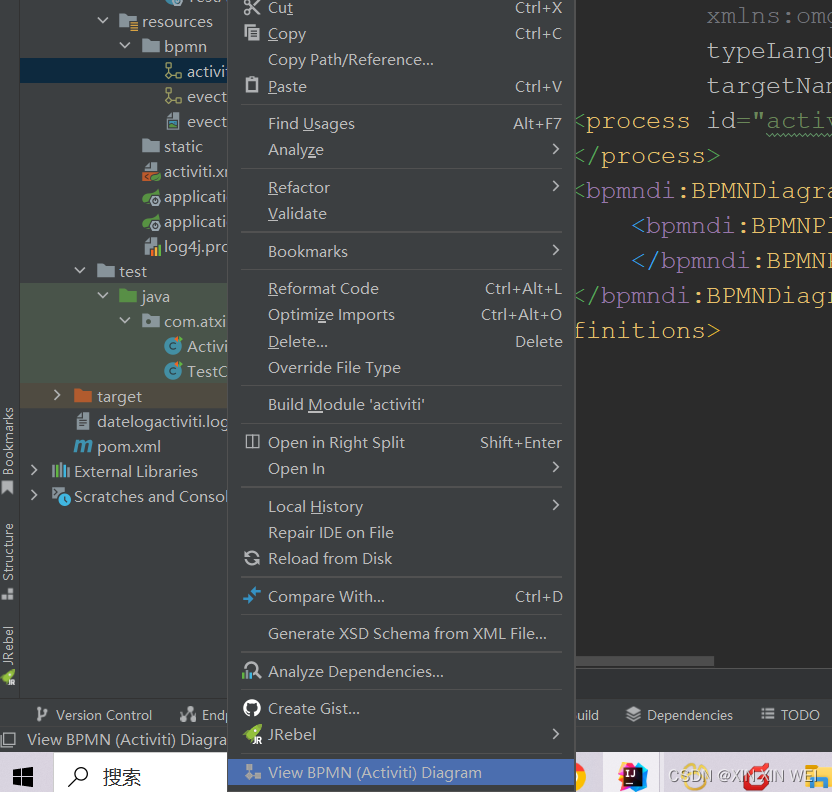

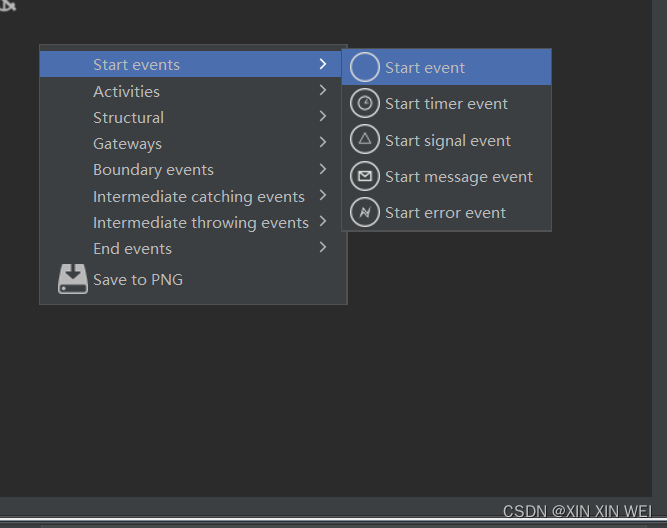
8)、再空白页面右键有各个事件(介绍三个必不可少的)启动、节点、结束


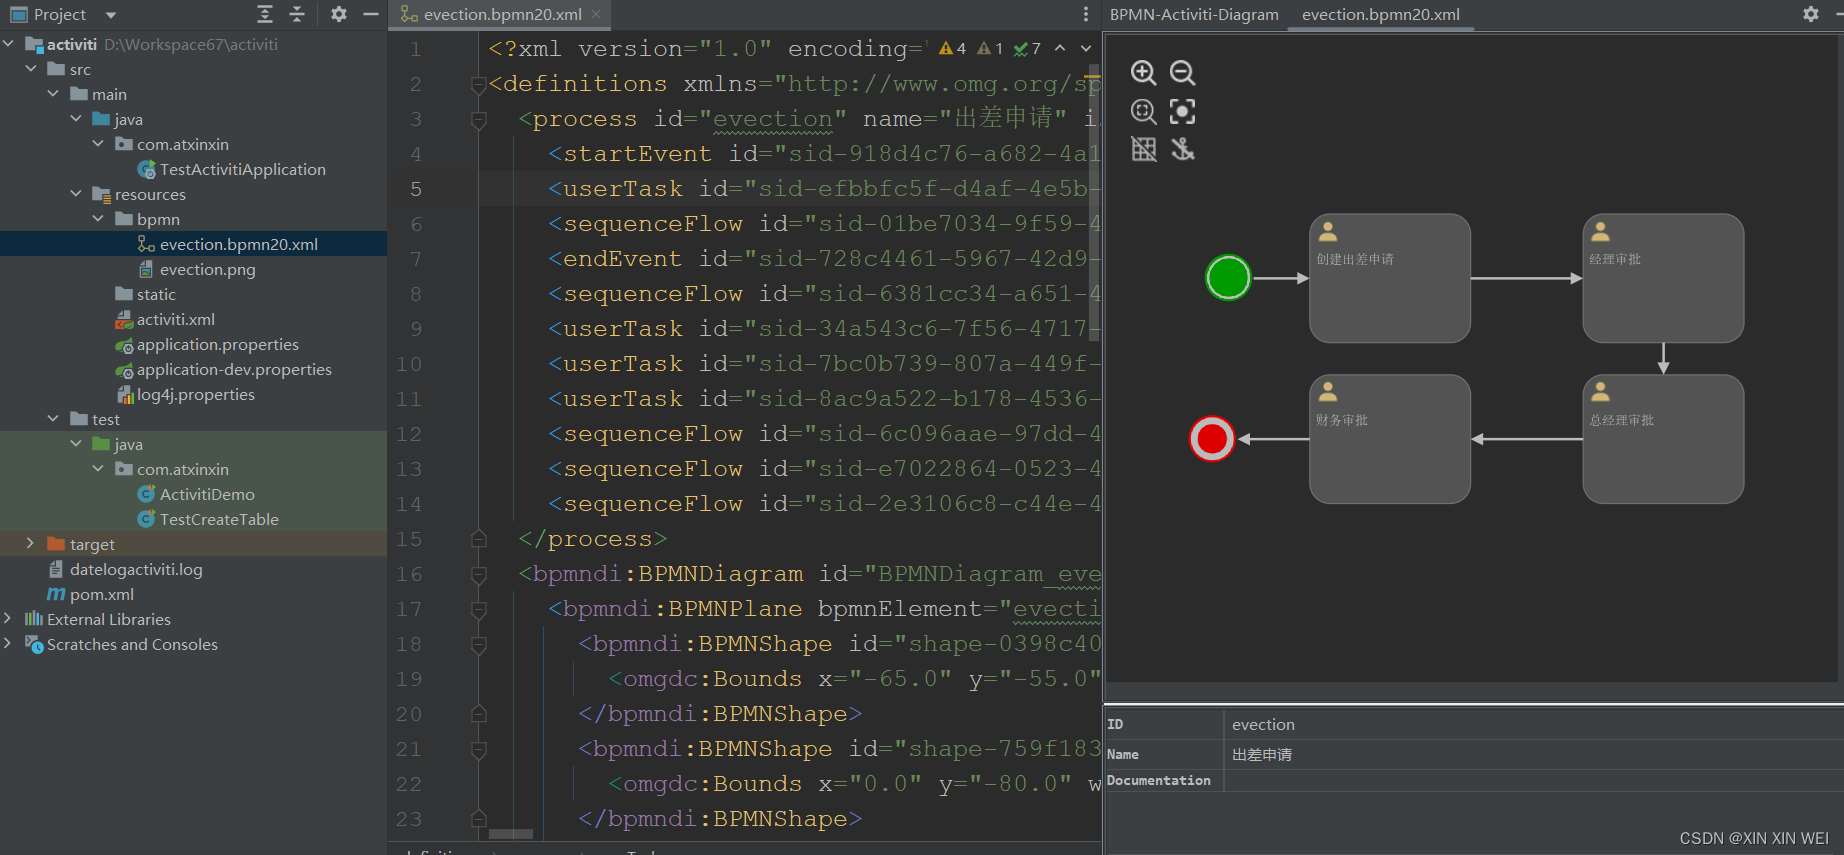
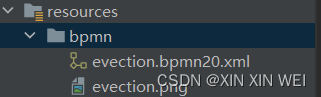
10)、到这里会玩的大概也差不多了,怎么画就不详细说了,我这里把我的 evection.bpmn20.xml 放出来。对于png文件把后缀名改成png就可以
<?xml version="1.0" encoding="UTF-8"?>
<definitions xmlns="http://www.omg.org/spec/BPMN/20100524/MODEL" xmlns:xsi="http://www.w3.org/2001/XMLSchema-instance" xmlns:xsd="http://www.w3.org/2001/XMLSchema" xmlns:activiti="http://activiti.org/bpmn" xmlns:bpmndi="http://www.omg.org/spec/BPMN/20100524/DI" xmlns:omgdc="http://www.omg.org/spec/DD/20100524/DC" xmlns:omgdi="http://www.omg.org/spec/DD/20100524/DI" typeLanguage="http://www.w3.org/2001/XMLSchema" expressionLanguage="http://www.w3.org/1999/XPath" targetNamespace="http://www.activiti.org/processdef">
  <process id="evection" name="出差申请" isExecutable="true">
    <startEvent id="sid-918d4c76-a682-4a1d-8160-c853a2293fc0" name="myEvection"/>
    <userTask id="sid-efbbfc5f-d4af-4e5b-9f2c-6ac2be4fb0de" name="创建出差申请" activiti:assignee="zhangsan"/>
    <sequenceFlow id="sid-01be7034-9f59-4812-9d89-42603748a9f7" sourceRef="sid-918d4c76-a682-4a1d-8160-c853a2293fc0" targetRef="sid-efbbfc5f-d4af-4e5b-9f2c-6ac2be4fb0de"/>
    <endEvent id="sid-728c4461-5967-42d9-99dd-973e989dc6b9" name="endEvection"/>
    <sequenceFlow id="sid-6381cc34-a651-4d8e-aa9e-1639bd0c765a" sourceRef="sid-efbbfc5f-d4af-4e5b-9f2c-6ac2be4fb0de" targetRef="sid-34a543c6-7f56-4717-81e3-ac3e9f781f68"/>
    <userTask id="sid-34a543c6-7f56-4717-81e3-ac3e9f781f68" name="经理审批" activiti:assignee="lisi"/>
    <userTask id="sid-7bc0b739-807a-449f-9280-efad4650434d" name="总经理审批" activiti:assignee="wangwu"/>
    <userTask id="sid-8ac9a522-b178-4536-bf6c-3354a303301b" name="财务审批" activiti:assignee="zhaoliu"/>
    <sequenceFlow id="sid-6c096aae-97dd-4a4b-bac9-d14f540a960f" sourceRef="sid-34a543c6-7f56-4717-81e3-ac3e9f781f68" targetRef="sid-7bc0b739-807a-449f-9280-efad4650434d"/>
    <sequenceFlow id="sid-e7022864-0523-4dd4-a652-04a80dd83730" sourceRef="sid-7bc0b739-807a-449f-9280-efad4650434d" targetRef="sid-8ac9a522-b178-4536-bf6c-3354a303301b"/>
    <sequenceFlow id="sid-2e3106c8-c44e-436d-8873-20c1351f8041" sourceRef="sid-8ac9a522-b178-4536-bf6c-3354a303301b" targetRef="sid-728c4461-5967-42d9-99dd-973e989dc6b9"/>
  </process>
  <bpmndi:BPMNDiagram id="BPMNDiagram_evection">
    <bpmndi:BPMNPlane bpmnElement="evection" id="BPMNPlane_evection">
      <bpmndi:BPMNShape id="shape-0398c401-36bb-469a-8d7d-2f7cc9c4155e" bpmnElement="sid-918d4c76-a682-4a1d-8160-c853a2293fc0">
        <omgdc:Bounds x="-65.0" y="-55.0" width="30.0" height="30.0"/>
      </bpmndi:BPMNShape>
      <bpmndi:BPMNShape id="shape-759f1834-be0a-4ca0-bca5-8c4ca232b22a" bpmnElement="sid-efbbfc5f-d4af-4e5b-9f2c-6ac2be4fb0de">
        <omgdc:Bounds x="0.0" y="-80.0" width="100.0" height="80.0"/>
      </bpmndi:BPMNShape>
      <bpmndi:BPMNEdge id="edge-e9e3e744-8b73-4c26-8266-1534dd6f6e0e" bpmnElement="sid-01be7034-9f59-4812-9d89-42603748a9f7">
        <omgdi:waypoint x="-35.0" y="-40.0"/>
        <omgdi:waypoint x="0.0" y="-40.0"/>
      </bpmndi:BPMNEdge>
      <bpmndi:BPMNShape id="shape-81cdb314-1800-4251-bf37-c5905fa74294" bpmnElement="sid-728c4461-5967-42d9-99dd-973e989dc6b9">
        <omgdc:Bounds x="-75.0" y="45.0" width="30.0" height="30.0"/>
      </bpmndi:BPMNShape>
      <bpmndi:BPMNEdge id="edge-b3dae946-cff0-4424-85da-d5a1663bab38" bpmnElement="sid-6381cc34-a651-4d8e-aa9e-1639bd0c765a">
        <omgdi:waypoint x="100.0" y="-40.0"/>
        <omgdi:waypoint x="170.0" y="-40.0"/>
      </bpmndi:BPMNEdge>
      <bpmndi:BPMNShape id="shape-e5dcff26-8968-49b2-9ffb-e8af02dde13d" bpmnElement="sid-34a543c6-7f56-4717-81e3-ac3e9f781f68">
        <omgdc:Bounds x="170.0" y="-80.0" width="100.0" height="80.0"/>
      </bpmndi:BPMNShape>
      <bpmndi:BPMNShape id="shape-dc398d5e-7227-4a25-8787-51e4544d9c31" bpmnElement="sid-7bc0b739-807a-449f-9280-efad4650434d">
        <omgdc:Bounds x="170.0" y="20.0" width="100.0" height="80.0"/>
      </bpmndi:BPMNShape>
      <bpmndi:BPMNShape id="shape-54b39e0b-98ac-4d20-88dc-df942e84e52d" bpmnElement="sid-8ac9a522-b178-4536-bf6c-3354a303301b">
        <omgdc:Bounds x="0.0" y="20.0" width="100.0" height="80.0"/>
      </bpmndi:BPMNShape>
      <bpmndi:BPMNEdge id="edge-33a2f259-0113-4f01-adf2-bcc42e680591" bpmnElement="sid-6c096aae-97dd-4a4b-bac9-d14f540a960f">
        <omgdi:waypoint x="220.0" y="0.0"/>
        <omgdi:waypoint x="220.0" y="20.0"/>
      </bpmndi:BPMNEdge>
      <bpmndi:BPMNEdge id="edge-14615a3e-cad3-4f3d-a378-e8fff55ddc33" bpmnElement="sid-e7022864-0523-4dd4-a652-04a80dd83730">
        <omgdi:waypoint x="170.0" y="60.0"/>
        <omgdi:waypoint x="100.0" y="60.0"/>
      </bpmndi:BPMNEdge>
      <bpmndi:BPMNEdge id="edge-a275de64-4c05-4b3b-a719-70fa26145a5a" bpmnElement="sid-2e3106c8-c44e-436d-8873-20c1351f8041">
        <omgdi:waypoint x="0.0" y="60.0"/>
        <omgdi:waypoint x="-45.0" y="60.0"/>
      </bpmndi:BPMNEdge>
    </bpmndi:BPMNPlane>
  </bpmndi:BPMNDiagram>
</definitions>
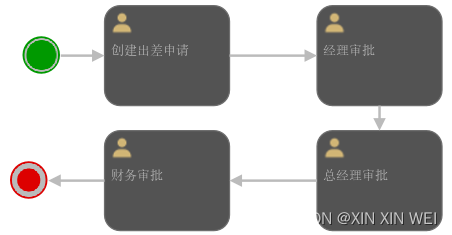
这里 创建申请-zhansan 经理-lisi 总经理-wangwu 财务-zhaoliu
11)、部署流程图 部署完成查看act_re_deployment表
@Test
    public void testDeployment(){
        // 1.创建processEngine
        ProcessEngine processEngine = ProcessEngines.getDefaultProcessEngine();
        // 2.获取RepositoryService
        RepositoryService repositoryService = processEngine.getRepositoryService();
        // 3.使用service进行流程部署 ,定义流程名,把 bpmn 和 png 部署到数据库
        Deployment deployment = repositoryService.createDeployment()
                .name("出差申请流程")
                .addClasspathResource("bpmn/evection.bpmn20.xml")
                .addClasspathResource("bpmn/evection.png")
                .deploy();
        System.out.println("流程部署id = " + deployment.getId());
        System.out.println("流程部署name = " + deployment.getName());
    }
12)、启动流程实例
/**
    *@Description 启动流程实例
    *@author weixinxin
    *@Date   17:17 2023/6/28
    **/
    @Test
    public void testStartProcess(){
        // 1. 创建ProcessEngine
        ProcessEngine processEngine = ProcessEngines.getDefaultProcessEngine();
        // 2. 获取RuntimeService
        RuntimeService runtimeService = processEngine.getRuntimeService();
        // 3. 根据流程定义的id启动流程
        ProcessInstance myEvection = runtimeService.startProcessInstanceByKey("evection");
        System.out.println("流程定义id = " + myEvection.getProcessDefinitionId());
        System.out.println("流程实例id = " + myEvection.getId());
        System.out.println("当前活动id = " + myEvection.getActivityId());
    }
13)、查询个人待办任务
/**
    *@Description 查询个人待执行的任务
    *@author weixinxin
    *@Date   17:33 2023/6/28
    **/
    @Test
    public void testFindPersonalTaskList(){
        // 1.获取流程引擎
        ProcessEngine processEngine = ProcessEngines.getDefaultProcessEngine();
        // 2.获取taskService
        TaskService taskService = processEngine.getTaskService();
        // 3.根据流程key 和 任务负责人 查询任务
        List<Task> list = taskService.createTaskQuery()
                .processDefinitionKey("evection")
                .taskAssignee("zhangsan")
                .list();
        for (Task task : list) {
            System.out.println("流程实例id = " + task.getProcessInstanceId());
            System.out.println("任务id = " + task.getId());
            System.out.println("任务负责人id = " + task.getAssignee());
            System.out.println("任务名称 = " + task.getName());
        }
    }
14)、完成个人任务,依次完成zhangsan、lisi、wangwu、zhaoliu的任务
/**
    *@Description 完成个人任务
    *@author weixinxin
    *@Date   17:45 2023/6/28
    **/
    @Test
    public void completTesk(){
        // 1.获取流程引擎
        ProcessEngine processEngine = ProcessEngines.getDefaultProcessEngine();
        // 2.获取taskService
        TaskService taskService = processEngine.getTaskService();

      /*Task task = taskService.createTaskQuery() //完成zhangsan任务
                .processDefinitionKey("evection")
                .taskAssignee("zhangsan")
                .singleResult();*/

        /*Task task = taskService.createTaskQuery() //完成lisi任务
                .processDefinitionKey("evection")
                .taskAssignee("lisi")
                .singleResult();*/

        /*Task task = taskService.createTaskQuery() //完成wangwu任务
                .processDefinitionKey("evection")
                .taskAssignee("wangwu")
                .singleResult();*/

        Task task = taskService.createTaskQuery() //完成zhaoliu任务
                .processDefinitionKey("evection")
                .taskAssignee("zhaoliu")
                .singleResult();

        System.out.println("流程实例id = " + task.getProcessInstanceId());
        System.out.println("任务id = " + task.getId());
        System.out.println("任务负责人id = " + task.getAssignee());
        System.out.println("任务名称 = " + task.getName());

        taskService.complete(task.getId());
    }
以上是idea的插件简单的activiti工作引擎的使用过程
(页面设计器部署到自己项目中)来画流程图。下篇文章http://t.csdnimg.cn/yuimK


 8257
8257


 被折叠的 条评论
为什么被折叠?
被折叠的 条评论
为什么被折叠?
 到【灌水乐园】发言


