


本文用的资料均在百度网盘:
- Ubuntu 14.04 LTS,内核版本3.13:https://old-releases.ubuntu.com/releases/14.04.0/
- WePE_64_V2.3.exe https://www.wepe.com.cn/download.html
- ULtraISO9_cn_9.7.0.3476.exe
1. 材料准备
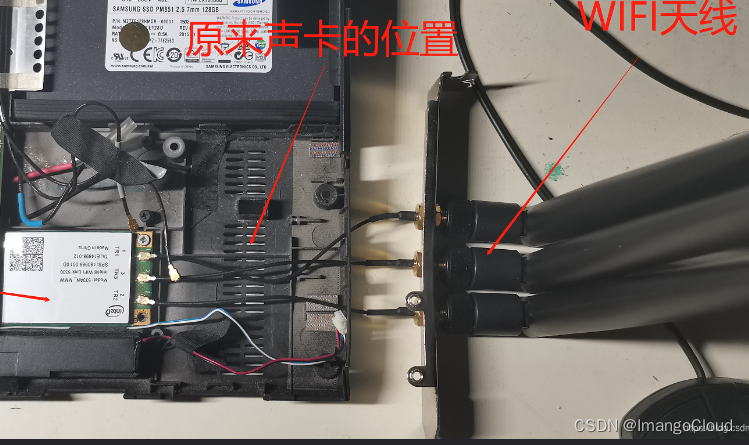
- ThinkPad X201
- Intel 5300网卡,分为三种:(如果是笔记本尽量使用半高卡,三根接线的顺序无所谓,随便接)
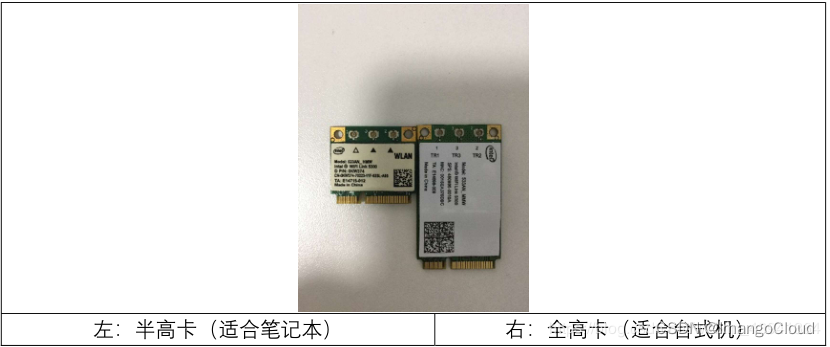
最后一种为外接式的:
2. 在U盘安装PE系统刷新BIOS,更新白名单
联想在16年之前的电脑有硬件设备名单限制,因此需要更新BIOS白名单。
白名单参考:https://zhanghuanglong.com/dl/detail/szliunian/301667
操作指南参考:
- 解压缩ThinkPad X201_6quj10us_SLIC21_no_whitelist.zip
- 在64bit文件夹下选择‘WinPhlash64.exe’,进入如下页面:
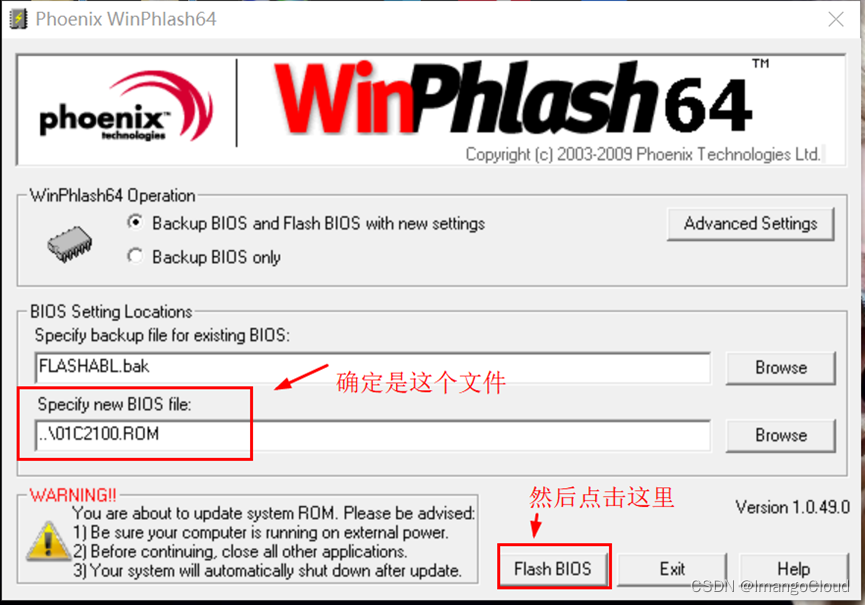
- 之后会自动重启,关机后,拔出U盘,不然又会进PE
3. 安装ubuntu 14.04 LTS
可以从网站下载,也可以从百度网盘取。
- 使用提供的ULtraISO9为U盘制作启动盘
- 一直点下一步就行,不要选择任何更新
4. 更新apt源别
sudo gedit /etc/apt/sources.list
deb http://mirrors.aliyun.com/ubuntu/ trusty main restricted universe multiverse
deb http://mirrors.aliyun.com/ubuntu/ trusty-security main restricted universe multiverse
deb http://mirrors.aliyun.com/ubuntu/ trusty-updates main restricted universe multiverse
deb http://mirrors.aliyun.com/ubuntu/ trusty-proposed main restricted universe multiverse
deb http://mirrors.aliyun.com/ubuntu/ trusty-backports main restricted universe multiverse
deb-src http://mirrors.aliyun.com/ubuntu/ trusty main restricted universe multiverse
deb-src http://mirrors.aliyun.com/ubuntu/ trusty-security main restricted universe multiverse
deb-src http://mirrors.aliyun.com/ubuntu/ trusty-updates main restricted universe multiverse
deb-src http://mirrors.aliyun.com/ubuntu/ trusty-proposed main restricted universe multiverse
deb-src http://mirrors.aliyun.com/ubuntu/ trusty-backports main restricted universe multiverse
sudo apt-get update && sudo apt-get upgrade
5. 查看网卡是否被识别(最重要,识别不到,后面的就别折腾了)
使用ifconfig查看是否能找到新加的无线网卡
ifconfig
或者使用iwconfig查看,或者使用ifconfig -a查看隐藏的网卡(没有使用或者哪里没成功)
如果出现
- iwconfig存在,ifconfig不存在,
- “SIOCSIFFLAGS: Operation not possible due to RF-kill”?
- Operation not possible due to RF-kill, phy0 hard blocked
等等类似的问题,则
sudo rfkill list all
如果网卡出现了yes,说明被锁了,不能使用,得是两个都是no才可以。需要在笔记本电脑的左下侧边,有一个滑动按钮,滑到绿色,重新启动电脑即可
0: phy0: Wireless LAN
    Soft blocked: no
    Hard blocked: yes
1: asus-wlan: Wireless LAN
    Soft blocked: no
    Hard blocked: no
6. 更新驱动至4.2.0
有一些文章(第一个参考)说需要自己重新编译内核,后来发现不用重新编译也可以
查看内核版本
uname -r
升级内核至4.2.0,弹出一个需要确认的输入Y,查看一下是不是4.2.0,如果不是就按照参考一重新编译内核
apt-get install linux-generic-lts-wily
7. 无脑执行安装
在此感谢参考二
1、sudo apt-get install gcc make linux-headers-$(uname -r) git-core
2、CSITOOL_KERNEL_TAG=csitool-$(uname -r | cut -d . -f 1-2)
3、git clone http://github.moeyy.xyz/https://github.com/dhalperi/linux-80211n-csitool
4、cd linux-80211n-csitool
5、git checkout ${CSITOOL_KERNEL_TAG}
6、make -C /lib/modules/$(uname -r)/build M=$(pwd)/drivers/net/wireless/iwlwifi modules
7、sudo make -C /lib/modules/$(uname -r)/build M=$(pwd)/drivers/net/wireless/iwlwifi INSTALL_MOD_DIR=updates \
	modules_install
8、sudo depmod
9、cd ..
10、git clone http://github.moeyy.xyz/https://github.com/dhalperi/linux-80211n-csitool-supplementary
11、for file in /lib/firmware/iwlwifi-5000-*.ucode; do sudo mv $file $file.orig; done
12、sudo cp linux-80211n-csitool-supplementary/firmware/iwlwifi-5000-2.ucode.sigcomm2010 /lib/firmware/
13、sudo ln -s iwlwifi-5000-2.ucode.sigcomm2010 /lib/firmware/iwlwifi-5000-2.ucode
14、make -C linux-80211n-csitool-supplementary/netlink
中间第三步下载的速度是比较慢的,毕竟是从 github 上面下载 1个多 G 的文件,我原本以为速度很慢,但其实还好,1个小时左右就可以搞定。
然后有一步 make 编译的时候会有提示 Can’t read private key ,不要理会,官方也说了没事:https://dhalperi.github.io/linux-80211n-csitool/installation.html
遇到这个问题可以参考:https://blog.csdn.net/zhangpeterx/article/details/88044404
到此为止环境配置完毕。
一收一发两台电脑的操作
参考一,按照这里执行,就不重复写了
中间需要注意:wlan的需要用ifconfig查询需要写准确。
接受端可能需要执行:rfkill unblock wifi这句命令
sudo ntpdate ntp1.aliyun.com

% 接收端
cd ~/Desktop/linux-80211n-csitool-supplementary/netlink/
rfkill unblock wifi
sudo bash ./monitor.sh wlan0 128 HT20
sudo bash run.sh w-5-test

% 发送端
cd ~/Desktop/linux-80211n-csitool-supplementary/injection/
echo 0x4101 | sudo tee `sudo find /sys -name monitor_tx_rate`
sudo bash ./inject.sh wlan1 128 HT20
sudo ./random_packets 10000000 10 1 3333
0x4101,0xC101,0x1C101可以设置发送天线的数量分别为1,2,3但是不知道为什么,我的没有成功。
参考链接:
完成安装教程1
Linux CSI Tool 完整使用说明(一发一收,monitor模式)(权威版 已成功测试)
完成安装教程2
https://blog.csdn.net/Acecai01/article/details/129442761?spm=1001.2014.3001.5502
CSI数据处理相关
CSI 数据处理篇之读取数据与数据解析(二)
CSI 数据处理篇之降噪(三)
商用WIFI的相位都不准一般,需要去噪
CSI呼吸检测有代码和数据
基于WiFi的CSI数据做呼吸频率检测-python版(含代码和数据)
由于官方只有matlab的read_bf,没有python
上面一个老哥的python版本有问题,原因是shape不对,修改如下:
class Bfee:

    def __init__(self):
        pass

    @staticmethod
    def from_file(filename, model_name_encode="shift-JIS"):

        with open(filename, "rb") as f:
            from functools import reduce
            # reduce(函数,list),将list中元素依次累加
            array = bytes(reduce(lambda x, y: x+y, list(f)))

        bfee = Bfee()

#         vmd.current_index = 0
        bfee.file_len = len(array)
        bfee.dicts = []
        bfee.all_csi = []

#         vmd.timestamp_low0 = int.from_bytes(array[3:7], byteorder='little', signed=False)

#         array = array[3:]

        # %% Initialize variables
        # ret = cell(ceil(len/95),1);    # % Holds the return values - 1x1 CSI is 95 bytes big, so this should be upper bound
        cur = 0                       # % Current offset into file
        count = 0                    # % Number of records output
        broken_perm = 0              # % Flag marking whether we've encountered a broken CSI yet
        # % What perm should sum to for 1,2,3 antennas
        triangle = [0, 1, 3]

        while cur < (bfee.file_len - 3):
            # % Read size and code
            # % 将文件数据读取到维度为 sizeA 的数组 A 中,并将文件指针定位到最后读取的值之后。fread 按列顺序填充 A。
            bfee.field_len = int.from_bytes(
                array[cur:cur+2], byteorder='big', signed=False)
            bfee.code = array[cur+2]
            cur = cur+3

            # there is CSI in field if code == 187,If unhandled code skip (seek over) the record and continue
            if bfee.code == 187:
                pass
            else:
                # % skip all other info
                cur = cur + bfee.field_len - 1
                continue

            # get beamforming or phy data
            if bfee.code == 187:
                count = count + 1

                bfee.timestamp_low = int.from_bytes(
                    array[cur:cur+4], byteorder='little', signed=False)
                bfee.bfee_count = int.from_bytes(
                    array[cur+4:cur+6], byteorder='little', signed=False)
                bfee.Nrx = array[cur+8]
                bfee.Ntx = array[cur+9]
                bfee.rssi_a = array[cur+10]
                bfee.rssi_b = array[cur+11]
                bfee.rssi_c = array[cur+12]
                bfee.noise = array[cur+13] - 256
                bfee.agc = array[cur+14]
                bfee.antenna_sel = array[cur+15]
                bfee.len = int.from_bytes(
                    array[cur+16:cur+18], byteorder='little', signed=False)
                bfee.fake_rate_n_flags = int.from_bytes(
                    array[cur+18:cur+20], byteorder='little', signed=False)
                bfee.calc_len = (
                    30 * (bfee.Nrx * bfee.Ntx * 8 * 2 + 3) + 6) / 8
                bfee.csi = np.zeros(
                    shape=(30, bfee.Nrx, bfee.Ntx), dtype=np.dtype(np.complex))
                bfee.perm = [1, 2, 3]
                bfee.perm[0] = ((bfee.antenna_sel) & 0x3)
                bfee.perm[1] = ((bfee.antenna_sel >> 2) & 0x3)
                bfee.perm[2] = ((bfee.antenna_sel >> 4) & 0x3)

                cur = cur + 20

                # get payload
                payload = array[cur:cur+bfee.len]
                cur = cur + bfee.len

                index = 0

                # Check that length matches what it should
                if (bfee.len != bfee.calc_len):
                    print("MIMOToolbox:read_bfee_new:size",
                          "Wrong beamforming matrix size.")

                # Compute CSI from all this crap :
                # import struct
                for i in range(30):
                    index += 3
                    remainder = index % 8
                    for j in range(bfee.Nrx):
                        for k in range(bfee.Ntx):
                            real_bin = bytes([(payload[int(index / 8)] >> remainder) | (
                                payload[int(index/8+1)] << (8-remainder)) & 0b11111111])
                            real = int.from_bytes(
                                real_bin, byteorder='little', signed=True)
                            imag_bin = bytes([(payload[int(index / 8+1)] >> remainder) | (
                                payload[int(index/8+2)] << (8-remainder)) & 0b11111111])
                            imag = int.from_bytes(
                                imag_bin, byteorder='little', signed=True)
                            tmp = np.complex(float(real), float(imag))
                            bfee.csi[i, j, k] = tmp
                            index += 16

                # % matrix does not contain default values
                if sum(bfee.perm) != triangle[bfee.Nrx-1]:
                    print('WARN ONCE: Found CSI (', filename, ') with Nrx=',
                          bfee.Nrx, ' and invalid perm=[', bfee.perm, ']\n')
                else:
                    temp_csi = np.zeros(
                        bfee.csi.shape, dtype=np.dtype(np.complex))
                    # bfee.csi[:,bfee.perm[0:bfee.Nrx],:] = bfee.csi[:,0:bfee.Nrx,:]
                    for r in range(bfee.Nrx):
                        temp_csi[:, bfee.perm[r], :] = bfee.csi[:, r, :]
                    bfee.csi = temp_csi
                # 将类属性导出为dict,并返回
                bfee_dict = {}
                bfee_dict['timestamp_low'] = bfee.timestamp_low
                bfee_dict['bfee_count'] = bfee.bfee_count
                bfee_dict['Nrx'] = bfee.Nrx
                bfee_dict['Ntx'] = bfee.Ntx
                bfee_dict['rssi_a'] = bfee.rssi_a
                bfee_dict['rssi_b'] = bfee.rssi_b
                bfee_dict['rssi_c'] = bfee.rssi_c
                bfee_dict['noise'] = bfee.noise
                bfee_dict['agc'] = bfee.agc
                bfee_dict['antenna_sel'] = bfee.antenna_sel
                bfee_dict['perm'] = bfee.perm
                bfee_dict['len'] = bfee.len
                bfee_dict['fake_rate_n_flags'] = bfee.fake_rate_n_flags
                bfee_dict['calc_len'] = bfee.calc_len
                bfee_dict['csi'] = bfee.csi.transpose(2,1,0)

                bfee.dicts.append(bfee_dict)
                bfee.all_csi.append(bfee.csi.transpose(2,1,0))

        return bfee


def db(X, U):
    R = 1
    if 'power'.startswith(U):
        assert X >= 0
    else:
        X = math.pow(abs(X), 2) / R

    return (10 * math.log10(X) + 300) - 300


def dbinv(x):
    return math.pow(10, x / 10)


def get_total_rss(csi_st):
    # Careful here: rssis could be zero
    rssi_mag = 0
    if csi_st['rssi_a'] != 0:
        rssi_mag = rssi_mag + dbinv(csi_st['rssi_a'])
    if csi_st['rssi_b'] != 0:
        rssi_mag = rssi_mag + dbinv(csi_st['rssi_b'])
    if csi_st['rssi_c'] != 0:
        rssi_mag = rssi_mag + dbinv(csi_st['rssi_c'])
    return db(rssi_mag, 'power') - 44 - csi_st['agc']


def get_scaled_csi(csi_st):
    # Pull out CSI
    csi = csi_st['csi']

    # Calculate the scale factor between normalized CSI and RSSI (mW)
    csi_sq = csi * np.conj(csi)
    csi_pwr = np.sum(csi_sq)
    rssi_pwr = dbinv(get_total_rss(csi_st))
    # rssi_pwr = 1 / get_total_rss(csi_st)  # Assuming get_total_rss returns RSSI in mW
    scale = rssi_pwr / (csi_pwr / 30)

    # Thermal noise might be undefined if the trace was
    # captured in monitor mode.
    # ... If so, set it to -92
    if csi_st['noise'] == -127:
        noise_db = -92
    else:
        noise_db = csi_st['noise']
    thermal_noise_pwr = dbinv(noise_db)

    # Quantization error: the coefficients in the matrices are
    # 8-bit signed numbers, max 127/-128 to min 0/1. Given that Intel
    # only uses a 6-bit ADC, I expect every entry to be off by about
    # +/- 1 (total across real & complex parts) per entry.
    #
    # The total power is then 1^2 = 1 per entry, and there are
    # Nrx * Ntx entries per carrier. We only want one carrier's worth of
    # error, since we only computed one carrier's worth of signal above.
    quant_error_pwr = scale * (csi_st['Nrx'] * csi_st['Ntx'])

    # Total noise and error power
    total_noise_pwr = thermal_noise_pwr + quant_error_pwr

    # ret now has units of sqrt(SNR) just like H in textbooks
    ret = csi * np.sqrt(scale / total_noise_pwr)

    if csi_st['Ntx'] == 2:
        ret = ret * np.sqrt(2)
    elif csi_st['Ntx'] == 3:
        # Note: this should be sqrt(3) ~ 4.77 dB. But, 4.5 dB is how
        # Intel (and some other chip makers) approximate a factor of 3
        #
        # You may need to change this if your card does the right thing.
        ret = ret * np.sqrt(dbinv(4.5))

    return ret
bfee = Bfee.from_file(r"D:\projects\rppgdata\需要处理的数据\wifi_data\test_w\wifi_origin.dat", model_name_encode="gb2312")
    # bfee = Bfee.from_file(r"D:\projects\rppgdata\WiFi_CSI_Respiration\data\4_14_m5.dat", model_name_encode="gb2312")
    for k in range(len(bfee.all_csi)):
        csi = get_scaled_csi(bfee.dicts[k])
        tx_num, rx_num, sub_num = csi.shape
        bfee.dicts[k]["scaled_csi"] = csi
        bfee.dicts[k]["amplitude"] = np.abs(csi)
        bfee.dicts[k]["phase"] = np.angle(csi)


    print(f"Number of csi: {len(bfee.dicts)}, tx: {tx_num}, rx: {rx_num}, sub: {sub_num}")


 3178
3178

 被折叠的 条评论
为什么被折叠?
被折叠的 条评论
为什么被折叠?
 到【灌水乐园】发言


