【HTML】过年不能放烟花,那就放电子烟花


鑫宝Code

🌈个人主页: 鑫宝Code
🔥热门专栏: 闲话杂谈炫酷HTML | JavaScript基础
💫个人格言: "如无必要,勿增实体"


闲谈

大家回家过年可能都多多少少放过些🧨,但是有些在城市上过年的小伙伴可能就没有机会放鞭炮了。不过没关系,我们懂技术,我们用技术自娱自乐,放电子烟花,总不可能被警长叔叔敲门问候吧。

开干

首先,我们先明确一下思路,我觉得可以分解为如下2个步骤。涉及到Canvas+requestAnimationFrame+物理知识,🐶。

  1. 我们先画出一个烟花爆炸出来的粒子,这涉及到技术Canvas + 物理知识
  2. 最后通过动画将多个粒子的运动轨迹连在一起即可。

大家看下,我感觉应该没什么问题了,于是深入细节分析。

初始化粒子

我们先分析一下这个粒子有哪些属性,我罗列如下

  • 粒子的初始坐标(x,y)
  • 粒子的初始速度(Vx,Vy)
  • 粒子的颜色(Color)
  • 粒子的半径(Radius)
  • 粒子的透明度,随着粒子的落下,粒子的亮度会逐渐减小(opacity)

属性分析完了,接下来我们思考一个问题,粒子在爆炸那一刹那,是如何运动的呢?
很显然,是带着初速度的自由落体运动。
image.png
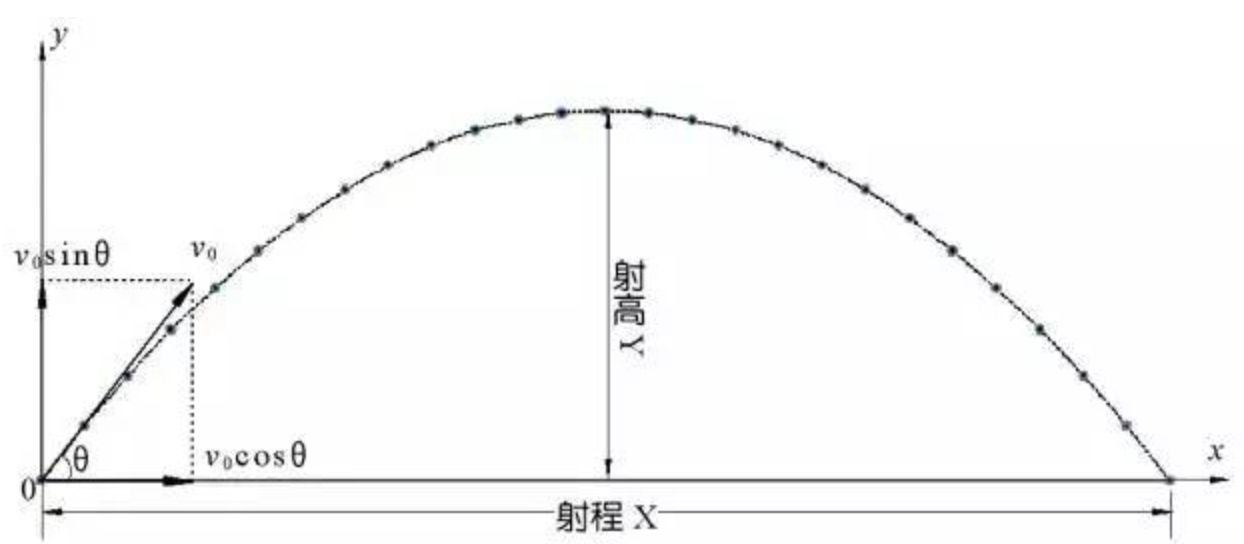
我们将速度分成水平方向Vx以及竖直方向Vy,于是我们可以得到

  • Vx在运动中是不变的
  • Vy的速度为Vy = Vy - gt,也就是每秒会速度下降g,由于g是个定值,在模拟的时候我们就取每帧(屏幕刷新率,大概10ms一次)下降0.15px速度。

注意: Vy的速度在代码里是Vy += 0.15,为什么是加呢,因为对于屏幕而言,右上角的px是(0,0),所以想下的速度是正,向上的速度是负。

于是我们便可撰写如下代码

class Dot {
  constructor(x, y, color, Vx, Vy) {
    this.x = x;
    this.y = y;
    this.Vx = Vx;
    this.Vy = Vy;
    this.color = color;
    this.radius = 2.5;
    this.opacity = 1;
  }

  update() {
    // 每一帧x和y轴移动的距离
    this.x += this.Vx;
    this.y += this.Vy;
    // 每一帧速度变化
    this.Vy += 0.15;
    // 每一帧清晰度较小
    this.opacity = this.opacity - 0.01;
  }

  draw() {
    ctx.beginPath();
    ctx.arc(this.x, this.y, this.radius, 0, Math.PI * 2);
    ctx.fillStyle = this.color;
    ctx.globalAlpha = this.opacity;
    ctx.fill();
  }
}

粒子聚合成烟花

如何将粒子聚合成烟花呢,我们声明一个烟花类即可。对于一个烟花,我们只需要知道这个研发爆炸在什么位置就可以了,也就是xy的坐标。

  • 粒子的颜色? 为了让粒子的颜色更加饱和一点,我们采用的是HSL颜色,跟RGBHEX记录颜色不同,这个是用色相、饱和度和明度(HSL)来指定颜色。这里我们采用的代码为
// 是JavaScript中动态生成一个随机色相、饱和度为100%、亮度为50%的HSL颜色值。
const color = `hsl(${Math.random() * 360}, 100%, 50%)`;
  • 粒子的初始速度? 对于Vx速度,我们可以取[-x,x]的区间,允许粒子在横向轴上向左向右运动。对于Vy速度,我们这次都取向上的速度,这里向上的速度是负的,因为之前说的对于屏幕而言,右上角的px是(0,0)。
const Vx = (Math.random() - 0.5) * 6;
const Vy = -Math.random() * 10;

于是我们可以将烟花类写好

class Firework {
  constructor(x, y) {
    this.x = x;
    this.y = y;
    this.dots = [];
    // 一次性放40个烟花粒子
    for (let i = 0; i < 40; i++) {
      const color = `hsl(${Math.random() * 360}, 100%, 50%)`;
      const Vx = (Math.random() - 0.5) * 6;
      const Vy = -Math.random() * 10;
      this.dots.push(new Dot(x, y, color, Vx, Vy));
    }
  }

  draw() {
    this.dots.forEach((particle) => particle.update());
    this.dots.forEach((particle) => particle.draw());
  }
}

让粒子动起来

我们现在有这些炫酷的粒子了,如何让粒子动起来呢?没错,使用requestAnimationFrame大法。参见MDN

你希望执行一个动画,并且要求浏览器在下次重绘之前调用指定的回调函数更新动画。该方法需要传入一个回调函数作为参数,该回调函数会在浏览器下一次重绘之前执行

直接调用Fireworkdraw于是我们就能得到这样的效果。
Feb-16-2024 14-02-32.gif
但是粒子是有了,但是我们想要的是粒子有一个流星一样的尾巴,那该如何做呢?
解决: 我们将背景设为半透明的黑色,这样结合之前粒子下落时也会半透明是不是碰撞出新的视图呢?这里我们采用如下代码设置Canvas 2D 绘图上下文的填充颜色为半透明黑色

ctx.fillStyle = "rgba(0, 0, 0, 0.1)";
ctx.fillRect(0, 0, canvas.width, canvas.height);

之后,我们可以通过点击屏幕,触发这个烟花绽放。相应的代码如下

// 鼠标点击触发烟花效果
canvas.addEventListener("click", (event) => {
  const x = event.clientX;
  const y = event.clientY;
  // 所有的烟花
  fireworks.push(new Firework(x, y));
});

function animate() {
  ctx.fillStyle = "rgba(0, 0, 0, 0.1)";
  ctx.fillRect(0, 0, canvas.width, canvas.height);
  fireworks.forEach((firework, index) => {
    // 去除透明度为0的烟花
    if (firework.dots[0].opacity <= 0) {
      fireworks.splice(index, 1);
    } else {
      firework.draw();
    }
  });
  requestAnimationFrame(animate);
}

对应的效果图如下:
Feb-16-2024 14-11-13.gif

全部代码

<!DOCTYPE html>
<html lang="en">
  <head>
    <meta charset="UTF-8" />
    <meta name="viewport" content="width=device-width, initial-scale=1.0" />
    <title>烟花效果</title>
    <style>
      body {
        margin: 0;
      }
    </style>
  </head>
  <body>
    <canvas id="fireworksCanvas"></canvas>
    <script>
      const canvas = document.getElementById("fireworksCanvas");
      const ctx = canvas.getContext("2d");
      // 所有烟花的集合
      let fireworks = [];

      // 设置画布大小
      canvas.width = window.innerWidth;
      canvas.height = window.innerHeight;

      // 监听窗口大小变化
      window.addEventListener("resize", () => {
        canvas.width = window.innerWidth;
        canvas.height = window.innerHeight;
      });

      class Dot {
        constructor(x, y, color, Vx, Vy) {
          this.x = x;
          this.y = y;
          this.Vx = Vx;
          this.Vy = Vy;
          this.color = color;
          this.radius = 2.5;
          this.opacity = 1;
        }
        update() {
          this.x += this.Vx;
          this.y += this.Vy;
          this.Vy += 0.15;
          this.opacity = this.opacity - 0.01;
        }
        draw() {
          ctx.beginPath();
          ctx.arc(this.x, this.y, this.radius, 0, Math.PI * 2);
          ctx.fillStyle = this.color;
          ctx.globalAlpha = this.opacity;
          ctx.fill();
        }
      }

      class Firework {
        constructor(x, y) {
          this.x = x;
          this.y = y;
          this.dots = [];
          for (let i = 0; i < 40; i++) {
            const color = `hsl(${Math.random() * 360}, 100%, 50%)`;
            const Vx = (Math.random() - 0.5) * 6;
            const Vy = -Math.random() * 10;
            this.dots.push(new Dot(x, y, color, Vx, Vy));
          }
        }
        draw() {
          this.dots.forEach((particle) => particle.update());
          this.dots.forEach((particle) => particle.draw());
        }
      }

      // 鼠标点击触发烟花效果
      canvas.addEventListener("click", (event) => {
        const x = event.clientX;
        const y = event.clientY;
        fireworks.push(new Firework(x, y));
      });

      function animate() {
        ctx.fillStyle = "rgba(0, 0, 0, 0.1)";
        ctx.fillRect(0, 0, canvas.width, canvas.height);
        fireworks.forEach((firework, index) => {
          if (firework.dots[0].opacity <= 0) {
            fireworks.splice(index, 1);
          } else {
            firework.draw();
          }
        });
        requestAnimationFrame(animate);
      }

      // 启动动画
      animate();
    </script>
  </body>
</html>
  • 48
    点赞
  • 58
    收藏
    觉得还不错? 一键收藏
  • 打赏
    打赏
  • 31
    评论
以下是使用HBuilderX烟花代码的HTML示例: ```html <!DOCTYPE html> <html> <head> <meta charset="UTF-8"> <title>烟花</title> <style> body { background-color: black; } canvas { position: absolute; top: 0; left: 0; z-index: -1; } </style> </head> <body> <canvas id="canvas"></canvas> <script> var canvas = document.getElementById('canvas'); canvas.width = window.innerWidth; canvas.height = window.innerHeight; var ctx = canvas.getContext('2d'); var particles = []; var particleCount = 100; var particleRadius = 3; var particleSpeed = 2; var particleColor = '#fff'; function Particle(x, y, radius, color, speed) { this.x = x; this.y = y; this.radius = radius; this.color = color; this.speed = speed; this.angle = Math.random() * Math.PI * 2; this.velocity = { x: Math.cos(this.angle) * this.speed, y: Math.sin(this.angle) * this.speed }; this.gravity = 0.05; this.friction = 0.99; this.alpha = 1; this.update = function() { this.velocity.x *= this.friction; this.velocity.y *= this.friction; this.velocity.y += this.gravity; this.x += this.velocity.x; this.y += this.velocity.y; this.alpha -= 0.01; if (this.alpha <= 0) { particles.splice(particles.indexOf(this), 1); } this.draw(); }; this.draw = function() { ctx.beginPath(); ctx.arc(this.x, this.y, this.radius, 0, Math.PI * 2); ctx.fillStyle = this.color; ctx.globalAlpha = this.alpha; ctx.fill(); }; } function createParticles(x, y) { for (var i = 0; i < particleCount; i++) { particles.push(new Particle(x, y, particleRadius, particleColor, particleSpeed)); } } canvas.addEventListener('click', function(e) { createParticles(e.clientX, e.clientY); }); function animate() { requestAnimationFrame(animate); ctx.clearRect(0, 0, canvas.width, canvas.height); for (var i = 0; i < particles.length; i++) { particles[i].update(); } } animate(); </script> </body> </html> ``` 你可以将上述代码复制到HBuilderX中的HTML文件中,然后运行该文件即可在浏览器中看到烟花的效果。
评论 31
添加红包

请填写红包祝福语或标题

红包个数最小为10个

红包金额最低5元

当前余额3.43前往充值 >
需支付:10.00
成就一亿技术人!
领取后你会自动成为博主和红包主的粉丝 规则
hope_wisdom
发出的红包

打赏作者

鑫宝Code

你的鼓励将是我创作的最大动力

¥1 ¥2 ¥4 ¥6 ¥10 ¥20
扫码支付:¥1
获取中
扫码支付

您的余额不足,请更换扫码支付或充值

打赏作者

实付
使用余额支付
点击重新获取
扫码支付
钱包余额 0

抵扣说明:

1.余额是钱包充值的虚拟货币,按照1:1的比例进行支付金额的抵扣。
2.余额无法直接购买下载,可以购买VIP、付费专栏及课程。

余额充值