


一、配置文件的位置
SpringBoot启动会扫描一下位置的application.properties或application.yml文件作为SpringBoot的默认配置文件
1)file:/config/
2)file:/ 项目的根路径,如果当前的项目有父工程,配置文件要放在父工程的根路径下
3)classpath:/config/
4)classpath:/
优先级由高到低,高优先级的配置会覆盖低优先级的配置
SpringBoot会从这四个位置全部加载主配置文件:互补配置
如果我们的配置文件名字不叫application.properties,可以通过以下参数来指定配置文件的名字,例如,myprojects是配置文件名
$ java -jar myproject.jar --spring.config.name=myproject
也可以指定其他位置的配置文件
$ java -jar myproject.jar --spring.config.location=classpath:/default.properties,classpath/override.properties
二、配置文件
1.yaml
yml是yaml语言的文件,以数据为中心,更简洁,比properties、xml等更适合做配置文件
2.yaml语法
以空格的缩进程度来控制层级关系。空格的个数不重要,只要左边空格对齐则视为同一层级,其大小写敏感。支持字面值、对象、数组三种数据结构,也支持复合结构
字面值:字符串、布尔类型、数值、日期。字符串默认不加引号,双引号会转义特殊字符
日期格式支持 yyyy/MM/dd HH:mm:ss
对象:由键值对组成,形如key:(空格)value的数据组成
每组键值对占用一行,且缩进程度一致,也可以使用行内写法:{k1:v1,…kn:vn}
数组:由形如-(空格)value的数据组成。也可以使用行内写法:[1,2,…n]
复合结构:上面三种数据结构任意组合
3.yaml的使用
application.yml
yaml:
  str: 字符串默认不加引号
  num: 888
  dNum: 888.66
  birth: 2021/2/21 16:34:25
# list:
#   - one
#   - two
#   - three
  list:
    [one,two,three]
# map:
#   one: 1
#   two: 2
#   three: 3
  map:
    {one: 1,two: 2}
  userModels:
    - name: 张三
      age: 18
    - name: 李四
      age: 20
YamlModel
@Component
@ConfigurationProperties(prefix = "yaml")
public class YamlModel {
    private String str;
    private int num;
    private double dNum;
    private Date birth;
    private List<String> list;
    private Map<String,Integer> map;
    private List<UserModel> userModels;
YamlController
@RestController
public class YamlController {
    @Autowired
    private YamlModel yamlModel;
    @RequestMapping("/yaml")
    public YamlModel yamlModel(){
        System.out.println(yamlModel);
        return yamlModel;
    }
}
三、yaml绑定
1.属性绑定
1)实体类
@Component
@ConfigurationProperties("acme")
public class AcmeProperties {
    private boolean enabled;

    private InetAddress remoteAddress;

    private final Security security = new Security();

    public boolean isEnabled() {
        return enabled;
    }

    public void setEnabled(boolean enabled) {
        this.enabled = enabled;
    }

    public InetAddress getRemoteAddress() {
        return remoteAddress;
    }

    public void setRemoteAddress(InetAddress remoteAddress) {
        this.remoteAddress = remoteAddress;
    }

    public Security getSecurity() {
        return security;
    }


    public static class Security {

        private String username;

        private String password;

        private List<String> roles = new ArrayList<>(Collections.singleton("USER"));

        public String getUsername() {
            return username;
        }

        public void setUsername(String username) {
            this.username = username;
        }

        public String getPassword() {
            return password;
        }

        public void setPassword(String password) {
            this.password = password;
        }

        public List<String> getRoles() {
            return roles;
        }

        public void setRoles(List<String> roles) {
            this.roles = roles;
        }
    }
}
2)为了让当前的实体类能在配置文件中有对应的提示,我们需要引入以下依赖
	<dependency>
      <groupId>org.springframework.boot</groupId>
      <artifactId>spring-boot-configuration-processor</artifactId>
      <optional>true</optional>
    </dependency>
3)配置文件
acme:
  enabled: true
  remote-address: 192.168.0.0
  security:
    username: pangpang
    password: 123
    roles: [程序员,老师]
4)Controller
@RestController
public class AcmeController {
    @Autowired
    private AcmeProperties acmeProperties;
    @RequestMapping("/acme")
    public AcmeProperties acmeProperties(){
        return acmeProperties;
    }
}
我们可以添加 lombok 依赖去自动的创建getter和setter方法,然后在实体类的上面添加注解
其中@Date注解包含了Setter、Getter、ToString等多个注解
	<dependency>
      <groupId>org.projectlombok</groupId>
      <artifactId>lombok</artifactId>
      <version>1.18.16</version>
    </dependency>
2.构造器绑定
1)实体类
@Data
@ConstructorBinding
@ConfigurationProperties("acme")
public class AcmeProperties {

    private final boolean enabled;

    private final InetAddress remoteAddress;

    private final Security security;

    public AcmeProperties(boolean enabled, InetAddress remoteAddress, Security security) {
        this.enabled = enabled;
        this.remoteAddress = remoteAddress;
        this.security = security;
    }

    @Data
    public static class Security {

        private final String username;

        private final String password;

        private final List<String> roles;

        public Security(String username, String password,
                        @DefaultValue("USER") List<String> roles) {
            this.username = username;
            this.password = password;
            this.roles = roles;
        }
    }
}
2)Controller
@RestController
@EnableConfigurationProperties(AcmeProperties.class) //注入对应实体类
public class AcmeController {
    @Resource
    private AcmeProperties acmeProperties;
    @RequestMapping("/acme")
    public AcmeProperties acmeProperties(){
        return acmeProperties;
    }
}
要使用构造函数绑定,必须使用@EnableConfigurationProperties(AcmeProperties.class)或配属性扫描启用类,不能对由常规Spring机制创建的Bean使用构造函数绑定(例如@Comment bean,通过@Bean方法创建的Bean或使用Import加载的Bean)
3.第三方组件的绑定
@ConfigurationProperties(“acme”)除了可以标注在类上,也可以标注在方法上
实体类
@Data
public class AnotherProperties {
    private  boolean enabled;
    private InetAddress remoteAddress;
}
service层
@Service
public class AnotherService {
    @Bean
    @ConfigurationProperties("acme")
    public AnotherProperties another(){
        return new AnotherProperties();
    }
}
controller层
@RestController
public class AnotherController {
    @Resource
    private AnotherProperties anotherProperties;
    @RequestMapping("/other")
    public String another(){
        System.out.println(anotherProperties);
        return "Spring Boot";
    }
}
4.配置的松散绑定
| 属性文件中配置 | 说明 |
|---|---|
| first-name | 羊肉串模式 |
| first_name | 下划线模式 |
| FIRST_NAME | 大写下划线模式,如果使用系统环境时推荐使用 |
在属性文件中不可以使用驼峰模式,推荐使用羊肉串模式
在yml配置文件中所有模式都可以使用
5.属性绑定的校验
每当使用Spring的@Validated注解对@ConfigurationProperties类进行注解时,SpringBoot就会尝试验证他们,可以使用JSR-303 javax.validation,此处我们使用的是Hibernate的实现,然后将约束注解添加到字段中
1)引入依赖
	<dependency>
      <groupId>org.hibernate.validator</groupId>
      <artifactId>hibernate-validator</artifactId>
    </dependency>
2)在属性上加入注解
@Data
@Component
@ConfigurationProperties("acme")
@Valid
public class test{
	//添加约束注解
    @NotNull
    private  String name;
    @Max(35)
    private int age;
    @Email
    private String email;

	//属性绑定校验关联类
	@Valid
	private School school=new School();
	@Data
	class School{
		@NotNull
		private String sname;
	}
}
6.@ConfigurationProperties与@Value的区别
@Value 只能对单个属性进行属性绑定
| 特征 | @ConfigurationProperties | @Value |
|---|---|---|
| 松散绑定 | yes | limit (属性类使用羊肉串模式可以匹配配置文件中的驼峰模式和羊肉串模式,使用驼峰模式只能匹配配置文件中的驼峰模式) |
| 元数据支持 | yes | no |
| SpEl | no | yes |
| 复杂类型绑定 | yes | no |
| 属性绑定的校验 | yes | no |
| 应用场景 | boot里面多个属性绑定 | 单个属性绑定 |
7.yaml中profile的用法
配置文件
acme:
  enabled: true
  remote-address: 192.168.0.0
spring:
  config:
    activate:
      on-profile: test
---
acme:
  enabled: true
  remote-address: 192.168.0.1
spring:
  config:
    activate:
      on-profile: dev
---
acme:
  enabled: true
  remote-address: 192.168.0.2
spring:
  config:
    activate:
      on-profile: pro
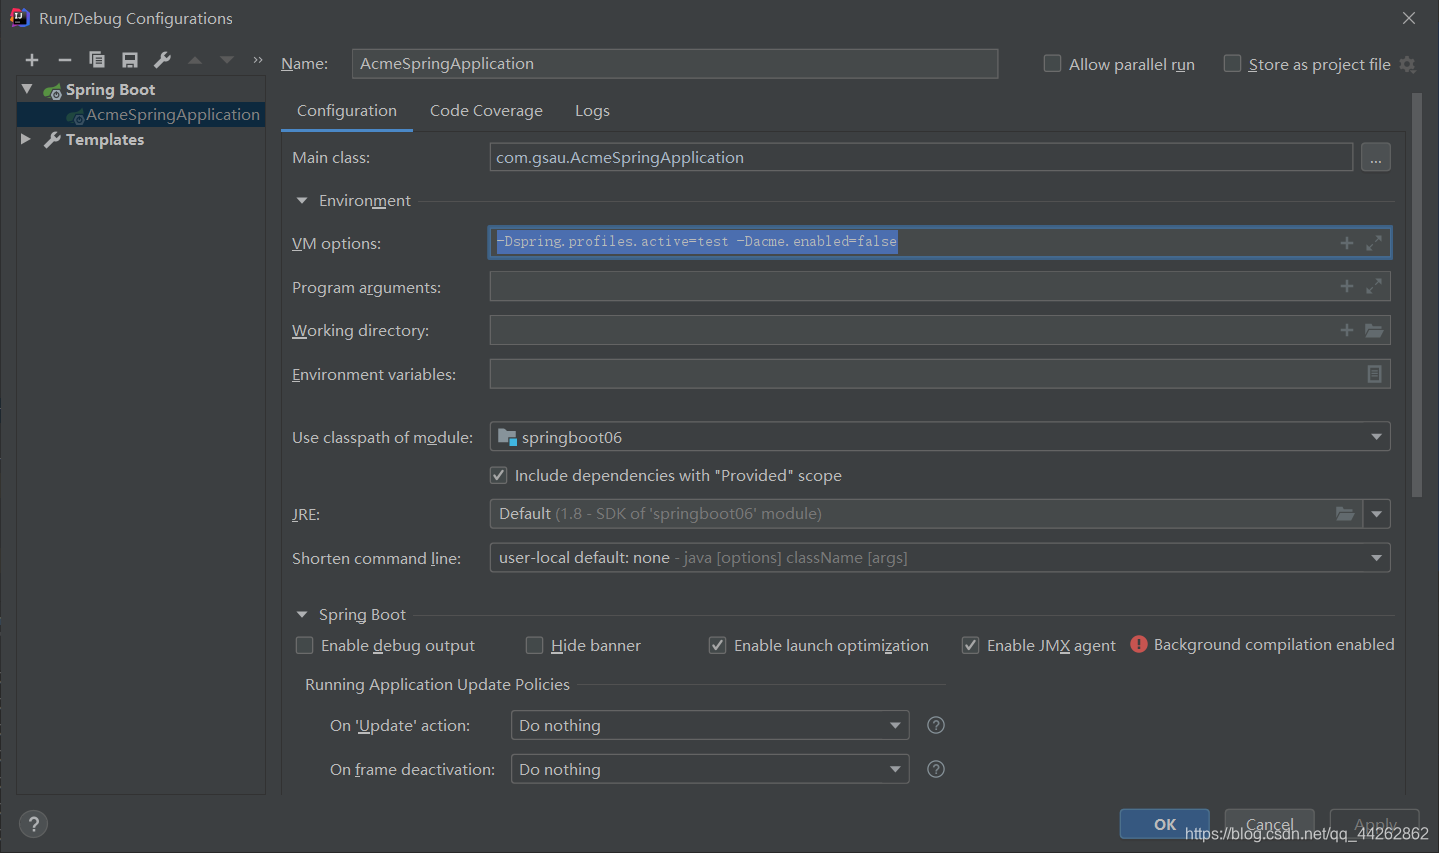
启动
不同的配置环境用 - - - 分开
通过设置参数来确定使用哪个模块和修改属性的值
-Dspring.profiles.active=test -Dacme.enabled=false


 被折叠的 条评论
为什么被折叠?
被折叠的 条评论
为什么被折叠?
 到【灌水乐园】发言


