


 本文档详细介绍了如何在Vue项目中集成环信(Easemob)实现一对一单聊功能,包括注册登录环信、创建应用用户、下载SDK、配置WebIMConfig.js文件、初始化连接以及监听消息事件。通过示例代码展示了登录、发送和接收消息的实现,并提供了两个页面(A页面和B页面)的示例,以便在不同浏览器中进行一对一聊天。
Vue集成环信步骤详解(这里例子介绍一对一单聊)
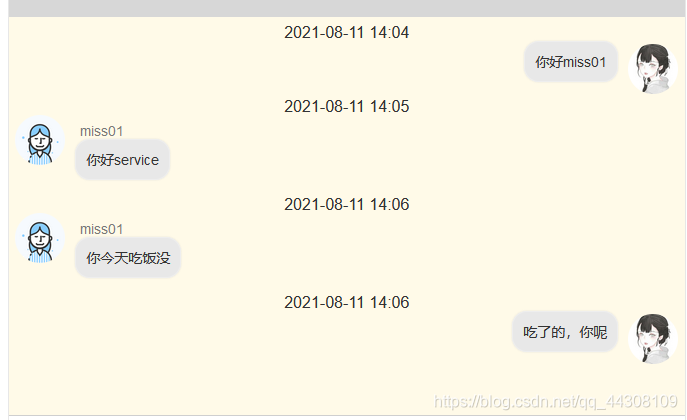
效果图
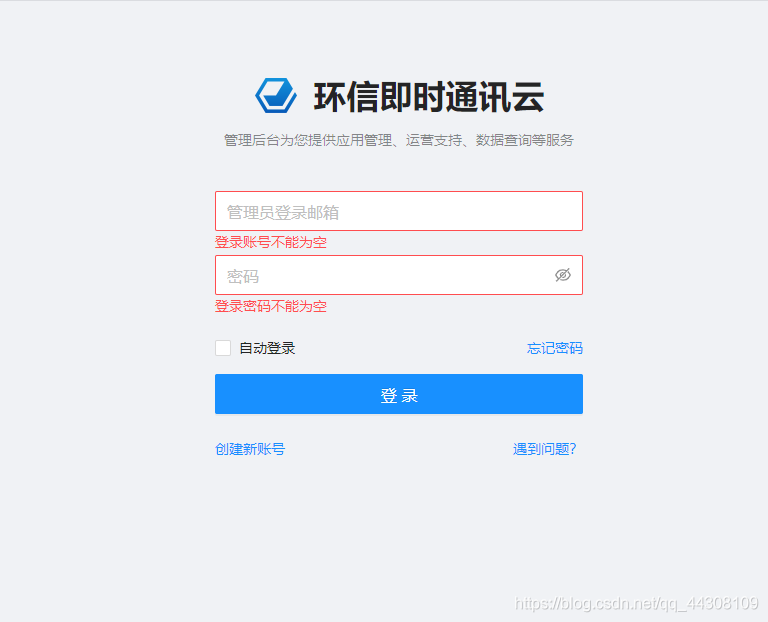
1.注册登陆环信并创建用户
步骤:注册 => 登录 => 创建应用 => 创建应用用户
登录注册:环信登陆注册页面(https://console.easemob.com/user/login)
创建应用 (ps:应该有一个试用的,就是应用列表第一个,有的话可不用再创建)
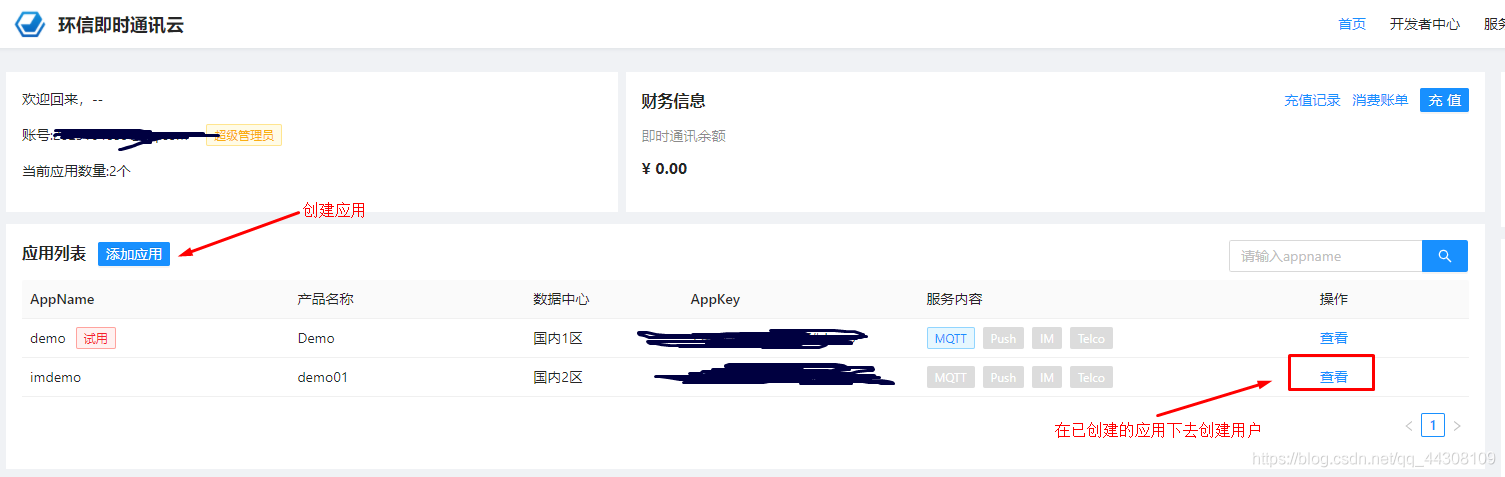
【创建应用】页面:
appname:应用的ID,唯一
Appkey:环信自动生成的一串唯一标识,用来区别应用
产品名称:根据自己的需求填写
描述:根据自己的需求填写
注册模式:一般选择开放注册

创建应用用户 (至少创建两个,方便后面的一对一聊天通讯)

2.npm下载环信sdk
环信开发文档:开发文档链接(https://docs-im.easemob.com/im/web/intro/integration)
npm install easemob-websdk --save
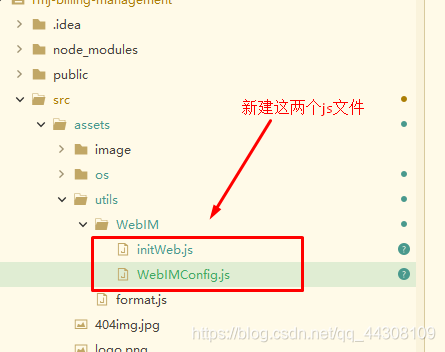
3. 在自己的资源文件中新建(或自己去下载环信demo把里面的WebIMConfig.js拿过来)
WebIMConfig.js配置文件
initWeb.js 初始化文件
WebIMConfig.js配置文件代码
注意需要修改appKey(在应用详情中查看自己的appKey)
/**
 * git do not control webim.config.js
 * everyone should copy webim.config.js.demo to webim.config.js
 * and have their own configs.
 * In this way , others won't be influenced by this config while git pull.
 */

// for react native
// var location = {

//     protocol: "https"
// }


var config = {

    /*
     * websocket server
     * im-api-v2.easemob.com/ws 线上环境
     * im-api-v2-hsb.easemob.com/ws 沙箱环境
     */
    socketServer: (window.location.protocol === "https:" ? "https:" : "http:") + "//im-api-v2.easemob.com/ws",
    /*
     * Backend REST API URL
     * a1.easemob.com 线上环境
     * a1-hsb.easemob.com 沙箱环境
     */
    restServer: (window.location.protocol === "https:" ? "https:" : "http:") + "//a1.easemob.com",
    /*
     * Application AppKey
     */
    appkey: '自己应用的APPkey',
    /*
     * Application Host
     */
    Host: 'easemob.com',
    /*
     * Whether to use HTTPS
     * @parameter {Boolean} true or false
     */
    https: true,

    /*
    * 公有云配置默认为 true,
    * 私有云配置请设置 isHttpDNS = false , 详细文档:http://docs-im.easemob.com/im/web/other/privatedeploy
    */
    isHttpDNS: true,
    /*
     * isMultiLoginSessions
     * true: A visitor can sign in to multiple webpages and receive messages at all the webpages.
     * false: A visitor can sign in to only one webpage and receive messages at the webpage.
     */
    isMultiLoginSessions: true,
    /**
     * isSandBox=true:  socketURL: 'im-api.sandbox.easemob.com',  apiURL: '//a1.sdb.easemob.com',
     * isSandBox=false: socketURL: 'im-api.easemob.com',          apiURL: '//a1.easemob.com',
     * @parameter {Boolean} true or false
     */
    isSandBox: false, //内部测试环境,集成时设为false
    /**
     * Whether to console.log
     * @parameter {Boolean} true or false
     */
    isDebug: true,
    /**
     * will auto connect the websocket server autoReconnectNumMax times in background when client is offline.
     * won't auto connect if autoReconnectNumMax=0.
     */
    autoReconnectNumMax: 10,
    /**
     * webrtc supports WebKit and https only
     */
    isWebRTC: window.RTCPeerConnection && /^https\:$/.test(window.location.protocol),
    /*
     * Upload pictures or file to your own server and send message with url
     * @parameter {Boolean} true or false
     * true: Using the API provided by SDK to upload file to huanxin server
     * false: Using your method to upload file to your own server
     */
    useOwnUploadFun: false,
    /**
     *  cn: chinese
     *  us: english
     */
    i18n: 'cn',
    /*
     * Set to auto sign-in
     */
    isAutoLogin: true,
    /**
     * Size of message cache for person to person
     */
    p2pMessageCacheSize: 500,
    /**
     * When a message arrived, the receiver send an ack message to the
     * sender, in order to tell the sender the message has delivered.
     * See call back function onReceivedMessage
     */
    delivery: false,
    /**
     * Size of message cache for group chating like group, chatroom etc. For use in this demo
     */
    groupMessageCacheSize: 200,
    /**
     * 5 actual logging methods, ordered and available:
     * 'TRACE', 'DEBUG', 'INFO', 'WARN', 'ERROR'
     */
    loglevel: 'ERROR',

    /**
     * enable localstorage for history messages. For use in this demo
     */
    enableLocalStorage: true,

    deviceId: 'webim'
}
export default config
initWeb.js初始化文件代码
import websdk from 'easemob-websdk'
import config from './WebIMConfig.js'

//初始化
let conn = {
   };
WebIM.config = config;
conn = WebIM.conn = new
最低0.47元/天 解锁文章


 763
763

 被折叠的 条评论
为什么被折叠?
被折叠的 条评论
为什么被折叠?
 到【灌水乐园】发言


