


文章目录
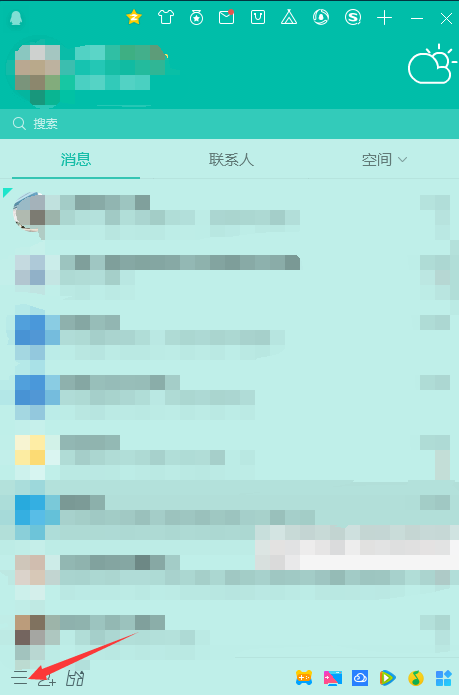
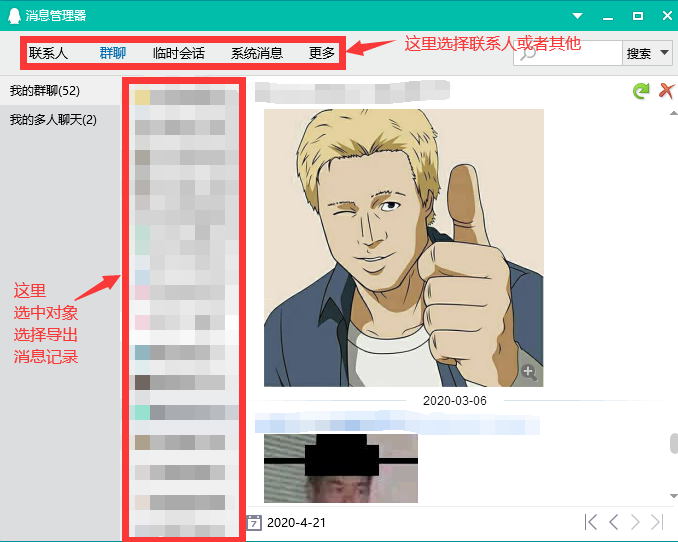
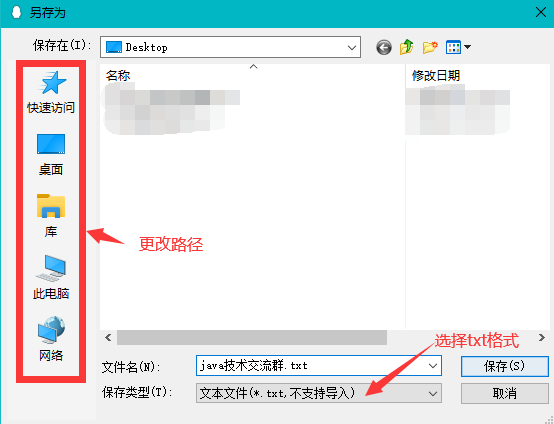
首先导出想要生成词云的聊天记记录(QQ支持)

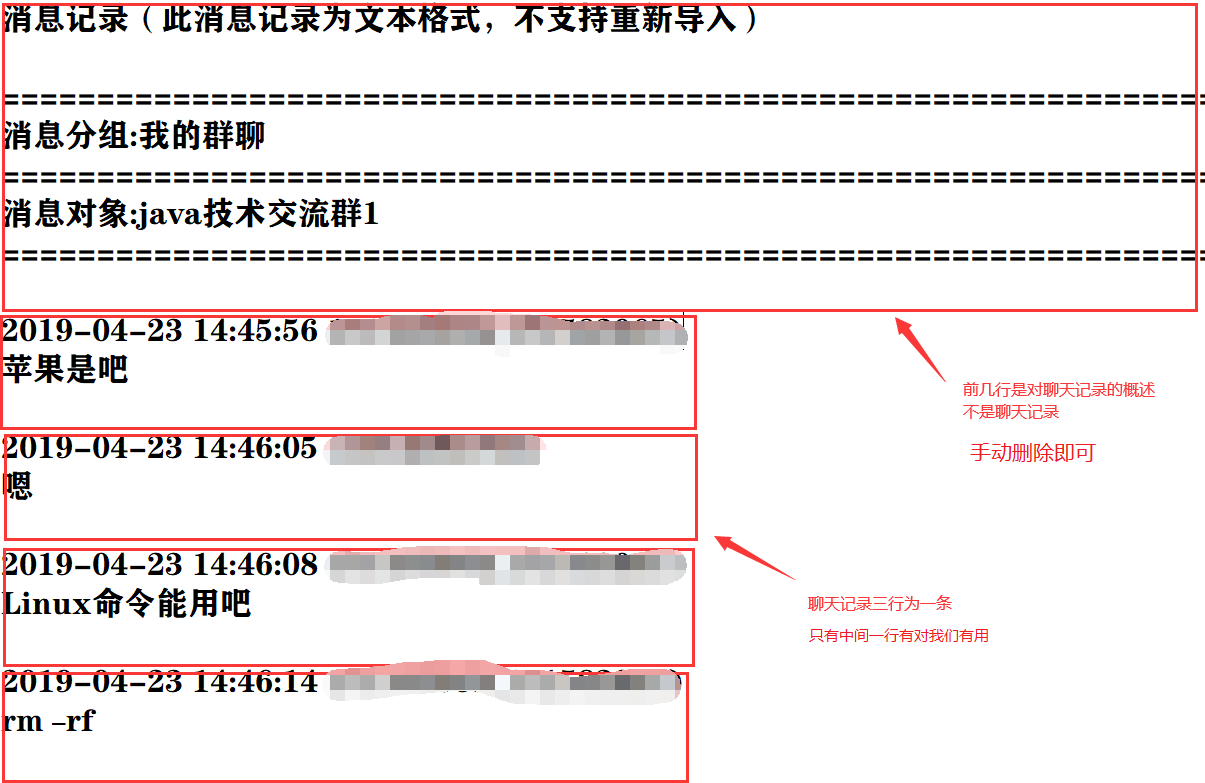
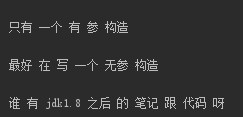
打开导出的聊天记录查看


净化聊天记录
代码
#将文本导入到程序中
text=open(r'C:\Users\LIANG\Desktop\java技术交流群.txt',encoding='utf-8')

# 提取文本 一行一行选取 存入text_clean.txt文件中
text_clean = open(r'C:\Users\LIANG\Desktop\text_clean.txt','w',encoding="utf-8-sig")
str_s=text.readlines()
for str in str_s:
    if str.find('[表情]')!=-1:
        str=str.replace('[表情]','')
    elif str.find('2019')!=-1 or str.find('2020')!=-1 or str=='' or str.find('[图片]')!=-1:
        continue
    else:
        text_clean.write(str)
净化后的文件部分内容显示(text_clean.txt)

分词
代码
import jieba # 中文分词组件
#利用jieba模块对聊天记录精确分词
text_clean = open(r'C:\Users\LIANG\Desktop\text_clean.txt','r',encoding="utf-8-sig").read()
text_jieba = jieba.cut(text_clean, cut_all=False)
text_split = " ".join(text_jieba)
分词后文本部分结果print(text_split):
选取图片
代码
#PIL专门处理图像
import numpy as np
from PIL import Image
cloud_mask = np.array(Image.open(r'C:\Users\LIANG\Desktop\云朵.jpg'))
图片

选取字体(词云只支持英文 但是通过以下方式可以正常显示中文)
更换字体路径
我们按照路径"C:\Windows\Fonts"打开文件 我们可以选择 其中任意一种支持中文的字体

比如:选择微软雅黑中的简体字 右键点击属性 复制粘贴到’C:\Windows\Fonts’路径后 改变font属性


代码
font = r'C:\Windows\Fonts\msyh.ttc'
生成图片并显示
代码
#导包
from wordcloud import WordCloud
import matplotlib.pyplot as plt
'''
scale : 			按比例放大画布
background_color :	背景颜色
font_path :			字体
width :				宽
height :			高
mask : 				nd-array or None类型 通常用于添加图片背景
max_words : 		要显示的词的最大个数
更多参数可以去看官方文档
'''
wordcloud = WordCloud( scale=10,background_color='white',width=200,height=200, font_path=font,mask=cloud_mask,max_words=300).generate(text_split)
#interpolation='bilinear',排线方式
plt.imshow(wordcloud,interpolation='bilinear')
#取消显示轴线
plt.axis('off')
#显示图片
plt.show()
生成的词云图片

全部代码
import jieba # 中文分词组件
import numpy as np
from PIL import Image
from wordcloud import WordCloud
import matplotlib.pyplot as plt

#步骤一:将文本导入到程序中
text=open(r'C:\Users\LIANG\Desktop\java技术交流群.txt',encoding='utf-8')

# 步骤二:净化文本数据
text_clean = open(r'C:\Users\LIANG\Desktop\text_clean.txt','w',encoding="utf-8-sig")
str_s=text.readlines()
for str in str_s:
    if str.find('[表情]')!=-1:
        str=str.replace('[表情]','')
    elif str.find('2019')!=-1 or str.find('2020')!=-1 or str=='' or str.find('[图片]')!=-1:
        continue
    else:
        text_clean.write(str)
text_clean.close()

#步骤四:利用jieba模块对聊天记录精确分词
text_clean = open(r'C:\Users\LIANG\Desktop\text_clean.txt','r',encoding="utf-8-sig").read()
text_jieba = jieba.cut(text_clean, cut_all=False)
text_split = " ".join(text_jieba)
print(text_split)


#步骤五:设置背景图 和字体
cloud_mask = np.array(Image.open(r'C:\Users\LIANG\Desktop\云朵.jpg'))
font = r'C:\Windows\Fonts\msyh.ttc'


#步骤六:生成词云
'''
scale : 			按比例放大画布
background_color :	背景颜色
font_path :			字体
width :				宽
height :			高
mask : 				nd-array or None类型 通常用于添加图片背景
max_words : 		要显示的词的最大个数
更多参数可以去看官方文档
'''
wordcloud = WordCloud( scale=10,background_color='white',width=200,height=200, font_path=font,mask=cloud_mask,max_words=300).generate(text_split)
#interpolation='bilinear',排线方式
plt.imshow(wordcloud,interpolation='bilinear')
#取消显示轴线
plt.axis('off')
#显示图片
plt.show()


 331
331


 被折叠的 条评论
为什么被折叠?
被折叠的 条评论
为什么被折叠?
 到【灌水乐园】发言


