


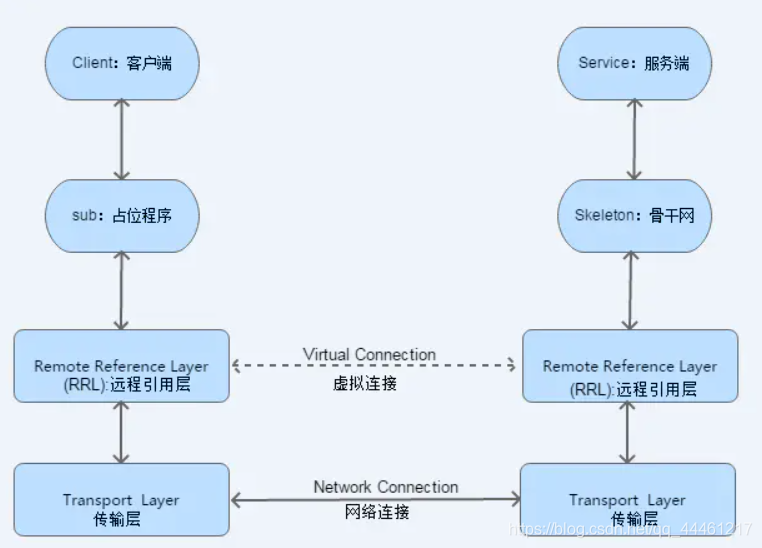
RMI简介
Java RMI,即 远程方法调用(Remote Method Invocation),一种用于实现远程过程调用(RPC)(Remote procedure call)的Java API, 能直接传输序列化后的Java对象和分布式垃圾收集。它的实现依赖于Java虚拟机(JVM),因此它仅支持从一个JVM到另一个JVM的调用。
rmi的实现
(1) 直接使用Registry实现rmi
服务端:
public class RegistryService {
    public static void main(String[] args) {
        try {
            // 本地主机上的远程对象注册表Registry的实例,默认端口1099
            Registry registry = LocateRegistry.createRegistry(1099);
            // 创建一个远程对象
            HelloRegistryFacade hello = new HelloRegistryFacadeImpl();
            // 把远程对象注册到RMI注册服务器上,并命名为HelloRegistry
            registry.rebind("HelloRegistry", hello);
            System.out.println("======= 启动RMI服务成功! =======");
        } catch (RemoteException e) {
            e.printStackTrace();
        }
    }
}
接口:
继承Remote接口
public interface HelloRegistryFacade extends Remote {

    String helloWorld(String name) throws RemoteException;

}
接口实现:
继承UnicastRemoteObject
public class HelloRegistryFacadeImpl extends UnicastRemoteObject implements HelloRegistryFacade{

    public HelloRegistryFacadeImpl() throws RemoteException {
        super();
    }

    @Override
    public String helloWorld(String name) {
        return "[Registry] 你好! " + name;
    }

}
客户端:
public class RegistryClient {
    public static void main(String[] args) {
        try {
            Registry registry = LocateRegistry.getRegistry(1099);
            HelloRegistryFacade hello = (HelloRegistryFacade) registry.lookup("HelloRegistry");
            String response = hello.helloWorld("ZhenJin");
            System.out.println("=======> " + response + " <=======");
        } catch (NotBoundException | RemoteException e) {
            e.printStackTrace();
        }
    }
}
图解:
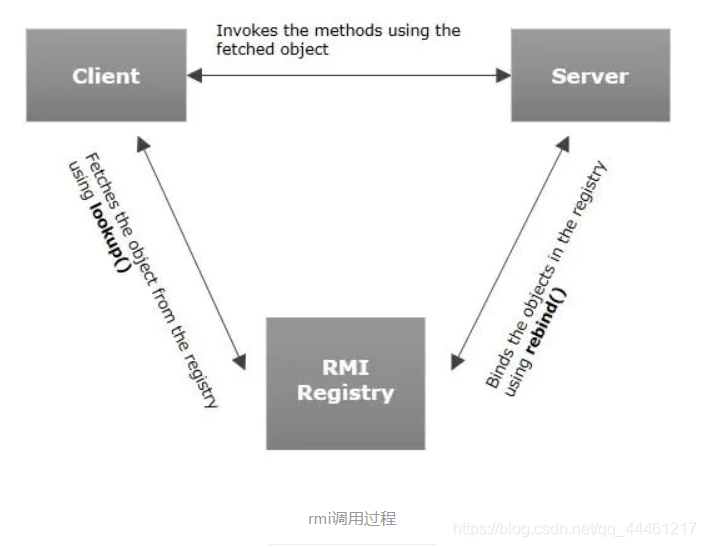
Registry(注册表)是放置所有服务器对象的命名空间。
每次服务端创建一个对象时,它都会使用bind()或rebind()方法注册该对象。
这些是使用称为绑定名称的唯一名称注册的。

要调用远程对象,客户端需要该对象的引用,如(HelloRegistryFacade)。
即通过服务端绑定的名称(HelloRegistry)从注册表中获取对象(lookup()方法)。
(2) 使用Naming方法实现rmi
服务端:
public class NamingService {
    public static void main(String[] args) {
        try {
            // 本地主机上的远程对象注册表Registry的实例
            LocateRegistry.createRegistry(1100);
            // 创建一个远程对象
            HelloNamingFacade hello = new HelloNamingFacadeImpl();
            // 把远程对象注册到RMI注册服务器上,并命名为Hello
            //绑定的URL标准格式为:rmi://host:port/name
            Naming.bind("rmi://localhost:1100/HelloNaming", hello);
            System.out.println("======= 启动RMI服务成功! =======");
        } catch (RemoteException | MalformedURLException | AlreadyBoundException e) {
            e.printStackTrace();
        }
    }
}
接口和接口实现和Registry的方式一样
客户端:
public class NamingClient {
    public static void main(String[] args) {
        try {
            String remoteAddr="rmi://localhost:1100/HelloNaming";
            HelloNamingFacade hello = (HelloNamingFacade) Naming.lookup(remoteAddr);
            String response = hello.helloWorld("ZhenJin");
            System.out.println("=======> " + response + " <=======");
        } catch (NotBoundException | RemoteException | MalformedURLException e) {
            e.printStackTrace();
        }
    }
}
Naming部分源码:
public static Remote lookup(String name)
    throws NotBoundException,java.net.MalformedURLException,RemoteException{
    ParsedNamingURL parsed = parseURL(name);
    Registry registry = getRegistry(parsed);

    if (parsed.name == null)
        return registry;
    return registry.lookup(parsed.name);
}
Naming其实是对Registry的一个封装
Scala实现rmi
上面说了rmi是通过JVM虚拟机进行一个远程调用的,我们通过Scala,kotlin等jvm语言印证下
服务端:
object ScalaRmiService extends App {
  try {
    val user:UserScalaFacade = new UserScalaFacadeImpl
    LocateRegistry.createRegistry(1103)
    Naming.rebind("rmi://localhost:1103/UserScala", user)
    println("======= 启动RMI服务成功! =======")
  } catch {
    case e: IOException => println(e)
  }
}
接口
trait UserScalaFacade extends Remote {

  /**
    * 通过用户名获取用户信息
    */
  @throws(classOf[RemoteException])
  def getByName(userName: String): User

  /**
    * 通过用户性别获取用户信息
    */
  @throws(classOf[RemoteException])
  def getBySex(userSex: String): List[User]

}
接口实现:
class UserScalaFacadeImpl extends UnicastRemoteObject with UserScalaFacade {

  /**
    * 模拟一个数据库表
    */
  private lazy val userList = List(
    new User("Jane", "女", 16),
    new User("jack", "男", 17),
    new User("ZhenJin", "男", 18)
  )

  override def getByName(userName: String): User = userList.filter(u => userName.equals(u.userName)).head

  override def getBySex(userSex: String): List[User] = userList.filter(u => userSex.equals(u.userSex))

}
实体类:
实体类必须实现序列化(Serializable)才能进行一个远程传输
class User(name: String, sex: String, age: Int) extends Serializable {

  var userName: String = name
  var userSex: String = sex
  var userAge: Int = age
  override def toString = s"User(userName=$userName, userSex=$userSex, userAge=$userAge)"

}
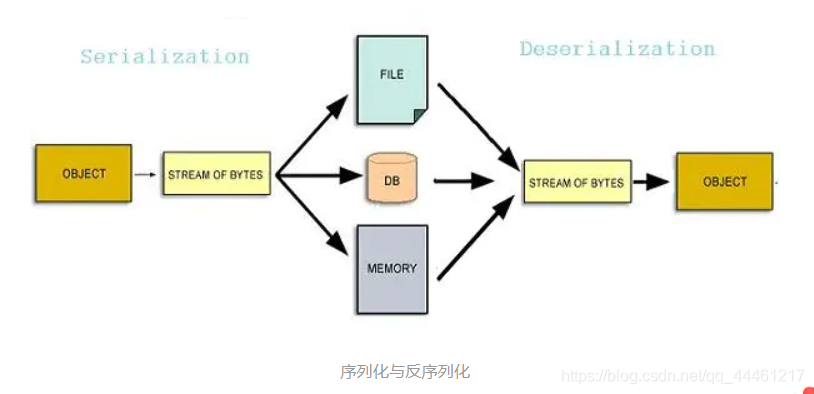
序列化简介
序列化(Serialization)是将数据结构或对象状态转换为可以存储(例如,在文件或存储器缓冲区中)或传输(例如,通过网络连接)的格式的过程, 反序列化(Deserialization)则是从一系列字节中提取数据结构的相反操作.
SpringBoot实现rmi
StringBoot通过配置就可以简单实现rmi了
服务端:
@Configuration
public class RmiServiceConfig {
    @Bean
    public RmiServiceExporter registerService(UserFacade userFacade) {
        RmiServiceExporter rmiServiceExporter = new RmiServiceExporter();
        rmiServiceExporter.setServiceName("UserInfo");
        rmiServiceExporter.setService(userFacade);
        rmiServiceExporter.setServiceInterface(UserFacade.class);
        rmiServiceExporter.setRegistryPort(1101);
        return rmiServiceExporter;
    }
}
客户端:
@Configuration
public class RmiClientConfig {

    @Bean
    public UserFacade userInfo() {
        RmiProxyFactoryBean rmiProxyFactoryBean = new RmiProxyFactoryBean();
        rmiProxyFactoryBean.setServiceUrl("rmi://localhost:1101/UserInfo");
        rmiProxyFactoryBean.setServiceInterface(UserFacade.class);
        rmiProxyFactoryBean.afterPropertiesSet();
        return (UserFacade) rmiProxyFactoryBean.getObject();
    }

}
客户端测试类:
@Autowired
private UserFacade userFacade;

@Test
public void userBySexTest() {
    try {
        List<User> userList = userFacade.getBySex("男");
        userList.forEach(System.out::println);
    } catch (RemoteException e) {
        e.printStackTrace();
    }
}
通过测试类可以看出,这和我们平时的程序调用内部方法没什么区别!
rmi调用过程
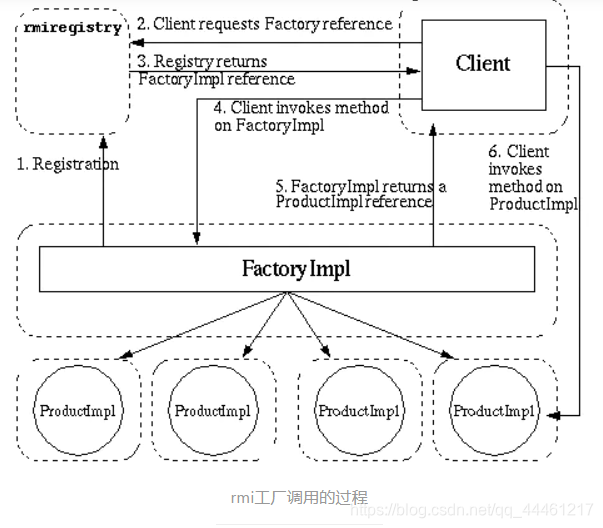
有两个远程服务接口可供client调用,Factory和Product接口
FactoryImpl类实现了Factory接口,ProductImpl类实现了Product接口
1. FactoryImpl被注册到了rmi-registry中
2. client端请求一个Factory的引用
3. rmi-registry返回client端一个FactoryImpl的引用
4. client端调用FactoryImpl的远程方法请求一个ProductImpl的远程引用
5. FactoryImpl返回给client端一个ProductImpl引用
6. client通过ProductImpl引用调用远程方法


 6401
6401


 被折叠的 条评论
为什么被折叠?
被折叠的 条评论
为什么被折叠?
 到【灌水乐园】发言


