


mybatis/mybatis-plus常用
仓库代码地址:https://gitee.com/luckkiven/tedu-boot-vue3.0-mp
文章目录
基于RBAC联表resultMap封装
为什么要联表
mybatis 单表操作
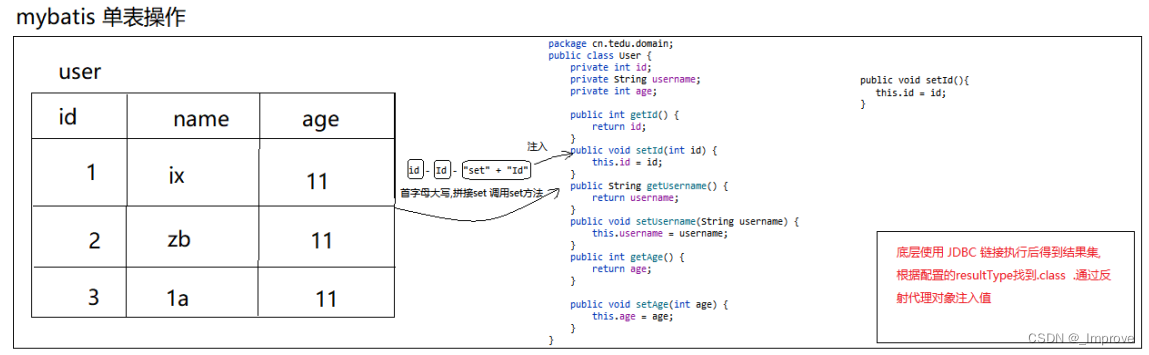
如上图:
<select id="selectUsers" parameterType="int" resultType="User">
  select
    id  ,
    name  ,
    age   ,
  from user
  where id = #{id}
</select>
这些情况下,MyBatis 会在幕后自动创建一个 ResultMap,基于属性名来映射列到 JavaBean 的属性上
单表时 ,可以很轻松的根据JDBC对实体对象进行值封装, 但是在多表操作中,甚至是对象里面嵌套对象的时候, 并不能一次封装到对象,再封装到属性里面去
所以此时要使用resultMap 去配置规则**.处理嵌套**,或者处理属性名和表字段名不一致的情况
你可以把resultMap 看成是手动配置结果集封装
ResultMap 的设计就是简单语句不需要明确的结果映射,而很多复杂语句确实需要描述它们 的关系。
联表的坏处是什么
走越多的表关联关系, 意味查询更多的数据, 时间增加.SQL复杂度增加
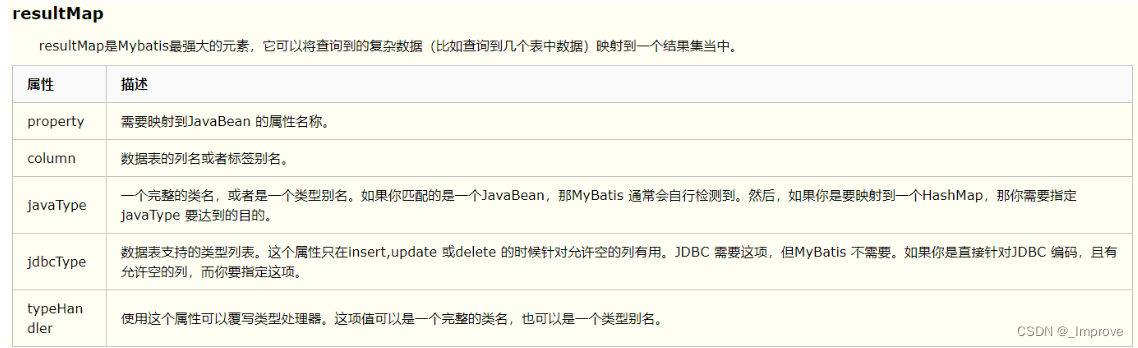
一对一,一对多,多对多

属性和结构
<!--column不做限制,可以为任意表的字段,而property须为type 定义的pojo属性-->
<resultMap id="唯一的标识" type="映射的pojo对象">
  <id column="表的主键字段,或者可以为查询语句中的别名字段" jdbcType="字段类型" property="映射pojo对象的主键属性" />
  <result column="表的一个字段(可以为任意表的一个字段)" jdbcType="字段类型" property="映射到pojo对象的一个属性(须为type定义的pojo对象中的一个属性)"/>
  <association property="pojo的一个对象属性" javaType="pojo关联的pojo对象">
    <id column="关联pojo对象对应表的主键字段" jdbcType="字段类型" property="关联pojo对象的主席属性"/>
    <result  column="任意表的字段" jdbcType="字段类型" property="关联pojo对象的属性"/>
  </association>
  <!-- 集合中的property须为oftype定义的pojo对象的属性-->
  <collection property="pojo的集合属性" ofType="集合中的pojo对象" autoMapping="true(自动封装字段映射)">
    <id column="集合中pojo对象对应的表的主键字段" jdbcType="字段类型" property="集合中pojo对象的主键属性" />
    <result column="可以为任意表的字段" jdbcType="字段类型" property="集合中的pojo对象的属性" />
  </collection>
</resultMap>
实战
准备表结构数据
jtsys.sql
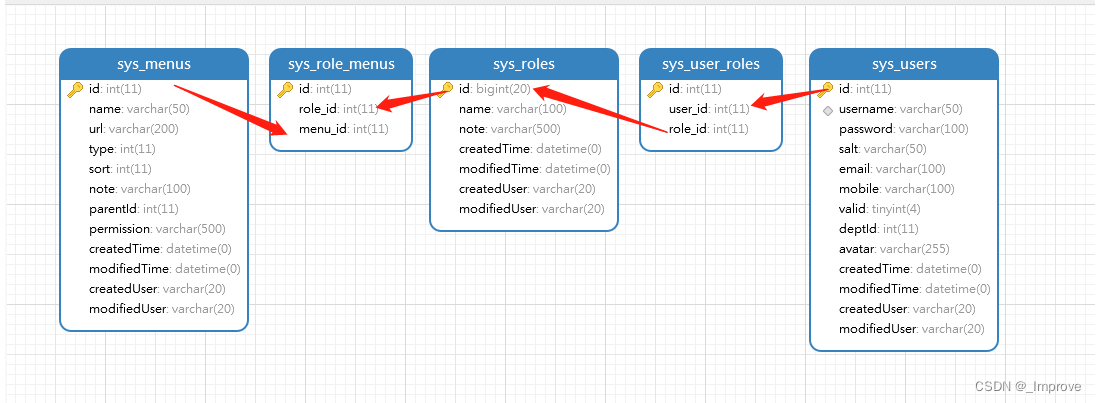
如何做到5表联查 .
演示两种封装resultMap
提出需求💯
目前我知道用户的ID , 想知道该用户有多少权限, 也就是 menus 表.
实体类:
package cn.tedu.domain;

import lombok.Data;

import java.io.Serializable;
import java.util.Date;

@Data
public class SysMenu  implements Serializable{
	private static final long serialVersionUID = 3080223330352007070L;
	private Integer id;
	private String name;
	private String url;
	private Integer type;
	private Integer sort;
	private String note;
	private String permission;
	private Integer parentId;
	private String parentName;
	private String createdUser;
	private String modifiedUser;
	private Date createdTime;
	private Date modifiedTime;
}
VO类:
package cn.tedu.domain;

import lombok.Data;

import java.io.Serializable;
import java.util.List;

@Data
public class SysUserMenu implements Serializable{
	private static final long serialVersionUID = 7266721118655784653L;
	private Integer id;
	private String name;
	//菜单
	private List<SysMenu> menus;

}//VO,BO,DO,DTO
xml
<?xml version="1.0" encoding="UTF-8"?>
<!DOCTYPE mapper
  PUBLIC "-//mybatis.org//DTD Mapper 3.0//EN"
  "http://mybatis.org/dtd/mybatis-3-mapper.dtd">
  <mapper namespace="cn.tedu.mapper.UserMenuMapper">

    <resultMap id="userMenuMap" type="cn.tedu.domain.SysUserMenu">
      <id column="uid" property="id"></id>
      <result column="uname" property="name"></result>
      <collection property="menus" ofType="cn.tedu.domain.SysMenu" >
        <id column="mid" property="id"></id>
        <result column="mname" property="name"></result>
        <result column="url" property="url"></result>
        <result column="type" property="type"></result>
        <result column="sort" property="sort"></result>
        <result column="note" property="note"></result>
        <result column="permission" property="permission"></result>
        <result column="parentId" property="parentId"></result>
        <result column="parentName" property="parentName"></result>
        <result column="createdUser" property="createdUser"></result>
        <result column="modifiedUser" property="modifiedUser"></result>
        <result column="createdTime" property="createdTime"></result>
        <result column="modifiedTime" property="modifiedTime"></result>
      </collection>
    </resultMap>
    <select id="findMenusByUserId" resultMap="userMenuMap">
        select u.id uid,u.username uname,m.id mid,m.name mname,m.url url,m.type type,m.sort sort,m.note note,m.permission permission,
        m.parentId parentId ,m.createdUser createdUser,
        m.modifiedUser modifiedUser,m.createdTime createdTime,m.modifiedTime modifiedTime
        from sys_users u
        inner join sys_user_roles ur
        on u.id = ur.user_id
        inner join sys_roles r
        on ur.role_id = r.id
        inner join sys_role_menus rm
        on rm.role_id = r.id
        inner join sys_menus m
        on m.id = rm.menu_id where u.id = #{id}
    </select>
  </mapper>
collection相同字段映射不写的话增加属性
<collection property="menus" ofType="cn.tedu.domain.SysMenu" autoMapping="true">
            <id property="id" column="id"></id>
        </collection>
mapper
package cn.tedu.mapper;

import cn.tedu.domain.SysUserMenu;
import org.apache.ibatis.annotations.Mapper;

import java.util.List;

@Mapper
public interface UserMenuMapper {
    List<SysUserMenu> findMenusByUserId(Long id);
}
Test
package cn.tedu;

import cn.tedu.domain.SysUserMenu;
import cn.tedu.mapper.UserMenuMapper;
import org.junit.jupiter.api.Test;
import org.springframework.beans.factory.annotation.Autowired;
import org.springframework.boot.test.context.SpringBootTest;

import java.util.List;

@SpringBootTest
class TestresultmapApplicationTests {

    @Autowired
    private UserMenuMapper userMenuMapper;

    @Test
    void contextLoads() {
        List<SysUserMenu> menusByUserId = userMenuMapper.findMenusByUserId((long) 1);
        System.out.println(menusByUserId);
    }

}
提出需求🥈
需求 . 我知道部门id ,我要查出部门信息,和所有员工的信息
实体类:
package cn.tedu.domain;

import lombok.Data;

import java.io.Serializable;
import java.util.Date;

@Data
public class SysUser implements Serializable {
	private static final long serialVersionUID = -924193587093306322L;
	private Integer id;
	private String username;
	private String password;//md5
	private String salt;
	private String email;
	private String mobile;
	private Integer valid=1;
	private Integer deptId; //private SysDept sysDept;
	private Date createdTime;
	private Date modifiedTime;
	private String createdUser;
	private String modifiedUser;
}
package cn.tedu.domain;

import lombok.Data;

import java.io.Serializable;
import java.util.Date;
import java.util.List;

/**
 * 部门PO对象
 */
@Data
public class SysDept implements Serializable{
	private static final long serialVersionUID = 8876920804134951849L;
	private Integer id;
	private String name;
	private Integer parentId;
	private Integer sort;
	private String note;
	private List<SysUser> users;
	private Date createdTime;
	private Date modifiedTime;
	private String createdUser;
	private String modifiedUser;
}
xml
 <resultMap id="deptAndUsers" type="cn.tedu.domain.SysDept">
        <id column="id" property="id"></id>
        <collection property="users" column="id" ofType="cn.tedu.domain.SysUser" select="findUsers"></collection>
    </resultMap>

    <select id="findUsers" resultType="cn.tedu.domain.SysUser">
        select * from sys_users where deptId = #{id}
    </select>

    <select id="findUsersByDeptId" resultMap="deptAndUsers">
        select * from sys_depts where id = #{id}
    </select>
mapper接口
package cn.tedu.mapper;

import cn.tedu.domain.SysUser;
import cn.tedu.domain.SysUserMenu;
import org.apache.ibatis.annotations.Mapper;

import java.util.List;

@Mapper
public interface UserMenuMapper {
    List<SysUserMenu> findMenusByUserId(Long id);

    List<SysUser> findUsersByDeptId(Long id);
}
测试类:
 @Test
    void testDept(){
        List<SysUser> usersByDeptId = userMenuMapper.findUsersByDeptId((long) 3);
        System.out.println(usersByDeptId);
    }
mybatis/mp动态SQL相关
API 一个模块默认的6个接口
getInfoById(); || findInfoById();
deleteInfoByIds(); 删除和批量删除做一起
findUserList(User user) 动态SQL查询
addUser(User user)
updateUser(User user)
export() 导出Excel
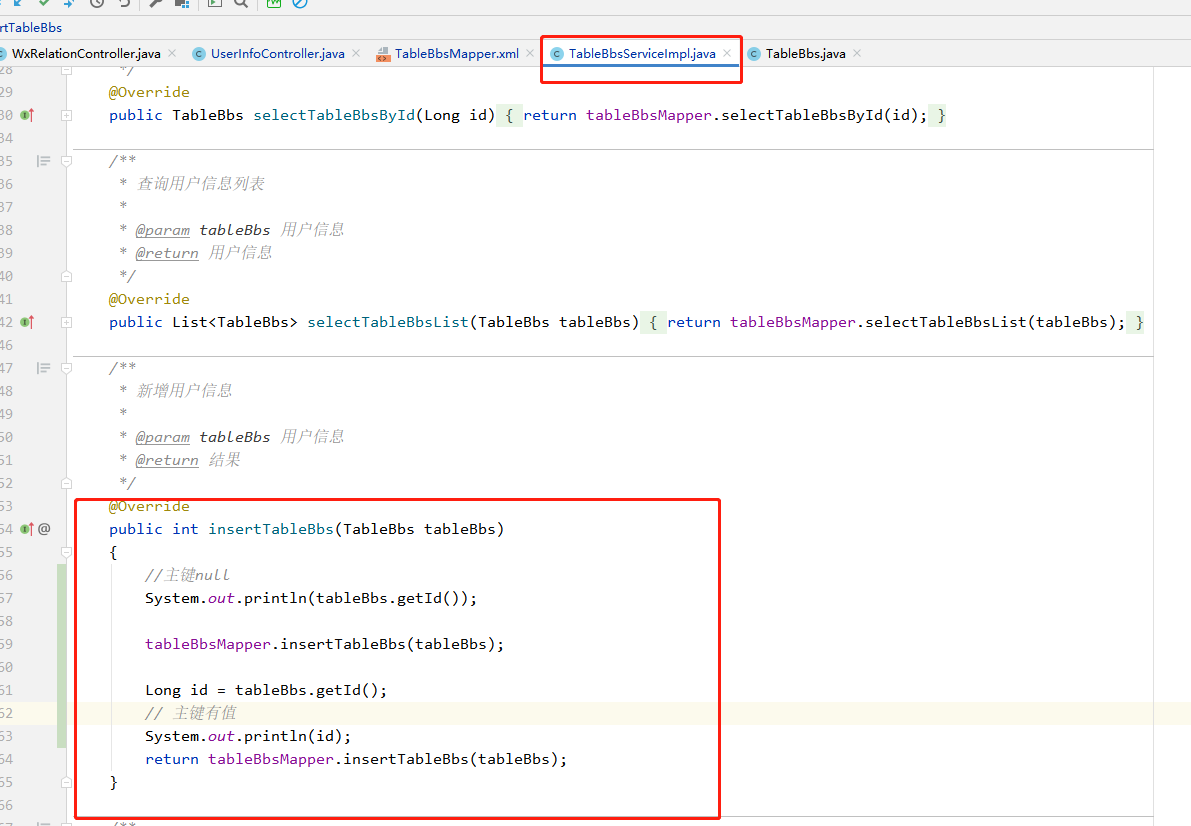
mybatis 插入返回主键

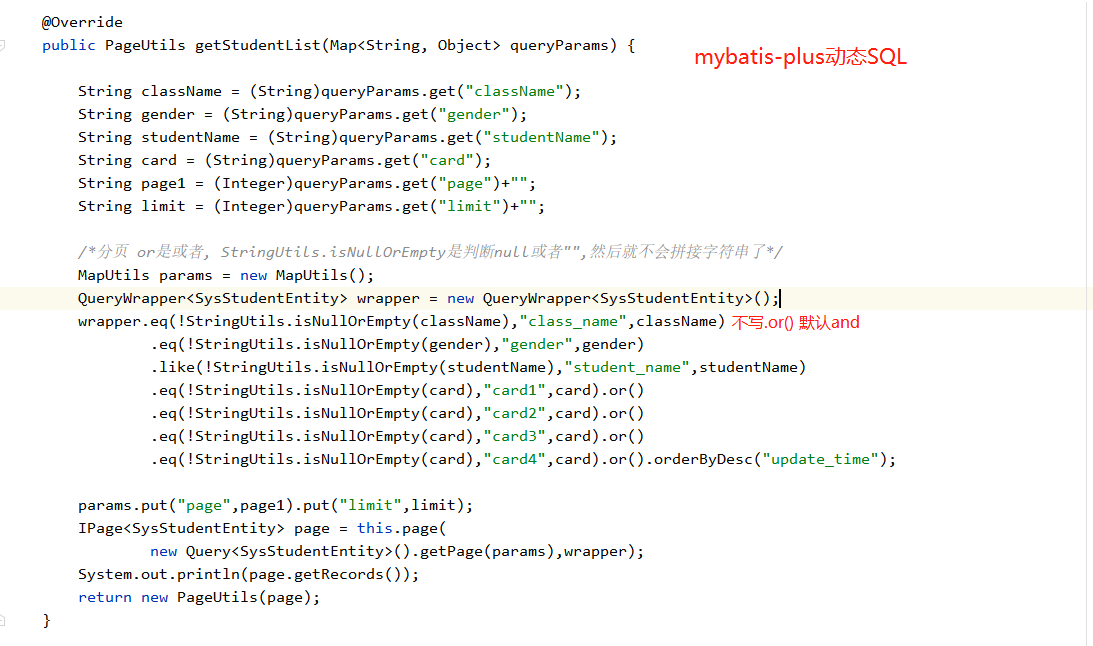
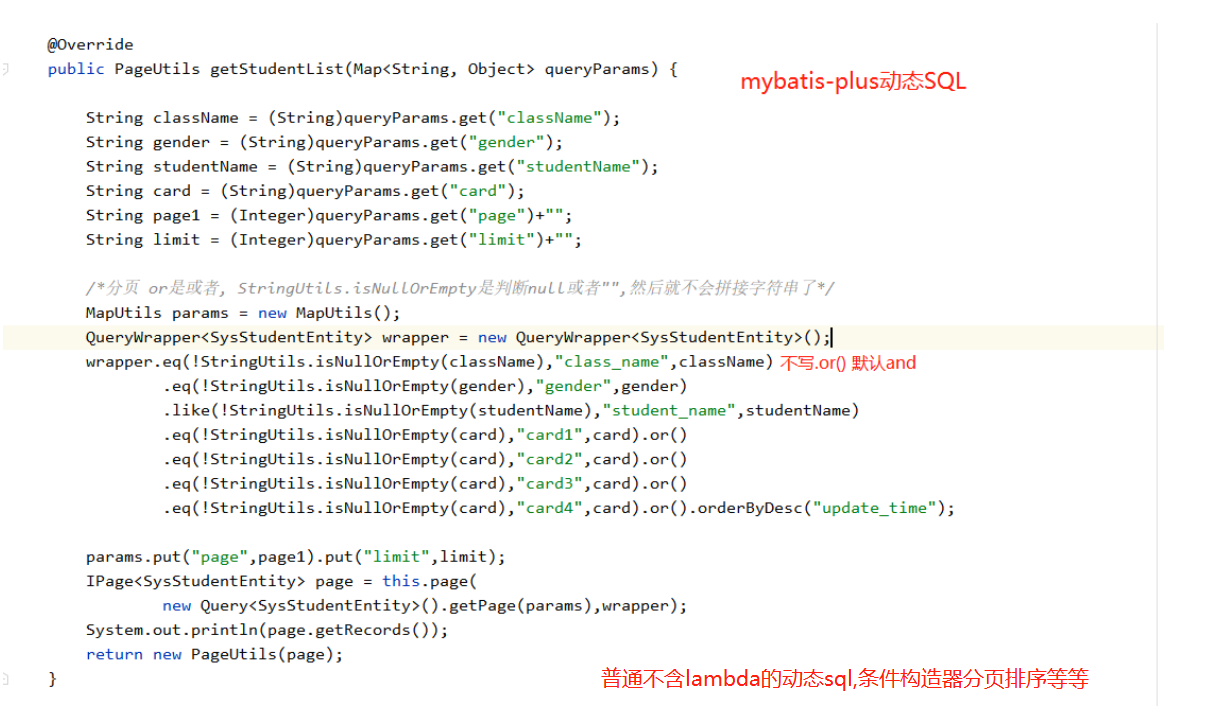
mybatis-plus 动态SQL 查询
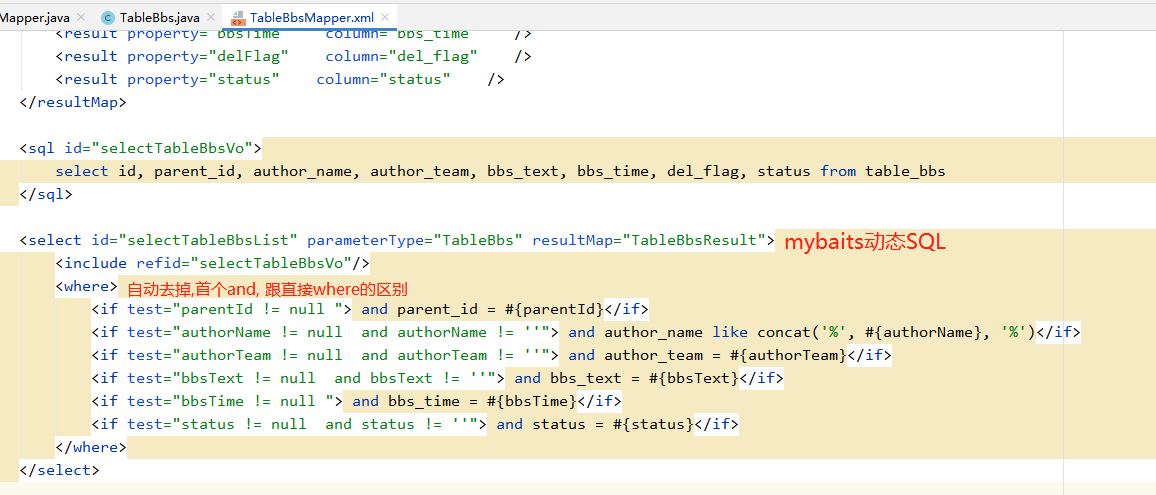
mybatis 动态SQL 查询
mybatis批量插入
wxUserInfo
mapper接口
/**
 * @author Kiven
 */
@Mapper
public interface WxUserinfoMapper extends BaseMapper<WxUserinfo> {

    Integer insertWxUserInfos(List<WxUserinfo> list);
}
mapper.xml
<?xml version="1.0" encoding="UTF-8"?>
<!DOCTYPE mapper
  PUBLIC "-//mybatis.org//DTD Mapper 3.0//EN"
  "http://mybatis.org/dtd/mybatis-3-mapper.dtd">
  <mapper namespace="cn.tedu.mapper.WxUserinfoMapper">
        <insert id="insertWxUserInfos">
            INSERT INTO wx_userinfo (openid, nickname, sex, language, city, province, country, headimgurl, privilege)
            VALUES
            <foreach collection="list" item="item" index="index" separator=",">
                (#{item.openid}, #{item.nickname}, #{item.sex}, #{item.language}, #{item.city}, #{item.province}, #{item.country}, #{item.headimgurl}, #{item.privilege})
            </foreach>
        </insert>
  </mapper>
test测试:
@Test
    void testInsertBatch(){
        List<WxUserinfo> list = new ArrayList<>();
        for (int i = 0; i < 10; i++) {
            WxUserinfo user = new WxUserinfo();
            user.setOpenid(UUID.randomUUID().toString());
            user.setNickname("User" + i);
            user.setSex(ThreadLocalRandom.current().nextInt(1, 3)); // assuming 1 for male and 2 for female
            user.setLanguage("zh");
            user.setCity("City" + i);
            user.setProvince("Province" + i);
            user.setCountry("Country" + i);
            user.setHeadimgurl("http://example.com/headimgurl" + i + ".jpg");
            user.setPrivilege("privilege" + i);
            list.add(user);
        }
        wxUserinfoMapper.insertWxUserInfos(list);
    }
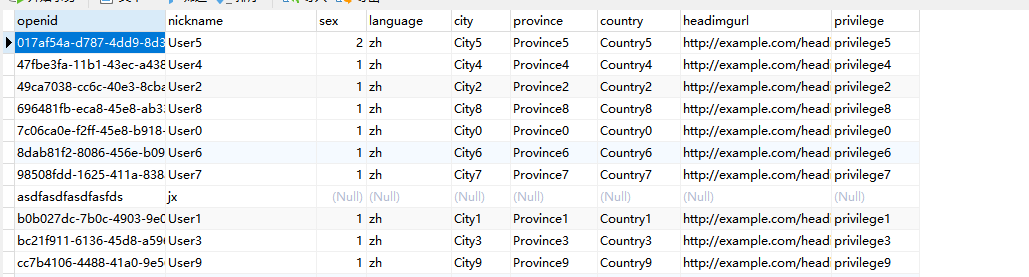
最终效果:
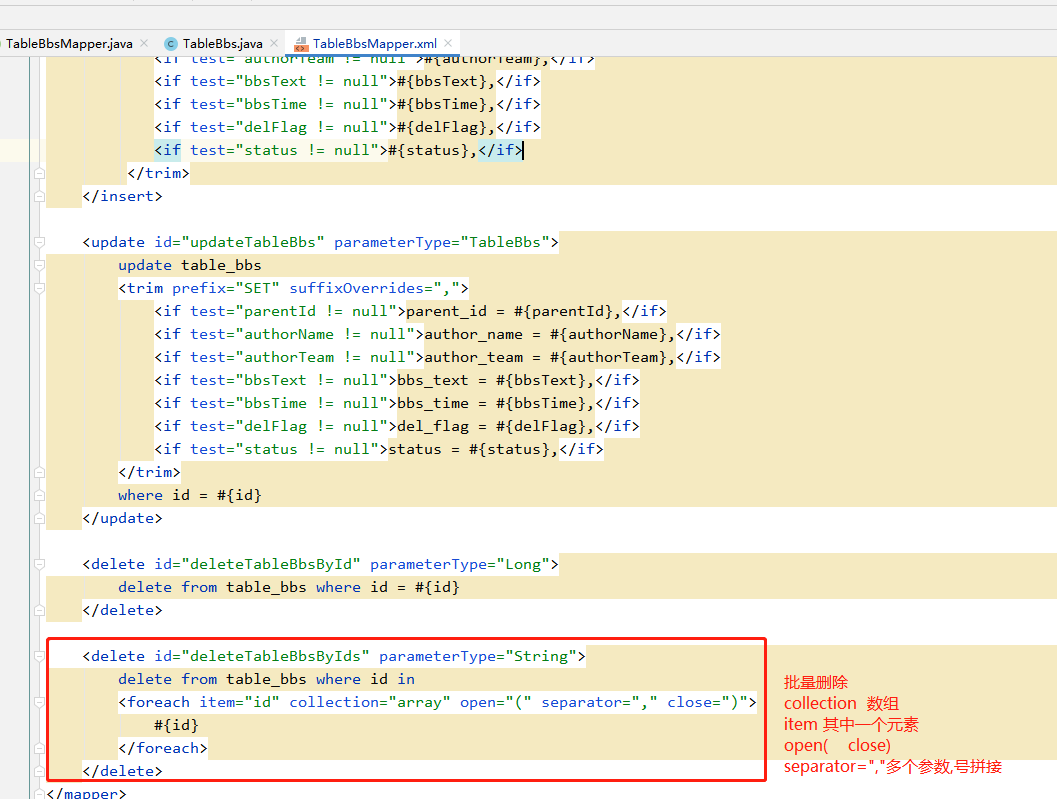
修改删除切记
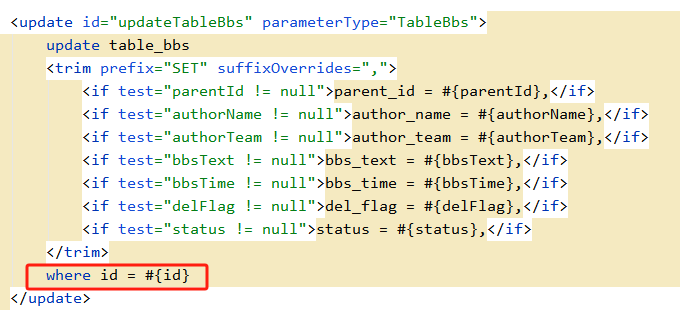
比如上图选中的部分,一定不能使用 避免因为id为null导致 不拼接where语句,改整个表
批量删除foreach
日期的 和like
<select id="selectTableLeaveListSalfGradeOrDeptIdLeave" parameterType="SystemLeave" resultMap="TableLeaveResult">
        <include refid="selectTableLeaveVo"/>
        <where>
            <if test="tableLeave.type != null  and tableLeave.type != ''"> and type = #{type}</if>
            <if test="tableLeave.startDate != null ">
                AND date_format(start_date,'%y%m%d') >= date_format(#{tableLeave.startDate},'%y%m%d')
            </if>
            <if test="tableLeave.endDate != null ">
                AND date_format(end_date,'%y%m%d') <= date_format(#{tableLeave.endDate},'%y%m%d')
            </if>
            <if test="tableLeave.classId != null"> and class_id = #{tableLeave.classId}</if>
            <if test="tableLeave.name != null  and tableLeave.name != ''"> and name like concat('%', #{tableLeave.name}, '%')</if>
            <if test="ids != null">
                AND class_id in
                <foreach item="item" collection="ids" separator="," open="(" close=")"  index="">
                    #{item}
                </foreach>
            </if>
        </where>

        ORDER BY created_time ${tableLeave.params.isAsc}
        LIMIT ${tableLeave.params.pageStart},${tableLeave.params.pageSize}

    </select>
<select id="selectTableLeaveListSalfGradeOrDeptIdLeave" parameterType="SystemLeave" resultMap="TableLeaveResult">
<include refid="selectTableLeaveVo"/>
<where>
<if test="tableLeave.type != null and tableLeave.type != ''"> and type = #{type}</if>
<if test="tableLeave.startDate != null ">
AND date_format(start_date,'%y%m%d') >= date_format(#{tableLeave.startDate},'%y%m%d')
</if>
<if test="tableLeave.endDate != null ">
AND date_format(end_date,'%y%m%d') <= date_format(#{tableLeave.endDate},'%y%m%d')
</if>
<if test="tableLeave.classId != null"> and class_id = #{tableLeave.classId}</if>
<if test="tableLeave.name != null and tableLeave.name != ''"> and name like concat('%', #{tableLeave.name}, '%')</if>
<if test="ids != null">
AND class_id in
<foreach item="item" collection="ids" separator="," open="(" close=")" index="">
#{item}
</foreach>
</if>
</where>
ORDER BY created_time ${tableLeave.params.isAsc}
LIMIT ${tableLeave.params.pageStart},${tableLeave.params.pageSize}
</select>
Mybatis-plus
概述
Mybatis-plus 简介
MyBatis-Plus是一个基于MyBatis的增强工具,它简化了MyBatis的开发流程,提供了许多实用的增强功能,同时还保持了MyBatis原有的灵活性和强大的SQL映射能力。
MyBatis-Plus提供了很多实用的功能,包括自动生成代码、分页插件、性能分析插件、全局拦截器、乐观锁插件等等。此外,MyBatis-Plus还提供了Lambda表达式查询、条件构造器、动态表名等功能,使得我们可以更加便捷地进行复杂查询和操作
Mybatis-plus 的优点和不足
MyBatis-Plus的优点主要包括以下几点:
- 简化开发:MyBatis-Plus封装了许多常用的操作,如增删改查等,可以大大简化代码的编写。
- 提高效率:MyBatis-Plus提供了自动生成代码的功能,可以快速生成基础代码,提高开发效率。
- 丰富功能:MyBatis-Plus提供了许多实用的增强功能,如分页插件、性能分析插件等等,可以大大提高开发效率和系统性能。
- 易于扩展:MyBatis-Plus保持了MyBatis原有的灵活性,可以与其他框架很好地集成,同时还提供了丰富的扩展点,可以方便地进行功能扩展。
总的来说,MyBatis-Plus是一个非常实用的MyBatis增强工具,可以大大提高开发效率和系统性能,同时还保持了MyBatis原有的灵活性和强大的SQL映射能力。
尽管MyBatis-Plus具有许多优点,但它也存在一些不足之处:
- 学习成本:MyBatis-Plus提供了许多实用的增强功能,但是学习这些功能需要一定的时间和精力。
- 增强功能有限制:尽管MyBatis-Plus提供了许多实用的增强功能,但是这些功能并不能满足所有的需求,有些复杂的操作还需要自己手动实现。
- 不支持所有的数据库:尽管MyBatis-Plus支持大多数常见的数据库,但是并不支持所有的数据库,有些特殊的数据库可能无法使用MyBatis-Plus。
- 版本迭代速度较快:MyBatis-Plus的版本迭代速度较快,有时会导致一些API的变更和兼容性问题。
总的来说,尽管MyBatis-Plus存在一些不足之处,但它仍然是一个非常实用的MyBatis增强工具,可以大大提高开发效率和系统性能。
Mybatis-plus 的特性和用途
- 自动代码生成:MyBatis-Plus提供了代码生成器,可以自动生成基础的CRUD代码,极大地减少了重复劳动。
- 方便的分页插件:MyBatis-Plus提供了分页插件,可以方便地进行分页操作。
- Lambda表达式查询:MyBatis-Plus支持使用Lambda表达式进行条件查询,可以方便地进行复杂查询操作。
- 逻辑删除功能:MyBatis-Plus提供了逻辑删除功能,可以方便地进行软删除操作。
- 动态表名和字段名:MyBatis-Plus支持动态表名和字段名,可以方便地进行多表查询和操作。
- 性能分析插件:MyBatis-Plus提供了性能分析插件,可以方便地对SQL语句进行性能分析。
- 全局拦截器:MyBatis-Plus提供了全局拦截器,可以方便地对SQL语句进行拦截和处理。
- 乐观锁插件:MyBatis-Plus提供了乐观锁插件,可以方便地实现乐观锁功能。
环境搭建
添加MyBatis-Plus依赖
<!-- springboot集成 mybatis-plus -->
        <dependency>
            <groupId>com.baomidou</groupId>
            <artifactId>mybatis-plus-boot-starter</artifactId>
            <version>3.5.3</version>
        </dependency>
yml配置
# 数据库连接信息
spring.datasource.url=jdbc:mysql://localhost:3306/test?useUnicode=true&characterEncoding=utf-8&serverTimezone=UTC
spring.datasource.username=root
spring.datasource.password=root

# MyBatis-Plus配置项
mybatis-plus.mapper-locations=classpath:mapper/*.xml
mybatis-plus.type-aliases-package=com.example.demo.entity
mybatis-plus.configuration.map-underscore-to-camel-case=true
配置类
package cn.tedu.config;

import com.baomidou.mybatisplus.extension.plugins.PaginationInterceptor;
import org.springframework.context.annotation.Bean;
import org.springframework.context.annotation.Configuration;

/**
 * mybatis-plus配置
 *
 * @author Mark sunlightcs@gmail.com
 */
@Configuration
@MapperScan("cn.tedu.mapper")
public class MybatisPlusConfig {

    /**
     * 新的分页插件,一缓和二缓遵循mybatis的规则,需要设置 MybatisConfiguration#useDeprecatedExecutor = false 避免缓存出现问题(该属性会在旧插件移除后一同移除)
     */
    @Bean
    public MybatisPlusInterceptor mybatisPlusInterceptor() {
        MybatisPlusInterceptor interceptor = new MybatisPlusInterceptor();
        interceptor.addInnerInterceptor(new PaginationInnerInterceptor(DbType.MYSQL));
        return interceptor;
    }

}
基础使用
实体类:
package com.fsscdd.pojo.admin;

import com.baomidou.mybatisplus.annotation.IdType;
import com.baomidou.mybatisplus.annotation.TableId;
import com.baomidou.mybatisplus.annotation.TableName;
import com.fasterxml.jackson.annotation.JsonIgnore;
import lombok.Data;

import java.io.Serializable;
import java.util.Date;

/**
 * Model: 系统管理员表
 * @author kong
 */
@Data
@TableName("sp_admin")
public class SpsAdminEntity implements Serializable  {

	private static final long serialVersionUID = 1L;
	@TableId(type = IdType.AUTO)
	private long id;
	private long shopId;
	private String name;
	private String avatar;
	private String password;
	private String pw;
	private String phone;
	private long roleId;
	private int status;
	private long createByAid;
	private Date createTime;
	private Date loginTime;
	private String loginIp;
	private int loginCount;
}
mapper:
package com.fsscdd.mapper;

import com.baomidou.mybatisplus.core.mapper.BaseMapper;
import com.fsscdd.pojo.admin.SpsAdminEntity;
import org.apache.ibatis.annotations.Mapper;

@Mapper
public interface SpsAdminMapper  extends BaseMapper<SpsAdminEntity> {
}
service:
package com.fsscdd.service;

import com.baomidou.mybatisplus.extension.service.IService;
import com.fsscdd.pojo.admin.SpsAdminEntity;

public interface ISpsAdminService  extends IService<SpsAdminEntity> {

}
@Service
@Slf4j
public class ISpsAdminServiceImpl extends ServiceImpl<SpsAdminMapper, SpsAdminEntity> implements ISpsAdminService {}
简单使用
使用说明, 此时不管是mapper, 还是service都有对应的mp提供的api了. 可以直接食用,如下图:
其中QueryWrapper是查询条件构造器, updateWrapper是修改条件构造器 api带batch的就是批量
//UpdateWrapper
UpdateWrapper<User> uw = new
UpdateWrapper<>();
uw.set("age",35).like("name","Jack" );
// 让他只查询某些字段
QueryWrapper<User> userQueryWrapper = new QueryWrapper<>();
userQueryWrapper.select("id", "name", "age", "gender");
List<User> users = userMapper.selectList(userQueryWrapper);
lambda表达式的使用:
普通查询: api带batch的就是批量
SpsAdminEntity spsAdminEntity = spsAdminMapper.selectOne(Wrappers.<SpsAdminEntity>lambdaQuery().eq(SpsAdminEntity::getPhone, phone));
spsAdminMapper.selectList(
                Wrappers.<SpsAdminEntity>lambdaQuery().eq(SpsAdminEntity::getPhone,phone)
                .like(SpsAdminEntity::getName,name).or().eq(SpsAdminEntity::getAvatar,avatar)
                        .orderByDesc(SpsAdminEntity::getCreateTime)
        );
public JsonResult adminList(SpsAdminDTO spsAdminDTO,Integer currentPage,Integer pageSize) {

        IPage<SpsAdminEntity> page = new Page<>(currentPage,pageSize);
        //QueryWrapper<SpsAdminEntity> queryWrapper= new QueryWrapper<>();
        //
        //queryWrapper.eq(StringUtils.isNotBlank(spsAdminDTO.getName())
        //        ,"username",spsAdminDTO.getName());
        // 实现分页
        // 实现动态SQL
        // 实现lambda
        // 实现倒序
        IPage<SpsAdminEntity> spsAdminEntityIPage = spsAdminMapper.selectPage(page, Wrappers.<SpsAdminEntity>lambdaQuery()
                .eq(StringUtils.isNotBlank(spsAdminDTO.getName())
                        , SpsAdminEntity::getName, spsAdminDTO.getName())

                .or().eq(StringUtils.isNotBlank(spsAdminDTO.getPhone())
                        , SpsAdminEntity::getPhone, spsAdminDTO.getPhone())
                .ge(spsAdminDTO.getCreateTime() != null, SpsAdminEntity::getCreateTime, spsAdminDTO.getCreateTime())
                .le(spsAdminDTO.getCreateTime() != null, SpsAdminEntity::getCreateTime, spsAdminDTO.getCreateTime())
                .orderByDesc(SpsAdminEntity::getCreateTime)
        );
        return JsonResult.success(spsAdminEntityIPage);
    }
修改:
//其他条件
spsAdminMapper.update(spsAdminEntity,Wrappers.<SpsAdminEntity>lambdaUpdate().eq(SpsAdminEntity::getPhone,phone));
spsAdminMapper.updateById(spsAdminEntity);
删除:

其他的什么.like.or.and.orderBy.等等都和上图一样,获取属性名称区别而已
分页:
/**
 * 根据 "擅长项目" 分页查找师傅列表
 */
@Override
public Page<SpsInstallTeacherEntity> selectByReamarks(String reamarks,Long pageCurrent,Long pageSize) {
    log.debug("开始 根据 '擅长项目' 分页查找师傅列表");
    Page<SpsInstallTeacherEntity> page = new Page<>(pageCurrent,pageSize);

    // 分页并且根据创建时间倒叙
    Page<SpsInstallTeacherEntity> e = installTeacherMapper.selectPage(page,
            Wrappers.<SpsInstallTeacherEntity>lambdaQuery()
                    .like(SpsInstallTeacherEntity::getReamarks,reamarks)
                    .orderByDesc(SpsInstallTeacherEntity::getCreateTime));

    return e;
}
联表不含XML写法:
此处为chatGPT提供的方案,还未经过测试,慎用
@Mapper
public interface UserMapper extends BaseMapper<User> {

    @Select("SELECT u.*, r.role_name FROM user u LEFT JOIN user_role ur ON u.id = ur.user_id LEFT JOIN role r ON ur.role_id = r.id ${ew.customSqlSegment}")
    List<User> selectUserAndRole(@Param(Constants.WRAPPER) Wrapper<User> wrapper);

}
e w . s q l S e g m e n t 会帮你拼接 w h e r e , {ew.sqlSegment}会帮你拼接where, ew.sqlSegment会帮你拼接where,{ew.sqlSelect}就直接拼接语句
在这个示例中,我们通过 @Select 注解定义了一个 SQL 查询语句,其中使用了 LEFT JOIN 连接了三个表。${ew.customSqlSegment} 是 MyBatis-Plus 提供的占位符语法,它表示将条件构造器中的 SQL 片段拼接到查询语句中。
方法参数中的 @Param(Constants.WRAPPER) 注解表示这个方法会接受一个名为 wrapper 的参数,这个参数类型为 Wrapper<User>,它是 MyBatis-Plus 提供的条件构造器接口。我们可以使用 wrapper 对象来动态地拼接查询条件
QueryWrapper<User> wrapper = new QueryWrapper<>();
wrapper.eq("u.username", "admin");
wrapper.eq("r.role_name", "admin");
List<User> userList = userMapper.selectUserAndRole(wrapper);
联表官方高版本>=3.3.0
https://zhuanlan.zhihu.com/p/368591782
动态排序
//
// Source code recreated from a .class file by IntelliJ IDEA
// (powered by FernFlower decompiler)
//

package cn.sini.common.web.vo;

import com.baomidou.mybatisplus.extension.plugins.pagination.Page;
import io.swagger.v3.oas.annotations.media.Schema;
import java.io.Serializable;
import javax.validation.constraints.Pattern;
import org.apache.commons.lang3.BooleanUtils;
import org.apache.commons.lang3.StringUtils;

@Schema(
    description = "分页Vo"
)
public class PageVo implements Serializable {
    private static final long serialVersionUID = 1L;
    private static final long MAX_PAGE_SIZE = 1000L;
    @Schema(
        description = "当前页码 "
    )
    private Long pageNo = 1L;
    @Schema(
        description = "每页显示条数 "
    )
    private Long pageSize = 10L;
    @Schema(
        description = "排序方式 "
    )
    @Pattern(
        regexp = "^[\\u4E00-\\u9FA5A-Za-z0-9_\\-\\.\\:\\/\\?\\&\\(\\)\\。\\;\\,\\:\\《\\》\\?\\、\\“\\”\\s]{0,50}$",
        message = "排序方式格式不正确"
    )
    private String sortOrder = "ascend";
    @Schema(
        description = "排序字段 "
    )
    @Pattern(
        regexp = "^[A-Za-z0-9_\\-]{0,50}$",
        message = "排序字段格式不正确"
    )
    private String sortField;
    @Schema(
        description = "是否查询总数 "
    )
    private Boolean searchCount;

    public PageVo() {
    }

    public PageVo(Long pageNo, Long pageSize) {
        this.setPageNo(pageNo);
        this.setPageSize(pageSize);
    }

    public Long getPageNo() {
        return this.pageNo;
    }

    public void setPageNo(Long pageNo) {
        if (pageNo != null && pageNo > 0L) {
            this.pageNo = pageNo;
        }

    }

    public Long getPageSize() {
        return this.pageSize;
    }

    public void setPageSize(Long pageSize) {
        if (pageSize != null && pageSize > 0L && pageSize <= 1000L) {
            this.pageSize = pageSize;
        }

    }

    public boolean getSortOrder() {
        return this.sortOrder == null || "ascend".equalsIgnoreCase(this.sortOrder);
    }

    public void setSortOrder(String sortOrder) {
        if (StringUtils.isNotEmpty(sortOrder)) {
            this.sortOrder = sortOrder;
        }

    }

    public String getSortField() {
        return this.sortField;
    }

    public void setSortField(String sortField) {
        this.sortField = sortField;
    }

    public <T> Page<T> toMpPage() {
        return new Page(this.pageNo, this.pageSize, BooleanUtils.isNotFalse(this.searchCount));
    }
}

高级用法
代码生成器的使用
市场上有很多成熟的 代码生成器, 不建议浪费太多时间在这里. ruoyi
添加依赖
<dependency>
    <groupId>com.baomidou</groupId>
    <artifactId>mybatis-plus-boot-starter</artifactId>
    <version>最新版本</version>
</dependency>

<dependency>
    <groupId>com.baomidou</groupId>
    <artifactId>mybatis-plus-generator</artifactId>
    <version>最新版本</version>
</dependency>
配置代码生成器
@Configuration
public class CodeGeneratorConfig {

    /**
     * 数据库配置
     */
    @Value("${spring.datasource.url}")
    private String url;
    @Value("${spring.datasource.driver-class-name}")
    private String driverClassName;
    @Value("${spring.datasource.username}")
    private String username;
    @Value("${spring.datasource.password}")
    private String password;

    /**
     * 代码生成器配置
     */
    @Bean
    public AutoGenerator autoGenerator() {
        AutoGenerator generator = new AutoGenerator();
        // 全局配置 -- 可以把填写的Your name变量动态到yml
        GlobalConfig globalConfig = new GlobalConfig();
        globalConfig.setOutputDir(System.getProperty("user.dir") + "/src/main/java");
        globalConfig.setAuthor("Your Name");
        globalConfig.setOpen(false);
        globalConfig.setFileOverride(true);
        generator.setGlobalConfig(globalConfig);
        // 数据源配置
        DataSourceConfig dataSourceConfig = new DataSourceConfig();
        dataSourceConfig.setUrl(url);
        dataSourceConfig.setDriverName(driverClassName);
        dataSourceConfig.setUsername(username);
        dataSourceConfig.setPassword(password);
        generator.setDataSource(dataSourceConfig);
        // 包名配置 -- 可以把填写的变量动态到yml
        PackageConfig packageConfig = new PackageConfig();
        packageConfig.setParent("com.example");
        packageConfig.setModuleName("generator");
        generator.setPackageInfo(packageConfig);
        // 策略配置
        StrategyConfig strategyConfig = new StrategyConfig();
        strategyConfig.setNaming(NamingStrategy.underline_to_camel);
        strategyConfig.setColumnNaming(NamingStrategy.underline_to_camel);
        strategyConfig.setEntityLombokModel(true);
        strategyConfig.setRestControllerStyle(true);
        strategyConfig.setControllerMappingHyphenStyle(true);
        generator.setStrategy(strategyConfig);
        // 模板配置  -- 可以把填写的变量动态到yml
        TemplateConfig templateConfig = new TemplateConfig();
        templateConfig.setEntity("/templates/entity.java");
        generator.setTemplate(templateConfig);
        return generator;
    }
}
在这个示例配置类中,我们配置了以下参数:
-
数据库配置:包括数据库连接 URL、驱动类名、用户名和密码。
-
全局配置:包括代码生成的输出目录、作者名、是否打开生成的文件夹等。
-
包名配置:包括生成的实体类、Mapper 接口、Service 接口等的包名。
-
策略配置:包括表名和字段名的命名策略、实体类是否使用 Lombok 注解、Controller 是否使用@RestController 等。
-
模板配置:包括生成实体类的模板路径。
您可以根据自己的需求修改这些参数。
运行代码生成器
可以 单独做成一个模块
@SpringBootApplication
public class Application {

    public static void main(String[] args) {
        SpringApplication.run(Application.class, args);
    }

    @Autowired
    private AutoGenerator autoGenerator;

    @PostConstruct
    public void run() {
        autoGenerator.execute();
    }
}
逻辑删除的实现
逻辑删除是指将数据库中的数据标记为已删除,而不是真正的物理删除。在实际开发中,逻辑删除通常比物理删除更为常见,因为它可以保留被删除数据的历史记录,便于追溯和恢复。
MyBatis-Plus 提供了逻辑删除的支持,具体实现如下:
配置逻辑删除的全局参数
也可以yml配置:
mybatis-plus:
    global-config:
      db-config:
         # 这个可以不用配置,去实体类配置
          logic-delete-field: deleted
          # 代表已删除
          logic-delete-value: 1
          # 代表未删除
          logic-not-delete-value: 0
或config配置
@Configuration
@MapperScan("com.example.mapper")
public class MybatisPlusConfig {

    @Bean
    public GlobalConfig globalConfig() {
        GlobalConfig globalConfig = new GlobalConfig();
        globalConfig.setLogicDeleteField("deleted");
        globalConfig.setLogicDeleteValue("1");
        globalConfig.setLogicNotDeleteValue("0");
        return globalConfig;
    }
}
在这个示例配置中,我们使用 setLogicDeleteField 方法设置逻辑删除字段的名称为 deleted,使用 setLogicDeleteValue 方法设置逻辑删除字段的值为 1,使用 setLogicNotDeleteValue 方法设置逻辑未删除字段的值为 0。
给实体类添加逻辑删除注解
@Data
@TableName("user")
public class User {

    @TableId(type = IdType.AUTO)
    private Long id;

    private String username;

    private String password;

    private Integer age;

    @TableLogic
    private Integer deleted;
}
在这个示例实体类中,我们使用 @TableLogic 注解标记了逻辑删除字段 deleted。
使用逻辑删除方法删除数据
public interface UserMapper extends BaseMapper<User> {

    int deleteById(Long id);

}
在这个示例 Mapper 接口中,我们使用 deleteById 方法来删除指定 ID 的用户数据。
sql结果:

细节一:当我们使用MP逻辑删除的功能之后,比如执行查询、修改的方法,MP会为我们自动加上未删除的条件。自定义sql除外
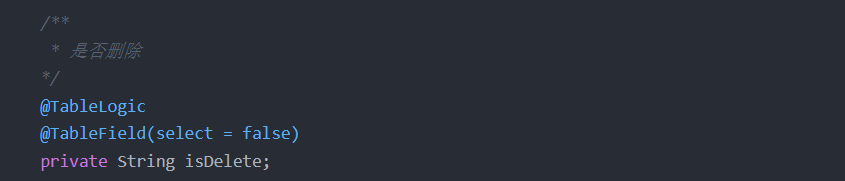
细节二:当我们查询数据时,不希望查询标识是否删除的字段,我们可以通过如下方式快速解决。当然还可以使用Wrapper中的select表达式来排除某些查询字段,只是通过注解的方式更加方便
多数据源的配置
添加依赖:
<dependency>
    <groupId>com.baomidou</groupId>
    <artifactId>dynamic-datasource-spring-boot-starter</artifactId>
    <version>2.0.0</version>
</dependency>
配置多数据源
spring:
  datasource:
    dynamic:
      primary: ds1
      datasource:
        ds1:
          url: jdbc:mysql://localhost:3306/test1?useUnicode=true&characterEncoding=UTF-8&serverTimezone=Asia/Shanghai
          username: root
          password: root
          driver-class-name: com.mysql.cj.jdbc.Driver
        ds2:
          url: jdbc:mysql://localhost:3306/test2?useUnicode=true&characterEncoding=UTF-8&serverTimezone=Asia/Shanghai
          username: root
          password: root
          driver-class-name: com.mysql.cj.jdbc.Driver
在这个示例配置中,我们配置了一个默认数据源和两个动态数据源 ds1 和 ds2,每个动态数据源都有自己的连接信息。
配置数据源切换
@Configuration
public class DataSourceConfig {

    @Bean
    @ConfigurationProperties(prefix = "spring.datasource.dynamic")
    public DataSource dataSource() {
        return new DruidDataSource();
    }

    @Bean
    public DataSourceTransactionManager transactionManager() {
        return new DynamicDataSourceTransactionManager(dataSource());
    }

    @Bean
    public DynamicDataSourceCreator dynamicDataSourceCreator() {
        return new DynamicDataSourceCreator();
    }

    @Bean
    public DataSourceContextHolder dataSourceContextHolder() {
        return new DataSourceContextHolder();
    }

}
在这个配置类中,我们创建了一个 Druid 数据源,并使用 DynamicDataSourceTransactionManager 作为事务管理器。还创建了 DynamicDataSourceCreator 和 DataSourceContextHolder 两个 bean,用于动态创建数据源和保存当前数据源的名称。
使用多数据源
// 默认使用某数据源
@DS("ds1")
public interface UserMapper extends BaseMapper<User> {

}
 @DS("ds2")
public interface OrderMapper extends BaseMapper<Order> {

}
@Service
public class UserServiceImpl implements UserService {

    @Autowired
    private UserMapper userMapper;

    @Override
    @DS("ds1")
    public List<User> listUsersFromDs1() {
        return userMapper.selectList(null);
    }

    @DS("ds2")
	@Override
    public List<Order> listOrders() {
        return orderMapper.selectList(null);
    }
简洁版本: https://juejin.cn/post/7020066406012026893
全局配置的使用
配置类:
@Configuration
public class MybatisPlusConfig {

    /**
     * 全局配置
     */
    @Bean
    public GlobalConfig globalConfig() {
        GlobalConfig globalConfig = new GlobalConfig();
        // 配置填充器
        globalConfig.setMetaObjectHandler(new MyMetaObjectHandler());
        // 配置逻辑删除
        globalConfig.setSqlInjector(new LogicSqlInjector());
        globalConfig.setDbConfig(new GlobalConfig.DbConfig().setLogicDeleteField("deleted"));
        return globalConfig;
    }

}
上面的示例中,通过 GlobalConfig 配置了填充器和逻辑删除等全局通用属性。其中:
setMetaObjectHandler方法配置了填充器,用来自动填充实体的公共字段;setSqlInjector方法配置了逻辑删除,用来实现逻辑删除的功能;setDbConfig方法配置了逻辑删除的字段名。
除此之外,还可以在全局配置中配置其他属性,例如:IdType、表名下划线转驼峰等等。
yml:
mybatis-plus:
  global-config:
    db-config:
      logic-delete-field: deleted
    meta-object-handler: com.example.MyMetaObjectHandler
    sql-injector: com.example.LogicSqlInjector
上面的示例中,mybatis-plus.global-config 配置了全局配置,db-config 配置了逻辑删除的字段名。meta-object-handler 配置了填充器的类名,sql-injector 配置了逻辑删除的实现类名。
需要注意的是,如果使用 yml 配置方式,需要保证 MyMetaObjectHandler 和 LogicSqlInjector 已经被注册到 Spring 容器中。
SQL拦截器:
Mybatis-Plus 提供了 SQL 拦截器的功能,可以在执行 SQL 语句前、后进行一些操作,例如打印 SQL 语句、设置租户信息等。SQL 拦截器实际上是一个拦截器链,可以按照一定的顺序执行多个拦截器。
Mybatis-Plus 内置了三个 SQL 拦截器:
- PerformanceInterceptor:性能分析拦截器,用于输出 SQL 执行时间。
- PaginationInterceptor:分页拦截器,用于自动进行分页操作。
- OptimisticLockerInterceptor:乐观锁拦截器,用于处理乐观锁的更新操作。
除了内置的拦截器,Mybatis-Plus 还提供了自定义拦截器的功能,开发者可以自定义实现一些拦截器来满足自己的需求。
自定义拦截器需要实现 Mybatis 的 Interceptor 接口,并使用 @Intercepts 和 @Signature 注解来声明拦截的对象和方法。在配置文件中需要将自定义拦截器加入到拦截器链中,可以使用 Mybatis-Plus 提供的 Interceptor 属性或者使用 Mybatis 的 Plugin 属性来实现。
SQL 拦截器是 Mybatis-Plus 提供的一个重要功能,可以帮助开发者更好地管理和优化 SQL 执行。在实际项目中,根据实际需求选择合适的拦截器,可以显著提升系统的性能和稳定性。
PerformanceInterceptor:
@Configuration
public class MybatisPlusConfig {

    @Bean
    public PerformanceInterceptor performanceInterceptor() {
        PerformanceInterceptor interceptor = new PerformanceInterceptor();
        // SQL执行最大时长,超过此阈值的SQL将被记录
        interceptor.setMaxTime(5000);
        // 是否打印SQL语句
        interceptor.setWriteInLog(true);
        return interceptor;
    }
}
在上面的配置中,我们创建了一个 PerformanceInterceptor 实例,并设置了两个属性:
maxTime:表示SQL执行的最大时长,单位是毫秒。当执行的SQL语句超过这个阈值时,该SQL语句将被记录在日志中。在这个例子中,我们设置了maxTime为 5000,即5秒。writeInLog:表示是否打印SQL语句。如果设置为true,则会将执行的SQL语句打印在日志中,方便开发人员进行调试。在这个例子中,我们设置了writeInLog为true。
需要注意的是,我们需要将 PerformanceInterceptor 实例注入到 MyBatis Plus 的全局配置中。在上面的例子中,我们使用了 @Bean 注解来将该实例注册到Spring容器中,然后在 MybatisPlusConfig 配置类中将其注入到 MyBatis Plus 的全局配置中。
PaginationInterceptor :
@Configuration
public class MybatisPlusConfig {

    @Bean
    public PaginationInterceptor paginationInterceptor() {
        PaginationInterceptor interceptor = new PaginationInterceptor();
        // 设置请求的页面大于最大页后操作, true调回到首页,false 继续请求  默认false
        interceptor.setOverflow(false);
        // 设置最大单页限制数量,默认 500 条,-1 不受限制
        interceptor.setLimit(100);
        // 开启 count 的 join 优化,只针对部分 left join
        interceptor.setCountSqlParser(new JsqlParserCountOptimize(true));
        return interceptor;
    }
}
在上面的配置中,我们创建了一个 PaginationInterceptor 实例,并设置了三个属性:
overflow:表示请求的页面大于最大页时的操作。如果设置为true,则调回到首页;如果设置为false,则继续请求。在这个例子中,我们设置为false。limit:表示单页的最大限制数量。在这个例子中,我们设置为100。countSqlParser:表示是否开启count的join优化。如果设置为true,则只针对部分left join开启。在这个例子中,我们开启了count的join优化。
需要注意的是,我们同样需要将 PaginationInterceptor 实例注入到 MyBatis Plus 的全局配置中。在上面的例子中,我们同样使用了 @Bean 注解来将该实例注册到Spring容器中,然后在 MybatisPlusConfig 配置类中将其注入到 MyBatis Plus 的全局配置中
OptimisticLockerInterceptor :
pom.xml 文件中添加依赖:
<dependency>
    <groupId>com.baomidou</groupId>
    <artifactId>mybatis-plus-boot-starter</artifactId>
    <version>${mybatis-plus.version}</version>
</dependency>
在实体类中添加 @Version 注解,表示使用乐观锁
@Data
@TableName("user")
public class User {

    @TableId(type = IdType.AUTO)
    private Long id;

    private String name;

    private Integer age;
	@Version
    private Integer version; // 乐观锁版本号

}
在 MybatisPlusConfig.java 中添加 OptimisticLockerInterceptor:
@Configuration
public class MybatisPlusConfig {

    @Bean
    public OptimisticLockerInterceptor optimisticLockerInterceptor() {
        return new OptimisticLockerInterceptor();
    }
}
接下来就可以在 service 中使用了
@Service
public class UserServiceImpl extends ServiceImpl<UserMapper, User> implements UserService {

    @Override
    @Transactional(rollbackFor = Exception.class)
    public void updateUser(User user) {
        // 先查询用户信息
        User oldUser = getById(user.getId());
        if (oldUser == null) {
            throw new RuntimeException("用户不存在!");
        }

        // 设置新的属性值
        oldUser.setName(user.getName());
        oldUser.setAge(user.getAge());

        // 更新用户信息
        updateById(oldUser);
    }
}
在执行更新操作时,OptimisticLockerInterceptor 会自动检查版本号是否一致,如果一致则更新数据,如果不一致则抛出 OptimisticLockException 异常。
值得注意的是,对于 updateById() 和 update() 方法,MyBatis-Plus 都会自动为 SQL 语句添加乐观锁的校验条件。而对于 updateBatchById() 和 updateBatch() 方法,则需要手动添加乐观锁的校验条件,如下所示:
List<User> userList = new ArrayList<>();
// 假设 userList 中有多个用户
// 批量更新用户信息时需要手动添加乐观锁校验条件
userList.forEach(user -> {
    user.setVersion(user.getVersion() + 1);
});
updateBatchById(userList);
mybatis-plus实现多租户:
https://juejin.cn/post/7039605197877805063
https://www.hxstrive.com/subject/mybatis_plus.htm?id=311


 4229
4229


 被折叠的 条评论
为什么被折叠?
被折叠的 条评论
为什么被折叠?
 到【灌水乐园】发言


