


1.实现多线程
1.1进程
进程:是正在进行中的程序
- 是系统进行资源分配和调用的独立单位
- 每一个进程都有它自己的内存空间和系统资源
1.2线程
线程:是进程中的单个顺序控制流,是一条执行路径
-
单线程:一个进程如果有一条执行路径,称为单线程程序
-
多线程:一个进程如果有多条执行路径,称为多线程程序
1.3方式一 :继承 Thread父类
public class MyThread extends Thread {
    @Override
    public void run() {
        for(int i=0; i<100; i++) {
            System.out.println(i);
        }
    }
    //为什么重写run()方法?
    //因为run()是用来封装被线程执行的代码
}
/*
方式1:继承Thread类
1:定义一个类MyThread继承Thread类
2:在MyThread类中重写run()方法
3:创建MyThread类的对象
4:启动线程
*/
public class MyThreadDemo {
public static void main(String[] args) {
MyThread my1 = new MyThread();
MyThread my2 = new MyThread();
// my1.run();
// my2.run();
//void start() 导致此线程开始执行; Java虚拟机调用此线程的run方法
my1.start();
my2.start();
//run()方法和start()方法的区别:
//run():封装线程执行的代码,直接调用,相当于普通方法的调用
//start():启动线程;然后由JVM调用此线程的run()方法
}
}
1.4设置和获取线程名称
Thread类中获取和设置线程名称的方法
    void setName(String name):将此线程的名称更改为等于参数 name
    String getName():返回此线程的名称
public class MyThread extends Thread {

    public MyThread() {}

    public MyThread(String name) {
        super(name);
    }

    @Override
    public void run() {
        for (int i = 0; i < 100; i++) {
            System.out.println(getName()+":"+i);
        }
    }
}
public class MyThreadDemo {
public static void main(String[] args) {
// MyThread my1 = new MyThread();
// MyThread my2 = new MyThread();
//
// //void setName(String name):将此线程的名称更改为等于参数 name
// my1.setName("高铁");
// my2.setName("飞机");
//Thread(String name)
// MyThread my1 = new MyThread("高铁");
// MyThread my2 = new MyThread("飞机");
//
// my1.start();
// my2.start();
//static Thread currentThread() 返回对当前正在执行的线程对象的引用
System.out.println(Thread.currentThread().getName());
}
}
1.5线程调度
线程有两种调度模型
- 分时调度模型:所有线程轮流使用CPU的使用权,平均分配每个线程占用CPU的时间片
- 抢占式调度模型:优先让优先级高的线程使用CPU,如果线程的优先级相同,那么会随机选择一个,优先级高的线程获取的CPU时间片相对多一些
JAVA使用抢占式调度模型
hread类中设置和获取线程优先级的方法:
- public final void setPriority(int newPriority):更改此线程的优先级
- public final int getPriority():返回此线程的优先级
public class ThreadPriority extends Thread {
    @Override
    public void run() {
        for (int i = 0; i < 100; i++) {
            System.out.println(getName() + ":" + i);
        }
    }
}
public class ThreadPriorityDemo {
    public static void main(String[] args) {
        ThreadPriority tp1 = new ThreadPriority();
        ThreadPriority tp2 = new ThreadPriority();
        ThreadPriority tp3 = new ThreadPriority();

        tp1.setName("高铁");
        tp2.setName("飞机");
        tp3.setName("汽车");

        //public final int getPriority():返回此线程的优先级
//        System.out.println(tp1.getPriority()); //5
//        System.out.println(tp2.getPriority()); //5
//        System.out.println(tp3.getPriority()); //5

        //public final void setPriority(int newPriority):更改此线程的优先级
//        tp1.setPriority(10000); //IllegalArgumentException
//        System.out.println(Thread.MAX_PRIORITY); //10
//        System.out.println(Thread.MIN_PRIORITY); //1
//        System.out.println(Thread.NORM_PRIORITY); //5

        //设置正确的优先级
        tp1.setPriority(5);
        tp2.setPriority(10);
        tp3.setPriority(1);


        tp1.start();
        tp2.start();
        tp3.start();
    }
}
1.6线程控制
- static void sleep(long millis):使当前正在执行的线程停留(暂停执行)指定的毫秒数
public class ThreadSleep extends Thread {
    @Override
    public void run() {
        for (int i = 0; i < 100; i++) {
            System.out.println(getName() + ":" + i);
            //线程执行一次休息一秒
            try {
                Thread.sleep(1000);
            } catch (InterruptedException e) {
                e.printStackTrace();
            }

        }
    }
}
public class ThreadSleepDemo {
    public static void main(String[] args) {
        ThreadSleep ts1 = new ThreadSleep();
        ThreadSleep ts2 = new ThreadSleep();
        ThreadSleep ts3 = new ThreadSleep();

        ts1.setName("曹操");
        ts2.setName("刘备");
        ts3.setName("孙权");

        ts1.start();
        ts2.start();
        ts3.start();
    }
}
- void join():等待这个线程死亡
public class ThreadJoin extends Thread {
    @Override
    public void run() {
        for (int i = 0; i < 100; i++) {
            System.out.println(getName() + ":" + i);
        }
    }
}
public class ThreadJoinDemo {
    public static void main(String[] args) {
        ThreadJoin tj1 = new ThreadJoin();
        ThreadJoin tj2 = new ThreadJoin();
        ThreadJoin tj3 = new ThreadJoin();

        tj1.setName("康熙");
        tj2.setName("四阿哥");
        tj3.setName("八阿哥");

        tj1.start();
        //tj1线程执行完执行其它
        try {
            tj1.join();
        } catch (InterruptedException e) {
            e.printStackTrace();
        }
        tj2.start();
        tj3.start();
    }
}
- void setDaemon(booleanon):将此线程标记为守护线程,当运行的线程都是守护线程时,Java虚拟机将退出
public class ThreadDaemon extends Thread {
    @Override
    public void run() {
        for (int i = 0; i < 100; i++) {
            System.out.println(getName() + ":" + i);
        }
    }
}
public class ThreadDaemonDemo {
    public static void main(String[] args) {
        ThreadDaemon td1 = new ThreadDaemon();
        ThreadDaemon td2 = new ThreadDaemon();

        td1.setName("关羽");
        td2.setName("张飞");

        //设置主线程为刘备
        Thread.currentThread().setName("刘备");

        //设置守护线程
        //主线程结束后守护线程逐渐结束
        td1.setDaemon(true);
        td2.setDaemon(true);

        td1.start();
        td2.start();

        for(int i=0; i<10; i++) {
            System.out.println(Thread.currentThread().getName()+":"+i);
        }
    }
}
1.7线程生命周期

1.8方式2:实现Runnable接口
    1:定义一个类MyRunnable实现Runnable接口
    2:在MyRunnable类中重写run()方法
    3:创建MyRunnable类的对象
    4:创建Thread类的对象,把MyRunnable对象作为构造方法的参数
    5:启动线程
public class MyRunnable implements Runnable {
    @Override
    public void run() {
        for(int i=0; i<100; i++) {
            System.out.println(Thread.currentThread().getName()+":"+i);
        }
    }
}
public class MyRunnableDemo {
public static void main(String[] args) {
//创建MyRunnable类的对象
MyRunnable my = new MyRunnable();
//创建Thread类的对象,把MyRunnable对象作为构造方法的参数
//Thread(Runnable target)
// Thread t1 = new Thread(my);
// Thread t2 = new Thread(my);
//Thread(Runnable target, String name)
Thread t1 = new Thread(my,"高铁");
Thread t2 = new Thread(my,"飞机");
//启动线程
t1.start();
t2.start();
}
}
相比继承Thread类,实现Runnable接口的好处:
- 避免了Java单继承的局限性
- 适合多个相同程序的代码去处理同一个资源的情况,把线程和程序的代码、数据有效分离,较好的体现了面向对象的设计思想
2.线程同步
2.1同步代码块
格式
//这段代码只有一个线程执行
synchronized(任意对象){
		//多条语句操作共享数据的代码
		//相当于给代码加了锁,任意对象就可以看成是一把锁
}
//好处:解决了多线程的数据安全问题
//弊端:线程很多时,每个线程都会去判断同步上的锁,很耗费资源,降低运行效率
public class SellTicket implements Runnable {
    private int tickets = 100;
    private Object obj = new Object();

    @Override
    public void run() {
        while (true) {
            //tickets = 100;
            //t1,t2,t3
            //假设t1抢到了CPU的执行权
            //假设t2抢到了CPU的执行权
            synchronized (obj) {
                //t1进来后,就会把这段代码给锁起来
                if (tickets > 0) {
                    try {
                        Thread.sleep(100);
                        //t1休息100毫秒
                    } catch (InterruptedException e) {
                        e.printStackTrace();
                    }
                    //窗口1正在出售第100张票
                    System.out.println(Thread.currentThread().getName() + "正在出售第" + tickets + "张票");
                    tickets--; //tickets = 99;
                }
            }
            //t1出来了,这段代码的锁就被释放了
        }
    }
public class SellTicketDemo {
    public static void main(String[] args) {
        SellTicket st = new SellTicket();

        Thread t1 = new Thread(st, "窗口1");
        Thread t2 = new Thread(st, "窗口2");
        Thread t3 = new Thread(st, "窗口3");

        t1.start();
        t2.start();
        t3.start();
    }
}
2.2同步方法
同步方法:就是把synchronized关键字加到方法上
格式:修饰符 synchronized 返回值类型 方法名(方法参数){ }
同步方法的锁对象是:this
同步静态方法:就是把synchronized关键字加到静态方法上
格式:修饰符 static synchronized 返回值类型 方法名(方法参数){ }
同步方法的锁对象是:类名.class
public class SellTicket implements Runnable {
//    private int tickets = 100;
    private static int tickets = 100;
    private Object obj = new Object();
    private int x = 0;

    @Override
    public void run() {
        while (true) {
            if (x % 2 == 0) {
//                synchronized (obj) {
//                synchronized (this) {
                synchronized (SellTicket.class) {
                    if (tickets > 0) {
                        try {
                            Thread.sleep(100);
                        } catch (InterruptedException e) {
                            e.printStackTrace();
                        }
                        System.out.println(Thread.currentThread().getName() + "正在出售第" + tickets + "张票");
                        tickets--;
                    }
                }
            } else {
                sellTicket();
            }
            x++;
        }
    }

//    private synchronized void sellTicket() {
//        if (tickets > 0) {
//            try {
//                Thread.sleep(100);
//            } catch (InterruptedException e) {
//                e.printStackTrace();
//            }
//            System.out.println(Thread.currentThread().getName() + "正在出售第" + tickets + "张票");
//            tickets--;
//        }
//    }

    private static synchronized void sellTicket() {
        if (tickets > 0) {
            try {
                Thread.sleep(100);
            } catch (InterruptedException e) {
                e.printStackTrace();
            }
            System.out.println(Thread.currentThread().getName() + "正在出售第" + tickets + "张票");
            tickets--;
        }
    }
public class SellTicketDemo {
    public static void main(String[] args) {
        SellTicket st = new SellTicket();

        Thread t1 = new Thread(st, "窗口1");
        Thread t2 = new Thread(st, "窗口2");
        Thread t3 = new Thread(st, "窗口3");

        t1.start();
        t2.start();
        t3.start();
    }
}
2.3线程安全的类
/*
线程安全的类:
StringBuffer
Vector
Hashtable
*/
public class ThreadDemo {
public static void main(String[] args) {
StringBuffer sb = new StringBuffer();
StringBuilder sb2 = new StringBuilder();
Vector<String> v = new Vector<String>();
ArrayList<String> array = new ArrayList<String>();
Hashtable<String,String> ht = new Hashtable<String, String>();
HashMap<String,String> hm = new HashMap<String, String>();
//static <T> List<T> synchronizedList(List<T> list) 返回由指定列表支持的同步(线程安全)列表
List<String> list = Collections.synchronizedList(new ArrayList<String>());
}
}
2.4Lock锁
Lock中提供了获得锁和释放锁的方法
- void lock():获得锁
- void unlock():释放锁
Lock是接口不能直接实例化,这里采用它的实现类ReentrantLock来实例化
private Lock lock = new ReentrantLock();
- ReentrantLock():创建一个ReentrantLock的实例
public class SellTicket implements Runnable {
    private int tickets = 100;
    private Lock lock = new ReentrantLock();

    @Override
    public void run() {
        while (true) {
            try {
                lock.lock();
                if (tickets > 0) {
                    try {
                        Thread.sleep(100);
                    } catch (InterruptedException e) {
                        e.printStackTrace();
                    }
                    System.out.println(Thread.currentThread().getName() + "正在出售第" + tickets + "张票");
                    tickets--;
                }
            } finally {
                lock.unlock();
            }
        }
    }
}
public class SellTicketDemo {
    public static void main(String[] args) {
        SellTicket st = new SellTicket();

        Thread t1 = new Thread(st, "窗口1");
        Thread t2 = new Thread(st, "窗口2");
        Thread t3 = new Thread(st, "窗口3");

        t1.start();
        t2.start();
        t3.start();
    }
}
生产者消费者模式描述
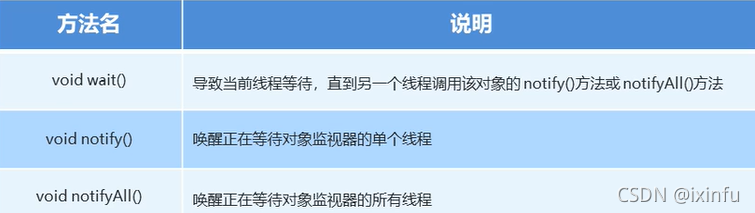
为了体现生产和消费过程中的等待和唤醒,Java就提供了几个方法,这几个方法在Object类中Object类的等待和唤醒方法:
public class Box {
    //定义一个成员变量,表示第x瓶奶
    private int milk;
    //定义一个成员变量,表示奶箱的状态
    private boolean state = false;

    //提供存储牛奶和获取牛奶的操作
    public synchronized void put(int milk) {
        //如果有牛奶,等待消费
        if(state) {
            try {
                wait();
            } catch (InterruptedException e) {
                e.printStackTrace();
            }
        }

        //如果没有牛奶,就生产牛奶
        this.milk = milk;
        System.out.println("送奶工将第" + this.milk + "瓶奶放入奶箱");

        //生产完毕之后,修改奶箱状态
        state = true;

        //唤醒其他等待的线程
        notifyAll();
    }

    public synchronized void get() {
        //如果没有牛奶,等待生产
        if(!state) {
            try {
                wait();
            } catch (InterruptedException e) {
                e.printStackTrace();
            }
        }

        //如果有牛奶,就消费牛奶
        System.out.println("用户拿到第" + this.milk + "瓶奶");

        //消费完毕之后,修改奶箱状态
        state = false;

        //唤醒其他等待的线程
        notifyAll();
    }
}
/*
    生产者消费者案例中包含的类:
        1:奶箱类(Box):定义一个成员变量,表示第x瓶奶,提供存储牛奶和获取牛奶的操作
        2:生产者类(Producer):实现Runnable接口,重写run()方法,调用存储牛奶的操作
        3:消费者类(Customer):实现Runnable接口,重写run()方法,调用获取牛奶的操作
        4:测试类(BoxDemo):里面有main方法,main方法中的代码步骤如下
            A:创建奶箱对象,这是共享数据区域
            B:创建生产者对象,把奶箱对象作为构造方法参数传递,因为在这个类中要调用存储牛奶的操作
            C:创建消费者对象,把奶箱对象作为构造方法参数传递,因为在这个类中要调用获取牛奶的操作
            D:创建2个线程对象,分别把生产者对象和消费者对象作为构造方法参数传递
            E:启动线程
 */
public class BoxDemo {
    public static void main(String[] args) {
        //创建奶箱对象,这是共享数据区域
        Box b = new Box();

        //创建生产者对象,把奶箱对象作为构造方法参数传递,因为在这个类中要调用存储牛奶的操作
        Producer p = new Producer(b);
        //创建消费者对象,把奶箱对象作为构造方法参数传递,因为在这个类中要调用获取牛奶的操作
        Customer c = new Customer(b);

        //创建2个线程对象,分别把生产者对象和消费者对象作为构造方法参数传递
        Thread t1 = new Thread(p);
        Thread t2 = new Thread(c);

        //启动线程
        t1.start();
        t2.start();
    }
}
public class Customer implements Runnable {
    private Box b;

    public Customer(Box b) {
        this.b = b;
    }

    @Override
    public void run() {
        while (true) {
            b.get();
        }
    }
}
public class Producer implements Runnable {
    private Box b;

    public Producer(Box b) {
        this.b = b;
    }

    @Override
    public void run() {
        for(int i=1; i<=30; i++) {
            b.put(i);
        }
    }
}


 8277
8277


 被折叠的 条评论
为什么被折叠?
被折叠的 条评论
为什么被折叠?
 到【灌水乐园】发言


