


目录
一、图像融合
图像融合的两种效果 :1.直接将两个图片进行加权融合;2.增加其中一张图片的透明度
import cv2
import numpy as np

# load image
img = cv2.imread("lena.jpg")

# initialize blank mask image of same dimensions for drawing the shapes
shapes = np.zeros_like(img, dtype=np.uint8)

# Draw shapes
cv2.rectangle(shapes, (50, 50), (100, 100), (0, 255, 0), cv2.FILLED)
cv2.circle(shapes, (75, 75), 25, (255, 0, 0), cv2.FILLED)

# 图像融合 :R=αx1 + βx2 + b(b为权重系数)
alpha = 0.5
out1 = cv2.addWeighted(img, alpha, shapes, 1-alpha, 0)

# generate output by blending image with shapes image,using the shapes
# images also as mask to limit the blending to those parts
out2 = img.copy()
alpha = 0.5
mask = shapes.astype(bool)
out2[mask] = cv2.addWeighted(img, alpha, shapes, 1-alpha, 0)[mask]

# visualization
cv2.imshow("Image", img)
cv2.imshow("Shapes", shapes)
cv2.imshow("Output1", out1)
cv2.imshow("Output2", out2)
cv2.waitKey(0)
cv2.destroyAllWindows()
效果图:
 更多的方法请参考:python - How to change the opacity of boxes (cv2.rectangle)? - Stack Overflow
二、VisualKeyboard
(一)键盘按键的设置
1.按键的数据类型---类
代码如下(示例):
class Button():
    def __init__(self, pos, text, size=(75, 75)):
        """
        定义按键对象的属性
        :param pos: 矩形框左上角点的像素坐标,水平为x轴,竖直为y轴,窗口的左上角为原点
        :param text: 文本
        :param size: 矩形框的w、h
        """
        self.pos = pos
        self.size = size
        self.text = text
2.设置按键属性
代码如下(示例):
# 将不同属性的按键对象,存放在buttonList列表里
buttonList = []
keys_value = [["Q", "W", "E", "R", "T", "Y", "U", "I", "O", "P", "?"],
              ["A", "S", "D", "F", "G", "H", "J", "K", "L", ";", "del"],
              ["Z", "X", "C", "V", "B", "N", "M", ",", ".", "/", "Enter"]]
for i in range(len(keys_value)):
    for index, key in enumerate(keys_value[i]):
        buttonList.append(Button((80+100*index, 100*(i+1)), key))
        # 计算按键的字符个数,当超过1时,调整按键的大小;当超过四时,根据字符的个数更新按键大小
        # 大D表示不要数字,也就是除了数字以外的内容返回
        len_key = len(re.findall(r"\D", key))
        if len_key>1:
            buttonList.append(Button((80+100*index, 100*(i+1)), key, size=(55*(len_key//4+2), 75)))
3.显示键盘
代码如下(示例):
# 定义函数,调用buttonList列表中所有的Button对象,并进行绘制
def drawAll(img, buttonList):
    for button in buttonList:
    # 根据每个矩形框中心点的位置,在一帧图像中画上每个矩形框
        x, y = button.pos
        w, h = button.size
        cv2.rectangle(img, (x, y), (x + w, y + h), (255, 0, 255), cv2.FILLED)
        cvzone.cornerRect(img, (x, y, w, h), 20, rt=0, colorC=(0, 255, 0))
        cv2.putText(img, button.text, (x + 25, y + 60), cv2.FONT_HERSHEY_PLAIN, 3, (255, 255, 255), thickness=3)
    return img
4.虚化键盘
代码如下(示例):
# 定义函数,调用buttonList列表中所有的Button对象,并进行绘制;另外进行透明的显示
def drawAll_transparence(img, buttonList):
    imgNew = np.zeros_like(img, dtype=np.uint8)
    for button in buttonList:
    # 根据每个矩形框中心点的位置,在一帧图像中画上每个矩形框
        x, y = button.pos
        w, h = button.size
        cv2.rectangle(imgNew, (x, y), (x + w, y + h), (255, 0, 255), cv2.FILLED)
        cvzone.cornerRect(imgNew, (x, y, w, h), 20, rt=0, colorC=(0, 255, 0))
        cv2.putText(imgNew, button.text, (x + 25, y + 60), cv2.FONT_HERSHEY_PLAIN, 3, (255, 255, 255), thickness=3)
    out = img.copy()
    alpha = 0.3
    mask = imgNew.astype(bool)
    out[mask] = cv2.addWeighted(img, alpha, imgNew, 1-alpha, 0)[mask]
    return out
(二)实现手的动态追踪和目标点的检测
1.调用摄像头
代码如下(示例):
import cv2

# 调用本机摄像头
cap = cv2.VideoCapture(0)
# 设置窗口大小:1280*720
cap.set(3, 1280)
cap.set(4, 700)

while True:
    ret, img = cap.read()
    img = cv2.flip(img, 1)

    # 显示每一帧图像
    cv2.imshow("Image", img)
    if cv2.waitKey(1) & 0xFF == ord('q'):        # q键退出
        break
cv2.destroyAllWindows()
cap.release()
2. 手的关键点识别和追踪
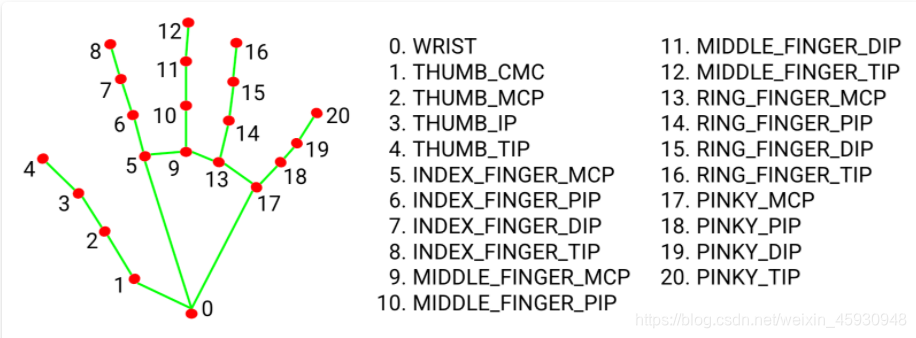
用cvzone.HandTrackingModule中的HandDetector模块,实现对手部关键点的识别和追踪。
HandDetector是检测手部关键点的函数,其中有4个输入参数量可以选择:
1、static_image_mode:默认为False,如果设置为false, 就是把输入看作一个视频流,在检测到手之后对手加了一个目标跟踪(目标检测+跟踪),无需调用另一次检测,直到失去对任何手的跟踪为止。如果设置为True,则手部检测将在每个输入图像上运行(目标检测),非常适合处理一批静态的,可能不相关的图像。(如果检测的是图片就要设置成True)
2、max_num_hands:可以检测到的手的数量最大值,默认是2
3、min_detection_confidence: 手部检测的最小置信度值,大于这个数值被认为是成功的检测。默认为0.5
4、min_tracking_confidence:目标踪模型的最小置信度值,大于这个数值将被视为已成功跟踪的手部,默认为0.5,如果static_image_mode设置为true,则忽略此操作。
代码如下(示例):
import re
import cv2
from cvzone.HandTrackingModule import HandDetector

cap = cv2.VideoCapture(0)
# 设置窗口大小:1280*720
cap.set(3, 1280)
cap.set(4, 700)


# 设置手部检测的最小置信度为0.8;目标跟踪模型的最小置信度值为默认值0.5
detector = HandDetector(detectionCon=0.8)

while True:
    ret, img = cap.read()
    img = cv2.flip(img, 1)      # 因为摄像头是镜像的,所以需要将摄像头水平翻转
    img = detector.findHands(img)
    # 存放手指点的信息和手的边界框信息
    lmList, bboxInfo = detector.findPosition(img)

    # 显示一帧图像
    cv2.imshow("Image", img)
    if cv2.waitKey(1) & 0xFF == ord('q'):        # q键退出
        break
cv2.destroyAllWindows()
cap.release()
(三)完整代码:
环境配置:cvzone==1.4.1 mediapip==0.8.7
代码如下(示例):
import re
import cv2
import time
import cvzone
import numpy as np
from cvzone.HandTrackingModule import HandDetector

cap = cv2.VideoCapture(0)
# 设置窗口大小:1280*720
cap.set(3, 1280)
cap.set(4, 700)

# 设置手部检测的最小置信度为0.8;目标跟踪模型的最小置信度值为默认值0.5
detector = HandDetector(detectionCon=0.8)

class Button():
    def __init__(self, pos, text, size=(75, 75)):
        """
        定义按键对象的属性
        :param pos: 矩形框左上角点的像素坐标,水平为x轴,竖直为y轴,窗口的左上角为原点
        :param text: 文本
        :param size: 矩形框的w、h
        """
        self.pos = pos
        self.size = size
        self.text = text

# 将不同属性的按键对象,存放在buttonList列表里
buttonList = []
keys_value = [["Q", "W", "E", "R", "T", "Y", "U", "I", "O", "P", "?"],
              ["A", "S", "D", "F", "G", "H", "J", "K", "L", ";", "del"],
              ["Z", "X", "C", "V", "B", "N", "M", ",", ".", "/", "Enter"]]
for i in range(len(keys_value)):
    for index, key in enumerate(keys_value[i]):
        buttonList.append(Button((80+100*index, 100*(i+1)), key))
        # 计算按键的字符个数,当超过1时,调整按键的大小;当超过四时,根据字符的个数更新按键大小
        # 大D表示不要数字,也就是除了数字以外的内容返回
        len_key = len(re.findall(r"\D", key))
        if len_key>1:
            buttonList.append(Button((80+100*index, 100*(i+1)), key, size=(55*(len_key//4+2), 75)))

# 定义函数,调用buttonList列表中所有的Button对象,并进行绘制
# def drawAll(img, buttonList):
#     for button in buttonList:
#     # 根据每个矩形框中心点的位置,在一帧图像中画上每个矩形框
#         x, y = button.pos
#         w, h = button.size
#         cv2.rectangle(img, (x, y), (x + w, y + h), (255, 0, 255), cv2.FILLED)
#         cvzone.cornerRect(img, (x, y, w, h), 20, rt=0, colorC=(0, 255, 0))
#         cv2.putText(img, button.text, (x + 25, y + 60), cv2.FONT_HERSHEY_PLAIN, 3, (255, 255, 255), thickness=3)
#     return img

# 定义函数,调用buttonList列表中所有的Button对象,并进行绘制;另外进行透明的显示
def drawAll_transparence(img, buttonList):
    imgNew = np.zeros_like(img, dtype=np.uint8)
    for button in buttonList:
    # 根据每个矩形框中心点的位置,在一帧图像中画上每个矩形框
        x, y = button.pos
        w, h = button.size
        cv2.rectangle(imgNew, (x, y), (x + w, y + h), (255, 0, 255), cv2.FILLED)
        cvzone.cornerRect(imgNew, (x, y, w, h), 20, rt=0, colorC=(0, 255, 0))
        cv2.putText(imgNew, button.text, (x + 25, y + 60), cv2.FONT_HERSHEY_PLAIN, 3, (255, 255, 255), thickness=3)
    out = img.copy()
    alpha = 0.3
    mask = imgNew.astype(bool)
    out[mask] = cv2.addWeighted(img, alpha, imgNew, 1-alpha, 0)[mask]
    return out

real_num_text = 0  # 记录finalText中真实存在的字符个数
num_text = 0       # 记录finalText中的字符个数,为了保证能每60个字符换一次行
finalText = ""     # 定义输出文本为空,字符串
# 每次读取一帧图像,除非有break出现,否则一直在读取并显示变化后摄像头每一帧的图像
while True:
    ret, img = cap.read()
    img = cv2.flip(img, 1)      # 因为摄像头是镜像的,所以需要将摄像头水平翻转
    img = detector.findHands(img)
    # 存放手指点的信息和手的边界框信息
    lmList, bboxInfo = detector.findPosition(img)
    # draw the visual keyboard
    img = drawAll_transparence(img, buttonList)

    if lmList:
        for button in buttonList:
            x, y = button.pos
            w, h = button.size

            if x < lmList[8][0] < x+w and y < lmList[8][1] < y+h:
                # 当食指的位置,在矩形框中,将矩形框的颜色变浅;文本字体变大
                cv2.rectangle(img, (x, y), (x + w, y + h), (175, 0, 175), cv2.FILLED)
                cvzone.cornerRect(img, (x, y, w, h), 20, rt=0, colorC=(0, 175, 0))
                cv2.putText(img, button.text, (x + 22, y + 65), cv2.FONT_HERSHEY_PLAIN, 4, (255, 255, 255), thickness=3)

                # when clicked
                len, _, _ = detector.findDistance(8, 12, img, draw=False)
                # print(len)
                # 当食指与中指的距离小于30时,执行if语句中的操作
                if len < 30:
                    # 当食指与中指的距离小于30时,变换矩形框的颜色;文本字体变大
                    cv2.rectangle(img, (x, y), (x + w, y + h), (0, 255, 0), cv2.FILLED)
                    cvzone.cornerRect(img, (x, y, w, h), 20, rt=0, colorC=(255, 0, 0))
                    cv2.putText(img, button.text, (x + 22, y + 65), cv2.FONT_HERSHEY_PLAIN, 4, (255, 255, 255), thickness=3)

                    # 输出button.text的内容到finalText中
                    if button.text == "del":
                        finalText = finalText[0:-1]
                        num_text = num_text - 1
                    if button.text == "Enter":
                        finalText += (50 - num_text % 50) * " "
                        for i in range(50 - num_text % 50):
                            num_text += 1
                    if button.text != "del" and button.text != "Enter":
                        finalText += button.text
                        num_text += 1
                    time.sleep(0.2)      # 每次按键的间隔时间

    # 显示字符;实现换行:当遇到Enter按键时,直接换行;每行满60个字符时,换行
    times = num_text//50
    cv2.rectangle(img, (80, 400), (1200, 450+times*25), (255, 0, 255), cv2.FILLED)
    for i in range(times+1):
        cv2.putText(img, finalText[50*i:50*(i+1)], (90, 425+25*i), cv2.FONT_HERSHEY_PLAIN, 2, (255, 255, 255), thickness=2)

    # 显示一帧图像
    cv2.imshow("Image", img)
    if cv2.waitKey(1) & 0xFF == ord('q'):        # q键退出
        break
cv2.destroyAllWindows()
cap.release()
(四)部分效果图
总体来看,可以实现每50个字符,换一次行;同时加有删除字符按键和换行按键。


 29
29


 被折叠的 条评论
为什么被折叠?
被折叠的 条评论
为什么被折叠?
 到【灌水乐园】发言


