


1、创建目录/fdfs

2、把安装包直接放到fdfs目录下


3、FastDFS添加依赖(安装过得无需安装)
- 安装GCC依赖
GCC用来对c语言代码进行编译运行
yum -y install gcc- 安装unzip工具
unzip工具可以帮我们对压缩包进行解压
yum install -y unzip zip- 安装libevent
yum -y install libevent- 安装nginx所需依赖
yum -y install pcre pcre-devel zlib zlib-devel openssl openssl-devel- 安装libfastcommon-master
这个没有yum包,只能通过编译安装:
解压上传到fdfs文件下的libfastcommon-master.zip
unzip libfastcommon-master.zip进入解压完成的目录
cd libfastcommon-master编译并安装
./make.sh
./make.sh install- 安装FastDFS
解压
tar -xvf FastDFS_v5.08.tar.gz
进入目录
cd FastDFS编译并安装
./make.sh
./make.sh install
4、 检查安装结果
cd /etc/init.d4.1 安装完成后,我们应该在/ect/init.d目录,通过命令 ll /etc/init.d/|grep fdfs 看到FastDFS提供的启动脚本:

- fdfs_trackerd 是tracker启动脚本
- fdfs_storaged 是storage启动脚本
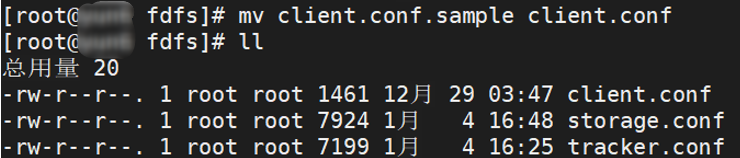
4.2.可以在/etc/fdfs目录下,通过ll命令查看到以下配置文件模板
总用量 20
-rw-r--r--. 1 root root 1461 12月 29 03:47 client.conf.sample
-rw-r--r--. 1 root root 7927 12月 29 03:47 storage.conf.sample
-rw-r--r--. 1 root root 7200 12月 29 03:47 tracker.conf.sample
- client.conf.sample 是客户端的配置文件模板
- storage.conf.sample 是storage的配置文件模板
- tracker.conf.sample 是tracker的配置文件模板
4.3设置tracker
- 去除后缀sample

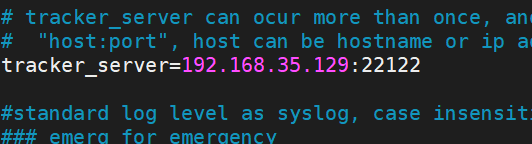
- 编辑tracker配置(修改tracker的数据和日志存放目录)

- 启动tracker
service fdfs_trackerd start
- 设置tracker开机启动
![]()
4.4设置stroage
- 去除后缀sample

- 修改storage的数据和日志的存放路径

- 修改上传文件存储的路径

- 修改访问地址
- 创建storage目录
mkdir -p /leyou/fdfs/storage- 启动storage
service fdfs_storaged start
- 设置storage开机启动
chkconfig fdfs_storaged on4.5测试文件上传
- 去除后缀sample
- 修改文件 client.conf 临时目录

- 修改tracker地址

- 运行
把图片放到tmp文件夹下
![]()
成功后返回图片id:
group1/M00/00/00/wKgjgV_zSheAWRb4AAAwev15JV0758.jpg
group1:组信息
M00:对应的store_path0
/00/00:磁盘路径
5、安装Nginx及FastDFS模块
- 切换目录

- 解压
tar xvf fastdfs-nginx-module_v1.16.tar.gz
- 移除安装包

- 配置config文件

执行命令(将配置中的/usr/local改为/usr)
:%s+/usr/local/+/usr/+g
执行后

- 配置 mod_fastdfs.conf
将src目录下的 mod_fastdfs.conf复制到/etc/fdfs目录
cp mod_fastdfs.conf /etc/fdfs/
查看/etc/fdfs
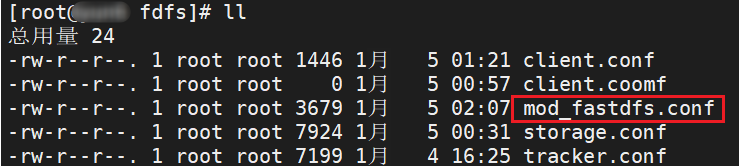
修改mod_fastdfs.conf配置文件
![]()


- 切换目录


复制FastDFS的配置文件 http.conf、 mime.types到 /etc/fdfs/文件夹下
cp http.conf mime.types /etc/fdfs/
6、安装nginx
- 解压
tar xvf nginx-1.10.0.tar.gz- 删除压缩包
rm -rf nginx-1.10.0.tar.gz
- 切换到nginx-1.10.0目录下
cd nginx-1.10.0/ ./configure --prefix=/opt/nginx --sbin-path=/usr/bin/nginx --add-module=/home/ly/fdfs/fastdfs-nginx-module/src
- 编译安装nginx
make && make install- 如果已经安装过
cd nginx-1.10.0/ ./configure --prefix=/opt/nginx --sbin-path=/usr/bin/nginx --add-module=/home/ly/fdfs/fastdfs-nginx-module/srcmakell
drwxr-xr-x. 6 leyou leyou 4096 12月 11 10:41 auto
-rw-r--r--. 1 leyou leyou 262619 4月 26 2016 CHANGES
-rw-r--r--. 1 leyou leyou 400302 4月 26 2016 CHANGES.ru
drwxr-xr-x. 2 leyou leyou 168 12月 11 20:11 conf
-rwxr-xr-x. 1 leyou leyou 2481 4月 26 2016 configure
drwxr-xr-x. 4 leyou leyou 72 12月 11 10:41 contrib
drwxr-xr-x. 2 leyou leyou 40 12月 11 10:41 html
-rw-r--r--. 1 leyou leyou 1397 4月 26 2016 LICENSE
-rw-r--r--. 1 root root 345 1月 5 02:53 Makefile
drwxr-xr-x. 2 leyou leyou 21 12月 11 10:41 man
drwxr-xr-x. 4 root root 187 1月 5 02:58 objs
-rw-r--r--. 1 leyou leyou 49 4月 26 2016 README
drwxr-xr-x. 9 leyou leyou 91 12月 11 10:41 src
#切换到目录
cd objs
ll
drwxr-xr-x. 3 root root 17 1月 5 02:53 addon
-rw-r--r--. 1 root root 15172 1月 5 02:53 autoconf.err
-rw-r--r--. 1 root root 38610 1月 5 02:53 Makefile
-rwxr-xr-x. 1 root root 3598368 1月 5 02:58 nginx
-rw-r--r--. 1 root root 5317 1月 5 02:58 nginx.8
-rw-r--r--. 1 root root 6738 1月 5 02:53 ngx_auto_config.h
-rw-r--r--. 1 root root 657 1月 5 02:53 ngx_auto_headers.h
-rw-r--r--. 1 root root 5615 1月 5 02:53 ngx_modules.c
-rw-r--r--. 1 root root 30736 1月 5 02:58 ngx_modules.o
drwxr-xr-x. 9 root root 91 12月 11 10:51 src
#替换以前的nginx
cp nginx /usr/bin
cp:是否覆盖"/usr/bin/nginx"? y
- 配置nginx整合fastdfs-module模块
我们需要修改nginx配置文件,在/opt/nginx/conf/nginx.conf文件中
vim /opt/nginx/conf/nginx.conf
 server {

        listen 80;
        server_name image.ly.com;

        # 监听域名中带有group的,交给FastDFS模块处理
        location ~/group([0-9])/ {
            ngx_fastdfs_module;
        }
        # 将其他图片代理指向本地的/ly/static目录
        location / {
            root /ly/static/;
        }
}
启动nginx
nginx

ngx_http_fastdfs_set pid=6357  # 启动成功
效果:
访问路径
image.ly.com/group1/M00/00/00/wKgjgV_zSheAWRb4AAAwev15JV0758.jpg


 1820
1820


 被折叠的 条评论
为什么被折叠?
被折叠的 条评论
为什么被折叠?
 到【灌水乐园】发言


