一、准备工作
1、创建动态web项目,引入jar包
(1)SSH整合的jar包下载地址:
https://download.csdn.net/download/qq_44757034/12609946
(2)引入struts2的注解开发包
在struts2的解压路径下lib当中的struts2-convention-plugin-2.3.24.jar包 :Struts2的注解开发包。

2、引入配置文件
(1)web.xml
配置struts2的过滤器,在web.xml当中配置

Spring的监听器

(2)Spring的jdbc.properties
jdbc.driverClass=com.mysql.jdbc.Driver
jdbc.url=jdbc:mysql:///ssh3
jdbc.username=root
jdbc.password=root
(3)log4j.properties
### direct log messages to stdout ###
log4j.appender.stdout=org.apache.log4j.ConsoleAppender
log4j.appender.stdout.Target=System.err
log4j.appender.stdout.layout=org.apache.log4j.PatternLayout
log4j.appender.stdout.layout.ConversionPattern=%d{ABSOLUTE} %5p %c{1}:%L - %m%n
### direct messages to file mylog.log ###
log4j.appender.file=org.apache.log4j.FileAppender
log4j.appender.file.File=c\:mylog.log
log4j.appender.file.layout=org.apache.log4j.PatternLayout
log4j.appender.file.layout.ConversionPattern=%d{ABSOLUTE} %5p %c{1}:%L - %m%n
### set log levels - for more verbose logging change 'info' to 'debug' ###
# error warn info debug trace
log4j.rootLogger= info, stdout
(4)applicationContext.xml
<?xml version="1.0" encoding="UTF-8"?>
<beans xmlns="http://www.springframework.org/schema/beans"
	xmlns:xsi="http://www.w3.org/2001/XMLSchema-instance"
	xmlns:context="http://www.springframework.org/schema/context"
	xmlns:aop="http://www.springframework.org/schema/aop"
	xmlns:tx="http://www.springframework.org/schema/tx"
	xsi:schemaLocation="http://www.springframework.org/schema/beans
	http://www.springframework.org/schema/beans/spring-beans.xsd
	http://www.springframework.org/schema/context
	http://www.springframework.org/schema/context/spring-context.xsd
	http://www.springframework.org/schema/aop
	http://www.springframework.org/schema/aop/spring-aop.xsd
	http://www.springframework.org/schema/tx
	http://www.springframework.org/schema/tx/spring-tx.xsd">
	<!-- 引入外部属性文件================================== -->
	<context:property-placeholder location="classpath:jdbc.properties"/>
	<!-- 配置C3P0链接池=================== -->
	<bean id="dataSource" class="com.mchange.v2.c3p0.ComboPooledDataSource">
		<!-- 注入属性 -->
		<property name="driverClass" value="${jdbc.driverClass}"></property>
		<property name="jdbcUrl" value="${jdbc.url}"></property>
		<property name="user" value="${jdbc.username}"></property>
		<property name="password" value="${jdbc.password}"></property>
	</bean>
</beans>
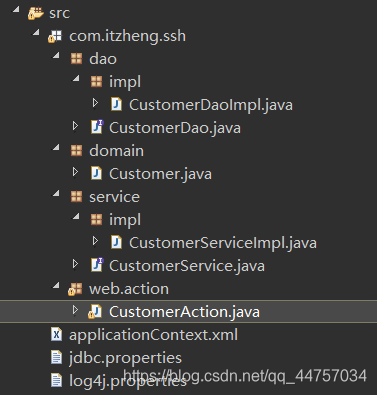
3、创建相关的包和类
(1)创建相关的包结构

(2)创建相关的类
Customer
package com.itzheng.ssh.domain;
/*
 * 客户管理的实体
 */
public class Customer {
}
CustomerDao
package com.itzheng.ssh.dao;
/*
 * 客户管理DAO的接口
 */
public interface CustomerDao {

}
CustomerDaoImpl
package com.itzheng.ssh.dao.impl;
import com.itzheng.ssh.dao.CustomerDao;
/*
 * 客户管理DAO的实现类
 */
public class CustomerDaoImpl implements CustomerDao {
}
CustomerService
package com.itzheng.ssh.service;
/*
 * 客户管理的Service的接口
 */
public interface CustomerService {
}
CustomerServiceImpl
package com.itzheng.ssh.service.impl;
import com.itzheng.ssh.service.CustomerService;
/*
 * 客户管理的Service的实现类
 */
public class CustomerServiceImpl implements CustomerService{
}
CustomerAction
package com.itzheng.ssh.web.action;
import com.itzheng.ssh.domain.Customer;
import com.opensymphony.xwork2.ActionSupport;
import com.opensymphony.xwork2.ModelDriven;
public class CustomerAction extends ActionSupport implements ModelDriven<Customer>{
	//模型驱动使用的对象
	private Customer customer = new Customer();
	@Override
	public Customer getModel() {
		// TODO Auto-generated method stub
		return customer;
	}
}
4、引入相关页面
引入页面下载地址:https://download.csdn.net/download/qq_44757034/12615556

二、保存客户
1、修改customer下的add.jsp页面

2、编写CustomerAction的save方法

3、配置CustomerAction
(1)在Spring的当中配置Action ,将Action交给Spring去管理(使用注解方式)
- 开启组件扫描:
在appliactionContext.xml

- 在类上去添加注解:
将当前类交给Spring管理

(2)在struts中去配置Action,Action负责处理请求和页面跳转的

(3)测试跳转成功并且执行了Action当中的方法


4、Action去调用业务层
(1)Service交给Spring管理
在CustomerServiceImpl设置

(2)Action中注入Service
在CustomerAction当中

(3)在Action的方法当中调用业务层
在CustomerAction的save方法当中

(4)测试


5、在Service中调用DAO
(1)将DAO交给Spring管理

(2)在Service当中注入DAO
- 在CustomerServiceImpl当中注入dao并调用DAO

- dao以及对应的实现类


(3)测试


6、创建实体和映射(映射使用的是注解)
- 映射要使用注解来实现(将表和类建立关系,将表当中的字段和类当中的属性建立关系)
在Customer上加一个实体注解

7、在Spring当中去整合Hibernate
在appliactionContext.xml当中
<?xml version="1.0" encoding="UTF-8"?>
<beans xmlns="http://www.springframework.org/schema/beans"
	xmlns:xsi="http://www.w3.org/2001/XMLSchema-instance"
	xmlns:context="http://www.springframework.org/schema/context"
	xmlns:aop="http://www.springframework.org/schema/aop"
	xmlns:tx="http://www.springframework.org/schema/tx"
	xsi:schemaLocation="http://www.springframework.org/schema/beans
	http://www.springframework.org/schema/beans/spring-beans.xsd
	http://www.springframework.org/schema/context
	http://www.springframework.org/schema/context/spring-context.xsd
	http://www.springframework.org/schema/aop
	http://www.springframework.org/schema/aop/spring-aop.xsd
	http://www.springframework.org/schema/tx
	http://www.springframework.org/schema/tx/spring-tx.xsd">
	<!-- 引入外部属性文件================================== -->
	<context:property-placeholder
		location="classpath:jdbc.properties" />
	<!-- 配置C3P0链接池=================== -->
	<bean id="dataSource"
		class="com.mchange.v2.c3p0.ComboPooledDataSource">
		<!-- 注入属性 -->
		<property name="driverClass" value="${jdbc.driverClass}"></property>
		<property name="jdbcUrl" value="${jdbc.url}"></property>
		<property name="user" value="${jdbc.username}"></property>
		<property name="password" value="${jdbc.password}"></property>
	</bean>
	<!-- 开启组件扫描(将类交给Spring管理)=================== -->
	<context:component-scan
		base-package="com.itzheng.ssh"></context:component-scan>
	<!-- Spring整合Hibernate===================== -->
	<bean id="sessionFactory"
		class="org.springframework.orm.hibernate5.LocalSessionFactoryBean">
		<property name="dateSource" ref="dateSource">
			<!-- 配置Hibernate属性 -->
			<!-- 注入复杂数据类型Properties -->
			<props>
				<prop key="hibernate.dialect">org.hibernate.dialect.MySQLDialect</prop>
				<prop key="hibernate.show_sql">true</prop>
				<prop key="hibernate.format_sql">true</prop>
				<prop key="hibernate.hbm2ddl.auto">update</prop>
			</props>
		</property>
		<!-- 加载映射 -->
		<property name="packagesToScan" value="com.itzheng.ssh.domain">
		</property>
	</bean>
</beans>
8、第十一步:在DAO当中使用模板
- 不能让DAO去继承HibernateDaoSupport,因为属性的注入就不能使用注解方式。
- 自己在DAO当中注入模板
- 定义Hibernate模板
(1) 在applicationContext.xml当中配置HibernateTemplate

(2) 注入模板,在CustomerDaoImpl当中注入模板,并调用模板当中的save方法

9、配置事务管理
- 配置事务管理器
- 开启注解事务
(1)在applicationContext.xml当中配置事务管理器以及开启注解事务

(2)在业务层加事务注解,在CustomerServiceImpl
- 在业务层添加注解

(3)测试


10、添加跳转
在CustomerAction的save方法上设置

测试
保存完成功跳转


 847
847


 被折叠的 条评论
为什么被折叠?


