


这次想要前端通过thymeleaf动态实现显示用户信息的操作
结果演示:
数据库user表数据

页面展示所有数据

代码布局格式
这里需要一个service,dao,bean,controller,以及实现service的接口、实现dao的接口
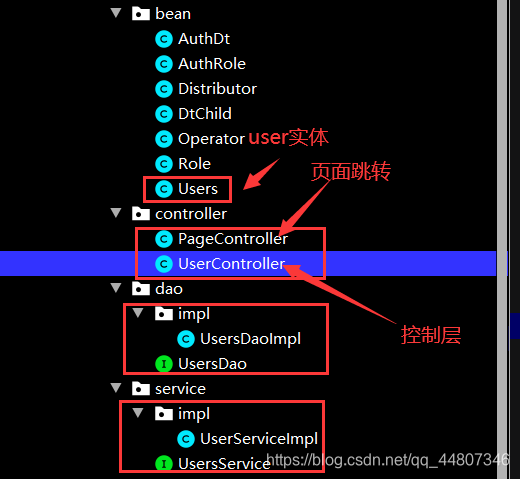
UserController .java
@Controller
@RequestMapping("/user")
public class UserController {
@Autowired
    private UsersService userService;
     /**
     * 查询全部用户
     */
    @GetMapping("/findUserAll")
    public String findUserAll(Model model){
        List<Users> list = null;
        try {
            list = this.userService.findUsersAll();
            model.addAttribute("list",list);
        }
        catch (Exception e){
            e.printStackTrace();
            return "error";
        }
        return "showuser";
    }
}
PageController .java
@Controller
public class PageController {
    /**
     * 定义一个页面跳转的方法
     */
    @RequestMapping("/{page}")
    public String showPage(@PathVariable String page){
        System.out.println(page);
        return page;
    }
}
Users .java
public class Users {
    private String userid;
    private String username;
    private String usersex;

    public String getUserid() {
        return userid;
    }

    public void setUserid(String userid) {
        this.userid = userid;
    }

    public String getUsername() {
        return username;
    }

    public void setUsername(String username) {
        this.username = username;
    }

    public String getUsersex() {
        return usersex;
    }

    public void setUsersex(String usersex) {
        this.usersex = usersex;
    }
}
UsersService .java
public interface UsersService {
    List<Users> findUsersAll();
}
UserServiceImpl .java
@Service
public class UserServiceImpl implements UsersService {
 @Override
    public List<Users> findUsersAll() {
        return this.usersDao.selectUsersAll();
    }
 }
UsersDao .java
public interface UsersDao {
    List<Users> selectUsersAll();
}
@Repository
public class UsersDaoImpl implements UsersDao {
	@Override
	    public List<Users> selectUsersAll() {
	        String sql = "select * from users";
	        return this.jdbcTemplate.query(sql, new RowMapper<Users>() {
	            /**
	             * 结果集的映射
	             * @param resultSet
	             * @param i
	             * @return
	             * @throws SQLException
	             */
	            @Override
	            public Users mapRow(ResultSet resultSet, int i) throws SQLException {
	                Users users = new Users();
	                users.setUserid(resultSet.getString("userid"));
	                users.setUsername(resultSet.getString("username"));
	                users.setUsersex(resultSet.getString("usersex"));
	                return users;
	            }
	        });
	    }
	  }
后端就是这部分内容了,逻辑结构应该已经很清楚了。现在就是如何在前端显示这些数据

在resources里的templates中创建一个html,显示所有数据
showuser.html
<!DOCTYPE HTML PUBLIC "-//W3C//DTD HTML 4.01 Transitional//EN"
        "http://www.w3.org/TR/html4/loose.dtd">
<html xmlns="http://www.w3.org/1999/xhtml"
      xmlns:th="http://www.thymeleaf.org">
<link rel="shortcut icon" href="../resource/favicon.ico" th:href="@{/static/favicon.ico}">
<head>
    <title>Title</title>
    <style type="text/css">
        body{
            background-color: antiquewhite;
        }
        table{
            margin-top: 5%;
            width: 80%;
            text-align: center;
        }
        table tr th{
            background-color: aliceblue;
        }
        .find{
            height: 30px;
            width: 200px;
            position: absolute;
            left: 20%;
            }
        button{
            height: 30px;
            position: absolute;
            left: 34%;
            top:14.5%;
        }
    </style>
</head>
<body>
    <h1 style="text-align: center">所有用户</h1>
    <a th:href="@{/addUser}">添加用户</a><br>
    <form th:action="@{/user/findUserById}" method="post">
        <input placeholder="请输入你要查找的用户" class="find" name="userid"/>
        <button type="submit">查找</button>
    </form>
    <table border="1"align="center">
        <tr>
            <th>ID</th>
            <th>姓名</th>
            <th>性别</th>
            <th>操作</th>
        </tr>
        <tr th:each="u:${list}">
            <td th:text="${u.userid}"></td>
            <td th:text="${u.username}"></td>
            <td th:text="${u.usersex}"></td>
            <td>
                <a th:href="@{/user/preUpdateUser(id=${u.userid})}">修改</a>
                <a th:href="@{/user/deleteUser(id=${u.userid})}">删除</a>
            </td>
        </tr>
    </table>
</body>
</html>
然后访问http://localhost:8080/user/findUserAll就可以访问数据库中的数据了。
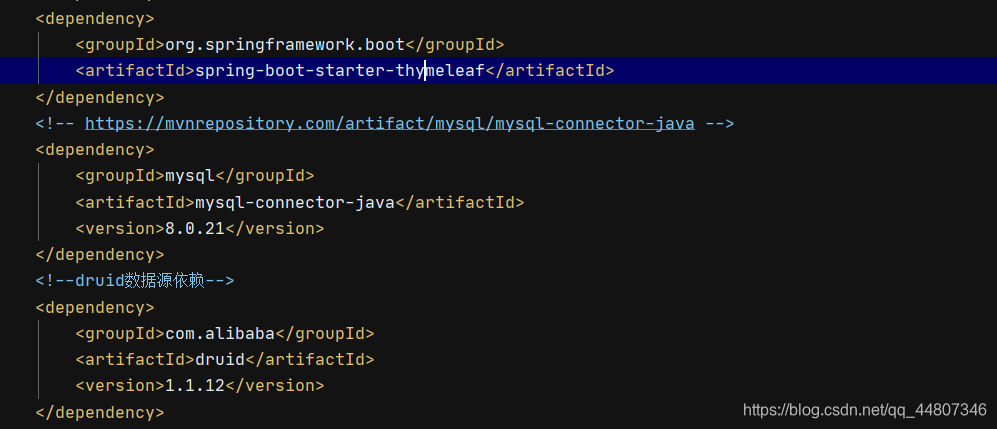
(前提是数据库有此表。我这里没有把pom.xml的配置写出来。以及要引入数据库依赖,thymeleaf依赖)
有啥不懂的或者代码部分可以交流的可以私聊我


 183
183


 被折叠的 条评论
为什么被折叠?
被折叠的 条评论
为什么被折叠?
 到【灌水乐园】发言


