


Spring Cloud
Spring Cloud 这个微服务的框架其实就是Spring Boot将Netflix公司旗下产品结合在一起孕育而生的一个框架,Spring Cloud = Spring Boot + Netflix(Eureka;Ribbon;Hystrix;Zuul;Config),在这个过程中Spring Boot其实也没干啥大事儿,就是将两套产品捆在一起稍作封装就形成Spring Cloud,学习Spring Cloud其实就是学习Netflix的五大组件。
Spring Cloud解决的不是在生产过程的某一个问题,它解决的是服务之间相互调用的问题,比如:
- 当某个项目的服务地址、端口一旦发生改变,那么其它调用该服务的项目,都需要修改调用地址,服务和服务之间入侵太大,耦合度太高。
Spring Cloud Alibaba
很多人可能会问,有了 spring cloud 这个微服务的框架,为什么又要使用 spring cloud alibaba 这个框架了?最重要的原因在于spring cloud中的几乎所有的组件都使用 Netflix 公司的产品,然后在其基础上做了一层封装。然而Netflix的服务发现组件Eureka已经停止更新,我们公司在使用的时候就发现过其一个细小的Bug;而其他的众多组件预计会在明年(即2020年)停止维护。所以急需其他的一些替代产品,也就是 spring cloud alibaba,目前正处于蓬勃发展的态式。
微服务:就是业务能力来拆分为一个个工程,每个工程是以一种去中心化的方式来独立运行和部署。
拆分方式:以数据为维度进行拆分、基于业务功能拆分、基于团队拆分、基于业务边界拆分
注册中心Nacos
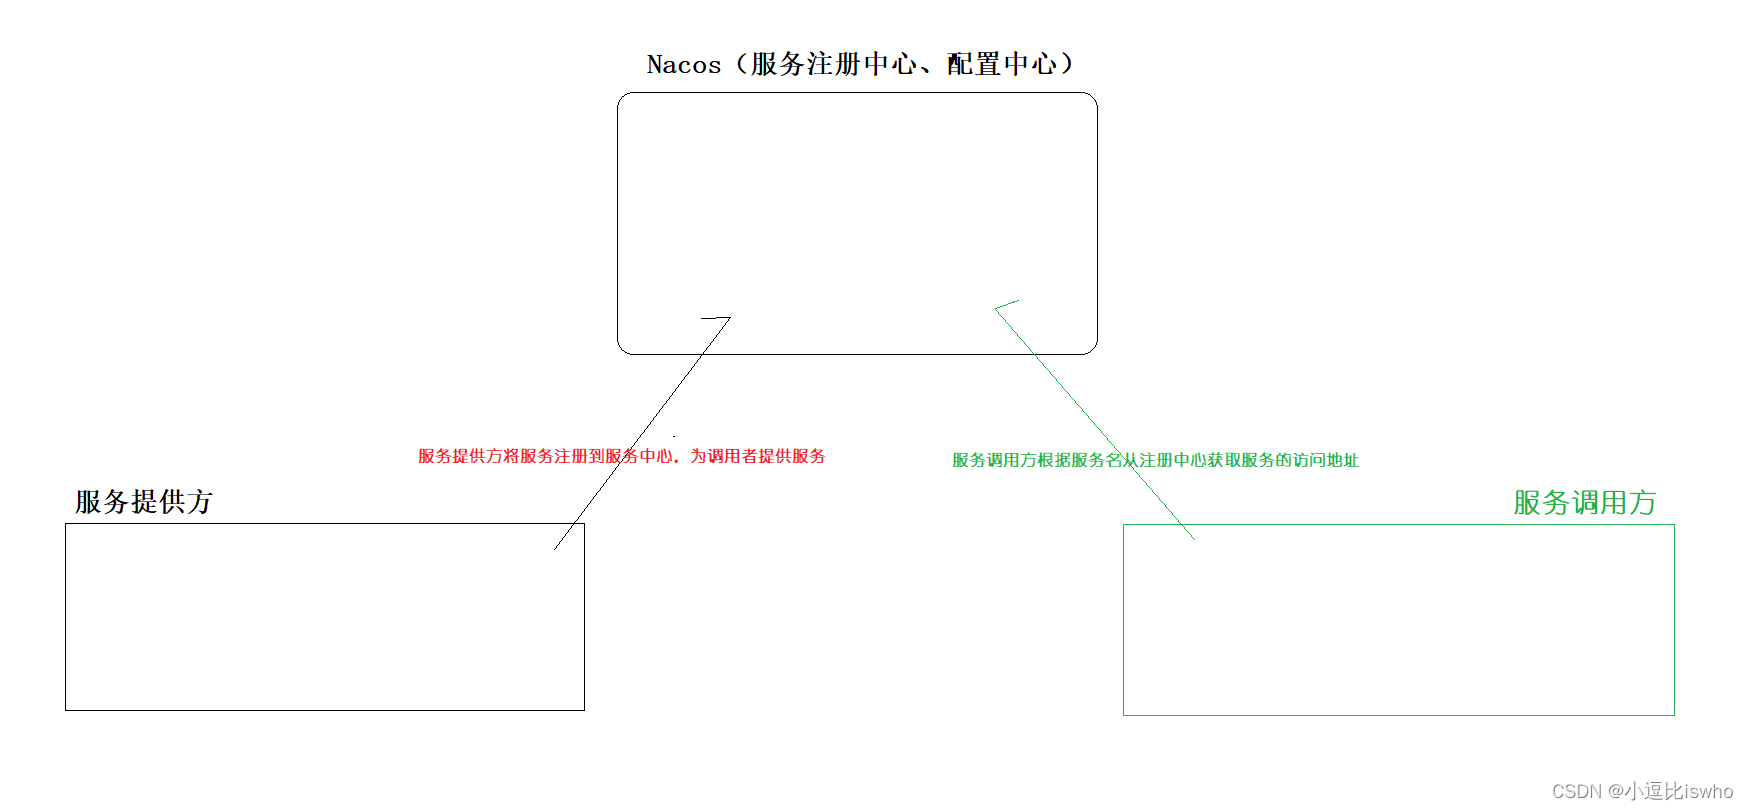
nacos的作用就是实现了服务间调用的解耦,可以方便的水平扩展。nacos是阿里巴巴研发的一个集注册中心与配置中心于一体的管理平台,使用其他非常的简单。下载地址:https://github.com/alibaba/nacos/releases
第一步:下载:
版本:NACOS2.1.0:https://github.com/alibaba/nacos/releases/download/2.1.0/nacos-server-2.1.0.tar.gz
版本:NACOS2.1.1:
第二步:将下载好的tar包通过xftp放入/data/nacos目录下,并解压
cd /data/nacos
tar -zxvf nacos-server-2.1.0.tar.gz
第三步:配置数据库
cd /data/nacos/nacos/conf
vim application.properties
## 找到如下相关的配置进行修改:
#*************** Config Module Related Configurations ***************#
### If use MySQL as datasource:
spring.datasource.platform=mysql

### Count of DB:
db.num=1

### Connect URL of DB:
db.url.0=jdbc:mysql://127.0.0.1:3306/nacos?characterEncoding=utf8&connectTimeout=1000&socketTimeout=3000&autoReconnect=true&useUnicode=true&useSSL=false&serverTimezone=UTC
db.user.0=root
db.password.0=123456

### Connection pool configuration: hikariCP
db.pool.config.connectionTimeout=30000
db.pool.config.validationTimeout=10000
db.pool.config.maximumPoolSize=20
db.pool.config.minimumIdle=2
第三步:添加数据库:
## 切换到conf目录下,找到nacos-mysql.sql,在navicate中执行该文件
cd /data/nacos/nacos/conf
## 找到nacos-mysql.sql,在navicate中执行该文件
第四步:开放端口
## 开放默认端口
firewall-cmd --zone=public --add-port=8848/tcp --permanent
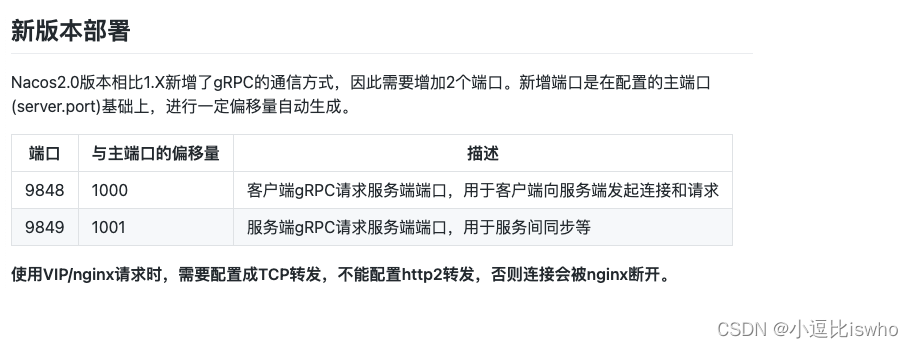
## 这俩端口不开放的话SpringBoot项目启动之后会报错Request nacos server failed:
firewall-cmd --zone=public --add-port=9848/tcp --permanent
firewall-cmd --zone=public --add-port=9849/tcp --permanent
第五步:启动Nacos
cd /data/nacos/nacos/bin
sh startup.sh -m standalone
网页访问地址:http:ip:8848/nacos
默认的登录名和密码是:nacos/nacos
Spring Boot整合Nacos
第一步:导入依赖,注意:
<parent>
    <groupId>org.springframework.boot</groupId>
    <artifactId>spring-boot-starter-parent</artifactId>
    <version>2.3.12.RELEASE</version>
    <relativePath/> <!-- lookup parent from repository -->
</parent>

<dependency>
   <groupId>com.alibaba.cloud</groupId>
   <artifactId>spring-cloud-starter-alibaba-nacos-discovery</artifactId>
</dependency>

<dependencyManagement>
   <dependencies>
       <dependency>
           <groupId>com.alibaba.cloud</groupId>
           <artifactId>spring-cloud-alibaba-dependencies</artifactId>
           <version>2.2.9.RELEASE</version>
           <type>pom</type>
           <scope>import</scope>
       </dependency>
       <dependency>
           <groupId>org.springframework.cloud</groupId>
           <artifactId>spring-cloud-dependencies</artifactId>
           <version>Hoxton.SR12</version>
           <type>pom</type>
           <scope>import</scope>
       </dependency>
   </dependencies>
</dependencyManagement>
第二步:配置yml
spring:
  application:
  	# 服务名
    name: spring-nacos
  cloud:
    nacos:
      discovery:
        server-addr: 192.168.119.134:8848
        # 将自己注册到注册中心
        register-enabled: true
第三步:调用
package com.example.demo.config.restTemplateConfig;

import org.springframework.context.annotation.Bean;
import org.springframework.context.annotation.Configuration;
import org.springframework.web.client.RestTemplate;

@Configuration
public class RestTemplateConfig {

    @Bean
    public RestTemplate getRestTemplate(){
        return new RestTemplate();
    }
}
package com.example.demo.nacos;

import org.springframework.beans.factory.annotation.Autowired;
import org.springframework.cloud.client.ServiceInstance;
import org.springframework.cloud.client.discovery.DiscoveryClient;
import org.springframework.web.client.RestTemplate;

import java.util.List;

public class FirstNacos {
    @Autowired
    private DiscoveryClient discoveryClient;
    @Autowired
    private RestTemplate restTemplate;

    private void useNacos(){
        List<ServiceInstance> instances = discoveryClient.getInstances("service-name");
        String url = instances.stream().map(ele -> {
            return "http://" + ele.getHost() + ":" + ele.getPort() + "/url";
        }).findFirst().get();
        String result = restTemplate.getForObject(url, String.class);
    }
}
Ribbon负载均衡
Spring Cloud Ribbon是基于Netflix Ribbon实现的一套客户端负载均衡的工具。其主要功能是提供客户端的负载均衡算法,并提供了完善的配置项如连接超时,重试等。简单的说,就是配置文件中列出Load Balancer后面所有的机器,Ribbon会自动的基于某种规则(如简单轮询,随机连接等)去连接这些机器,当然我们也可以使用Ribbon自定义负载均衡算法。
在单节点服务模式下,采取上述方式调用服务未尝不可,但是在集群服务模式下,我们就需要自己手动通过一定的策略实现服务调用的负载均衡,Ribbon通过在restTemplate添加@LoadBalanced注解即可实现服务调用的负载均衡,Ribbon的出现是为了解决服务集群模式下服务调用负载均衡的问题。
Ribbon只是一个客户端的负载均衡器工具,实现起来非常的简单,我们只需要在注入RestTemplate的bean上加上@LoadBalanced就可以了。如下:
package com.example.demo.config.restTemplateConfig;

import org.springframework.cloud.client.loadbalancer.LoadBalanced;
import org.springframework.context.annotation.Bean;
import org.springframework.context.annotation.Configuration;
import org.springframework.web.client.RestTemplate;

@Configuration
public class RestTemplateConfig {

    @Bean
    //通过Ribbon实现服务调用的负载均衡
    @LoadBalanced
    public RestTemplate getRestTemplate(){
        return new RestTemplate();
    }
}
package com.example.demo.nacos;

import org.springframework.beans.factory.annotation.Autowired;
import org.springframework.web.client.RestTemplate;

import java.util.List;

public class RibbonNacos {
    @Autowired
    private RestTemplate restTemplate;

    public void userRibbonOne(){
        List<String> result = restTemplate.getForObject("http://service-name/url1", List.class);
    }

    public void userRibbonTwo(){
        List<String> result = restTemplate.getForObject("http://service-name/url2", List.class);
    }

    public void userRibbonThree(){
        List<String> result = restTemplate.getForObject("http://service-name/url2", List.class);
    }

    public void userRibbonFoue(){
        List<String> result = restTemplate.getForObject("http://service-name/url4", List.class);
    }
}
Ribbon提供了一个很重要的接口叫做IRule,其中定义了很多的负载均衡策略,默认的是轮询的方式,以下是Ribbon的负载均衡策略:
| 类名 | 描述 |
|---|---|
| RoundRobbinRule | 轮询 |
| RandomRule | 随机挑选 |
| RetryRule | 按照轮询的方式去调用服务,如果其中某个服务不可用,但是还是会尝试几次,如果尝试过几次都没有成功,那么就不在调用该服务,会轮询调用其他的可用服务。 |
| AvailabilityFilteringRule | 会先过滤掉因为多次访问不可达和并发超过阈值的服务,然后轮询调用其他的服务 |
| WeightedResponseTimeRule | 根据平均响应时间计算权重,响应越快权重越大,越容易被选中。服务刚重启的时候,还未统计出权重会按照轮询的方式;当统计信息足够的时候,就会按照权重信息访问 |
| ZoneAvoidanceRule | 判断server所在的区域性能和可用性选择服务器 |
| BestAvailableRule | 会过滤掉多次访问都不可达的服务,然后选择并发量最小的服务进行调用,默认方式 |
改变Ribbon的负载均衡策略
只需要在Spring的IOC容器中注入对应的策略的Bean就可以了
@Bean
public IRule getRule() {
    return new RandomRule();
}
自定义负载均衡策略
第一步:自定义的负载均衡策略需要继承AbstractLoadBalancerRule这个类,然后重写choose方法
public class Customize_Rule extends AbstractLoadBalancerRule {

    private static Logger logger = LoggerFactory.getLogger(Customize_Rule.class);

    private int currentIndex = 0; //当前调用的索引
    private int num = 1; //次数
    private int limit = 5;

    /**
     * 初始化工作
     * @param iClientConfig
     */
    @Override
    public void initWithNiwsConfig(IClientConfig iClientConfig) {

    }

    @Override
    public Server choose(Object key) {
        ILoadBalancer balancer = getLoadBalancer();
        return choose(balancer, key);
    }

    private Server choose(ILoadBalancer balancer, Object key) {
        Server server = null;

        while(null == server) {
            //获取所有可用的服务
            List<Server> reachableServers = balancer.getReachableServers();
            if (0 == reachableServers.size()) {
                logger.error("没有可用的服务");
                return null;  //退出while循环
            }

            int total = reachableServers.size(); //可用服务的数量

            synchronized (this) {
                /**
                 * 有种极端情况,当我们在使用最后一个服务的时候,其他的服务都不可用,可能导致索引越界异常
                 */
                if (currentIndex + 1 > total) {
                    currentIndex = 0;
                    server = reachableServers.get(currentIndex);  //获取第一个服务
                    num = 0;
                    num++;
                } else {
                    if(limit == num) {
                        currentIndex++;
                        num = 0;
                        if(currentIndex == total) {
                            currentIndex=0;
                            server = reachableServers.get(currentIndex);  //获取第一个服务
                            num++;
                        }else{
                            server = reachableServers.get(currentIndex);
                            num++;
                        }
                    }else {
                        server = reachableServers.get(currentIndex);
                        num++;
                    }
                }
            }
        }
        return server;
    }
}
第二步:将自定义的负载均衡策略注入到容器中
@Bean
public IRule getRule() {
    return new Customize_Rule();
}
Feign负载均衡
通过上面代码不难看出,采用restTemplate.getForObject(“http://service-name/url4”, List.class)的方式造成了大量代码重复,Feign的出现是为了解决Ribbon通过RestTemplate调用服务时大量代码重复的问题,通过Feign调用远程服务就像调用本地方法一样。
feign是基于Ribbon的另外一个负载均衡的客户端框架,只需要在接口上定义要调用的服务名即可,使用起来非常的简单:
第一步:导入依赖
<dependency>
    <groupId>org.springframework.cloud</groupId>
    <artifactId>spring-cloud-starter-openfeign</artifactId>
</dependency>
第二步:在启动类上添加@EnableFeignClients
package com.example.demo;

import org.mybatis.spring.annotation.MapperScan;
import org.springframework.boot.SpringApplication;
import org.springframework.boot.autoconfigure.SpringBootApplication;
import org.springframework.cloud.openfeign.EnableFeignClients;

@SpringBootApplication
@EnableFeignClients
public class Demo2Application {

    public static void main(String[] args) {
        SpringApplication.run(Demo2Application.class, args);
    }

}
第三步:添加一个Service,该Service…
在这里插入代码片
Sentinel流量防卫兵
分布式系统中一个微服务需要依赖于很多的其他的服务,那么服务就会不可避免的失败。例如A服务依赖于B、C、D等很多的服务,当B服务不可用的时候,会一直阻塞或者异常,更不会去调用C服务和D服务。同时假设有其他的服务也依赖于B服务,也会碰到同样的问题,这就及有可能导致雪崩效应。
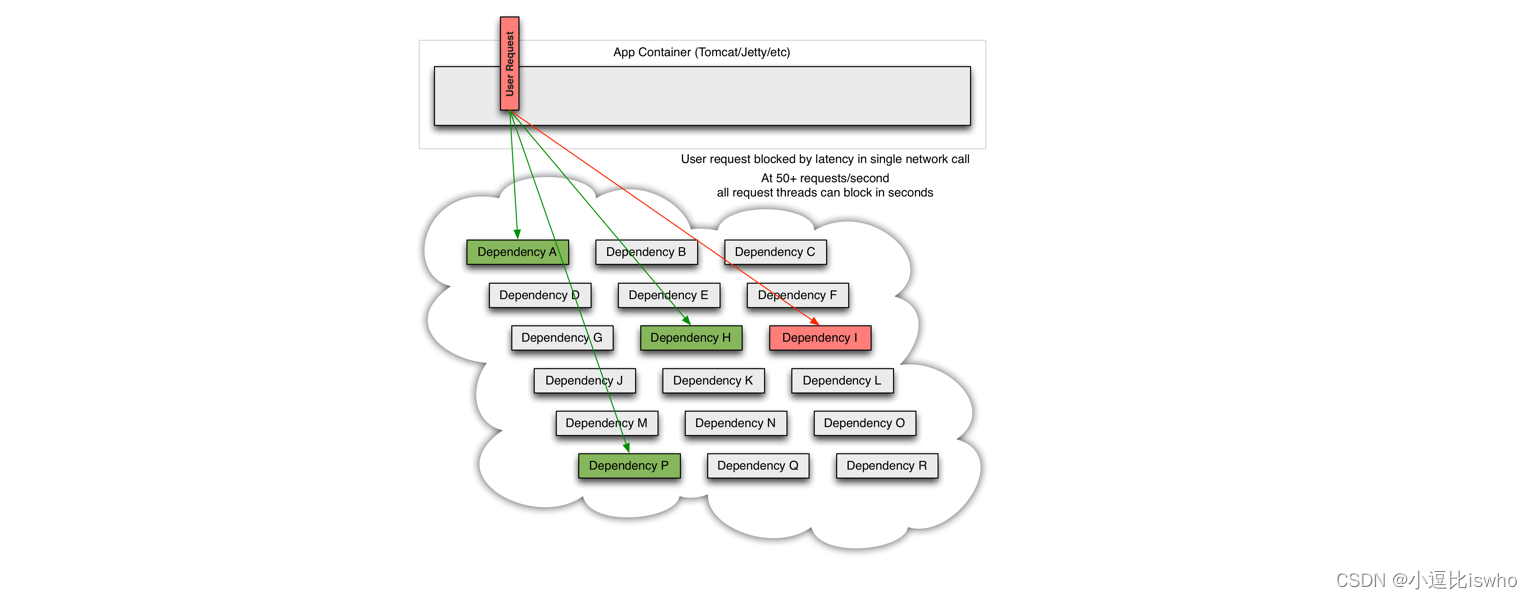
Sentinel是一个用于分布式系统的延迟和容错的开源库,在分布式系统中,许多依赖会不可避免的调用失败,例如超时,异常等,Sentinel能保证在一个依赖出现问题的情况下,不会导致整体服务失败,避免级联故障,以提高分布式系统的弹性。


 3738
3738


 被折叠的 条评论
为什么被折叠?
被折叠的 条评论
为什么被折叠?
 到【灌水乐园】发言


