


文章目录
参考
| 项目 | 描述 |
|---|---|
| VueJS 官方文档 | Props |
| Vue.js 前端开发 快速入门与专业应用 | 陈陆扬 |
| 搜索引擎 | Bing |
| 哔哩哔哩 | 黑马程序员 |
描述
| 项目 | 描述 |
|---|---|
| Edge | 109.0.1518.70 (正式版本) (64 位) |
| 操作系统 | Windows 10 专业版 |
| @vue/cli | 5.0.8 |
| npm | 8.19.3 |
| VueJS | 2.6.14 |
自定义属性(父组件向子组件传递数据)
在 VueJS 中,组件实例的作用域是孤立的。也就是说,子组件的是无法直接获取到父组件中的数据的。VueJS 为组件开发者提供了 props,通过 props 你将能够创建组件的自定义属性 ,父组件中的数据将能够通过自定义属性传递数据给子组件。
在对通用组件进行封装时,合理地使用 props 能够提升组件的复用性。
举个栗子
父组件 App.vue
<template>
  <div class="container">
    <Child init="1"></Child>
  </div>
</template>

<script>
// 导入组件
import Child from '@/components/Child.vue';

export default {
  // 注册组件
  components: {
    Child
  }
}
</script>

<style>
/* 去除元素带有的部分默认样式 */
*{
  margin: 0px;
  padding: 0px;
  box-sizing: border-box;
}

body{
  /* 使 body 元素中的内容居中显示 */
  min-height: 100vh;
  display: flex;
  justify-content: center;
  align-items: center;
}

.container{
  width: 400px;
  height: 300px;
  background-color: dodgerblue;
  display: flex;
  /*
  调整主轴方向为竖直方向(列),
  调整后该元素内部的元素将竖直排列。
   */
  flex-direction: column;
  justify-content: center;
  align-items: center;
  /* 设置圆角 */
  border-radius: 5px;
}
</style>
子组件 Child.vue
<template>
    <div class="container">
          <h3>Number: {{ init }}</h3>
    </div>
</template>

<script>
export default {
    props: ['init']
}
</script>

<style>
h3{
    color: #fff;
}
</style>
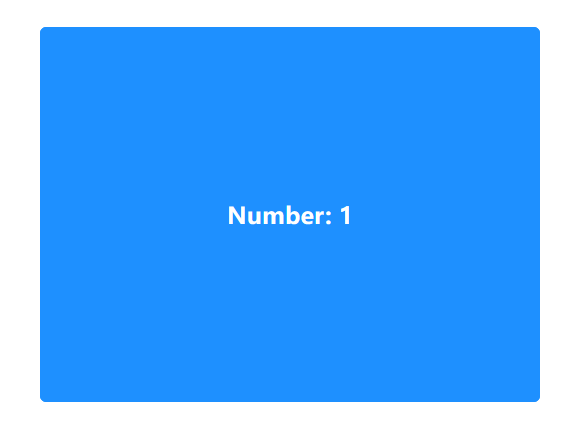
效果:
注:
我们可以在使用组件时,通过使用在子组件中使用 props 定义的属性来向子组件传递数据。
<Child init="1"></Child>
细节
驼峰式命名
排斥现象
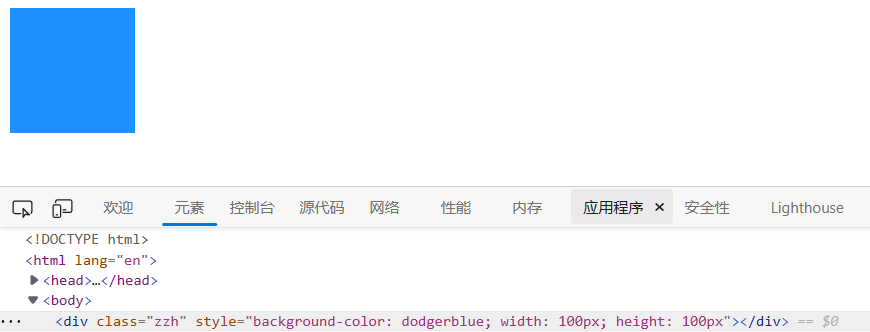
HTML 是 不区分大小写的。如果在一个 HTML 元素中存在多个同名属性(仅存在大小写区别),那么仅有在多个同名属性中第一个出现的属性会生效。
举个栗子:
<!DOCTYPE html>
<html lang="en">
<head>
    <meta charset="UTF-8">
    <meta http-equiv="X-UA-Compatible" content="IE=edge">
    <meta name="viewport" content="width=device-width, initial-scale=1.0">
    <title>Document</title>
</head>
<body>
    <div CLass="zzh" styLe="background-color: dodgerblue; width: 100px; height: 100px" style="background-color: pink; width: 100px; height: 100px"></div>
</body>
</html>
效果:
多管齐下
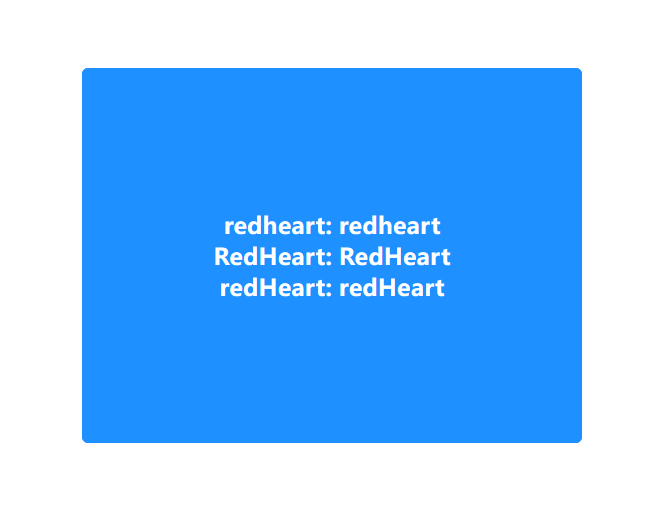
在 VueJS 中通过 props 定义的属性并不会出现 排斥现象,同名属性均会生效。
父组件 App.vue
<template>
  <div class="container">
    <!-- 为三个自定义属性赋值以向子组件传递数据 -->
    <Child redheart="redheart" RedHeart="RedHeart" redHeart="redHeart"></Child>
    <div class="controller">
    </div>
  </div>
</template>

<script>
// 导入组件
import Child from '@/components/Child.vue';

export default {
  // 注册组件
  components: {
    Child
  }
}
</script>

<style>
/* 去除元素带有的部分默认样式 */
*{
  margin: 0px;
  padding: 0px;
  box-sizing: border-box;
}

body{
  /* 使 body 元素中的内容居中显示 */
  min-height: 100vh;
  display: flex;
  justify-content: center;
  align-items: center;
}

.container{
  width: 400px;
  height: 300px;
  background-color: dodgerblue;
  display: flex;
  /*
  调整主轴方向为竖直方向(列),
  调整后该元素内部的元素将竖直排列。
   */
  flex-direction: column;
  justify-content: center;
  align-items: center;
  /* 设置圆角 */
  border-radius: 5px;
}
</style>
子组件 Child.vue
<template>
    <div class="container">
          <h3>redheart: {{ redheart }}</h3>
          <h3>RedHeart: {{ RedHeart }}</h3>
          <h3>redHeart: {{ redHeart }}</h3>
    </div>
</template>

<script>
export default {
    // 定义三个仅存在大小写区别的属性
    props: ['redheart', 'RedHeart', 'redHeart']
}
</script>

<style>
h3{
    color: #fff;
}
</style>
效果:
小驼峰式属性的另一种写法
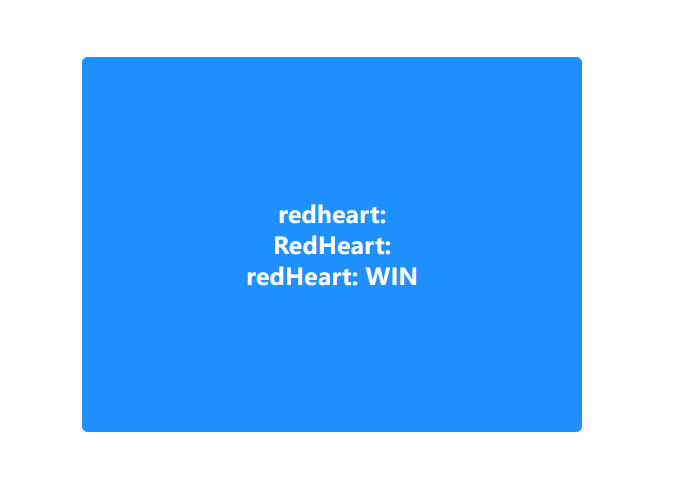
如果使用 props 定义的属性是小驼峰式命名的,那么你可以这样来进行数据的传递。
父组件 App.vue
<template>
  <div class="container">
    <!-- 为三个自定义属性赋值以向子组件传递数据 -->
    <Child red-heart="WIN"></Child>
    <div class="controller">
    </div>
  </div>
</template>

<script>
// 导入组件
import Child from '@/components/Child.vue';

export default {
  // 注册组件
  components: {
    Child
  }
}
</script>

<style>
/* 去除元素带有的部分默认样式 */
*{
  margin: 0px;
  padding: 0px;
  box-sizing: border-box;
}

body{
  /* 使 body 元素中的内容居中显示 */
  min-height: 100vh;
  display: flex;
  justify-content: center;
  align-items: center;
}

.container{
  width: 400px;
  height: 300px;
  background-color: dodgerblue;
  display: flex;
  /*
  调整主轴方向为竖直方向(列),
  调整后该元素内部的元素将竖直排列。
   */
  flex-direction: column;
  justify-content: center;
  align-items: center;
  /* 设置圆角 */
  border-radius: 5px;
}
</style>
效果:
传递数值
验证
在向子组件传递数据时,若直接使用 props 中定义的属性来传递数据,传递的数值将为字符串类型。
父组件 App.vue
<template>
  <div class="container">
    <Child init="1"></Child>
  </div>
</template>

<script>
// 导入组件
import Child from '@/components/Child.vue';

export default {
  // 注册组件
  components: {
    Child
  }
}
</script>

<style>
/* 去除元素带有的部分默认样式 */
*{
  margin: 0px;
  padding: 0px;
  box-sizing: border-box;
}

body{
  /* 使 body 元素中的内容居中显示 */
  min-height: 100vh;
  display: flex;
  justify-content: center;
  align-items: center;
}

.container{
  width: 400px;
  height: 150px;
  background-color: dodgerblue;
  display: flex;
  /*
  调整主轴方向为竖直方向(列),
  调整后该元素内部的元素将竖直排列。
   */
  flex-direction: column;
  justify-content: center;
  align-items: center;
  /* 设置圆角 */
  border-radius: 5px;
}
</style>
子组件 Child.vue
<template>
    <div class="container">
        <h3>Number: {{ init }}</h3>
        <div class="controller">
            <button class="add" @click="init += 1">Add</button>
            <button class="reduce" @click="init -= 1">Reduce</button>
        </div>
    </div>
</template>

<script>
export default {
    // 定义三个仅存在大小写区别的属性
    props: ['init']
}
</script>

<style>
h3{
    color: #fff;
    margin-top: 20px;
    margin-bottom: 10px;
}

.controller{
  width: 300px;
  height: 100px;
  display: flex;
  justify-content: center;
  align-items: center;
}

.controller .add{
  width: 120px;
  height: 40px;
  background-color: #f40;
  /* 去除按钮元素携带的默认边框 */
  border: none;
  border-radius: 3px;
  color: rgb(250, 250, 250);
  font-size: 16px;
  font-weight: 600;
  margin-right: 60px;
  /* 设置鼠标悬停在按钮上时鼠标的样式 */
  cursor: pointer;
}

.controller .reduce{
  width: 120px;
  height: 40px;
  background-color: mediumorchid;
  border: none;
  border-radius: 3px;
  color: #fff;
  font-size: 16px;
  font-weight: 600;
  cursor: pointer;
}
</style>
效果:
使用到的浏览器插件为 Vue.js devtools 。

在最初,由于父组件传递的数值为字符串类型,在点击 Add 按钮后发生了字符串的拼接。在点击 Reduce 后发生了 隐式类型转换,字符串数据类型转换为了数值类型,因此在点击 Reduce 按钮后再点击 Add 按钮将发生数值的相加。
传递数值
如果你希望父组件向子组件传递数值,那么你可以使用属性绑定指令,指令作用的属性的值中的内容将作为 JavaScript 代码解析。
要在父组件中直接向子组件传递数值,你仅需要将上一个示例中的:
<Child init="1"></Child>
替换为
<Child v-bind:init="1"></Child>
在使用属性绑定指令后,如果你希望传递字符串,那么你可以:
<Child v-bind:init="'1'"></Child>
因为指令作用的属性的值将作为 JavaScript 代码,所以我们可以再添加一组引号(该引号需要与外层引号不同类型)来传递字符串类型的数据。
只读
警告
通过 props 定义的属性从父组件传递数据到子组件后,数据仅建议子组件读取,不建议子组件对其进行修改,否则 VueJS 将在控制台中展示警告信息。
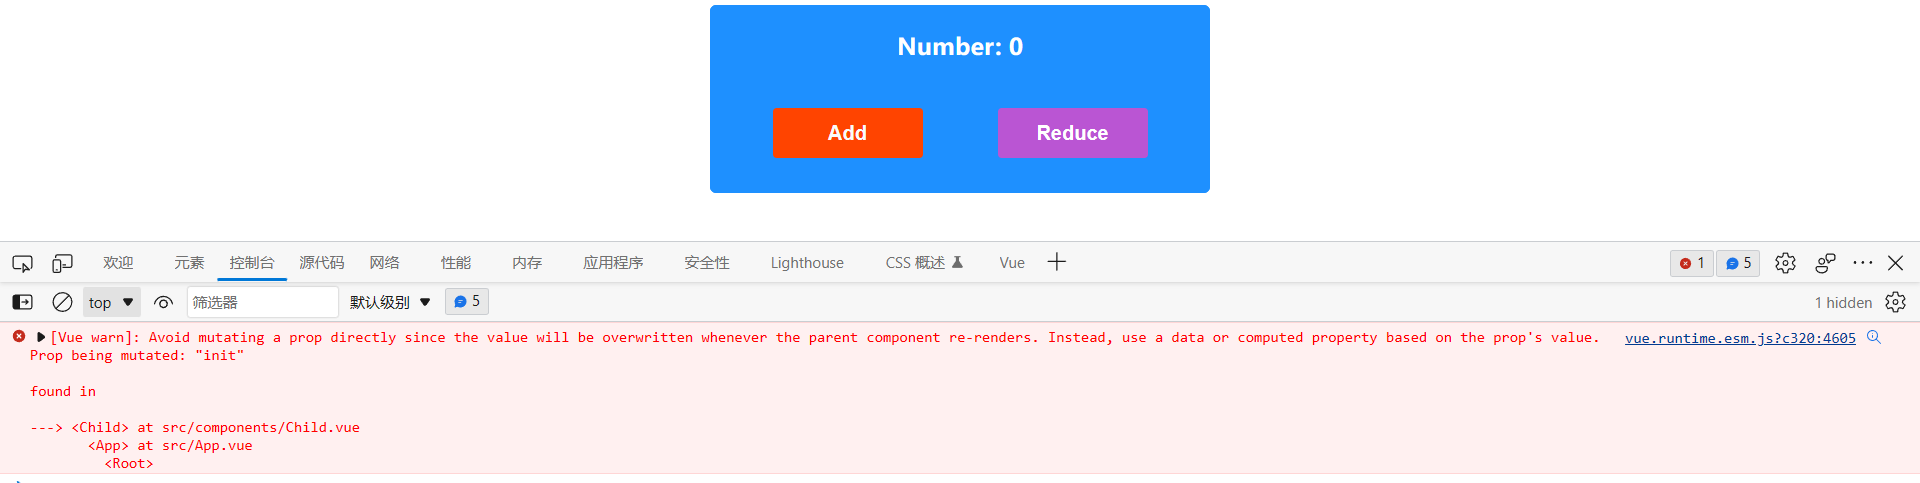
可以看到在对按钮进行点击以改变自定义属性的值后,控制台中都将展示警告信息。
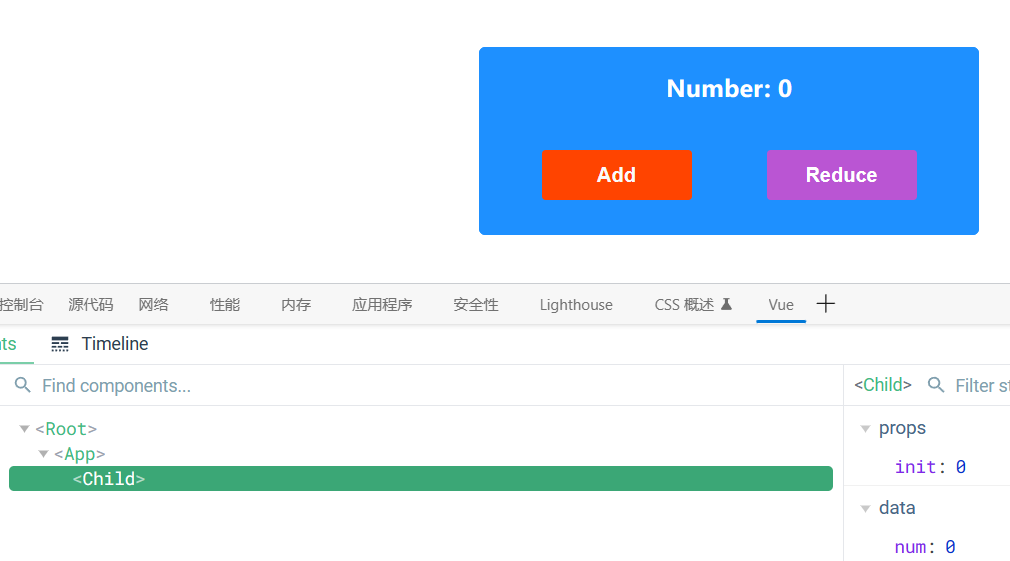
优化
我们可以将接收到的数据保存到变量中,通过点击按钮来改变变量中存储的值就可以避免更改自定义属性了。
父组件 App.vue
<template>
  <div class="container">
    <Child v-bind:init="1"></Child>
  </div>
</template>

<script>
// 导入组件
import Child from '@/components/Child.vue';

export default {
  // 注册组件
  components: {
    Child
  }
}
</script>

<style>
/* 去除元素带有的部分默认样式 */
*{
  margin: 0px;
  padding: 0px;
  box-sizing: border-box;
}

body{
  /* 使 body 元素中的内容居中显示 */
  min-height: 100vh;
  display: flex;
  justify-content: center;
  align-items: center;
}

.container{
  width: 400px;
  height: 150px;
  background-color: dodgerblue;
  display: flex;
  /*
  调整主轴方向为竖直方向(列),
  调整后该元素内部的元素将竖直排列。
   */
  flex-direction: column;
  justify-content: center;
  align-items: center;
  /* 设置圆角 */
  border-radius: 5px;
}
</style>
子组件 Child.vue
<template>
    <div class="container">
        <h3>Number: {{ num }}</h3>
        <div class="controller">
            <button class="add" @click="num += 1">Add</button>
            <button class="reduce" @click="num -= 1">Reduce</button>
        </div>
    </div>
</template>

<script>
export default {
    // 定义三个仅存在大小写区别的属性
    props: ['init'],
    // 定义变量
    data() {
        return {
            num: this.init
        }
    }
}
</script>

<style>
h3{
    color: #fff;
    margin-top: 20px;
    margin-bottom: 10px;
}

.controller{
  width: 300px;
  height: 100px;
  display: flex;
  justify-content: center;
  align-items: center;
}

.controller .add{
  width: 120px;
  height: 40px;
  background-color: #f40;
  /* 去除按钮元素携带的默认边框 */
  border: none;
  border-radius: 3px;
  color: rgb(250, 250, 250);
  font-size: 16px;
  font-weight: 600;
  margin-right: 60px;
  /* 设置鼠标悬停在按钮上时鼠标的样式 */
  cursor: pointer;
}

.controller .reduce{
  width: 120px;
  height: 40px;
  background-color: mediumorchid;
  border: none;
  border-radius: 3px;
  color: #fff;
  font-size: 16px;
  font-weight: 600;
  cursor: pointer;
}
</style>
效果:

配置
如果你使用对象作为为 export default{} 中的节点 props 的值,那么你将可以对自定义属性拥有更多的控制权。
默认值
你可以为自定义属性添加默认值,在父组件没有通过自定义属性传递数据时,使用预先设定的数据。
父组件 App.vue
<template>
  <div class="container">
    <!-- 不为自定义属性传递数据 -->
    <Child></Child>
  </div>
</template>

<script>
// 导入组件
import Child from '@/components/Child.vue';

export default {
  // 注册组件
  components: {
    Child
  }
}
</script>

<style>
/* 去除元素带有的部分默认样式 */
*{
  margin: 0px;
  padding: 0px;
  box-sizing: border-box;
}

body{
  /* 使 body 元素中的内容居中显示 */
  min-height: 100vh;
  display: flex;
  justify-content: center;
  align-items: center;
}

.container{
  width: 400px;
  height: 150px;
  background-color: dodgerblue;
  display: flex;
  /*
  调整主轴方向为竖直方向(列),
  调整后该元素内部的元素将竖直排列。
   */
  flex-direction: column;
  justify-content: center;
  align-items: center;
  /* 设置圆角 */
  border-radius: 5px;
}
</style>
子组件 Child.vue
<template>
    <div class="container">
        <h3>Number: {{ num }}</h3>
        <div class="controller">
            <button class="add" @click="num += 1">Add</button>
            <button class="reduce" @click="num -= 1">Reduce</button>
        </div>
    </div>
</template>

<script>
export default {
    // 定义三个仅存在大小写区别的属性
    props: {
        init: {
            // 设定当前自定义属性的默认值为 0
            default: 0
        }
    },
    // 定义变量
    data() {
        return {
            num: this.init
        }
    }
}
</script>

<style>
h3{
    color: #fff;
    margin-top: 20px;
    margin-bottom: 10px;
}

.controller{
  width: 300px;
  height: 100px;
  display: flex;
  justify-content: center;
  align-items: center;
}

.controller .add{
  width: 120px;
  height: 40px;
  background-color: #f40;
  /* 去除按钮元素携带的默认边框 */
  border: none;
  border-radius: 3px;
  color: rgb(250, 250, 250);
  font-size: 16px;
  font-weight: 600;
  margin-right: 60px;
  /* 设置鼠标悬停在按钮上时鼠标的样式 */
  cursor: pointer;
}

.controller .reduce{
  width: 120px;
  height: 40px;
  background-color: mediumorchid;
  border: none;
  border-radius: 3px;
  color: #fff;
  font-size: 16px;
  font-weight: 600;
  cursor: pointer;
}
</style>
效果:
必需
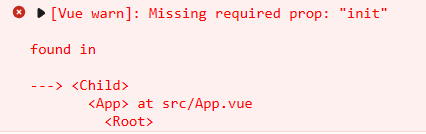
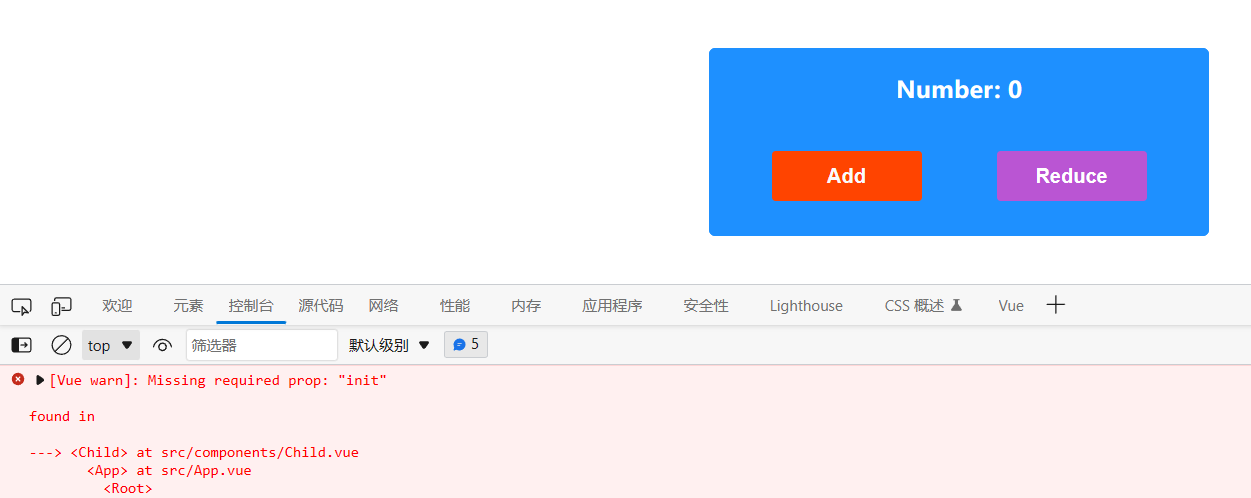
你可以通过设置 required 属性的值为 true 来规定父组件必须传递数据给子组件,否则将抛出警告。
注:
将 required 属性设置为 true 后,即使你设置了 default 属性来规定默认值,如果父组件没有传递数据到子组件中,控制台仍将抛出错误。
举个栗子
父组件 App.vue
<template>
  <div class="container">
    <!-- 不为自定义属性传递数据 -->
    <Child></Child>
  </div>
</template>

<script>
// 导入组件
import Child from '@/components/Child.vue';

export default {
  // 注册组件
  components: {
    Child
  }
}
</script>

<style>
/* 去除元素带有的部分默认样式 */
*{
  margin: 0px;
  padding: 0px;
  box-sizing: border-box;
}

body{
  /* 使 body 元素中的内容居中显示 */
  min-height: 100vh;
  display: flex;
  justify-content: center;
  align-items: center;
}

.container{
  width: 400px;
  height: 150px;
  background-color: dodgerblue;
  display: flex;
  /*
  调整主轴方向为竖直方向(列),
  调整后该元素内部的元素将竖直排列。
   */
  flex-direction: column;
  justify-content: center;
  align-items: center;
  /* 设置圆角 */
  border-radius: 5px;
}
</style>
子组件 Child.vue
<template>
    <div class="container">
        <h3>Number: {{ num }}</h3>
        <div class="controller">
            <button class="add" @click="num += 1">Add</button>
            <button class="reduce" @click="num -= 1">Reduce</button>
        </div>
    </div>
</template>

<script>
export default {
    // 定义三个仅存在大小写区别的属性
    props: {
        init: {
            // 设定当前自定义属性的默认值为 0
            default: 0,
            // 规定父组件必须传递值给当前自定义属性
            required: true
        }
    },
    // 定义变量
    data() {
        return {
            num: this.init
        }
    }
}
</script>

<style>
h3{
    color: #fff;
    margin-top: 20px;
    margin-bottom: 10px;
}

.controller{
  width: 300px;
  height: 100px;
  display: flex;
  justify-content: center;
  align-items: center;
}

.controller .add{
  width: 120px;
  height: 40px;
  background-color: #f40;
  /* 去除按钮元素携带的默认边框 */
  border: none;
  border-radius: 3px;
  color: rgb(250, 250, 250);
  font-size: 16px;
  font-weight: 600;
  margin-right: 60px;
  /* 设置鼠标悬停在按钮上时鼠标的样式 */
  cursor: pointer;
}

.controller .reduce{
  width: 120px;
  height: 40px;
  background-color: mediumorchid;
  border: none;
  border-radius: 3px;
  color: #fff;
  font-size: 16px;
  font-weight: 600;
  cursor: pointer;
}
</style>
效果:
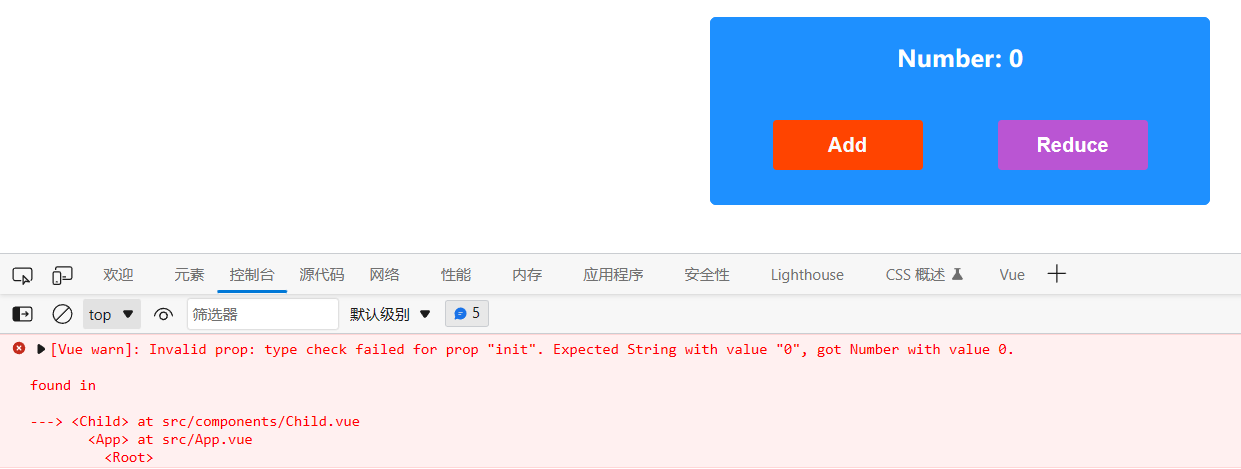
数据类型
你可以通过设置 type 属性来规定父组件需要传递给子组件的数据的类型。如果父组件没有传递规定类型的数据或使用的默认值不为指定的数据类型,VueJS 都将在控制台中抛出警告。
父组件 App.vue
<template>
  <div class="container">
    <!-- 不为自定义属性传递数据 -->
    <Child></Child>
  </div>
</template>

<script>
// 导入组件
import Child from '@/components/Child.vue';

export default {
  // 注册组件
  components: {
    Child
  }
}
</script>

<style>
/* 去除元素带有的部分默认样式 */
*{
  margin: 0px;
  padding: 0px;
  box-sizing: border-box;
}

body{
  /* 使 body 元素中的内容居中显示 */
  min-height: 100vh;
  display: flex;
  justify-content: center;
  align-items: center;
}

.container{
  width: 400px;
  height: 150px;
  background-color: dodgerblue;
  display: flex;
  /*
  调整主轴方向为竖直方向(列),
  调整后该元素内部的元素将竖直排列。
   */
  flex-direction: column;
  justify-content: center;
  align-items: center;
  /* 设置圆角 */
  border-radius: 5px;
}
</style>
子组件 Child.vue
<template>
    <div class="container">
        <h3>Number: {{ num }}</h3>
        <div class="controller">
            <button class="add" @click="num += 1">Add</button>
            <button class="reduce" @click="num -= 1">Reduce</button>
        </div>
    </div>
</template>

<script>
export default {
    // 定义三个仅存在大小写区别的属性
    props: {
        init: {
            // 设定当前自定义属性的默认值为 0
            default: 0,
            // 规定当前自定义属性接收的数据的数据类型
            type: String
        }
    },
    // 定义变量
    data() {
        return {
            num: this.init
        }
    }
}
</script>

<style>
h3{
    color: #fff;
    margin-top: 20px;
    margin-bottom: 10px;
}

.controller{
  width: 300px;
  height: 100px;
  display: flex;
  justify-content: center;
  align-items: center;
}

.controller .add{
  width: 120px;
  height: 40px;
  background-color: #f40;
  /* 去除按钮元素携带的默认边框 */
  border: none;
  border-radius: 3px;
  color: rgb(250, 250, 250);
  font-size: 16px;
  font-weight: 600;
  margin-right: 60px;
  /* 设置鼠标悬停在按钮上时鼠标的样式 */
  cursor: pointer;
}

.controller .reduce{
  width: 120px;
  height: 40px;
  background-color: mediumorchid;
  border: none;
  border-radius: 3px;
  color: #fff;
  font-size: 16px;
  font-weight: 600;
  cursor: pointer;
}
</style>
效果:
自定义事件(子组件向父组件传递数据)
在 VueJS 中,组件实例的作用域是孤立的。也就是说,父组件的是无法直接获取到子组件中的数据的。为了在子组件中向父组件传递数据,我们可以在子组件中定义事件,在父组件中监听事件,当子组件需要传递数据时便可以主动触发相应的自定义事件,同时将数据传递给父组件中的事件处理函数。
举个栗子
App.vue
<template>
  <div class="container">
    <p>Number: {{ num }}</p>
    <!-- 指定自定义事件触发后执行的事件处理函数 -->
    <Child @updateNum="getNum"></Child>
  </div>
</template>

<script>
// 导入组件
import Child from '@/components/Child.vue';

export default {
  // 注册组件
  components: {
    Child
  },
  data() {
    return {
      // 定义数据 num
      num: 0
    }
  },
  methods: {
    getNum(newNum) {
      // 使用子组件传递的数据对 num 进行更新
      this.num = newNum;
    }
  }
}
</script>

<style>

</style>
Child.vue
<template>
  <div class="container">
    <!-- 指定当前按钮被点击后执行的事件处理函数 -->
    <button @click="add">Add</button>
  </div>
</template>

<script>
export default {
  data() {
    return {
      // 定义数据 count
      count: 0
    }
  },
  methods: {
    add() {
      // 对定义的数据 count 的值进行 +1 的操作
      this.count += 1;
      // this.$emit 定义事件并触发事件
      // 第一个参数为被触发的事件,第二个参数
      // 为需要传递给事件处理函数的数据
      this.$emit('updateNum', this.count);
    }
  }
}
</script>

<style>

</style>
效果:


 1024
1024


 被折叠的 条评论
为什么被折叠?
被折叠的 条评论
为什么被折叠?
 到【灌水乐园】发言


