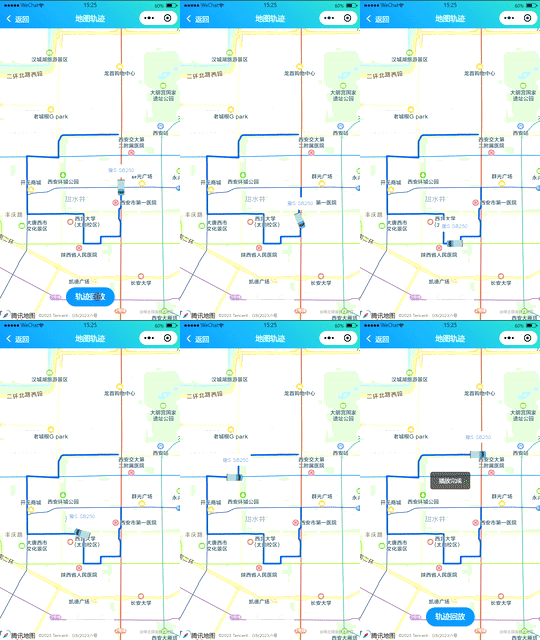
效果展示

配置地图key

页面结构
页面结构主要包括一个地图组件和一个按钮用来控制轨迹回放开始:
<view class="container">
  <map id='map' :latitude="latitude" :longitude="longitude" :markers="covers"
       :style="{ width: '100%', height: mapHeight + 'px' }" :scale="13" :polyline="polyline">
  </map>

  <view class="btnBox">
    <button :disabled="isDisabled" @click="start" class="cu-btn bg-blue round shadow lg">轨迹回放</button>
  </view>
</view>
数据绑定
data() {
  return {
    map: null,
    isDisabled: false,
    isStart: false,
    playIndex: 1,
    latitude: 34.263734,
    longitude: 108.934843,
    // 标记点(小车),详细见:https://uniapp.dcloud.net.cn/component/map.html#marker
    covers: [{
      id: 1,
      width: 42,
      height: 47,
      // 使用的小车图片默认车头方向朝左,然后因为 h5 中是负值为逆时针旋转,而微信小程序等中是正值逆时针旋转,所以这里使用了条件编译,仅在 h5 模式下使用负值
      // #ifndef H5
      rotate: -90,
      // #endif
      // #ifdef H5
      rotate: 90,
      // #endif
      latitude: 34.259428,
      longitude: 108.947040,
      iconPath: 'http://cdn.zhoukaiwen.com/car.png',
      callout: {
        content: "豫S·SB250", // 车牌信息
        display: "ALWAYS",
        fontWeight: "bold",
        color: "#5A7BEE", //文本颜色
        fontSize: "12px",
        bgColor: "#ffffff", //背景色
        padding: 5, //文本边缘留白
        textAlign: "center",
      },
      anchor: {
        x: 0.5,
        y: 0.5,
      },
    }],

    // 路线
    polyline: [],

    // 坐标数据,一般都是后端返回
    coordinate: [{
      latitude: 34.259428,
      longitude: 108.947040,
      problem: false,
    },{
      latitude: 34.252918,
      longitude: 108.946963,
      problem: false,
    },{
      latitude: 34.252408,
      longitude: 108.946240,
      problem: false,
    },{
      latitude: 34.249286,
      longitude: 108.946184,
      problem: false,
    },{
      latitude: 34.248670,
      longitude: 108.946640,
      problem: false,
    },{
      latitude: 34.248129,
      longitude: 108.946826,
      problem: false,
    },{
      latitude: 34.243537,
      longitude: 108.946816,
      problem: true,
    },{
      latitude: 34.243478,
      longitude: 108.939003,
      problem: true,
    },{
      latitude: 34.241218,
      longitude: 108.939027,
      problem: true,
    },{
      latitude: 34.241192,
      longitude: 108.934802,
      problem: true,
    },{
      latitude: 34.241182,
      longitude: 108.932235,
      problem: true,
    },{
      latitude: 34.247227,
      longitude: 108.932311,
      problem: true,
    },{
      latitude: 34.250833,
      longitude: 108.932352,
      problem: true,
    },{
      latitude: 34.250877,
      longitude: 108.931756,
      problem: true,
    }, {
      latitude: 34.250944,
      longitude: 108.931576,
      problem: true,
    },{
      latitude: 34.250834,
      longitude: 108.929662,
      problem: true,
    },{
      latitude: 34.250924,
      longitude: 108.926015,
      problem: true,
    },{
      latitude: 34.250802,
      longitude: 108.910121,
      problem: true,
    },{
      latitude: 34.269718,
      longitude: 108.909921,
      problem: true,
    },{
      latitude: 34.269221,
      longitude: 108.922366,
      problem: false,
    },{
      latitude: 34.274531,
      longitude: 108.922388,
      problem: false,
    },{
      latitude: 34.276201,
      longitude: 108.923433,
      problem: false,
    },{
      latitude: 34.276559,
      longitude: 108.924004,
      problem: false,
    },{
      latitude: 34.276785,
      longitude: 108.945855,
      problem: false,
    }]
  }
}
主要逻辑
onReady() {
  // 创建map对象
  this.map = uni.createMapContext('map');
},
mounted() {
  // 读取路径数据
  this.polyline = [{
    points: this.coordinate,
    color: '#025ADD',
    width: 4,
    dottedLine: false,
  }];
},
methods: {
  start() {
    this.isStart = true; // 开始回放
    this.isDisabled = true; // 禁用按钮
    let data = this.coordinate;
    let len = data.length;
    let datai = data[this.playIndex]; // 读取下一个要到达的点
    let _this = this; // 暂存 this

    // 参考:https://uniapp.dcloud.net.cn/api/location/map.html#createmapcontext
    _this.map.translateMarker({
      markerId: 1,
      autoRotate: true,
      destination: {
        longitude: datai.longitude, // 车辆即将移动到的下一个点的经度
        latitude: datai.latitude, // 车辆即将移动到的下一个点的纬度
      },
      duration: 700,
      // 动画结束
      animationEnd: function() {
        _this.playIndex++;
        if (_this.playIndex < len) {
          _this.start();
        } else {
          uni.showToast({
            title: '回放完成',
            duration: 1400,
            icon: 'none'
          });
          _this.playIndex = 0;
          _this.isStart = false;
          _this.isDisabled = false;
        }
      },
      fail(e) {
        // 轨迹回放失败回调
      },
    });
  }
}


 本文展示了如何在uni-app中配置地图key并实现轨迹回放功能。页面包含地图组件和控制按钮,数据绑定包括地图坐标、标记点和路线。主要逻辑在于onReady和start方法,利用uni.createMapContext进行地图操作,translateMarker方法实现标记点的动画移动,完成轨迹回放。


 4502
4502

 被折叠的 条评论
为什么被折叠?


