


1. 图像金字塔
图像金字塔是对图像的一种多尺度表达,将各个尺度的图像按照分辨率从小到大,依次从上到下排列,就会形成类似金字塔的结构,因此称为图像金字塔。
该组图像是由单张图像不断进行下采样所产生的,从底部第0层开始,逐层下采样,一直堆叠到金字塔的顶端第N层。

常见的图像金字塔有两类,一种是高斯金字塔(Gaussian Pyramid),另一种的拉普拉斯金字塔(Laplacian Pyramid)。
2. 图像金字塔下采样和上采样原理
图像金字塔中的下采样和上采样与通常的图像缩放不一样,主要有如下区别:
(1)图像缩放可以任意缩放图像的大小,而图像金字塔中的下采样和上采样通常是缩小和放大2倍,其大小变化如下图所示:
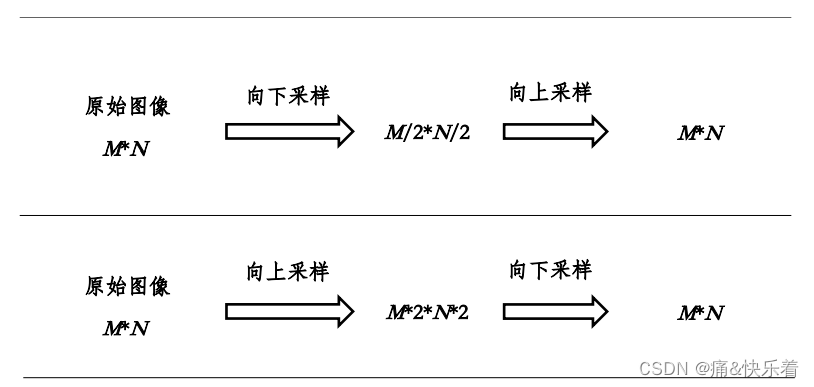
(2)图像金字塔的下采样之前会对图像进行模糊,上采样后也会进行模糊;
(3)实现不一样,图像金字塔可以不用插值就能实现下采样和上采样,而图像缩放resize时,需要进行插值。
注意:其实现的关键是高斯滤波核的选择,需要自定义高斯核。
图像金字塔–下采样(降采样)
高斯金字塔从底向上,逐层降采样取得,不能跨域越层;
对当前层删除偶数行与列就得到降采样后上一层的图片;
降采样后的图像大小是之前图像大小的1/4;
高斯金字塔生成步骤:
①进行高斯模糊;
②删除偶数行与列。
OpenCV中的函数如下:
void pyrDown(InputArray src, OutputArray dst, const Size& dstsize=Size(), int borderType=BORDER_DEFAULT )

//InputArray src: 输入图像,可以是Mat类型
//OutputArray dst: 输出图像,尺寸由第三个参数指定,类型与输入图像一致
//const Size & dstsize=Size(): 输出图像的尺寸,有默认值Size(),在默认情况下将会由Size((src.cols+1)/2, (src.rows+1)/2)计算得到并且还要满足以下条件:|dstsize.width2-src.cols|<=2       |dstsize.height2-src.rows|<=2
//int borderType=BORDER_DEFAULT: 用于推断图像外部像素的某种边界模式,有默认值BORDER_DEFAULT
图像金字塔–上采样(升采样)
将每个像素扩展成2x2的小区域,原像素放在左上角,其他3个位置补0,然后将卷积核乘以4,再对扩展后的图像做模糊即可。
void cv::pyrUp ( InputArray src, OutputArray dst, const Size & dstsize = Size(), int borderType =BORDER_DEFAULT )
3. python代码实现
在参考文献中看到效果不错的代码,copy了一下。
# -*- coding: utf-8 -*-
import cv2
import numpy as np
import matplotlib.pyplot as plt
def blur(image, kernel_scale=1.0):
"""
Blur image using a fixed kernel. Kernel scale can be set.
Parameters
----------
image: image data read by opencv.
kernel_scale: the scale factor of kernel.
"""
blur_kernel = np.array(
[[1, 4, 6, 4, 1],
[4, 16, 24, 16, 4],
[6, 24, 36, 24, 6],
[4, 16, 24, 16, 4],
[1, 4, 6, 4, 1]]) / 256.
blurred_image = cv2.filter2D(image, ddepth=-1,
kernel=blur_kernel * kernel_scale,
borderType=cv2.BORDER_REFLECT101)
return blurred_image
def pyramid_down(image):
"""
Down sample an image by 2x.
Parameters
----------
image: image data read by opencv.
"""
blurred_image = blur(image)
image_down = blurred_image[::2, ::2]
return image_down
def pyramid_up(image, dst_size=None, dtype=np.uint8):
"""
Up sample an image by 2x. The output size and data type can be set.
Parameters
----------
image: image data read by opencv.
dst_size: the output size. Note that the difference of dst_size and
2*image_size should be <=2.
dtype: the output data type.
"""
# check dst_size
height, width = image.shape[:2]
if dst_size is None:
dst_size = (width * 2, height * 2)
else:
if abs(dst_size[0] - width * 2) > 2 or \
abs(dst_size[1] - height * 2) > 2:
raise ValueError(r'the difference of dst_size and 2*image_size '
r'should be <=2.')
# create a new buffer that has the dst_size
dst_width, dst_height = dst_size
if image.ndim == 2:
image_up = np.zeros(shape=(dst_height, dst_width), dtype=dtype)
else:
channel = image.shape[2]
image_up = np.zeros(shape=(dst_height, dst_width, channel),
dtype=dtype)
image_up[::2, ::2] = image
image_up = blur(image_up, 4.0)
return image_up
src_image = cv2.imread(r'../images/lena.jpg', 0)
down = pyramid_down(src_image)
down1 = cv2.pyrDown(src_image)
up = pyramid_up(src_image)
up2 = cv2.pyrUp(src_image)
plt.figure()
plt.imshow(src_image, cmap='gray')
plt.figure()
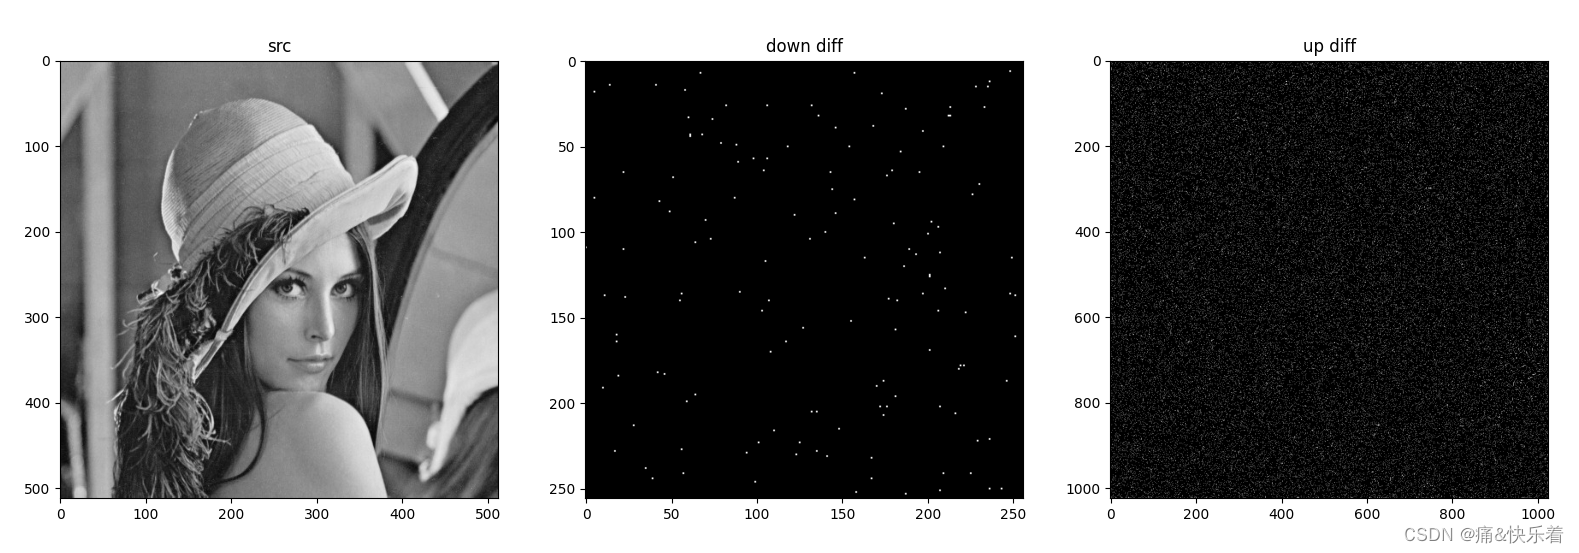
plt.imshow(down1-down, cmap='gray')
plt.figure()
plt.imshow(up2-up, cmap='gray')
plt.show()
测试结果如下:
4. C++代码实现
最近在写图像上采样和下采样的C++算法,下采样实现比较容易实现,使用大小5x5和方差为1的高斯滤波核即可得到想要的效果。
void Downsample(ImagePro *smooth, ImagePro *dst, int width, int height)
{
	int i, j, w, h, sour, dest;

	w = (width + 1) / 2;
	h = (height + 1) / 2;

	sour = 0;
	dest = 0;
	for (j = 0; j < h; j++)
	{
		for (i = 0; i < w; i++)
			dst[dest + i] = smooth[sour + i + i];

		sour += 2 * width;
		dest += w;
	}
}
void ImagePyrDown(ImagePro *src, ImagePro *dst, int width, int height)
{
	ImagePro* smooth = new ImagePro[width*height];
	FastGaussian((ImagePro*)src, (ImagePro*)smooth, width, height, 5, 1, 0);
	Downsample(smooth, dst, width, height);
	delete[] smooth;
	smooth = nullptr;
}
上采样实现代码如下:
void upsample(ImagePro *I_smooth, ImagePro *I_up, int width, int height)
{
	int i, j, w, h, dest, sour;

	memset(I_up, NULL, sizeof(ImagePro) * width * height);

	w = (width + 1) / 2;
	h = (height + 1) / 2;

	dest = 0;
	sour = 0;
	for (j = 0; j < h; j++)
	{
		for (i = 0; i < w; i++)
		{
			I_up[dest + i + i] = I_smooth[sour + i];
		}

		dest += 2 * width;
		sour += w;
	}
}
void ImagePyrUp(ImagePro *src, int width, int height, ImagePro *dst)
{
	ImagePro* temp = new ImagePro[width*height*4];
	upsample(src, temp, width*2, height*2);
	Mat t(height * 2, width * 2, CV_8UC1, temp);
	Gaussian(temp, dst, width * 2, height * 2, 5, 1);
	delete[] temp;
	temp = nullptr;
}
注意:为了确保像素值区间在向上采样后与原始图像保持一致,需要将高斯滤波器的系数乘以 4。 这不难理解,进行upsample后,图像像素值为0的像素在滤波后其值要和原图一样,该像素的四邻域权重之和应该在0.9左右,其余0.1的部分由其它像素贡献。
另外,还参考了Github上的代码(也可以得到上采样的效果):https://github.com/vvkin/bmp-resizer/tree/master/LAB_4。
float lerp(float a, float b, float c) {
	return a + c * (b - a);
}

float blerp(float c00, float c10, float c01, float c11, float tx, float ty) {
	return lerp(lerp(c00, c10, tx), lerp(c01, c11, tx), ty);
}

Mat resize(Mat image, int height, int width)
{
	int32_t new_height = height;
	int32_t new_width = width;
	new_width -= (new_width % 4 != 1) ? (new_width % 4) : 0;
	Mat new_image = cv::Mat::zeros(height, width, CV_8UC1);
	for (auto x = 0; x < new_height; ++x) {
		float gx = (float)x / (new_height) * (image.rows );
		for (auto y = 0; y < new_width; ++y) {

			float gy = (float)y / (new_width) * (image.cols );
			int gxi = (int)gx;
			int gyi = (int)gy;
			if (gx > image.rows - 1 ) {
				gx = image.rows - 1;
			}
			if (gy > image.cols - 1)
				gy = image.cols - 1;
			int c00 = image.at<uchar>(gxi, gyi);
			int c10 = image.at<uchar>(gxi + 1, gyi);
			int c01 = image.at<uchar>(gxi, gyi + 1);
			int c11 = image.at<uchar>(gxi + 1, gyi + 1);

			uint8_t red = (uint8_t)blerp(c00, c10, c01, c11, gx - gxi, gy - gyi);
			//uint8_t green = (uint8_t)blerp(c00.green, c10.green, c01.green, c11.green, gx - gxi, gy - gyi);
			//uint8_t blue = (uint8_t)blerp(c00.blue, c10.blue, c01.blue, c11.blue, gx - gxi, gy - gyi);
			new_image.at<uchar>(x,y) = red;
		}
	}
	return new_image;
}
void testPyrUp()
{
	Mat img = imread("Lena.png", -1);
	//下采样
	Mat down;
	pyrDown(img, down, Size(img.cols / 2, img.rows / 2));

	Mat temp;
	GaussianBlur(img, temp, Size(5, 5), 1);
	Mat down1 = resize(temp, 128, 128);
	//上采样
	Mat dup1 = resize(down, 256, 256);
	GaussianBlur(dup1, dup1, Size(3, 3), 1);

	Mat dup2;
	pyrUp(down, dup2, Size(256, 256));
	Mat diff = dup1 - dup2;
}
5. 参考文献
[1] 图像金字塔,原理、实现及应用
[2] 图像上采样算法(双线性插值)的实现
[3] 常见图像插值算法的原理与C++实现
[4] 图像的三次B样条插值原理与C++实现
[5] OpenCV图像金字塔


 767
767


 被折叠的 条评论
为什么被折叠?
被折叠的 条评论
为什么被折叠?
 到【灌水乐园】发言


