


目录
一、小程序标签
1.1 view
这个标签相当于div
它的特点就是在没有其他样式影响的情况下,宽度100%
1.2 text
这个标签相当于span、h1~h6、p...
它的特点就是在没有其他样式影响的情况下,不会独占一行,宽和高由内容撑开,这个时候你设置宽高是没有用的
1.3 image
图片组件。src里面可以放网络地址和本地图片地址
1.4 button
按钮组件
1.5 input
输入框组件
1.6 navigator
页面链接页面导航 在小程序中除了在tabbar中设置页面跳转之外 还可以通过navigator组件来控制页面的跳转 (因为tabbar只能控制5个页面的跳转但是在一个项目中 页面的数量肯定是大于5个的 而且 tabbar只能在页面的最下面显示 不够灵活 所以我们除了这tabbar跳转之外还要学习navigator
<!--pages/home/home.wxml-->
<text>pages/home/home.wxml</text>
<navigator url="../all/all" open-type="redirect">点我去详情页面</navigator>

<!-- navigator页面链接这个导航  默认只能跳转到  没有在tabbar绑定过的页面 -->
<!-- <navigator url="../user/user" >点我去用户页面</navigator> -->

<!-- 那么默认没有办法跳转 但是我就是想跳转怎么办?  那么在此时就要给当前这个跳转
组件添加他的open-type属性  并且写入switchTab属性值  这个属性值的意思就是跳转tabbar页面
 -->
<navigator url="../user/user"  open-type="switchTab">点我去用户页面</navigator>
二、小程序事件
2.1 事件分类
事件分为冒泡事件和非冒泡事件:
-
冒泡事件bind:当一个组件上的事件被触发后,该事件会向父节点传递。
-
非冒泡事件catch:当一个组件上的事件被触发后,该事件不会向父节点传递
| 类型 | 触发条件 | 最低版本 |
|---|---|---|
| touchstart | 手指触摸动作开始 | |
| touchmove | 手指触摸后移动 | |
| touchcancel | 手指触摸动作被打断,如来电提醒,弹窗 | |
| touchend | 手指触摸动作结束 | |
| tap | 手指触摸后马上离开 | |
| longpress | 手指触摸后,超过350ms再离开,如果指定了事件回调函数并触发了这个事件,tap事件将不被触发 | 1.5.0 |
| longtap | 手指触摸后,超过350ms再离开(推荐使用 longpress 事件代替) | |
| transitionend | 会在 WXSS transition 或 wx.createAnimation 动画结束后触发 | |
| animationstart | 会在一个 WXSS animation 动画开始时触发 | |
| animationiteration | 会在一个 WXSS animation 一次迭代结束时触发 | |
| animationend | 会在一个 WXSS animation 动画完成时触发 | |
| touchforcechange | 在支持 3D Touch 的 iPhone 设备,重按时会触发 |
2.2 函数参数传递
1.使用data-xxx的方式在事件的组件上面添加一个自定义事件
<!-- 小程序中 如果我们要完成函数的参数传递  那么我们需要使用data-自定义属性的方式来完成 -->
<button data-xiaoming="我是参数" catchtap="fun">点我调用函数传递参数</button>
2.在函数中使用event事件对象来得到标签上面的属性
  fun(event){
    console.log("我是一个函数么么哒",event.currentTarget.dataset.xiaoming);
  },
三、设备api
wx.stopBluetoothDevicesDiscovery(Object object) | 微信开放文档
四、位置api
wx.stopLocationUpdate(Object object) | 微信开放文档
五、配置开发者权限
我们在开发小程序的时候 如果这个项目不是我们写的 那么就需要让别人吧我们加入到小程序的开发列队中
告诉你们的项目经理让他把你们进行添加
让项目的管理员 登录微信公众平台-----》选择管理下面的成员管理----》项目成员 点击编辑 添加你为开发者权限即可
六、分包/拆包---subpackages
在微信小程序中 单个文件的体积不能大于2mb 如果大于2mb 那么我们的项目就没有办法正常的预览与提交上线
那么我们就可以通过分包 来吧原来一个项目大于2mb的 通过分包分成多个 那么每一个就可以小于2mb正常预览预提交
七、上线
用户登录
八、vant weapp的引入
vant weapp-小程序vant版文档:Vant Weapp - 轻量、可靠的小程序 UI 组件库
1、打开调试器终端,安装vant weapp:
npm init -y
# 通过 npm 安装
npm i @vant/weapp -S --production# 或者 通过 yarn 安装
yarn add @vant/weapp --production
2、将 app.json 中的 "style": "v2" 删除,小程序的新版基础组件强行加上了许多样式,难以覆盖,不关闭将造成部分组件样式混乱。
3、修改 project.config.json
把packNpmManually的值改成 "packNpmManually": true,
把 packNpmRelationList ,添加两个项
"packNpmManually": true,
"packNpmRelationList": [{
    "packageJsonPath": "./package.json",
    "miniprogramNpmDistDir": "./"
}],
4、构建npm包
打开微信开发者工具,点击 工具 -> 构建 npm,
点击右侧详情--> 本地设置 --> 并勾选 使用 npm 模块 选项,
构建完成后,即可引入组件。
九、自定义tabbar
9.1、添加自定义配置项
app.json中配置默认tabbar:
"tabBar": {
    "color":"#666",
    "selectedColor": "#8B0000",
    "list": [{
      "pagePath": "pages/home/home",
      "text": "首页"
    },{
      "pagePath": "pages/topic/topic",
      "text": "专题"
    }]
},
想要配置自定义tabbar,tabBar中需要添加属性
"custom": true,
且在pages中需要配置路径(官方要求,不能改变)
"custom-tab-bar/index"
9.2、配合UI组件库
文档:Vant Weapp - 轻量、可靠的小程序 UI 组件库
在custom-tab-bar/index.json中:
"usingComponents": {
  "van-tabbar": "@vant/weapp/tabbar/index",
  "van-tabbar-item": "@vant/weapp/tabbar-item/index"
}
在custom-tab-bar/index.wxml中:
<van-tabbar active="{{ active }}" bind:change="onChange">
  <van-tabbar-item icon="home-o">标签</van-tabbar-item>
  <van-tabbar-item icon="search">标签</van-tabbar-item>
  <van-tabbar-item icon="friends-o">标签</van-tabbar-item>
  <van-tabbar-item icon="setting-o">标签</van-tabbar-item>
</van-tabbar>
9.3、自定义tabbar配合UI组件库的基本配置
此时上面代码需要遍历出来,所以,在custom-tab-bar/index.js中准备好数据:
Component({
  data:{
    tabbarArr:[{
      "pagePath": "/pages/home/home",
      "text": "首页",
      "icon":"home-o"
    },{
      "pagePath": "/pages/topic/topic",
      "text": "专题",
      "icon":"user-o"
    }],
    // 当前项
    active: 0,
  },
  methods:{
    onChange(event) {
    console.log(event.detail);
      // event.detail 的值为当前选中项的索引
      this.setData({ active: event.detail });
    },
  }
})
在custom-tab-bar/index.wxml中:
<van-tabbar active="{{ active }}" bind:change="onChange">
  <van-tabbar-item icon="{{item.icon}}" wx:for="{{tabbarArr}}" wx:key="index">{{item.text}}</van-tabbar-item>
</van-tabbar>
9.4、改成我们自己的内容
先把custom-tab-bar/index.js中的tabbarArr数组填写完整:
[{
    pagePath: "/pages/home/home",
    text: "首页",
    icon: 'home-o'
}, {
    pagePath: "/pages/topic/topic",
    text: "专题",
    icon: 'label-o'
}, {
    pagePath: "/pages/category/category",
    text: "分类",
    icon: 'apps-o'
}, {
    pagePath: "/pages/cart/cart",
    text: "购物车",
    icon: 'cart-o'
}, {
    pagePath: "/pages/user/user",
    text: "用户",
    icon: 'user-o'
}],
app.json中也配好:
	"list": [{
      "pagePath": "pages/home/home",
      "text": "首页"
    }, {
      "pagePath": "pages/topic/topic",
      "text": "专题"
    }, {
      "pagePath": "pages/category/category",
      "text": "分类"
    }, {
      "pagePath": "pages/cart/cart",
      "text": "购物车"
    }, {
      "pagePath": "pages/user/user",
      "text": "用户"
    }]
custom-tab-bar/index.wxml中补充颜色:
<van-tabbar active="{{ active }}" bind:change="onChange" active-color="#8B0000"
  inactive-color="#666">
  <van-tabbar-item icon="{{item.icon}}" wx:for="{{tabbarArr}}" wx:key="index">{{item.text}}</van-tabbar-item>
</van-tabbar>
回到custom-tab-bar/index.js中,书写切换tab栏的格式:
methods:{
    onChange(event) {
      console.log(event.detail);
      // event.detail 的值为当前选中项的索引
      this.setData({ active: event.detail });

      // 切换tabbar
      wx.switchTab({
        url: this.data.tabbarArr[event.detail].pagePath,
      })
    },
}
但目前只能切换,当前样式还是有问题(active被重置了),需要在进入到这个页面的时候修改这个active的值为对应的索引值,有几组页面就去那几个页面的xx.js里面的onShow()修改对应的active:下标
onShow: function () {
this.getTabBar().setData({
active:0
})
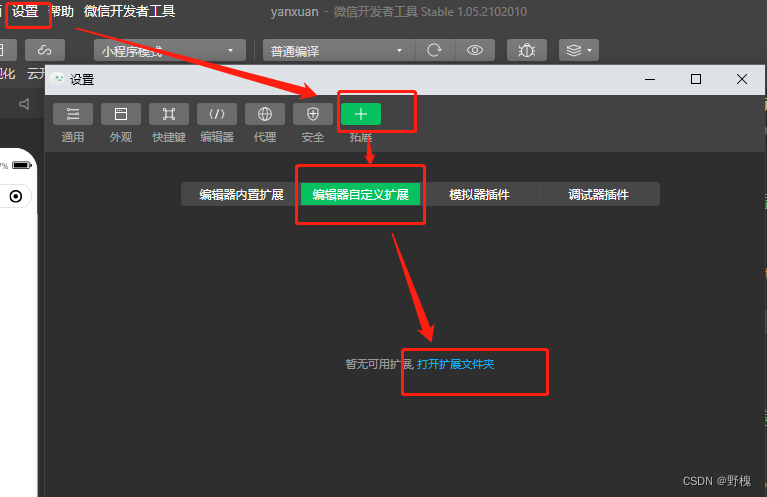
},十、微信开发者中配置Less
10.1、安装和启动扩展
VScode中配置安装 Easy LESS扩展:
来到微信开发者工具,打开扩展文件夹:
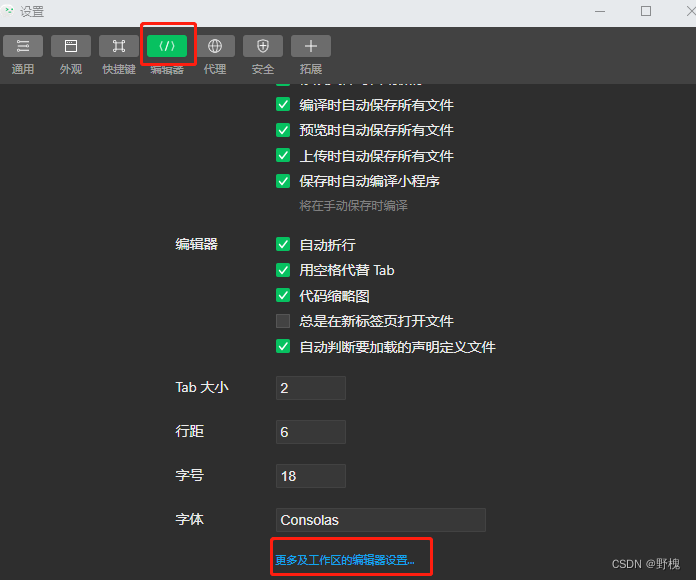
10.2、配置less
此时还需要配置less,编译成.wxss的后缀,才能使用:
!!!!!!!先重启微信开发者工具(因为刚刚添加了新扩展,需要初始化)
然后:
搜索:easy-less
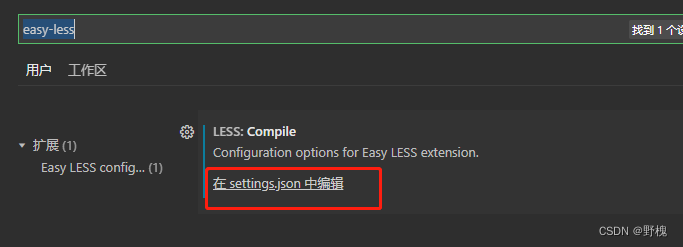
点进去添加outExt配置项:
   "less.compile": {
        "outExt":".wxss"
    }
10.3、书写less
在home目录下新建home.less,书写less语法,保存编译进行测试即可。


 5073
5073


 被折叠的 条评论
为什么被折叠?
被折叠的 条评论
为什么被折叠?
 到【灌水乐园】发言


