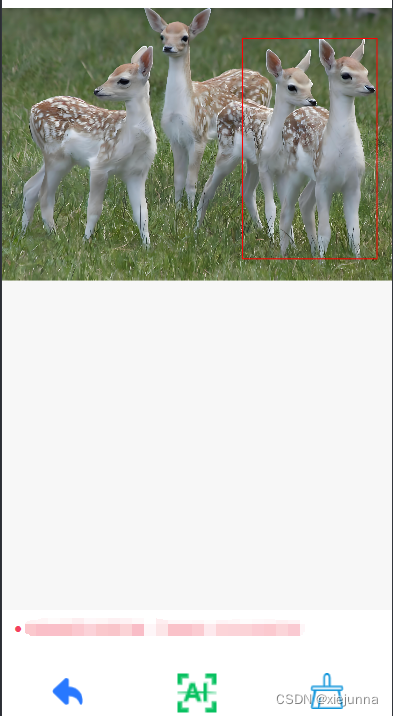
微信小程序画布显示图片绘制矩形选区

在这里插入图片描述

wxml

<view class="page-body">
  <!-- 画布 -->
  <view class="page-body-wrapper">
    <canvas canvas-id="myCanvas" type="2d" id="myCanvas" class='myCanvas' bindtouchstart="touchStart" bindtouchmove="touchMove" bindtouchend="touchEnd"></canvas>
  </view>
  <!-- 操作 -->
  <view class="layout-bottom">
    <view class="page-bottom">
      <view class="pbottom pmiddle" bindtap="pre">
        <image src="/images/next2.png" style="height: 65rpx; width: 65rpx; " mode="aspectFit"></image>
        <view class="pictureBottomArea"><p>返回</p></view>
      </view>
      <view class="pbottom pmiddle" bindtap="detection">
        <image src="{{sbUrl}}" style="height: 100rpx; width: 100rpx; " mode="aspectFit"></image>
        <view class="pictureBottomArea1"><p>识别</p></view>
      </view>
      <view class="pbottom pmiddle" bindtap="clear">
        <image src="/images/qc3.png" style="height: 70rpx; width: 70rpx; " mode="aspectFit"></image>
        <view class="pictureBottomArea"><p>清除选区</p></view>
      </view>
    </view>
  </view>
</view>

wxss

.myCanvas { background-color: #F7F7F7; width: 100vw; height: 100vh; }
page { width: 100%; height: 100%; padding: 0; margin: 0; background-color: #F8F8F8; font-size: 32rpx; line-height: 1.6; display: flex; display: -webkit-flex; flex-direction: column; flex-wrap: wrap; justify-content: center; align-items: center; }
.page-body { width: 100%; height: 100%; padding: 0; margin: 0; }  .page-body-wrapper { width: 100%; height: 80%; display: flex; flex-direction: column; align-items: center; width: 100%; }
.layout-bottom { width: 100%; height: 20%; background-color: white; }
.page-bottom { width: 100%; height: 75%; display: flex; display: -webkit-flex; flex-direction: row; flex-wrap: wrap; justify-content: center; align-items: center; }
.pbottom { width: 33.333333333%; height: 100%; }
.pmiddle{ display: flex; display: -webkit-flex; flex-direction: column; flex-wrap: wrap; justify-content: center; align-items: center; }
.pictureBottomArea { margin-top: 15rpx; font-size: small; }
.pictureBottomArea1 { font-size: 0.9rem; letter-spacing:4rpx; font-weight: 600; color: #585858; }

js

图片适配画布显示,关键在于计数图片缩放比例


// 定义变量
let startX, startY, endX, endY, rectWidth, rectHeight

Page({
  data: {
    drawWidth: 0,
    drawHeight: 0,
    drawX: 0,
    drawY: 0,
    ratio: 0,//缩放比例
    sbUrl: '/images/a2.png',//按钮
    imgSrc: '/images/ll.png',
    area: [],
    ctx: null,
    canvas: null,
    drawimage: null,
  },
  
  onLoad(options) {
    startX = 0
    startY = 0
    endX = 0
    endY = 0
    rectWidth = 0
    rectHeight = 0
    //把图片绘制到画布上
    this.drawImage(this.data.imgSrc)
  },

  //把图片绘制到画布上
  drawImage(imgSrc){
    let _this = this
    wx.createSelectorQuery().select('#myCanvas').fields({ node: true, size: true }).exec((res0) => {
      //获取canvas宽高
      const canvas = res0[0].node
      console.log(canvas)
      let ctx = canvas.getContext('2d');
      const cw = res0[0].width
      const ch = res0[0].height
      console.log('Canvas宽度:'+cw, 'Canvas高度:'+ch)

      const dpr = wx.getSystemInfoSync().pixelRatio
      console.log(dpr)
      
      canvas.width = cw * dpr     // 获取宽
      canvas.height = ch * dpr  // 获取高
      console.log(cw * dpr, ch * dpr)
      ctx.scale(dpr, dpr)

      wx.getImageInfo({
        src: imgSrc,
        success: function (res) {
          //获取图片宽高
          let iw = res.width
          let ih = res.height
          console.log('图片宽度:'+iw, '图片高度:'+ih);

          // 计算绘制位置,保持原始比例
          let ratio = Math.min(cw / iw, ch / ih);
          console.log(ratio)
          // 图片适配画布显示,关键在于计数图片缩放比例
          let drawWidth = iw * ratio;
          let drawHeight = ih * ratio;
          console.log('图片缩放后宽度:'+drawWidth, '图片缩放后高度:'+drawHeight);
          let drawX = (cw - drawWidth) / 2;
          let drawY = (ch - drawHeight) / 2;

          // 到这里就可以直接绘制
          let image = canvas.createImage();//创建iamge实例
          image.src = imgSrc;  // 引入本地图片
          image.onload = function () {
            ctx.drawImage(image, 0, 0, drawWidth, drawHeight);
          }

          _this.setData({drawWidth: drawWidth,drawHeight: drawHeight,drawX: drawX,drawY: drawY,  ratio: ratio,ctx: ctx,canvas: canvas,drawimage: image})
        },
        fail: function (res) {
          console.error('获取图片信息失败', res);
        }
      });
    })
  },

  // 触摸开始事件
  touchStart(e) {
    startX = e.touches[0].x
    startY = e.touches[0].y
    console.log("触摸开始事件", e.touches[0], startX, startY)
  },

  // 触摸移动事件
  touchMove(e) {
    let imgSrc = this.data.imgSrc
    let drawWidth = this.data.drawWidth
    let drawHeight = this.data.drawHeight
    let ctx = this.data.ctx
    let image = this.data.drawimage

    endX = e.touches[0].x
    endY = e.touches[0].y

    ctx.clearRect(0, 0, drawWidth, drawHeight)
    ctx.drawImage(image, 0, 0, drawWidth, drawHeight);
    
    rectWidth = endX - startX
    rectHeight = endY - startY
    ctx.strokeRect(startX, startY, rectWidth, rectHeight)
    ctx.strokeStyle = 'red'
    ctx.stroke()
  },

  // 触摸结束事件
  touchEnd(e) {
    // 绘制完成后的操作
    // 可以将坐标框的位置和大小保存到全局变量或发送给服务器等
    console.log("触摸结束事件",e.changedTouches[0])
  },

  //清除绘制的图形
  clear(){
    console.log("清除绘制")
    let imgSrc = this.data.imgSrc
    let drawWidth = this.data.drawWidth
    let drawHeight = this.data.drawHeight
    let ctx = this.data.ctx
    let image = this.data.drawimage
    ctx.clearRect(0, 0, drawWidth, drawHeight)
    ctx.drawImage(image, 0, 0, drawWidth, drawHeight);
    startX = 0
    startY = 0
    endX = 0
    endY = 0
    rectWidth = 0
    rectHeight = 0
  },
  // 识别
  detection(e){
    console.log("开始识别")
    let ratio = this.data.ratio
    //获取绘制选区的相关信息,这里要除以图片缩放比例,才是真是图片上的框选区
    if (rectWidth != 0 && rectHeight != 0){
        console.log('矩形','x='+startX/ratio,'y='+startY/ratio,'Width='+rectWidth/ratio,'Height='+rectHeight/ratio)
     }

  },
  //上一页
  pre(){
    console.log("上一页")
  }
})

  • 4
    点赞
  • 2
    收藏
    觉得还不错? 一键收藏
  • 0
    评论
微信小程序的toast是一种轻量级的提示框组件,一般用于展示简短的文字信息。然而,toast组件并不支持直接显示图片。不过我们可以通过一些技巧间接实现在toast中显示图片的效果。 一种常用的方法是在toast中使用自定义的图标,而不是直接显示图片。我们可以使用Font Awesome等图标库中的图标,然后在toast中设置相应的图标类名,从而实现在toast中显示图标的效果。这个图标可以是一个代表图片的图标,这样就能给用户一个视觉上的提示,让用户知道图片相关的内容。 另一种方法是结合toast组件和一个自定义的弹窗组件来实现。我们可以使用弹窗组件来展示图片,并设置一个透明的背景色,从而实现类似于toast的效果。在弹窗中展示图片后,我们可以设置一个定时器,在一定的时间后关闭弹窗,从而达到toast显示图片的效果。 除此之外,我们还可以考虑使用其他的提示组件,如基于canvas等技术实现的自定义提示组件,从而实现在微信小程序中直接在toast中显示图片的效果。这种方式相对来说比较复杂,需要开发者自己实现,并且可能会涉及到一些底层的API或者库的使用。 综上所述,微信小程序的toast组件本身并不支持直接显示图片,但我们可以通过一些技巧或者组合其他的组件来实现在toast中显示图片的效果。开发者可以根据自己的需求和技术水平选择合适的方法来实现这个功能。

“相关推荐”对你有帮助么?

  • 非常没帮助
  • 没帮助
  • 一般
  • 有帮助
  • 非常有帮助
提交
评论
添加红包

请填写红包祝福语或标题

红包个数最小为10个

红包金额最低5元

当前余额3.43前往充值 >
需支付:10.00
成就一亿技术人!
领取后你会自动成为博主和红包主的粉丝 规则
hope_wisdom
发出的红包
实付
使用余额支付
点击重新获取
扫码支付
钱包余额 0

抵扣说明:

1.余额是钱包充值的虚拟货币,按照1:1的比例进行支付金额的抵扣。
2.余额无法直接购买下载,可以购买VIP、付费专栏及课程。

余额充值