


环境准备
创建java工程
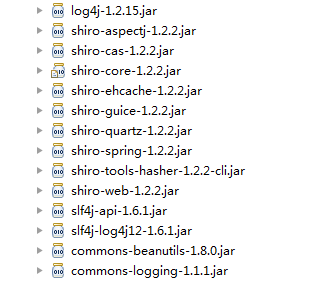
需要的jar包
- 大家也可以使用maven,参考官网
什么是Realm
在我所看的学习资料中,关于Realm的定义,写了整整一长串,但是对于初学者来说,看定义实在是太头疼了。
对于什么是Realm,我使用过之后,个人总结一下:shiro要进行身份验证,就要从realm中获取相应的身份信息来进行验证,简单来说,我们可以自行定义realm,在realm中,从数据库获取身份信息,然后和 用户输入的身份信息进行匹配。这一切都由我们自己来定义。
为什么要用Realm
在Shiro学习笔记(1)——shiro入门中,我们将身份信息(用户名/密码/角色/权限)写在配置文件中,但是实际开发中,这些身份信息应该保存在数据中,因此我们需要自定义Realm来从数据中获取身份信息,进行验证。
自定义Realm
- 定义一个MyRealm,继承
AuthorizingRealm
package com.shiro.realm;import java.util.HashSet;import java.util.Set;import org.apache.shiro.authc.AuthenticationException;import org.apache.shiro.authc.AuthenticationInfo;import org.apache.shiro.authc.AuthenticationToken;import org.apache.shiro.authc.IncorrectCredentialsException;import org.apache.shiro.authc.SimpleAuthenticationInfo;import org.apache.shiro.authc.UnknownAccountException;import org.apache.shiro.authc.UsernamePasswordToken;import org.apache.shiro.authz.AuthorizationInfo;import org.apache.shiro.authz.SimpleAuthorizationInfo;import org.apache.shiro.realm.AuthorizingRealm;import org.apache.shiro.realm.Realm;import org.apache.shiro.subject.PrincipalCollection;import org.slf4j.Logger;import org.slf4j.LoggerFactory;public class MyRealm1 extends AuthorizingRealm{ private static final transient Logger log = LoggerFactory.getLogger(Main.class); /** * 获取身份信息,我们可以在这个方法中,从数据库获取该用户的权限和角色信息 */ @Override protected AuthorizationInfo doGetAuthorizationInfo(PrincipalCollection principals) { log.info("----------doGetAuthorizationInfo方法被调用----------"); String username = (String) getAvailablePrincipal(principals); //我们可以通过用户名从数据库获取权限/角色信息 SimpleAuthorizationInfo info = new SimpleAuthorizationInfo(); //权限 Set<String> s = new HashSet<String>(); s.add("printer:print"); s.add("printer:query"); info.setStringPermissions(s); //角色 Set<String> r = new HashSet<String>(); r.add("role1"); info.setRoles(r); return info; } /** * 在这个方法中,进行身份验证 */ @Override protected AuthenticationInfo doGetAuthenticationInfo( AuthenticationToken token) throws AuthenticationException { //用户名 String username = (String) token.getPrincipal(); log.info("username:"+username); //密码 String password = new String((char[])token.getCredentials()); log.info("password:"+password); //从数据库获取用户名密码进行匹配,这里为了方面,省略数据库操作 if(!"admin".equals(username)){ throw new UnknownAccountException(); } if(!"123".equals(password)){ throw new IncorrectCredentialsException(); } //身份验证通过,返回一个身份信息 AuthenticationInfo aInfo = new SimpleAuthenticationInfo(username,password,getName()); return aInfo; }}
- 1
- 2
- 3
- 4
- 5
- 6
- 7
- 8
- 9
- 10
- 11
- 12
- 13
- 14
- 15
- 16
- 17
- 18
- 19
- 20
- 21
- 22
- 23
- 24
- 25
- 26
- 27
- 28
- 29
- 30
- 31
- 32
- 33
- 34
- 35
- 36
- 37
- 38
- 39
- 40
- 41
- 42
- 43
- 44
- 45
- 46
- 47
- 48
- 49
- 50
- 51
- 52
- 53
- 54
- 55
- 56
- 57
- 58
- 59
- 60
- 61
- 62
- 63
- 64
- 65
- 66
- 67
- 68
- 69
- 70
- 71
- 72
- 73
- 让我们定义的Realm起作用,就要在配置文件中配置(shiro-realm.ini)
#声明一个realm MyRealm1=com.shiro.realm.MyRealm1 #指定securityManager的realms实现 securityManager.realms=$MyRealm1
- 1
- 2
- 3
- 4
- 测试
package com.shiro.realm;import org.apache.shiro.SecurityUtils;import org.apache.shiro.authc.AuthenticationException;import org.apache.shiro.authc.IncorrectCredentialsException;import org.apache.shiro.authc.LockedAccountException;import org.apache.shiro.authc.UnknownAccountException;import org.apache.shiro.authc.UsernamePasswordToken;import org.apache.shiro.config.IniSecurityManagerFactory;import org.apache.shiro.mgt.SecurityManager;import org.apache.shiro.subject.Subject;import org.apache.shiro.util.Factory;import org.slf4j.Logger;import org.slf4j.LoggerFactory;public class Main { private static final transient Logger log = LoggerFactory.getLogger(Main.class); public static void main(String[] args) { //获取SecurityManager的实例 Factory<SecurityManager> factory = new IniSecurityManagerFactory("classpath:shiro-realm.ini"); SecurityManager securityManager = factory.getInstance(); SecurityUtils.setSecurityManager(securityManager); Subject currenUser = SecurityUtils.getSubject(); //如果还未认证 if(!currenUser.isAuthenticated()){ UsernamePasswordToken token = new UsernamePasswordToken("admin","123"); token.setRememberMe(true); try { currenUser.login(token); } catch (UnknownAccountException uae) { log.info("没有该用户: " + token.getPrincipal()); } catch (IncorrectCredentialsException ice) { log.info( token.getPrincipal() + " 的密码不正确!"); } catch (LockedAccountException lae) { log.info( token.getPrincipal() + " 被锁定 ,请联系管理员"); }catch (AuthenticationException ae) { //其他未知的异常 } } if(currenUser.isAuthenticated()) log.info("用户 "+currenUser.getPrincipal() +" 登录成功"); //是否有role1这个角色 if(currenUser.hasRole("role1")){ log.info("有角色role1"); }else{ log.info("没有角色role1"); } //是否有对打印机进行打印操作的权限 if(currenUser.isPermitted("printer:print")){ log.info("可以对打印机进行打印操作"); }else { log.info("不可以对打印机进行打印操作"); } }}
- 1
- 2
- 3
- 4
- 5
- 6
- 7
- 8
- 9
- 10
- 11
- 12
- 13
- 14
- 15
- 16
- 17
- 18
- 19
- 20
- 21
- 22
- 23
- 24
- 25
- 26
- 27
- 28
- 29
- 30
- 31
- 32
- 33
- 34
- 35
- 36
- 37
- 38
- 39
- 40
- 41
- 42
- 43
- 44
- 45
- 46
- 47
- 48
- 49
- 50
- 51
- 52
- 53
- 54
- 55
- 56
- 57
- 58
- 59
- 60
- 61
- 62
- 63
- 64
- 测试结果

从结果截图中,我们可以看到,自定义的Realm中的
doGetAuthorizationInfo方法被调用了两次,并且分别在currenUser.hasRole()和currenUser.isPermitted方法调用时调用
散列算法支持
一般我们存入数据库的密码都是通过加密的,比如将“原密码+盐”进行一次或多次MD5计算,shiro提供了对散列算法的支持
package com.shiro.realm;import org.apache.shiro.authc.AuthenticationException;import org.apache.shiro.authc.AuthenticationInfo;import org.apache.shiro.authc.AuthenticationToken;import org.apache.shiro.authc.SimpleAuthenticationInfo;import org.apache.shiro.authz.AuthorizationInfo;import org.apache.shiro.realm.AuthorizingRealm;import org.apache.shiro.subject.PrincipalCollection;import org.apache.shiro.util.ByteSource;public class UserRealm extends AuthorizingRealm { private String salt = "hehe";//盐 @Override protected AuthorizationInfo doGetAuthorizationInfo(PrincipalCollection arg0) { // TODO Auto-generated method stub return null; } @Override protected AuthenticationInfo doGetAuthenticationInfo( AuthenticationToken token) throws AuthenticationException { //用户输入的用户名 String username = (String) token.getPrincipal(); //如果数据库中没有这个用户,则返回null,登录失败 if(!username.equals("xiaozhou")) return null; //从数据库中查询密码 String password = "42029a889cc26562c986346114c02367"; SimpleAuthenticationInfo info = new SimpleAuthenticationInfo(username, password, ByteSource.Util.bytes(salt), getName()); return info; }}
- 1
- 2
- 3
- 4
- 5
- 6
- 7
- 8
- 9
- 10
- 11
- 12
- 13
- 14
- 15
- 16
- 17
- 18
- 19
- 20
- 21
- 22
- 23
- 24
- 25
- 26
- 27
- 28
- 29
- 30
- 31
- 32
- 33
- 34
- 35
- 36
- 37
- 38
- 39
- 40
使用MD5的realm和一般的realm没有太多区别,唯一的区别在于:不使用散列算法(即对密码加密)的话,从数据库查询出来的密码是明文,否则查询出来的是密文,我们没法使用密文来直接比对判断密码是否正确,为了让shiro自动帮我们先加密再比对,我们要在配置文件ini中告诉shiro使用什么算法
[main]#密码匹配器credentialsMatcher=org.apache.shiro.authc.credential.HashedCredentialsMatcher#匹配器使用md5credentialsMatcher.hashAlgorithmName=md5#进行几次散列(用md5算法做几次运算)credentialsMatcher.hashIterations=1#realmuserRealm=com.shiro.realm.UserRealm#该realm使用的匹配器是哪个userRealm.credentialsMatcher=$credentialsMatcher#使用哪个realmsecurityManager.realms=$userRealm
- 1
- 2
- 3
- 4
- 5
- 6
- 7
- 8
- 9
- 10
- 11
- 12
- 13
- 14
多个Realm
有时候,我们需要进行多次身份验证,我们可以定义多个Realm,如同流水线一样,shiro会依次调用Realm
MyRealm1
package com.shiro.mutilrealm;import java.util.HashSet;import java.util.Set;import org.apache.shiro.authc.AuthenticationException;import org.apache.shiro.authc.AuthenticationInfo;import org.apache.shiro.authc.AuthenticationToken;import org.apache.shiro.authc.IncorrectCredentialsException;import org.apache.shiro.authc.SimpleAuthenticationInfo;import org.apache.shiro.authc.UnknownAccountException;import org.apache.shiro.authc.UsernamePasswordToken;import org.apache.shiro.authz.AuthorizationInfo;import org.apache.shiro.authz.SimpleAuthorizationInfo;import org.apache.shiro.realm.AuthorizingRealm;import org.apache.shiro.realm.Realm;import org.apache.shiro.subject.PrincipalCollection;import org.slf4j.Logger;import org.slf4j.LoggerFactory;import com.shiro.realm.Main;public class MyRealm1 extends AuthorizingRealm{ private static final transient Logger log = LoggerFactory.getLogger(Main.class); @Override protected AuthorizationInfo doGetAuthorizationInfo(PrincipalCollection principals) { String username = (String) getAvailablePrincipal(principals); //通过用户名从数据库获取权限字符串 SimpleAuthorizationInfo info = new SimpleAuthorizationInfo(); //权限 Set<String> s = new HashSet<String>(); s.add("printer:print"); s.add("printer:query"); info.setStringPermissions(s); //角色 Set<String> r = new HashSet<String>(); r.add("role1"); info.setRoles(r); return info; } @Override protected AuthenticationInfo doGetAuthenticationInfo( AuthenticationToken token) throws AuthenticationException { log.info("MyRealm1开始认证。。。。。。"); //用户名 String username = (String) token.getPrincipal(); log.info("username:"+username); //密码 String password = new String((char[])token.getCredentials()); log.info("password:"+password); //从数据库获取用户名密码进行匹配,这里为了方面,省略数据库操作 if(!"admin".equals(username)){ throw new UnknownAccountException(); } if(!"123".equals(password)){ throw new IncorrectCredentialsException(); } //身份验证通过 AuthenticationInfo aInfo = new SimpleAuthenticationInfo(username,password,getName()); return aInfo; }}
- 1
- 2
- 3
- 4
- 5
- 6
- 7
- 8
- 9
- 10
- 11
- 12
- 13
- 14
- 15
- 16
- 17
- 18
- 19
- 20
- 21
- 22
- 23
- 24
- 25
- 26
- 27
- 28
- 29
- 30
- 31
- 32
- 33
- 34
- 35
- 36
- 37
- 38
- 39
- 40
- 41
- 42
- 43
- 44
- 45
- 46
- 47
- 48
- 49
- 50
- 51
- 52
- 53
- 54
- 55
- 56
- 57
- 58
- 59
- 60
- 61
- 62
- 63
- 64
- 65
- 66
- 67
- 68
- 69
- 70
- 71
- MyRealm2和MyRealm1 代码其实基本上是一样的,直接复制一份即可。当然,如果有需求,我们可以自由地定义修改Realm。这里只做个示例而已。
配置Authenticator和AuthenticationStrategy
这两个东东是啥玩意?
上面我们配置了多个Realm进行身份验证,假设一下:MyRealm1 验证通过了,MyRealm2验证不通过怎么办,这就需要定义一个验证策略来处理这种情况。Strategy的意思就是策略。Authenticator就是验证器
配置文件(shiro-mutil-realm.ini)
#声明一个realm MyRealm1=com.shiro.mutilrealm.MyRealm1MyRealm2=com.shiro.mutilrealm.MyRealm2#配置验证器authenticator = org.apache.shiro.authc.pam.ModularRealmAuthenticator#配置策略# AllSuccessfulStrategy 表示 MyRealm1和MyRealm2 认证都通过才算通过authcStrategy = org.apache.shiro.authc.pam.AllSuccessfulStrategy#将验证器和策略关联起来authenticator.authenticationStrategy = $authcStrategy#配置验证器所使用的Realmauthenticator.realms=$MyRealm2,$MyRealm1#把Authenticator设置给securityManagersecurityManager.authenticator = $authenticator########################################################################### 1. AtLeastOneSuccessfulStrategy :如果一个(或更多)Realm 验证成功,则整体的尝试被认# 为是成功的。如果没有一个验证成功,则整体尝试失败。# 2. FirstSuccessfulStrategy 只有第一个成功地验证的Realm 返回的信息将被使用。所有进一步# 的Realm 将被忽略。如果没有一个验证成功,则整体尝试失败# 3. AllSucessfulStrategy 为了整体的尝试成功,所有配置的Realm 必须验证成功。如果没有一# 个验证成功,则整体尝试失败。# ModularRealmAuthenticator 默认的是AtLeastOneSuccessfulStrategy###########################################################################
- 1
- 2
- 3
- 4
- 5
- 6
- 7
- 8
- 9
- 10
- 11
- 12
- 13
- 14
- 15
- 16
- 17
- 18
- 19
- 20
- 21
- 22
- 23
- 24
- 25
- 26
- 27
- 28
- 29
- 验证的策略有三种,在配置文件中我用注释都写好了,就不再详细说明了
- 测试
package com.shiro.mutilrealm;import java.util.List;import org.apache.shiro.SecurityUtils;import org.apache.shiro.authc.AuthenticationException;import org.apache.shiro.authc.IncorrectCredentialsException;import org.apache.shiro.authc.LockedAccountException;import org.apache.shiro.authc.UnknownAccountException;import org.apache.shiro.authc.UsernamePasswordToken;import org.apache.shiro.config.IniSecurityManagerFactory;import org.apache.shiro.mgt.SecurityManager;import org.apache.shiro.subject.PrincipalCollection;import org.apache.shiro.subject.Subject;import org.apache.shiro.util.Factory;import org.slf4j.Logger;import org.slf4j.LoggerFactory;public class Main { private static final transient Logger log = LoggerFactory.getLogger(Main.class); public static void main(String[] args) { //获取SecurityManager的实例 Factory<SecurityManager> factory = new IniSecurityManagerFactory("classpath:shiro-mutil-realm.ini"); SecurityManager securityManager = factory.getInstance(); SecurityUtils.setSecurityManager(securityManager); Subject currenUser = SecurityUtils.getSubject(); //如果还未认证 if(!currenUser.isAuthenticated()){ UsernamePasswordToken token = new UsernamePasswordToken("admin","123"); token.setRememberMe(true); try { currenUser.login(token); } catch (UnknownAccountException uae) { log.info("没有该用户: " + token.getPrincipal()); } catch (IncorrectCredentialsException ice) { log.info( token.getPrincipal() + " 的密码不正确!"); } catch (LockedAccountException lae) { log.info( token.getPrincipal() + " 被锁定 ,请联系管理员"); }catch (AuthenticationException ae) { //其他未知的异常 } } if(currenUser.isAuthenticated()) log.info("用户 "+currenUser.getPrincipal() +" 登录成功"); //得到一个身份集合 PrincipalCollection principalCollection = currenUser.getPrincipals(); }}
- 1
- 2
- 3
- 4
- 5
- 6
- 7
- 8
- 9
- 10
- 11
- 12
- 13
- 14
- 15
- 16
- 17
- 18
- 19
- 20
- 21
- 22
- 23
- 24
- 25
- 26
- 27
- 28
- 29
- 30
- 31
- 32
- 33
- 34
- 35
- 36
- 37
- 38
- 39
- 40
- 41
- 42
- 43
- 44
- 45
- 46
- 47
- 48
- 49
- 50
- 51
- 52
- 53
- 54
- 55
- 56
- 57
- 58
- 运行结果

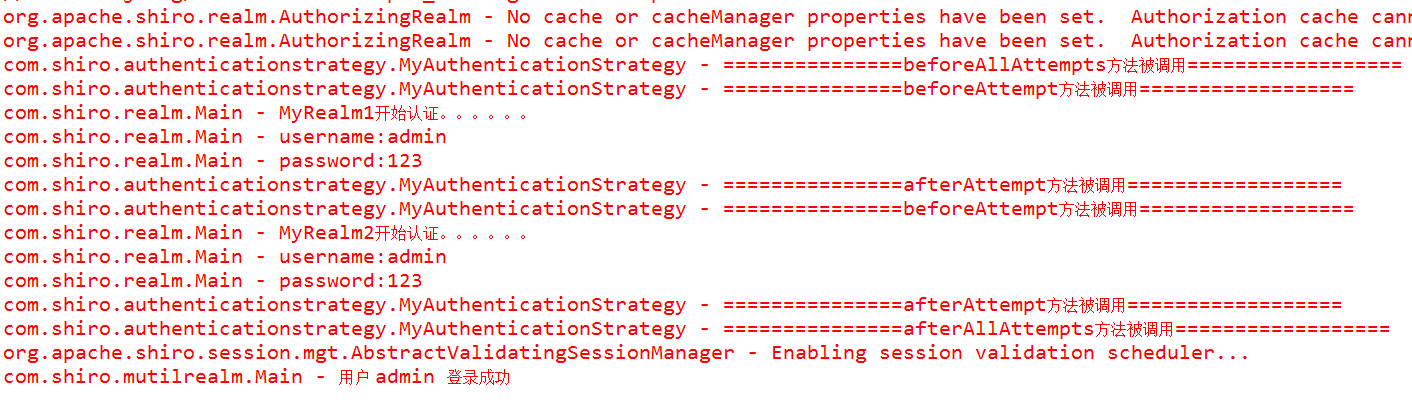
结果很明显,MyRealm1和MyRealm2依次执行
自定义AuthenticationStrategy(验证策略)
- 上面我们使用了shiro自带的AuthenticationStrategy,其实我们也可以自己定义。
package com.shiro.authenticationstrategy;import java.util.Collection;import org.apache.shiro.authc.AuthenticationException;import org.apache.shiro.authc.AuthenticationInfo;import org.apache.shiro.authc.AuthenticationToken;import org.apache.shiro.authc.pam.AbstractAuthenticationStrategy;import org.apache.shiro.realm.Realm;import org.slf4j.Logger;import org.slf4j.LoggerFactory;import com.shiro.realm.Main;public class MyAuthenticationStrategy extends AbstractAuthenticationStrategy{ private static final transient Logger log = LoggerFactory.getLogger(MyAuthenticationStrategy.class); /** * 所有Realm验证之前调用 */ @Override public AuthenticationInfo beforeAllAttempts( Collection<? extends Realm> realms, AuthenticationToken token) throws AuthenticationException { log.info("===============beforeAllAttempts方法被调用=================="); return super.beforeAllAttempts(realms, token); } /** * 每一个Realm验证之前调用 */ @Override public AuthenticationInfo beforeAttempt(Realm realm, AuthenticationToken token, AuthenticationInfo aggregate) throws AuthenticationException { log.info("===============beforeAttempt方法被调用=================="); return super.beforeAttempt(realm, token, aggregate); } /** * 每一个Realm验证之后调用 */ @Override public AuthenticationInfo afterAttempt(Realm realm, AuthenticationToken token, AuthenticationInfo singleRealmInfo, AuthenticationInfo aggregateInfo, Throwable t) throws AuthenticationException { log.info("===============afterAttempt方法被调用=================="); return super.afterAttempt(realm, token, singleRealmInfo, aggregateInfo, t); } /** * 所有Realm验证之后调用 */ @Override public AuthenticationInfo afterAllAttempts(AuthenticationToken token, AuthenticationInfo aggregate) throws AuthenticationException { log.info("===============afterAllAttempts方法被调用=================="); return super.afterAllAttempts(token, aggregate); }}
- 1
- 2
- 3
- 4
- 5
- 6
- 7
- 8
- 9
- 10
- 11
- 12
- 13
- 14
- 15
- 16
- 17
- 18
- 19
- 20
- 21
- 22
- 23
- 24
- 25
- 26
- 27
- 28
- 29
- 30
- 31
- 32
- 33
- 34
- 35
- 36
- 37
- 38
- 39
- 40
- 41
- 42
- 43
- 44
- 45
- 46
- 47
- 48
- 49
- 50
- 51
- 52
- 53
- 54
- 55
- 56
- 57
- 58
- 59
- 60
- 61
我们所继承的 AbstractAuthenticationStrategy 中,各个方法并不是抽象的,也就是说并一定要重写,我们可以根据需求重写需要的方法即可
配置文件
要让我们自定义的AuthenticationStrategy起作用,只要将上面配置文件(shiro-mutil-realm.ini)中
authcStrategy = org.apache.shiro.authc.pam.AllSuccessfulStrategy
改为authcStrategy = com.shiro.authenticationstrategy.MyAuthenticationStrategy即可测试代码不变
结果
从截图中也可以清除的看到自定义的策略中,各个方法被调用的顺序。有了这些,我们就可以随心所欲的根据需求进行操作了
多个Realm验证顺序
隐式排列
- 当你配置多个realm的时候,处理的顺序默认就是你配置的顺序。
- 这种情况通常就是只定义了realm,而没有配置securityManager的realms
显式排列
- 也就是显示的配置securityManager.realms,那么执行的顺序就是你配置该值的realm的顺序。
- 通常更推荐显示排列。
我们可以简单的理解为,多个Realm验证的顺序,就是我们配置的顺序


 1万+
1万+


 被折叠的 条评论
为什么被折叠?
被折叠的 条评论
为什么被折叠?
 到【灌水乐园】发言


