


渲染GIF
这种就是最简单的方法,不需要前端做任何事情,找UI切一张GIF动图,然后直接渲染动图就完事了。
  const myIcon = L.icon({
    iconUrl: POSITIONGIF, // 这个是动图
    iconSize: [20, 20]
  });
  const marker = L.marker([22.5, 100], {
    icon: myIcon
  }).addTo(map);
UI:我超爱你们,自己想办法搞定
控制点的透明度
在创建marker的构造当中会传递一个配置对象,这个里面就可以配置对应的透明度opacity,那么只需要去修改这个透明度的值就好了。通过定时器去一直改值即可。
const changeOpacity = (entity) => {
  let i = 1;
  let int = setInterval(() => {
    if (!entity._map) clearInterval(int);
    if (i < -1) {
      i = 1;
    }
    i = i - 0.08;
    if (i < 0) entity.setOpacity(i * -1);
    else entity.setOpacity(i);
  }, 60);
};
还可以对这段代码进行调整一下,改成用动画帧去渲染,那么也就是:
const changeOpacity = (entity) => {
  let timer = null;
  let i = 1;

  function updateAnimation() {
    if (!entity._map) return cancelAnimationFrame(timer);
    if (i < -1) {
      i = 1;
    }
    i = i - 0.01;
    if (i < 0) entity.setOpacity(i * -1);
    else entity.setOpacity(i);
    timer = requestAnimationFrame(updateAnimation);
  }

  updateAnimation();
};
本质上是一样的,只要去改变透明度即可。最后创建一个点调用这个方法来进行测试一下
const marker2 = L.marker([22.5, 110], {}).addTo(map);
changeOpacity(marker2);
// 添加平面设置透明度,这个是下面那个,先一起把代码贴上来
// const polygon = L.polygon([
//  [22, 111],
//  [20, 115],
//  [24, 118],
//  [25, 113]
// ]).addTo(map);
// changePlaneOpacity(polygon);

拓展:控制平面的透明度
在控制平面的时候和点是不一样的,平面都继承至Path对象,这个里面需要通过setStyle去设置对应的属性,所以这里进行细微的调整一下。举一反三我们同样可以通过这种方式去改变其他属性值。
function changePlaneOpacity(entity) {
  let timer = null;
  let i = 1;
  let j = 0.2; // 注意要和线的透明度同步修改,保持开始和结束时间一致
  function updateAnimation() {
    if (i < -1) {
      i = 1;
    }
    i = i - 0.01;
    if (j < -0.2) {
      j = 0.2;
    }
    j = j - 0.002; //注意要和线的透明度同步修改,保持开始和结束时间一致
    if (i < 0) entity.setStyle({opacity: i * -1, fillOpacity: j * -1});
    else entity.setStyle({opacity: i, fillOpacity: j});
    if (!entity._map) return cancelAnimationFrame(timer);
    timer = requestAnimationFrame(updateAnimation);
  }

  updateAnimation();
}
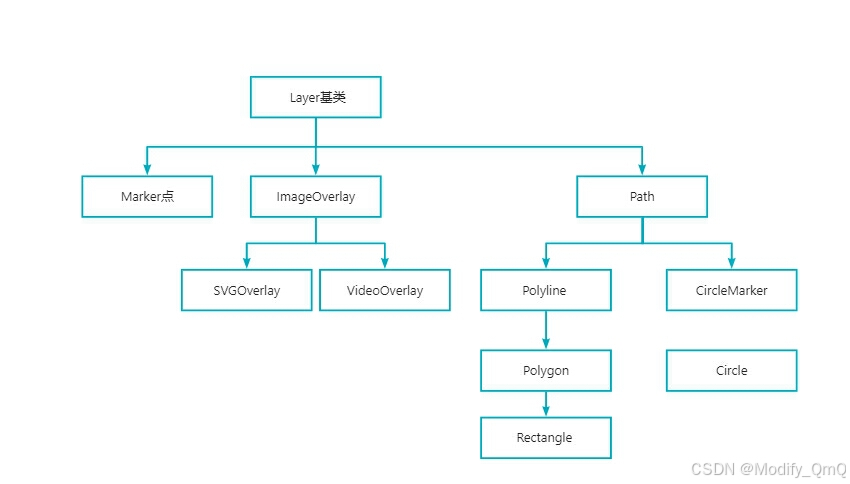
leaflet Layer继承关系
在leaflet当中可以去查看一下常用绘制图形的继承关系,其中marker对象的属性是本身自带的,那么也就可以通过直接set属性名去设置值。而平面(线、面、圆)都是继承Path对象来的,在Path对象当中设置属性需要通过setStyle去更改,这也就是为什么不能一个方法通用的原因。可以查看官网属性方法说明
leaflet-pulse-icon插件
简单使用插件,本质上就是构建出一个icon然后将这个icon作为marker标记的图标属性进行渲染
// 安装插件
// npm i @ansur/leaflet-pulse-icon
// 导入插件,同时需要把css一起导入进来
import '@ansur/leaflet-pulse-icon';
import '@ansur/leaflet-pulse-icon/dist/L.Icon.Pulse.css';
// 指定了点的大小以及外围圈的颜色
const pulsingIcon = L.icon.pulse({iconSize:[20,20],color:'red'});
const marker = L.marker([50,15],{icon: pulsingIcon}).addTo(map);
L.icon.pulse 配置说明
| 键 | 取值 | 说明 |
|---|---|---|
| iconSize | Array | 宽高 |
| color | 颜色值 | 外围颜色,默认红色 |
| fillColor | 颜色值 | 点的填充颜色,默认红色 |
| heartbeat | 数字 | 一圈渲染完成需要时间,单位为秒,默认为1 |
渲染n个随机点
// 得到随机颜色
const getRandomColor = () => {
  const r = Math.floor(Math.random() * 255);
  const g = Math.floor(Math.random() * 255);
  const b = Math.floor(Math.random() * 255);
  return `rgb(${r},${g},${b})`;
};

// 得到min和max之间的随机整数
const getRandomInt = (min, max) => {
  min = Math.ceil(min);
  max = Math.floor(max);
  return Math.floor(Math.random() * (max - min + 1)) + min;
};
const addPulseMarker = () => {
  for (let i = 0; i < 100; i++) {
    const size = getRandomInt(5, 10);
    const color = getRandomColor();
    const lat = 15 + Math.random() * 10;
    const lng = 110 + Math.random() * 10;
    const pulsingIcon = L.icon.pulse({
      iconSize: [size, size],
      color,
      fillColor: color,
      heartbeat: 1
    });
    const marker = L.marker([lat, lng], {icon: pulsingIcon}).addTo(map);
    marker.bindPopup(`<b>我的位置:${lng.toFixed(2)}, ${lat.toFixed(2)}</b><br>我的尺寸${size}.`);
  }
};

leaflet-pulse-icon插件源码透析
这个插件主要的就是前面引入的js和css文件。位置就在node_modules/@ansur/leaflet-pulse-icon/src,
L.Icon.Pulse.js
- 使用的时候会使用
L.icon.pulse在这里就是直接new了一个L.Icon.Pulse,然后传递的options配置就直接放到这里面,通过setOptions赋值 - 之后就是根据配置把对应的Dom元素给组装出来
- 最后将这个挂载到marker上也就完成了渲染
(function(window) {

    L.Icon.Pulse = L.DivIcon.extend({

        options: {
            className: '',
            iconSize: [12,12],
            fillColor: 'red',
            color: 'red',
            animate: true,
            heartbeat: 1,
        },

        initialize: function (options) {
            L.setOptions(this,options);

            // css

            var uniqueClassName = 'lpi-'+ new Date().getTime()+'-'+Math.round(Math.random()*100000);

            var before = ['background-color: '+this.options.fillColor];
            var after = [

                'box-shadow: 0 0 6px 2px '+this.options.color,

                'animation: pulsate ' + this.options.heartbeat + 's ease-out',
                'animation-iteration-count: infinite',
                'animation-delay: '+ (this.options.heartbeat + .1) + 's',
            ];

            if (!this.options.animate){
                after.push('animation: none');
                after.push('box-shadow:none');
            }

            var css = [
                '.'+uniqueClassName+'{'+before.join(';')+';}',
                '.'+uniqueClassName+':after{'+after.join(';')+';}',
            ].join('');

            var el = document.createElement('style');
            if (el.styleSheet){
                el.styleSheet.cssText = css;
            } else {
                el.appendChild(document.createTextNode(css));
            }

            document.getElementsByTagName('head')[0].appendChild(el);

            // apply css class

            this.options.className = this.options.className+' leaflet-pulsing-icon '+uniqueClassName;

            // initialize icon

            L.DivIcon.prototype.initialize.call(this, options);

        }
    });

    L.icon.pulse = function (options) {
        return new L.Icon.Pulse(options);
    };


    L.Marker.Pulse = L.Marker.extend({
        initialize: function (latlng,options) {
            options.icon = L.icon.pulse(options);
            L.Marker.prototype.initialize.call(this, latlng, options);
        }
    });

    L.marker.pulse = function (latlng,options) {
        return new L.Marker.Pulse(latlng,options);
    };

})(window);
L.Icon.Pulse.css
这个本质上也就是根据动画去改变外围圆的大小(scale)和透明度(opacity)
.leaflet-pulsing-icon {
    border-radius: 100%;
    box-shadow: 1px 1px 8px 0 rgba(0,0,0,0.75);
}

.leaflet-pulsing-icon:after {
    content: "";
    border-radius: 100%;
    height: 300%;
    width: 300%;
    position: absolute;
    margin: -100% 0 0 -100%;

}

@keyframes pulsate {
    0% {
        transform: scale(0.1, 0.1);
        opacity: 0;
        -ms-filter: "progid:DXImageTransform.Microsoft.Alpha(Opacity=0)";
        filter: alpha(opacity=0);
    }
    50% {
        opacity: 1;
        -ms-filter: none;
        filter: none;
    }
    100% {
        transform: scale(1.2, 1.2);
        opacity: 0;
        -ms-filter: "progid:DXImageTransform.Microsoft.Alpha(Opacity=0)";
        filter: alpha(opacity=0);
    }
}
实现一个leaflet-pulse-icon插件
前置知识:
- 这个插件本质上就是绘制了一个特定的Leaflet.Icon然后将Icon放到Marker当中再进行渲染
- 所以我们也只需要弄一个Icon出来就好了,可以使用
DivIcon
拓展DivIcon
使用这个可以传递一个html属性,他的值是一个HTMLElement 的实例。那么我们构建一个Dom元素放进去就好了。
var myIcon = L.divIcon({className: 'my-div-icon'});
// 你可以在 .my-div-icon CSS 中设置样式

L.marker([50.505, 30.57], {icon: myIcon}).addTo(map);
实现
在vue3当中实现,把这个单独放在一个方法当中。
- 创建dom元素并且给dom加上对应的样式(这里由于是在vue3项目当中并且用了tailwindcss部分样式就用类名代替了)
- 创建dom元素之后会根据传递的参数property的属性(color、iconSize、fillColor、speedTime)去修改对应的样式
- 最后会得到一个完整的dom,将dom通过L.divIcon就可以创建一个属于我们自己的一个icon了
export const createMyIcon = (property) => {
  // 使用js标签,便于操作,这个temDivEle的作用是将divEle通过innerHTML的方式获取为字符串
  const tempDivEle = document.createElement('div');
  const divEle = document.createElement('div');
  const spanEl = document.createElement('span');
  const aEl = document.createElement('a');
  tempDivEle.append(divEle);
  divEle.append(spanEl);
  spanEl.append(aEl);
  // 设置上基础的样式
  spanEl.classList.add('pulse-span-icon', 'w-[15px]', 'h-[15px]', 'relative', 'bg-[red]', 'inline-block', 'rounded-full');
  aEl.classList.add('dive-icon', 'rounded-full', 'absolute', 'h-[200%]', 'w-[200%]');
  // 操作样式
  var style = document.createElement('style');
  document.head.appendChild(style);
  // 主体颜色
  if (property) {
    if (property.color) {
      spanEl.style.backgroundColor = property.color;
    }
    // 标记大小
    if (property.iconSize) {
      spanEl.style.width = property.iconSize[0] + 'px';
      spanEl.style.height = property.iconSize[1] + 'px';
    }
    // 发散的color
    if (property.fillColor) {
      aEl.style.boxShadow = '0 0 6px 2px ' + property.fillColor;
    }
    // 闪烁的速度
    if (property.speedTime) {
      aEl.style.setProperty('animation', 'pulsate ' + property.speedTime + 's infinite');
    }
    aEl.style.setProperty('position', 'absolute');
    aEl.style.setProperty('z-index', '-1');
  }
  return L.divIcon({className: 'my-div-icon', html: tempDivEle.innerHTML});
};
这里还有一部分别的样式,单独定义在了css里面,并且类名也是保留了下来,后续调试可以直接通过类名去改css。
.dive-icon {
    box-shadow: 0 0 6px 2px red;
    animation-delay: 1.1s;
    animation: pulsate 2s infinite;
    margin-top: -50%;
    margin-left: -50%;
}

@keyframes pulsate {
    0% {
        transform: scale(0.1, 0.1);
        opacity: 0;
        filter: alpha(opacity=0);
    }
    50% {
        opacity: 1;
        -ms-filter: none;
        filter: none;
    }
    100% {
        transform: scale(1.2, 1.2);
        opacity: 0;
        filter: alpha(opacity=0);
    }
}
最后就是使用了,和leaflet-pulse-icon插件一样。
// 导入js和css
import {createMyIcon} from './MyLeaflet';
import './MyLeaflet.css';
// 创建icon再通过设置marker进行渲染
const icon = createMyIcon({
  iconSize: [20, 20],
  color: 'green',
  fillColor: 'blue',
  speedTime: 2
});
const marker3 = L.marker([38.5, 100], {icon}).addTo(map);
补充:后面还可以拓展其他css属性也是一样的通过options传递进去,同时还可以定义别的dom元素进行渲染


 2328
2328

 被折叠的 条评论
为什么被折叠?
被折叠的 条评论
为什么被折叠?
 到【灌水乐园】发言


