


手动实现 Spring 底层机制
1.Spring整体架构分析
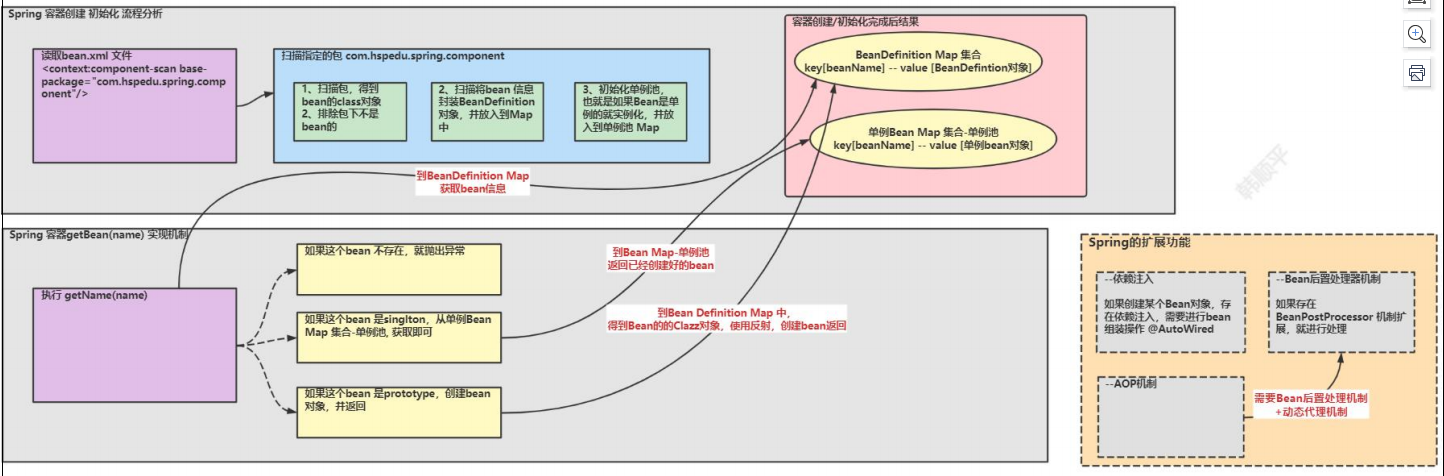
2.手动实现Spring底层机制
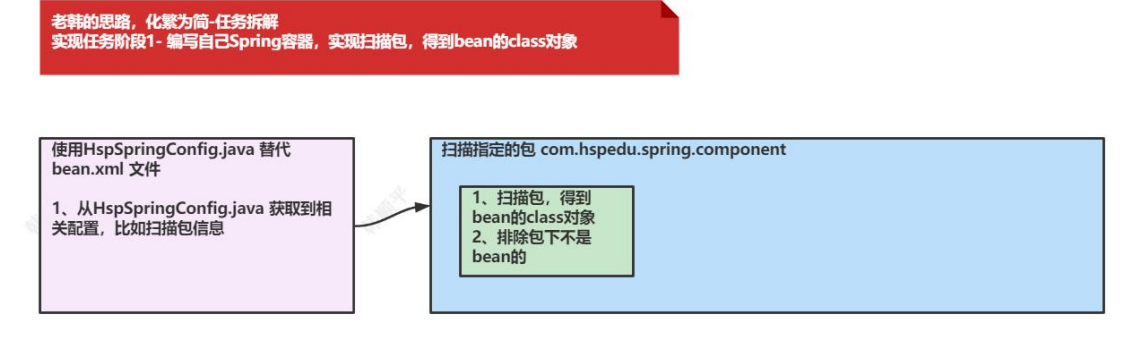
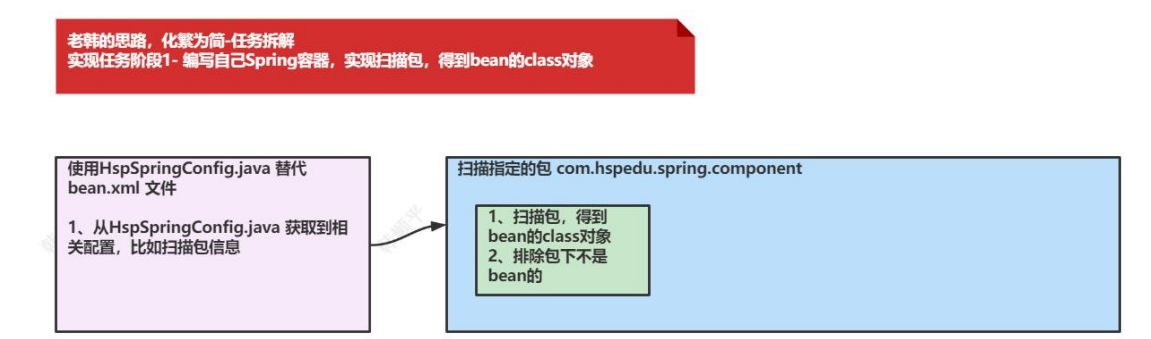
1.编写自己的Spring容器,实现扫描包,得到bean的class对象
1.补充:类加载器
● java 的类加载器 3 种
Bootstrap 类加载器--------------对应路径 jre/lib
Ext 类加载器--------------------对应路径
jre/lib/ext App 类加载器-------------------对应路径 classpath
● classpath 类路径,就是 java.exe 执行时,指定的路径,比如
这是我们运行程序的真正位置

2.分析+代码实现+测试
● 分析示意图
● 代码实现
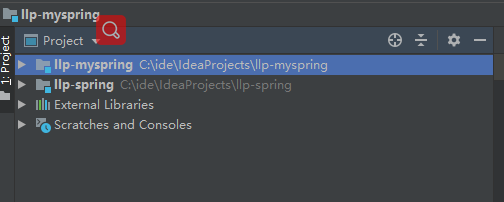
idea创建同级子模块工程

1.定义@ComponentScan包扫描注解
package com.llp.spring.annotaion;
import java.lang.annotation.*;
@Target(ElementType.TYPE)
@Retention(RetentionPolicy.RUNTIME)
@Documented
public @interface ComponentScan {
    String value() default "";
}
2.定义@Component注解
package com.llp.spring.annotaion;
import java.lang.annotation.*;
@Target({ElementType.TYPE})
@Retention(RetentionPolicy.RUNTIME)
@Documented
public @interface Component {
    //通过value给注入的bean指定名字,xml bean中的id
    String value() default "";
}
3.定义自己的spring ioc容器
配置类
package com.llp.spring.ioc;
import com.llp.spring.annotaion.ComponentScan;
/**
 * 这是一个配置类, 作用类似我们原生spring的 beans.xml 容器配置文件
 */
@ComponentScan(value = "com.llp.spring.component")
public class LLpSpringConfig {
}
自己的spring容器
package com.llp.spring.ioc;
import com.llp.spring.annotaion.Component;
import com.llp.spring.annotaion.ComponentScan;
import java.io.File;
import java.net.URL;

/**
 * 类的作用类似Spring原生ioc容器
 */
public class LLPSpringApplicationContext {
    private Class aClass;
    public LLPSpringApplicationContext(Class aClass) {
        this.aClass = aClass;
        //1.根据传入的LLpSpringApplicationConfig获取@ComponentScan注解
        ComponentScan componentScan = (ComponentScan) aClass.getAnnotation(ComponentScan.class);
        //2.获取包扫描路径
        String basePackage = componentScan.value();
        //path= com/llp/spring/component
        String path = basePackage.replace(".", "/");
        System.out.println("path= " + path);
        //得到类型加载器 ->app类加载器
        ClassLoader classLoader = LLPSpringApplicationContext.class.getClassLoader();
        //根据包路径获取目录的绝对路径
        //file:/C:/ide/IdeaProjects/llp-spring/out/production/llp-spring/com/llp/spring/component
        URL resource = classLoader.getResource(path);
        System.out.println("resource = " + resource);
        ///C:/ide/IdeaProjects/llp-spring/out/production/llp-spring/com/llp/spring/component
        String filePath = resource.getFile();
        File file = new File(filePath);
        //判断文件是否为目录
        if (file.isDirectory()) {
            //是目录,获取目录下的所有文件
            File[] files = file.listFiles();
            for (File f : files) {
                //获取每个文件的绝对路径
                String absolutePath = f.getAbsolutePath();
                System.out.println(absolutePath);
                //获取类名
                String className = absolutePath.substring(absolutePath.lastIndexOf("\\") + 1, absolutePath.indexOf(".class"));
                //拼接得到全类名
                String classFullName = basePackage + "." + className;
                try {
                    //根据类加载器获取Class对象
                    Class<?> cls = classLoader.loadClass(classFullName);
                    if (cls.isAnnotationPresent(Component.class)) {
                        System.out.println("这是一个Spring bean=" + cls + " 类名=" + className);
                    } else {
                        System.out.println("这不是一个Spring bean=" + cls + " 类名=" + className);
                    }
                } catch (Exception e) {
                    e.printStackTrace();
                }
            }
        }
    }

    //编写方法getBean(String name),编写方法返回对容器中对象
    public Object getBean(String name) {
        return null;
    }

}
2.扫描将 bean 信息封装到 BeanDefinition 对象, 并放入到 Map
● 分析示意图
● 代码实现
BeanDefinition对象
package com.llp.spring.ioc;

/**
 * 模拟Spring ioc容器中 BeanDefinitionMap中对应的每个value对象
 */
public class BeanDefinition {

    /**
     * 通过clazz拿到对应的bean信息
     */
    private Class clazz;

    /**
     * 判断对象是单例还是多例
     */
    private String scope;


    public Class getClazz() {
        return clazz;
    }

    public void setClazz(Class clazz) {
        this.clazz = clazz;
    }

    public String getScope() {
        return scope;
    }

    public void setScope(String scope) {
        this.scope = scope;
    }
}
自定义Spring ioc容器
package com.llp.spring.ioc;

import com.llp.spring.annotaion.Component;
import com.llp.spring.annotaion.ComponentScan;
import com.llp.spring.annotaion.Scope;
import org.apache.commons.lang.StringUtils;

import java.io.File;
import java.net.URL;
import java.util.concurrent.ConcurrentHashMap;

/**
 * 类的作用类似Spring原生ioc容器
 */
public class LLPSpringApplicationContext {
    /**
     * 接受配置类信息,通过配置类获取到包扫描信息
     */
    private Class configClass;

    /**
     * 定义属性BeanDefinitionMap -> 存放BeanDefinition对象
     */
    private ConcurrentHashMap<String, BeanDefinition> beanDefinitionMap = new ConcurrentHashMap<>();

    /**
     * 定义属性SingletonObjects -> 存放单例对象
     */
    private ConcurrentHashMap<String, Object> singletonObjects = new ConcurrentHashMap<>();


    public LLPSpringApplicationContext(Class aClass) {
        beanDefinitionScan(aClass);
        System.out.println(beanDefinitionMap);
    }

    /**
     * 该方法完成指定包扫描,并将bean信息封装到BeanDefinition对象,在放入到map中
     * @param configClass
     */
    public void beanDefinitionScan(Class configClass){
        this.configClass = configClass;
        //1.根据传入的LLpSpringApplicationConfig获取@ComponentScan注解
        ComponentScan componentScan = (ComponentScan) configClass.getAnnotation(ComponentScan.class);
        //2.获取包扫描路径
        String basePackage = componentScan.value();
        //path= com/llp/spring/component
        String path = basePackage.replace(".", "/");
        System.out.println("path= " + path);
        //得到类型加载器 ->app类加载器
        ClassLoader classLoader = LLPSpringApplicationContext.class.getClassLoader();
        //根据包路径获取目录的绝对路径
        //file:/C:/ide/IdeaProjects/llp-spring/out/production/llp-spring/com/llp/spring/component
        URL resource = classLoader.getResource(path);
        System.out.println("resource = " + resource);
        ///C:/ide/IdeaProjects/llp-spring/out/production/llp-spring/com/llp/spring/component
        String filePath = resource.getFile();
        File file = new File(filePath);
        //判断文件是否为目录
        if (file.isDirectory()) {
            //是目录,获取目录下的所有文件
            File[] files = file.listFiles();
            for (File f : files) {
                //获取每个文件的绝对路径
                String absolutePath = f.getAbsolutePath();
                System.out.println("absolutePath= " + absolutePath);
                //获取类名 eg:——>MonsterDao
                String className = absolutePath.substring(absolutePath.lastIndexOf("\\") + 1, absolutePath.indexOf(".class"));
                //拼接得到全类名
                String classFullName = basePackage + "." + className;
                try {
                    //根据类加载器获取Class对象
                    Class<?> cls = classLoader.loadClass(classFullName);
                    if (cls.isAnnotationPresent(Component.class)) {
                        Component componentAnnotation = cls.getDeclaredAnnotation(Component.class);
                        String beanName = componentAnnotation.value();
                        if ("".equals(beanName)) {
                            beanName = StringUtils.uncapitalize(className);
                        }
                        BeanDefinition beanDefinition = new BeanDefinition();
                        beanDefinition.setClazz(cls);
                        //判断该类上是否有@Scope注解
                        if (cls.isAnnotationPresent(Scope.class)) {
                            //得到Scope注解对象
                            Scope scope = cls.getDeclaredAnnotation(Scope.class);
                            //获取scope注解配置的值,singleton-单例,prototype-原型
                            beanDefinition.setScope(scope.value());
                        } else {
                            //默认为单例
                            beanDefinition.setScope("singleton");
                        }
                        beanDefinitionMap.put(beanName, beanDefinition);
                        System.out.println("这是一个Spring bean=" + cls + " 类名=" + className);
                    } else {
                        System.out.println("这不是一个Spring bean=" + cls + " 类名=" + className);
                    }
                } catch (Exception e) {
                    e.printStackTrace();
                }
            }
        }
    }

    //编写方法getBean(String name),编写方法返回对容器中对象
    public Object getBean(String name) {
        return null;
    }

}
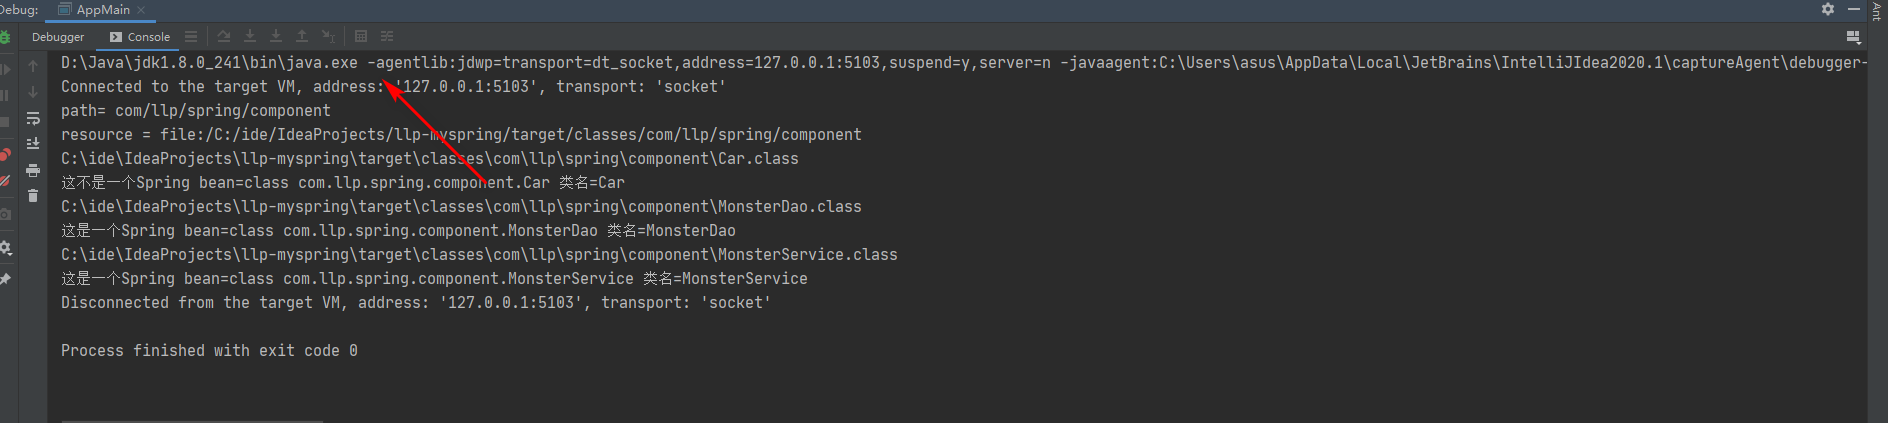
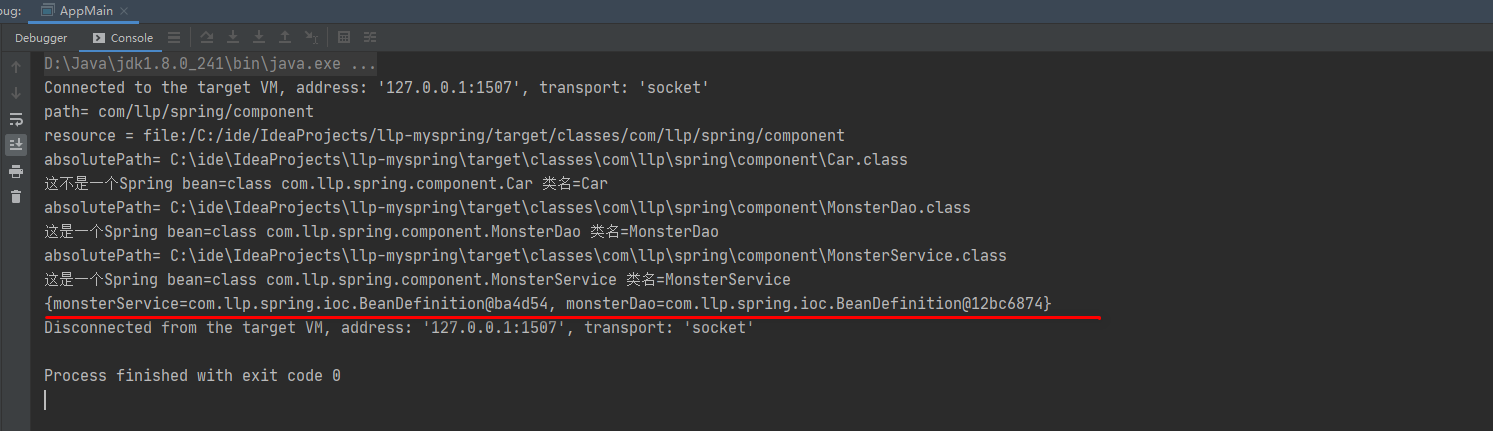
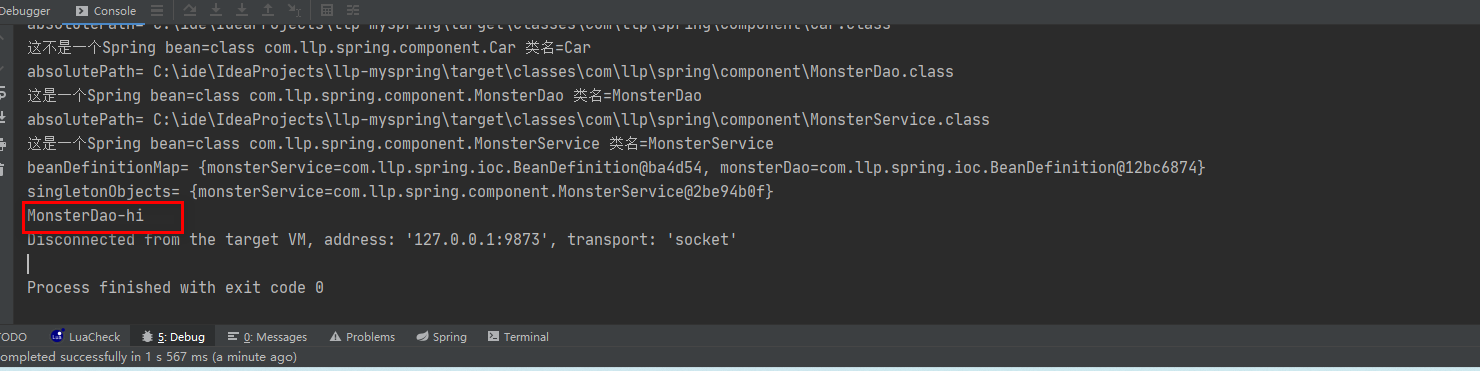
● 测试结果
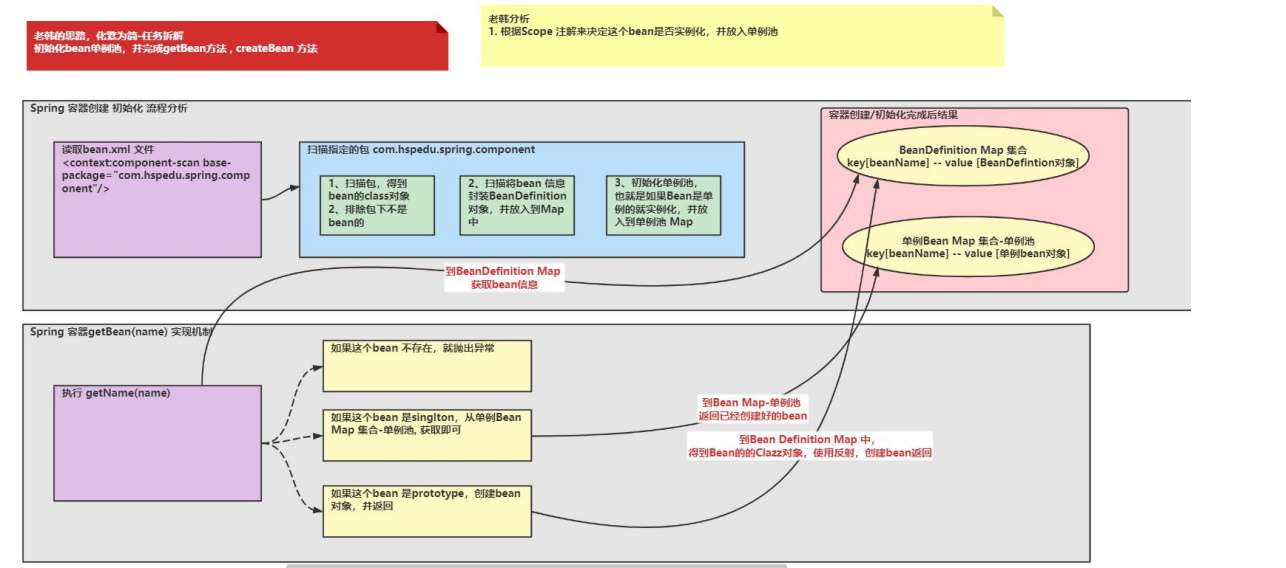
3.初始化 bean 单例池,并完成 getBean 方法 , createBean 方法
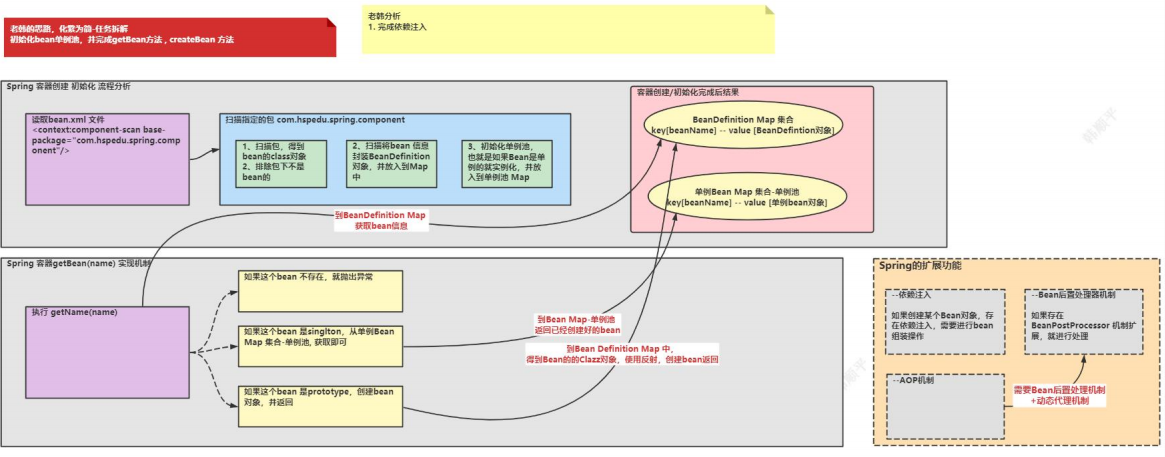
● 分析示意图
● 代码实现
/**
 * 类的作用类似Spring原生ioc容器
 */
public class LLPSpringApplicationContext {
    /**
     * 接受配置类信息,通过配置类获取到包扫描信息
     */
    private Class configClass;

    /**
     * 定义属性BeanDefinitionMap -> 存放BeanDefinition对象
     */
    private ConcurrentHashMap<String, BeanDefinition> beanDefinitionMap = new ConcurrentHashMap<>();

    /**
     * 定义属性SingletonObjects -> 存放单例对象
     */
    private ConcurrentHashMap<String, Object> singletonObjects = new ConcurrentHashMap<>();


    public LLPSpringApplicationContext(Class aClass) {
        beanDefinitionScan(aClass);
        System.out.println("beanDefinitionMap= "+beanDefinitionMap);
        //将单例的bean放入到singletonObjects中
        setSingletonObjects();
        System.out.println("singletonObjects= "+singletonObjects);
    }

    /**
     * 将单例的bean放入到singletonObjects中
     */
    public void setSingletonObjects() {
        //将单例的bean放入到singletonObjects中
        Enumeration<String> keys = beanDefinitionMap.keys();
        while (keys.hasMoreElements()) {
            String beanName = keys.nextElement();
            BeanDefinition beanDefinition = beanDefinitionMap.get(beanName);
            String scope = beanDefinition.getScope();
            if ("singleton".equalsIgnoreCase(scope)) {
                singletonObjects.put(beanName, createBean(beanDefinition));
            }
        }
    }

    /**
     * 该方法完成指定包扫描,并将bean信息封装到BeanDefinition对象,在放入到map中
     *
     * @param configClass
     */
    public void beanDefinitionScan(Class configClass) {
        this.configClass = configClass;
        //1.根据传入的LLpSpringApplicationConfig获取@ComponentScan注解
        ComponentScan componentScan = (ComponentScan) configClass.getAnnotation(ComponentScan.class);
        //2.获取包扫描路径
        String basePackage = componentScan.value();
        //path= com/llp/spring/component
        String path = basePackage.replace(".", "/");
        System.out.println("path= " + path);
        //得到类型加载器 ->app类加载器
        ClassLoader classLoader = LLPSpringApplicationContext.class.getClassLoader();
        //根据包路径获取目录的绝对路径
        //file:/C:/ide/IdeaProjects/llp-spring/out/production/llp-spring/com/llp/spring/component
        URL resource = classLoader.getResource(path);
        System.out.println("resource = " + resource);
        ///C:/ide/IdeaProjects/llp-spring/out/production/llp-spring/com/llp/spring/component
        String filePath = resource.getFile();
        File file = new File(filePath);
        //判断文件是否为目录
        if (file.isDirectory()) {
            //是目录,获取目录下的所有文件
            File[] files = file.listFiles();
            for (File f : files) {
                //获取每个文件的绝对路径
                String absolutePath = f.getAbsolutePath();
                System.out.println("absolutePath= " + absolutePath);
                //获取类名 eg:——>MonsterDao
                String className = absolutePath.substring(absolutePath.lastIndexOf("\\") + 1, absolutePath.indexOf(".class"));
                //拼接得到全类名
                String classFullName = basePackage + "." + className;
                try {
                    //根据类加载器获取Class对象
                    Class<?> cls = classLoader.loadClass(classFullName);
                    if (cls.isAnnotationPresent(Component.class)) {
                        Component componentAnnotation = cls.getDeclaredAnnotation(Component.class);
                        String beanName = componentAnnotation.value();
                        if ("".equals(beanName)) {
                            beanName = StringUtils.uncapitalize(className);
                        }
                        BeanDefinition beanDefinition = new BeanDefinition();
                        beanDefinition.setClazz(cls);
                        //判断该类上是否有@Scope注解
                        if (cls.isAnnotationPresent(Scope.class)) {
                            //得到Scope注解对象
                            Scope scope = cls.getDeclaredAnnotation(Scope.class);
                            //获取scope注解配置的值,singleton-单例,prototype-原型
                            beanDefinition.setScope(scope.value());
                        } else {
                            //默认为单例
                            beanDefinition.setScope("singleton");
                        }
                        beanDefinitionMap.put(beanName, beanDefinition);
                        System.out.println("这是一个Spring bean=" + cls + " 类名=" + className);
                    } else {
                        System.out.println("这不是一个Spring bean=" + cls + " 类名=" + className);
                    }
                } catch (Exception e) {
                    e.printStackTrace();
                }
            }
        }
    }

    /**
     * 通过beanDefinition对象创建对应的实例bean
     *
     * @param beanDefinition
     * @return
     */
    public Object createBean(BeanDefinition beanDefinition) {
        Class clazz = beanDefinition.getClazz();
        Object o = null;
        try {
            o = clazz.newInstance();
        } catch (InstantiationException e) {
            e.printStackTrace();
        } catch (IllegalAccessException e) {
            e.printStackTrace();
        }
        return o;
    }

   //编写方法getBean(String beanName),编写方法返回对容器中对象
    public Object getBean(String beanName) {
        if (beanDefinitionMap.containsKey(beanName)) {
            //1.先拿到beanDefinition的scope,分别进行处理
            BeanDefinition beanDefinition = beanDefinitionMap.get(beanName);
            String scope = beanDefinition.getScope();
            //2.如果是单例的对象直接从singletonObjects(单例池)中获取对象
            if ("singleton".equalsIgnoreCase(scope)) {
                return singletonObjects.get(beanName);
            } else {
                //3.如果不是单例,调用createBean,反射一个对象
                return createBean(beanDefinition);
            }
        } else {
            throw new NullPointerException("没有找到该bean");
        }
    }

}
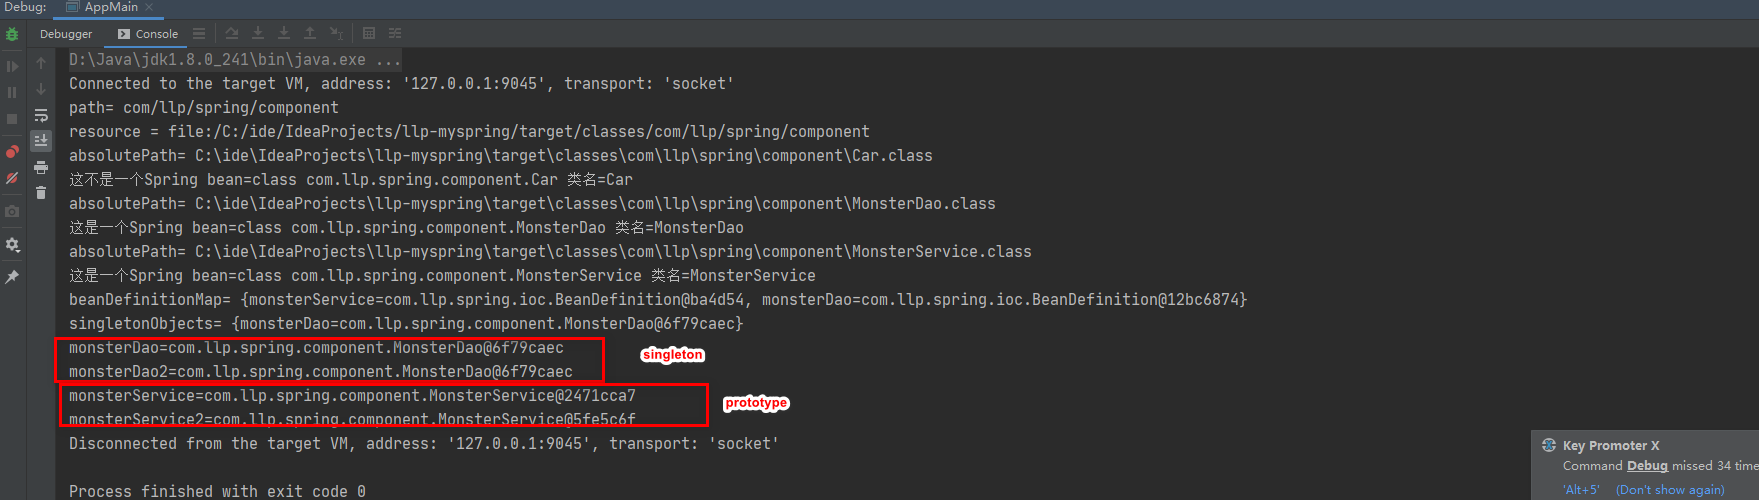
测试
4.完成依赖注入
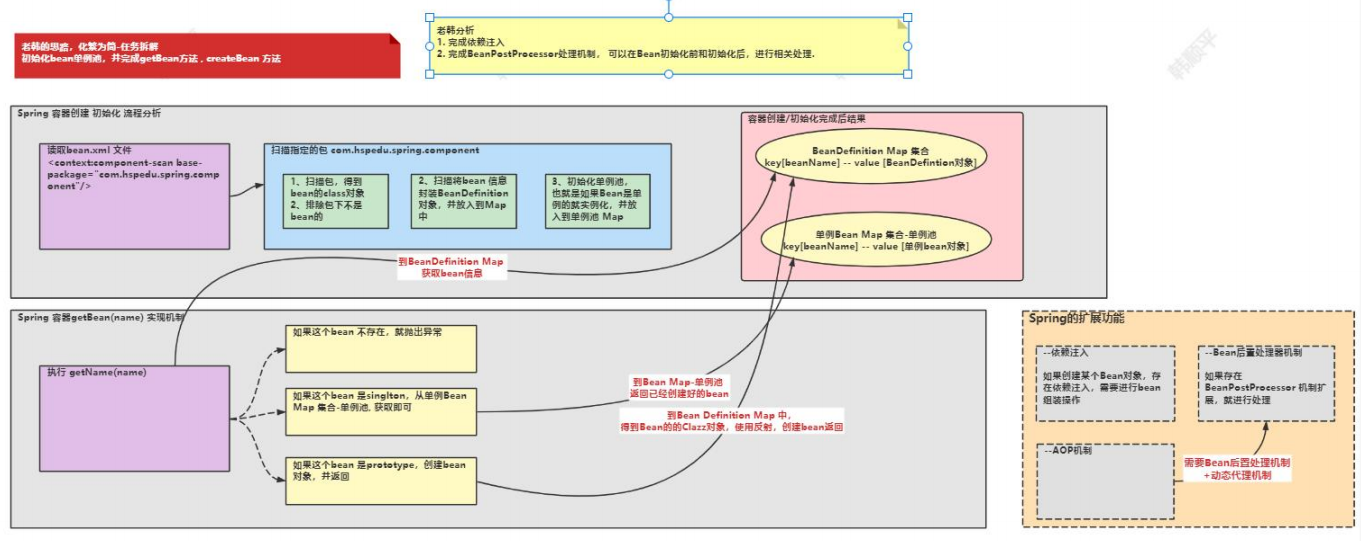
● 分析示意图
● 代码实现
自定义@Autowired注解
package com.llp.spring.annotaion;
import java.lang.annotation.*;

@Target({ElementType.METHOD, ElementType.FIELD})
@Retention(RetentionPolicy.RUNTIME)
public @interface Autowired {
    //required 为true是表示该bean必须存在,否则就会注入失败。
    boolean required() default true;
}
@Component(value = "monsterService")
public class MonsterService {
    @Autowired
    private MonsterDao monsterDao;

    public void hi(){
        monsterDao.hi();
    }

}
@Component
@Scope("prototype")
public class MonsterDao {

    public void hi() {
        System.out.println("MonsterDao-hi");
    }
}
createBean方法添加依赖注入逻辑
  /**
     * 通过beanDefinition对象创建对应的实例bean
     *
     * @param beanDefinition
     * @return
     */
    public Object createBean(BeanDefinition beanDefinition) {
        Class clazz = beanDefinition.getClazz();
        Object o = null;
        try {
            o = clazz.newInstance();
            //依赖注入逻辑,在创建bean是给bean的字段中被@Autowired修饰的字段进行赋值
            //1.获取bean中所有字段
            Field[] declaredFields = clazz.getDeclaredFields();
            //2.遍历判断字段上是否含有Autowired注解
            for (Field declaredField : declaredFields) {
                if (declaredField.isAnnotationPresent(Autowired.class)) {
                    //3.获取到@Autowired修饰字段的字段名称
                    String beanName = declaredField.getName();
                    //4.byName方式(根据名称匹配)获取bean对象
                    Object bean = getBean(beanName);
                    //5.拿到Autowired的required属性,如果为true则判断bean的值是否为null如果为null则表示注入失败抛出异常
                    Autowired declaredAnnotation = declaredField.getDeclaredAnnotation(Autowired.class);
                    boolean required = declaredAnnotation.required();
                    if(required && bean==null){
                        throw new RuntimeException("bean注入失败");
                    }
                    //私有属性暴破
                    declaredField.setAccessible(true);
                    //6.将字段的值赋给对象
                    declaredField.set(o, bean);
                }

            }
        } catch (InstantiationException e) {
            e.printStackTrace();
        } catch (IllegalAccessException e) {
            e.printStackTrace();
        }
        return o;
    }
测试效果
5.bean 后置处理器实现
1.后置处理回顾
/**
 * 后置处理器
 */
@Component
public class MyBeanPostProcessor implements BeanPostProcessor {

    /**
     * 什么时候被调用:在Bean的init方法前被调用
     * @param bean 传入的在ioc容器中创建/配置的bean
     * @param beanName 传入的ioc容器中创建/配置bean的id
     * @return Object 程序员对传入的bean 进行修改/处理【如果有需要的话】 ,返回
     * @throws BeansException
     */
    @Override
    public Object postProcessBeforeInitialization(Object bean, String beanName) throws BeansException {
        System.out.println("postProcessBeforeInitialization(),bean="+bean+",beanName="+beanName);
        return bean;
    }

    /**
     * 什么时候被调用:在Bean的init方法后被调用
     * @param bean 传入的在ioc容器中创建/配置的bean
     * @param beanName 传入的ioc容器中创建/配置bean的id
     * @return 程序员对传入的bean 进行修改/处理【如果有需要的话】 ,返回
     * @throws BeansException
     */
    @Override
    public Object postProcessAfterInitialization(Object bean, String beanName) throws BeansException {
        System.out.println("postProcessAfterInitialization(),bean="+bean+",beanName="+beanName);
        return bean;
    }
}
2.bean的生命周期
- 执行构造器
- 执行 set 相关方法
- 调用 bean 的初始化的方法(需要配置)
- 使用 bean
- 当容器关闭时候,调用 bean 的销毁方法(需要配置)
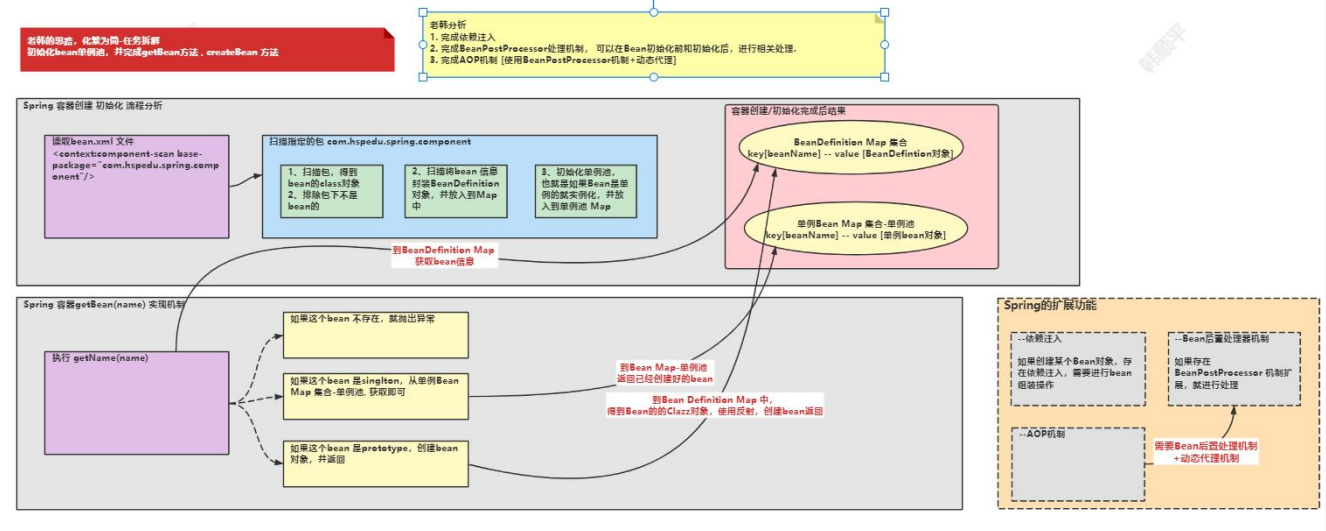
● 分析示意图
● 代码实现
3.模拟初始化方法
/**
 * 1. 我们根据原生Spring 定义了一个InitializingBean
 * 2. 该InitializingBean接口有一个方法void afterPropertiesSet() throws Exception;
 * 3. afterPropertiesSet() 在Bean的 setter后执行,即就是我们原来的初始化方法
 * 4. 当一个Bean实现这个接口后,就实现afterPropertiesSet() , 这个方法就是初始化方法
 */
public interface InitializingBean {
    void afterPropertiesSet() throws Exception;
}
4.定义自己的BeanPostProcessor接口
package com.llp.spring.processor;
public interface BeanPostProcessor {

    /**
     * 执行初始化方法之前的执行
     * @param bean
     * @param beanName
     * @return
     */
    default Object postProcessBeforeInitialization(Object bean, String beanName)  {
        return bean;
    }

    /**
     * 执行初始化方法之后执行
     * @param bean
     * @param beanName
     * @return
     */
    default Object postProcessAfterInitialization(Object bean, String beanName)  {
        return bean;
    }

}
5.MonsterService实现初始化接口
@Component(value = "monsterService")
public class MonsterService implements InitializingBean {
    @Autowired
    private MonsterDao monsterDao;

    public void hi(){
        monsterDao.hi();
    }

    /**
     * 执行setter方法后执行的初始化方法
     * @throws Exception
     */
    @Override
    public void afterPropertiesSet() throws Exception {
        System.out.println("MonsterService 初始化方法被调用 程序员在这里加入初始化的业务..");
    }
}
6.LLPSpringApplicationContext-在自定义的spring容器中添加一个用于存放自定义后置处理器的集合
//定义一个属性beanPostProcessorList, => 存放后置处理器
private List<BeanPostProcessor> beanPostProcessorList = new ArrayList<>();
7.在进行包扫描时添加BeanPostProcessor到集合中
/**
 * 该方法完成指定包扫描,并将bean信息封装到BeanDefinition对象,在放入到map中
 *
 * @param configClass
 */
public void beanDefinitionScan(Class configClass) {
    this.configClass = configClass;
    //1.根据传入的LLpSpringApplicationConfig获取@ComponentScan注解
    ComponentScan componentScan = (ComponentScan) configClass.getAnnotation(ComponentScan.class);
    //2.获取包扫描路径
    String basePackage = componentScan.value();
    //path= com/llp/spring/component
    String path = basePackage.replace(".", "/");
    System.out.println("path= " + path);
    //得到类型加载器 ->app类加载器
    ClassLoader classLoader = LLPSpringApplicationContext.class.getClassLoader();
    //根据包路径获取目录的绝对路径
    //file:/C:/ide/IdeaProjects/llp-spring/out/production/llp-spring/com/llp/spring/component
    URL resource = classLoader.getResource(path);
    System.out.println("resource = " + resource);
    ///C:/ide/IdeaProjects/llp-spring/out/production/llp-spring/com/llp/spring/component
    String filePath = resource.getFile();
    File file = new File(filePath);
    //判断文件是否为目录
    if (file.isDirectory()) {
        //是目录,获取目录下的所有文件
        File[] files = file.listFiles();
        for (File f : files) {
            //获取每个文件的绝对路径
            String absolutePath = f.getAbsolutePath();
            System.out.println("absolutePath= " + absolutePath);
            //获取类名 eg:——>MonsterDao
            String className = absolutePath.substring(absolutePath.lastIndexOf("\\") + 1, absolutePath.indexOf(".class"));
            //拼接得到全类名
            String classFullName = basePackage + "." + className;
            try {
                //根据类加载器获取Class对象
                Class<?> cls = classLoader.loadClass(classFullName);
                if (cls.isAnnotationPresent(Component.class)) {
                    //判断当前的这个clazz有没有实现BeanPostProcessor
                    //说明, 这里我们不能使用 instanceof 来判断clazz是否实现了BeanPostProcessor
                    //原因: clazz不是一个实例对象,而是一个类对象/clazz, 使用isAssignableFrom
                    if(BeanPostProcessor.class.isAssignableFrom(cls)){
                        //将对象转换成BeanPostProcessor对象放入到我们定义的beanPostProcessorList集合中
                        //在原生的Spring容器中, 对后置处理器还是走的getBean, createBean
                        //但是需要我们在singletonObjects 加入相应的业务逻辑
                        BeanPostProcessor beanPostProcessor = (BeanPostProcessor)cls.newInstance();
                        beanPostProcessorList.add(beanPostProcessor);
                        //避免将BeanPostProcessor添加到singletonObjects中在执行时被作为bean
                        continue;
                    }

                    Component componentAnnotation = cls.getDeclaredAnnotation(Component.class);
                    String beanName = componentAnnotation.value();
                    if ("".equals(beanName)) {
                        beanName = StringUtils.uncapitalize(className);
                    }
                    BeanDefinition beanDefinition = new BeanDefinition();
                    beanDefinition.setClazz(cls);
                    //判断该类上是否有@Scope注解
                    if (cls.isAnnotationPresent(Scope.class)) {
                        //得到Scope注解对象
                        Scope scope = cls.getDeclaredAnnotation(Scope.class);
                        //获取scope注解配置的值,singleton-单例,prototype-原型
                        beanDefinition.setScope(scope.value());
                    } else {
                        //默认为单例
                        beanDefinition.setScope("singleton");
                    }
                    beanDefinitionMap.put(beanName, beanDefinition);
                    System.out.println("这是一个Spring bean=" + cls + " 类名=" + className);
                } else {
                    System.out.println("这不是一个Spring bean=" + cls + " 类名=" + className);
                }
            } catch (Exception e) {
                e.printStackTrace();
            }
        }
    }
}
8.在创建bean时执行初始化方法和后置处理器的before和after方法
    /**
     * 通过beanDefinition对象创建对应的实例bean
     *
     * @param beanDefinition
     * @return
     */
    public Object createBean(String beanName,BeanDefinition beanDefinition) {
        Class clazz = beanDefinition.getClazz();
        Object o = null;
        try {
            o = clazz.newInstance();
            //依赖注入逻辑,在创建bean是给bean的字段中被@Autowired修饰的字段进行赋值
            //1.获取bean中所有字段
            Field[] declaredFields = clazz.getDeclaredFields();
            //2.遍历判断字段上是否含有Autowired注解
            for (Field declaredField : declaredFields) {
                if (declaredField.isAnnotationPresent(Autowired.class)) {
                    //3.获取到@Autowired修饰字段的字段名称
                    String declaredFieldName = declaredField.getName();
                    //4.byName方式(根据名称匹配)获取bean对象
                    Object bean = getBean(declaredFieldName);
                    //5.拿到Autowired的required属性,如果为true则判断bean的值是否为null如果为null则表示注入失败抛出异常
                    Autowired declaredAnnotation = declaredField.getDeclaredAnnotation(Autowired.class);
                    boolean required = declaredAnnotation.required();
                    if (required && bean == null) {
                        throw new RuntimeException("bean注入失败");
                    }
                    //私有属性暴破
                    declaredField.setAccessible(true);
                    //6.将字段的值赋给对象
                    declaredField.set(o, bean);
                }
            }
            //执行后置处理器,初始化方法之前的before方法
            for (BeanPostProcessor beanPostProcessor : beanPostProcessorList) {
                beanPostProcessor.postProcessBeforeInitialization(o,beanName);
            }
            /**
             * bean的生命周期
             * 1. 执行构造器
             * 2. 执行 set 相关方法
             * 3. 调用 bean 的初始化的方法(需要配置)
             * 4. 使用 bean
             * 5. 当容器关闭时候,调用 bean 的销毁方法(需要配置)
             */
            //执行初始化方法
            if (o instanceof InitializingBean) {
                InitializingBean initializingBean = (InitializingBean) o;
                try {
                    initializingBean.afterPropertiesSet();
                } catch (Exception e) {
                    e.printStackTrace();
                }
            }
            //执行后置处理器,初始化方法之后的after方法
            //在后置处理器的after方法,可以对容器的bean实例进行处理
            //然后返回处理后的bean实例, 相当于做一个后置处理
            for (BeanPostProcessor beanPostProcessor : beanPostProcessorList) {
                Object current = beanPostProcessor.postProcessAfterInitialization(o, beanName);
                if(current != null) {
                    o = current;
                }
            }

        } catch (InstantiationException e) {
            e.printStackTrace();
        } catch (IllegalAccessException e) {
            e.printStackTrace();
        }
        return o;
    }
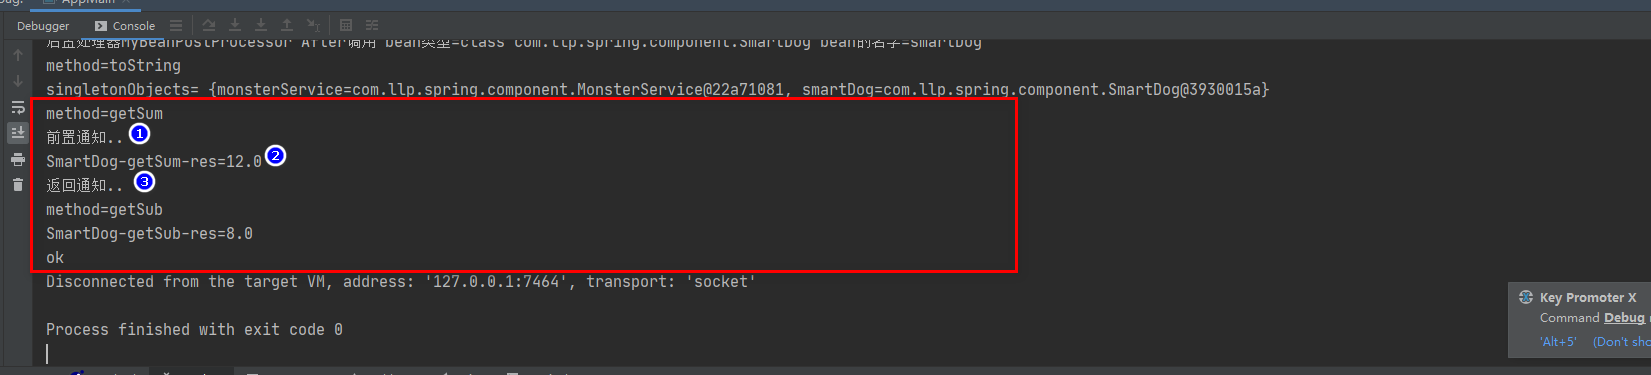
测试效果

6.AOP 机制实现
● 分析示意图
1.准备工作
定义一个接口
public interface SmartAnimalable {
    float getSum(float i, float j);
    float getSub(float i, float j);
}
接口实现类
@Component(value = "smartDog")
public class SmartDog implements SmartAnimalable {
    public float getSum(float i, float j) {
        float res = i + j;
        System.out.println("SmartDog-getSum-res=" + res);
        return res;
    }

    public float getSub(float i, float j) {
        float res = i - j;
        System.out.println("SmartDog-getSub-res=" + res);
        return res;
    }
}
切面类
/**
 * SmartAnimalAspect当做一个切面类来使用
 */
public class SmartAnimalAspect {

    public static void showBeginLog() {

        System.out.println("前置通知..");
    }

    public static void showSuccessLog() {

        System.out.println("返回通知..");
    }
}
2.修改后置处理器after方法模拟AOP前置和后置通知
@Component
public class MyBeanPostProcessor implements BeanPostProcessor {
    @Override
    public Object postProcessBeforeInitialization(Object bean, String beanName) {
        System.out.println("后置处理器MyBeanPostProcessor Before调用 bean类型=" + bean.getClass() + " bean的名字=" + beanName);
        return bean;
    }

    @Override
    public Object postProcessAfterInitialization(Object bean, String beanName) {
        System.out.println("后置处理器MyBeanPostProcessor After调用 bean类型=" + bean.getClass() + " bean的名字=" + beanName);
        if ("smartDog".equals(beanName)) {
            ClassLoader classLoader = MyBeanPostProcessor.class.getClassLoader();
            Class<?>[] interfaces = bean.getClass().getInterfaces();
            Object newProxyInstance = Proxy.newProxyInstance(classLoader, interfaces, new InvocationHandler() {
                /**
                 * invoke 方法是将来执行我们的target_vehicle的方法时,会调用到
                 * @param proxy 表示代理对象
                 * @param method 就是通过代理对象调用方法时,的哪个方法 代理对象.run()
                 * @param args : 表示调用 代理对象.run(xx) 传入的参数
                 * @return 表示 代理对象.run(xx) 执行后的结果.
                 * @throws Throwable
                 */
                @Override
                public Object invoke(Object proxy, Method method, Object[] args) throws Throwable {
                    System.out.println("method=" + method.getName());
                    Object result = null;
                    //假如我们进行前置通知+返回通知 处理的方法是getSum
                    //后面可以通过注解来做的更加灵活
                    if ("getSum".equals(method.getName())) {
                        SmartAnimalAspect.showBeginLog();
                        result = method.invoke(bean, args);//执行目标方法
                        //进行返回通知的处理
                        SmartAnimalAspect.showSuccessLog();
                    } else {
                        result = method.invoke(bean, args);//执行目标方法
                    }
                    return result;
                }
            });
            //如果bean是需要返回代理对象的, 这里就直接return proxyInstance
            return newProxyInstance;
        }
        //如果不需要AOP, 返回 bean
        return bean;
    }
}


 389
389


 被折叠的 条评论
为什么被折叠?
被折叠的 条评论
为什么被折叠?
 到【灌水乐园】发言


