


记录一下,很罗嗦,面向刚开始接触制作小程序的朋友们,大佬们勿喷
话不多说,直接开始正题
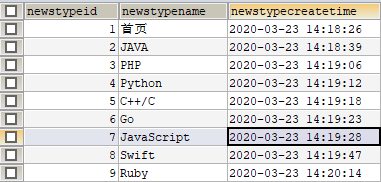
1. 首先创建一张数据表
2. 然后通过Mybatis逆向工程生成对应的Mapper和Pojo
<?xml version="1.0" encoding="UTF-8"?>
<!DOCTYPE generatorConfiguration PUBLIC "-//mybatis.org//DTD MyBatis Generator Configuration 1.0//EN" "http://mybatis.org/dtd/mybatis-generator-config_1_0.dtd">

<generatorConfiguration>
    <context id="DB2Tables" targetRuntime="MyBatis3">
        <commentGenerator>
            <!-- 是否去除自动生成的注释 -->
            <property name="suppressAllComments" value="true"/>
        </commentGenerator>
        <!-- Mysql数据库连接的信息:驱动类、连接地址、用户名、密码 -->
        <jdbcConnection driverClass="com.mysql.cj.jdbc.Driver"
                        connectionURL="jdbc:mysql://localhost:3306/数据库名?serverTimezone=UTC"
                        userId="用户名"
                        password="密码">
            <property name="nullCatalogMeansCurrent" value="true"/>
        </jdbcConnection>
        <!-- 默认为false,把JDBC DECIMAL 和NUMERIC类型解析为Integer,为true时
        把JDBC DECIMAL 和NUMERIC类型解析为java.math.BigDecimal -->
        <javaTypeResolver >
            <property name="forceBigDecimals" value="false" />
        </javaTypeResolver>

        <!-- targetProject:生成POJO类的位置 -->
        <javaModelGenerator targetPackage="填写自己项目对应的路径" targetProject=".\src">
            <!-- enableSubPackages:是否让schema作为包的后缀 -->
            <property name="enableSubPackages" value="false" />
            <!-- 从数据库返回的值被清理前后的空格 -->
            <property name="trimStrings" value="true" />
        </javaModelGenerator>

        <!-- targetProject:mapper映射文件生成的位置 -->
        <sqlMapGenerator targetPackage="填写自己项目对应的路径" targetProject=".\src">
            <!-- enableSubPackages:是否让schema作为包的后缀 -->
            <property name="enableSubPackages" value="false" />
        </sqlMapGenerator>

        <!-- targetProject:mapper接口生成的的位置 -->
        <javaClientGenerator type="XMLMAPPER" targetPackage="填写自己项目对应的路径" targetProject=".\src">
            <!-- enableSubPackages:是否让schema作为包的后缀 -->
            <property name="enableSubPackages" value="false" />
        </javaClientGenerator>

        <!-- 指定数据表 这里的数据表就是刚刚创建的那个-->
        <table tableName="wx_newstype" schema=""></table>

    </context>
</generatorConfiguration>
  public void generator() throws Exception {
        List<String> warnings = new ArrayList<String>();
        boolean overwrite = true;
        // 指定配置文件
        File configFile = new File("填写generatorConfig.xml的路径");
        ConfigurationParser cp = new ConfigurationParser(warnings);
        Configuration config = cp.parseConfiguration(configFile);
        DefaultShellCallback callback = new DefaultShellCallback(overwrite);
        MyBatisGenerator myBatisGenerator = new MyBatisGenerator(config, callback, warnings);
        myBatisGenerator.generate(null);
    }

    // 执行main方法以生成代码
    public static void main(String[] args) {
        try {
            GeneratorSqlmap generatorSqlmap = new GeneratorSqlmap();
            generatorSqlmap.generator();
        } catch (Exception e) {
            e.printStackTrace();
        }
    }
3. 生成完Mapper和Pojo后,就开始编写查询方法,找到生成的Mapper接口
public interface WxNewstypeMapper extends MyMapper<WxNewstype> {
    long countByExample(WxNewstypeExample example);

    int deleteByExample(WxNewstypeExample example);

    int deleteByPrimaryKey(Integer newstypeid);

    int insert(WxNewstype record);

    int insertSelective(WxNewstype record);

    List<WxNewstype> selectByExample(WxNewstypeExample example);

    WxNewstype selectByPrimaryKey(Integer newstypeid);

    int updateByExampleSelective(@Param("record") WxNewstype record, @Param("example") WxNewstypeExample example);

    int updateByExample(@Param("record") WxNewstype record, @Param("example") WxNewstypeExample example);

    int updateByPrimaryKeySelective(WxNewstype record);

    int updateByPrimaryKey(WxNewstype record);

	//查询全部分类的方法
    @Select("select * from wx_newstype")
    List<WxNewstype> findByAll();
}
4. Mapper接口中的方法写完了之后,就需要编写接口与实现类了
public interface WxNewsTypeService {
    //查询所有分类
    List<WxNewstype> typeAll();
}
@Service
public class WxNewsTypeServiceImpl implements WxNewsTypeService {
    @Resource
    WxNewstypeMapper wxNewstypeMapper;

    @Override
    public List<WxNewstype> typeAll() {
        return wxNewstypeMapper.findByAll();
    }
}
5. 到目前为止,准备工作基本做完,现在开始要和小程序端进行连接了,编写一个Controller,将查询到的数据发送到小程序中
@RestController
@RequestMapping("/type")
public class WxNewsTypeController {
    @Resource
    WxNewsTypeServiceImpl wxNewsTypeService;

    @GetMapping("/all")
    //这里的ResponseVo 和 ResultUtil采用的是自定义的工具类
    public ResponseVo typeall(){
        List<WxNewstype> wxNewstypes = wxNewsTypeService.typeAll();
        return ResultUtil.success("发送",wxNewstypes);
    }
}
7. 截至到目前,我们的后台已经完成了,现在就要到小程序中去接收数据
const app = getApp()

Page({

  /**
   * 页面的初始数据
   */
  data: {
  	//type用来存放我们接收到的数据
    type: [],
    //accountIndex代表Picker的默认开始的下标
    accountIndex: 0,
  },
  /**
   * 生命周期函数--监听页面加载
   */
  onLoad: function(options) {

  },

  /**
   * 生命周期函数--监听页面初次渲染完成
   */
  onReady: function() {

  },
  bindAccountChange: function (e) {
    console.log('picker account 发生选择改变,携带值为', e.detail.value);
    this.setData({
      accountIndex: e.detail.value
    })
  },
  /**
   * 生命周期函数--监听页面显示
   */
  onShow: function() {
  	//注意:这里的app.serverUrl是在App.js中定义的全局变量 对应的是我们服务器地址
    var serverUrl = app.serverUrl;
    var me = this;
    wx.request({
      url: serverUrl + '/type/all', // 接口地址  这里的接口地址是通过getApp方法 获取到我们在app.js中设置的全局URL路径 再通过+号拼接 后面拼接的内容就填上我们在后台写好的访问路径就可以了
      method:'GET',
      header: {
        'content-type': 'application/json', //定义请求类型json
      },
      success(res) {
        // 定义一个var变量 储存data数据
        var mydata = res.data;
        // 定义一个var变量 储存status数据
        var status = mydata.status;
        // console.log(status)
        // 获取到数据后 判断状态值
        if (status === 200) {
          // 如果状态值为200 则为正常 将mydata的data值赋值给var变量  这个data就是游览器在请求的时候的data属性
          me.setData({
            type: res.data.data
          });
        }
      }
    })
  },

  /**
   * 生命周期函数--监听页面隐藏
   */
  onHide: function() {

  },

  /**
   * 生命周期函数--监听页面卸载
   */
  onUnload: function() {

  },

  /**
   * 页面相关事件处理函数--监听用户下拉动作
   */
  onPullDownRefresh: function() {

  },

  /**
   * 页面上拉触底事件的处理函数
   */
  onReachBottom: function() {

  },

  /**
   * 用户点击右上角分享
   */
  onShareAppMessage: function() {

  }
})
注意:这里采用的是微信官方的UI
 <view class="weui-cells__title">选择分类</view>
    <view class="weui-cells weui-cells_after-title">
      <view class="weui-cell weui-cell_select">
        <view class="weui-cell__bd">
          <picker value="{{type[accountIndex].newstypeid}}"  range-key="{{'newstypename'}}" range="{{type}}" bindchange="bindAccountChange">
            <view class="weui-select">
              {{type[accountIndex].newstypename}}
            </view>
          </picker>
        </view>
      </view>
    </view>
value="{{type[accountIndex].newstypeid}}"
这里的type就是我们在js中定义的数组,用来存储接收的分类数据
而[accountIndex]代表的就是下标,我们在js中也设置了默认值0,也就是从0开始
后面的newstypename则是我们传递的参数名
range="{{type}}"
这里的range就是你需要显示哪个数组里面的东西
range-key="{{‘newstypename’}}"
注意:这里很重要,在我们的Picker中,想要显示出这种下图的效果range-key是必须要有的,而它这个里面的参数正是我们传递过来数据的key值,并且如果我们直接把这个key值放到{{}}中去,是没有任何效果的,必须要加上’ ’ 符号以{{ ’ key ’ }}"的形式传入才能正常的显示

bindchange="bindAccountChange"
这个是直接使用的微信官方的UI,不多解释
<view class="weui-select">{{type[accountIndex].newstypename}}</view>
这里的{{type[accountIndex].newstypename}}的意思是显示哪一条数据,同样的type是我们定义的数组,accountIndex则是下标,而newstypename是我们的数据
 默认情况下显示的效果
在默认的时候,它会显示下标为0的那一条数据,而当我们点开列表后,选择不同的分类数据,它返回的下标的值也会不一样,从而达到数据变化的效果(这里点击变化下标是因为bindAccountChange函数的效果)
ResultUtil代码
public class ResultUtil {

	public static ResponseVo success(){
		return vo(CoreConst.SUCCESS_CODE,null,null);
	}

	public static ResponseVo success(String msg){
		return vo(CoreConst.SUCCESS_CODE, msg,null);
	}

	public static ResponseVo success(String msg, Object data){
		return vo(CoreConst.SUCCESS_CODE, msg, data);
	}

	public static ResponseVo error(){
		return vo(CoreConst.FAIL_CODE,null,null);
	}

	public static ResponseVo error(String msg){
		return vo(CoreConst.FAIL_CODE, msg,null);
	}

	public static ResponseVo error(String msg, Object data){
		return vo(CoreConst.FAIL_CODE, msg,data);
	}

	public static PageResultVo table(List<?> list, Long total){
		return new PageResultVo(list, total);
	}

	public static ResponseVo vo(Integer status, String message, Object data) {
		return new ResponseVo<>(status, message, data);
	}

}
CoreConst代码
public class CoreConst {
    public static final Integer  SUCCESS_CODE           = 200;
    public static final Integer  FAIL_CODE               = 500;
}
ResponseVo代码
public class ResponseVo<T> {
    private Integer status;
    private String msg;
    private T data;

    public Integer getStatus() {
        return status;
    }

    public void setStatus(Integer status) {
        this.status = status;
    }

    public String getMsg() {
        return msg;
    }

    public void setMsg(String msg) {
        this.msg = msg;
    }

    public T getData() {
        return data;
    }

    public void setData(T data) {
        this.data = data;
    }

    public ResponseVo(Integer status, String msg, T data) {
        this.status = status;
        this.msg = msg;
        this.data = data;
    }

}
可能有点繁琐,见谅哈


 627
627


 被折叠的 条评论
为什么被折叠?
被折叠的 条评论
为什么被折叠?
 到【灌水乐园】发言


