


XXL-JOB快速上手
一.拉下原代码
http://gitee.com/xuxueli0323/xxl-job
环境:
- Maven3+
- Jdk1.8+
- Mysql5.7+
二.快速上手
2.1 初始化“调度数据库”
请下载项目源码并解压,获取 “调度数据库初始化SQL脚本” 并执行即可。
“调度数据库初始化SQL脚本” 位置为:
/xxl-job/doc/db/tables_xxl_job.sql
调度中心支持集群部署,集群情况下各节点务必连接同一个mysql实例;
如果mysql做主从,调度中心集群节点务必强制走主库;
2.2 编译源码
解压源码,按照maven格式将源码导入IDE, 使用maven进行编译即可,源码结构如下:
xxl-job-admin:调度中心
xxl-job-core:公共依赖
xxl-job-executor-samples:执行器Sample示例(选择合适的版本执行器,可直接使用,也可以参考其并将现有项目改造成执行器)
   :xxl-job-executor-sample-springboot:Springboot版本,通过Springboot管理执行器,推荐这种方式;
   :xxl-job-executor-sample-frameless:无框架版本;
2.3 配置部署“调度中心”
调度中心项目:xxl-job-admin作用:统一管理任务调度平台上调度任务,负责触发调度执行,并且提供任务管理平台。
步骤一:调度中心配置:
调度中心配置文件地址:
/xxl-job/xxl-job-admin/src/main/resources/application.properties
调度中心配置内容说明:
### 调度中心JDBC链接:链接地址请保持和 2.1章节 所创建的调度数据库的地址一致
spring.datasource.url=jdbc:mysql://127.0.0.1:3306/xxl_job?useUnicode=true&characterEncoding=UTF-8&autoReconnect=true&serverTimezone=Asia/Shanghai
spring.datasource.username=root
spring.datasource.password=root_pwd
spring.datasource.driver-class-name=com.mysql.jdbc.Driver
### 报警邮箱
spring.mail.host=smtp.qq.com
spring.mail.port=25
spring.mail.username=xxx@qq.com
spring.mail.password=xxx
spring.mail.properties.mail.smtp.auth=true
spring.mail.properties.mail.smtp.starttls.enable=true
spring.mail.properties.mail.smtp.starttls.required=true
spring.mail.properties.mail.smtp.socketFactory.class=javax.net.ssl.SSLSocketFactory
### 调度中心通讯TOKEN [选填]:非空时启用;
xxl.job.accessToken=
### 调度中心国际化配置 [必填]: 默认为 "zh_CN"/中文简体, 可选范围为 "zh_CN"/中文简体, "zh_TC"/中文繁体 and "en"/英文;
xxl.job.i18n=zh_CN
## 调度线程池最大线程配置【必填】
xxl.job.triggerpool.fast.max=200
xxl.job.triggerpool.slow.max=100
### 调度中心日志表数据保存天数 [必填]:过期日志自动清理;限制大于等于7时生效,否则, 如-1,关闭自动清理功能;
xxl.job.logretentiondays=30
步骤二:部署项目:
如果已经正确进行上述配置,可将项目编译运行。
调度中心访问地址:http://localhost:8080/xxl-job-admin (该地址执行器将会使用到,作为回调地址)
默认登录账号 “admin/123456”, 登录后运行界面如下图所示。
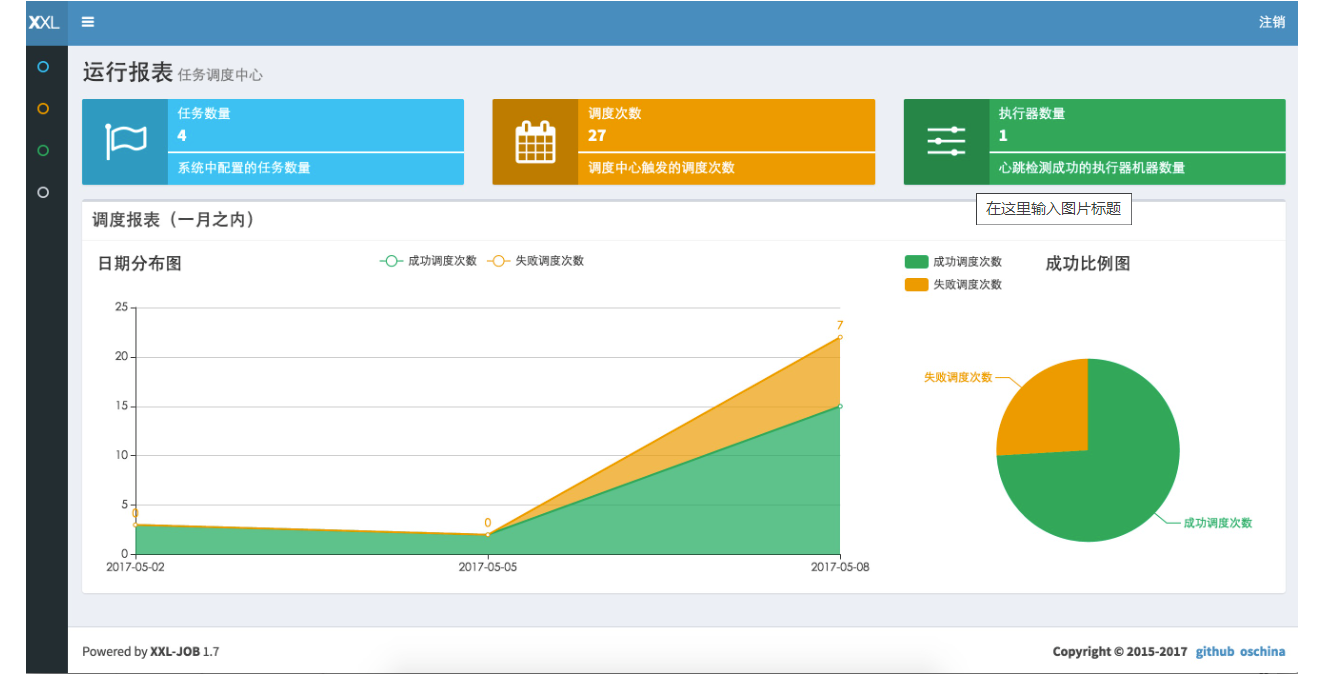
至此“调度中心”项目已经部署成功。
运行xxl-job-executor-sample-springboot测试调度任务
测试

执行一次运行成功

2.4 开发第一个任务“Hello World”
本示例以新建一个 “GLUE模式(Java)” 运行模式的任务为例。更多有关任务的详细配置,请查看“章节三:任务详解”。
( “GLUE模式(Java)”的执行代码托管到调度中心在线维护,相比“Bean模式任务”需要在执行器项目开发部署上线,更加简便轻量)
前提:请确认“调度中心”和“执行器”项目已经成功部署并启动;
步骤一:新建任务:
登录调度中心,点击下图所示“新建任务”按钮,新建示例任务。然后,参考下面截图中任务的参数配置,点击保存。

步骤二:“GLUE模式(Java)” 任务开发:
请点击任务右侧 “GLUE” 按钮,进入 “GLUE编辑器开发界面” ,见下图。“GLUE模式(Java)” 运行模式的任务默认已经初始化了示例任务代码,即打印Hello World。
( “GLUE模式(Java)” 运行模式的任务实际上是一段继承自IJobHandler的Java类代码,它在执行器项目中运行,可使用@Resource/@Autowire注入执行器里中的其他服务

package com.xxl.job.service.handler;
import org.slf4j.Logger;
import org.slf4j.LoggerFactory;
import com.xxl.job.core.biz.model.ReturnT;
import com.xxl.job.core.handler.IJobHandler;

public class DemoGlueJobHandler extends IJobHandler {

   private static Logger logger = LoggerFactory.getLogger(DemoGlueJobHandler.class);

    @Override
    public ReturnT<String> execute() throws Exception {
        logger.info("XXL-JOB hello");
        return ReturnT.SUCCESS;
    }

}
步骤三:触发执行:
请点击任务右侧 “执行” 按钮,可手动触发一次任务执行(通常情况下,通过配置Cron表达式进行任务调度触发)。
步骤四:查看日志:
请点击任务右侧 “日志” 按钮,可前往任务日志界面查看任务日志。
在任务日志界面中,可查看该任务的历史调度记录以及每一次调度的任务调度信息、执行参数和执行信息。运行中的任务点击右侧的“执行日志”按钮,可进入日志控制台查看实时执行日志。

在日志控制台,可以Rolling方式实时查看任务在执行器一侧运行输出的日志信息,实时监控任务进度;
三.尝试写一个任务用于每分钟同步MySQL数据库中的内容到redis
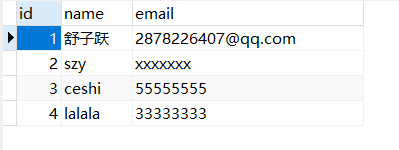
3.1建一个测试表
CREATE TABLE `user` (
    `id` INT(11) NOT NULL AUTO_INCREMENT,
    `name` VARCHAR(50) NOT NULL DEFAULT '',
    `email` VARCHAR(50) NOT NULL DEFAULT '',
    PRIMARY KEY (`id`)
) ENGINE=InnoDB DEFAULT CHARSET=utf8mb4;
3.2新建一个maven项目导入所需的包
<?xml version="1.0" encoding="UTF-8"?>
<project xmlns="http://maven.apache.org/POM/4.0.0"
         xmlns:xsi="http://www.w3.org/2001/XMLSchema-instance"
         xsi:schemaLocation="http://maven.apache.org/POM/4.0.0 http://maven.apache.org/xsd/maven-4.0.0.xsd">
    <modelVersion>4.0.0</modelVersion>

    <groupId>com.szy</groupId>
    <artifactId>xxl-job-test</artifactId>
    <version>1.0-SNAPSHOT</version>

    <properties>
        <maven.compiler.source>11</maven.compiler.source>
        <maven.compiler.target>11</maven.compiler.target>
    </properties>

    <dependencies>
        <!-- Spring Boot Starter -->
        <dependency>
            <groupId>org.springframework.boot</groupId>
            <artifactId>spring-boot-starter</artifactId>
            <version>2.6.3</version>
        </dependency>

        <!-- Spring Data Redis Starter -->
        <dependency>
            <groupId>org.springframework.boot</groupId>
            <artifactId>spring-boot-starter-data-redis</artifactId>
            <version>2.6.3</version>
        </dependency>

        <!-- MySQL Connector -->
        <dependency>
            <groupId>mysql</groupId>
            <artifactId>mysql-connector-java</artifactId>
            <version>8.0.21</version>
        </dependency>

        <!-- XXL-Job Executor Starter -->
        <dependency>
            <groupId>com.xuxueli</groupId>
            <artifactId>xxl-job-core</artifactId>
            <version>2.3.1</version>
        </dependency>

        <!-- MyBatis-Plus Starter -->
        <dependency>
            <groupId>com.baomidou</groupId>
            <artifactId>mybatis-plus-boot-starter</artifactId>
            <version>3.4.2</version>
        </dependency>
        <dependency>
            <groupId>org.projectlombok</groupId>
            <artifactId>lombok</artifactId>
            <version>RELEASE</version>
            <scope>compile</scope>
        </dependency>
        <dependency>
            <groupId>org.springframework.boot</groupId>
            <artifactId>spring-boot-starter-web</artifactId>
            <version>2.6.3</version>
        </dependency>

        <!-- MyBatis Starter -->
        <dependency>
            <groupId>org.mybatis.spring.boot</groupId>
            <artifactId>mybatis-spring-boot-starter</artifactId>
            <version>2.2.0</version>
        </dependency>

        <!-- Spring JDBC -->
        <dependency>
            <groupId>org.springframework.boot</groupId>
            <artifactId>spring-boot-starter-jdbc</artifactId>
            <version>2.6.3</version>
        </dependency>

    </dependencies>

</project>
3.3写application.yaml
server:
  port: 9090
xxl:
  job:
    admin:
      addresses: http://127.0.0.1:8080/xxl-job-admin
    accessToken: default_token
    executor:
      appname: xxl-job-test
      port: 9999
spring:
  datasource:
    url: jdbc:mysql://你的地址:3306/xxljobtest?useUnicode=true&characterEncoding=utf-8&serverTimezone=Asia/Shanghai
    username: root
    password: 你的密码
    driver-class-name: com.mysql.cj.jdbc.Driver
  redis:
    host: 你的地址
    port: 6379
    database: 3
    password: 你的密码
mybatis-plus:
  mapper-locations:
    classpath: mapper/*.xml
3.4编写一个接口用于查询全部数据
为了方便我上全部代码:

redisconfig:
package com.szy.config;

import org.springframework.context.annotation.Bean;
import org.springframework.context.annotation.Configuration;
import org.springframework.data.redis.connection.RedisConnectionFactory;
import org.springframework.data.redis.core.RedisTemplate;
import org.springframework.data.redis.serializer.StringRedisSerializer;

import javax.annotation.Resource;

@Configuration
public class RedisConfig {

    @Resource
    private RedisConnectionFactory redisConnectionFactory;

    @Bean
    public RedisTemplate<String, Object> redisTemplate() {
        RedisTemplate<String, Object> template = new RedisTemplate<>();
        template.setConnectionFactory(redisConnectionFactory);

        // 设置 Key 的序列化器
        template.setKeySerializer(new StringRedisSerializer());
        template.setHashKeySerializer(new StringRedisSerializer());

        // 设置 Value 的序列化器
        template.setValueSerializer(new StringRedisSerializer());
        template.setHashValueSerializer(new StringRedisSerializer());

        return template;
    }
}
XxlJobConfig:
package com.szy.config;

import com.xxl.job.core.executor.impl.XxlJobSpringExecutor;
import org.slf4j.Logger;
import org.slf4j.LoggerFactory;
import org.springframework.beans.factory.annotation.Value;
import org.springframework.context.annotation.Bean;
import org.springframework.context.annotation.Configuration;

/**
 * xxl-job config
 *
 * @author xuxueli 2017-04-28
 */
@Configuration
public class XxlJobConfig {
    private Logger logger = LoggerFactory.getLogger(XxlJobConfig.class);

    @Value("${xxl.job.admin.addresses}")
    private String adminAddresses;

    @Value("${xxl.job.accessToken}")
    private String accessToken;

    @Value("${xxl.job.executor.appname}")
    private String appname;

    @Value("${xxl.job.executor.port}")
    private int port;


    @Bean
    public XxlJobSpringExecutor xxlJobExecutor() {
        logger.info(">>>>>>>>>>> xxl-job config init.");
        XxlJobSpringExecutor xxlJobSpringExecutor = new XxlJobSpringExecutor();
        xxlJobSpringExecutor.setAdminAddresses(adminAddresses);
        xxlJobSpringExecutor.setAppname(appname);
        xxlJobSpringExecutor.setPort(port);
        xxlJobSpringExecutor.setAccessToken(accessToken);
        return xxlJobSpringExecutor;
    }

    /**
     * 针对多网卡、容器内部署等情况,可借助 "spring-cloud-commons" 提供的 "InetUtils" 组件灵活定制注册IP;
     *
     *      1、引入依赖:
     *          <dependency>
     *             <groupId>org.springframework.cloud</groupId>
     *             <artifactId>spring-cloud-commons</artifactId>
     *             <version>${version}</version>
     *         </dependency>
     *
     *      2、配置文件,或者容器启动变量
     *          spring.cloud.inetutils.preferred-networks: 'xxx.xxx.xxx.'
     *
     *      3、获取IP
     *          String ip_ = inetUtils.findFirstNonLoopbackHostInfo().getIpAddress();
     */


}
User:
@Data
@TableName("user")
public class User {
    private Integer id;
    private String name;
    private String email;
}
UserMapper:
@Mapper
public interface UserMapper extends BaseMapper<User> {
}
UserService:
public interface UserService {
    List<User> getAllUsers();
}
UserServiceImpl:
@Service
public class UserServiceImpl implements UserService {
    @Resource
    private UserMapper userMapper;

    @Override
    public List<User> getAllUsers() {
        return userMapper.selectList(null);
    }
}
UserController:
@RestController
public class UserController {
    @Resource
    private UserService userService;

    @GetMapping("/users")
    public List<User> getUsers() {
        return userService.getAllUsers();
    }
}
SyncTask:
@Component
public class SyncTask {
    @Resource
    private UserMapper userMapper;
    @Resource
    private RedisTemplate redisTemplate;

    @XxlJob("syncTask")
    public void syncTask() throws Exception {
        // 查询数据并同步到 Redis
        List<User> userList = userMapper.selectList(null);
        for (User user : userList) {
            String key = "user:"+String.valueOf(user.getId());
            String value = String.valueOf(user);
            redisTemplate.opsForValue().set(key, value);
        }

        XxlJobHelper.handleSuccess("同步任务执行成功");
    }
}
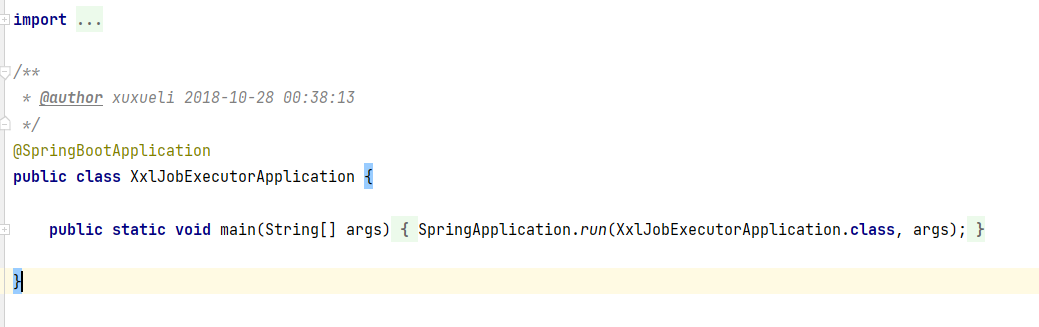
XxlJobTestApplication:
@SpringBootApplication
public class XxlJobTestApplication {
    public static void main(String[] args) {
        SpringApplication.run(XxlJobTestApplication.class, args);
    }
}
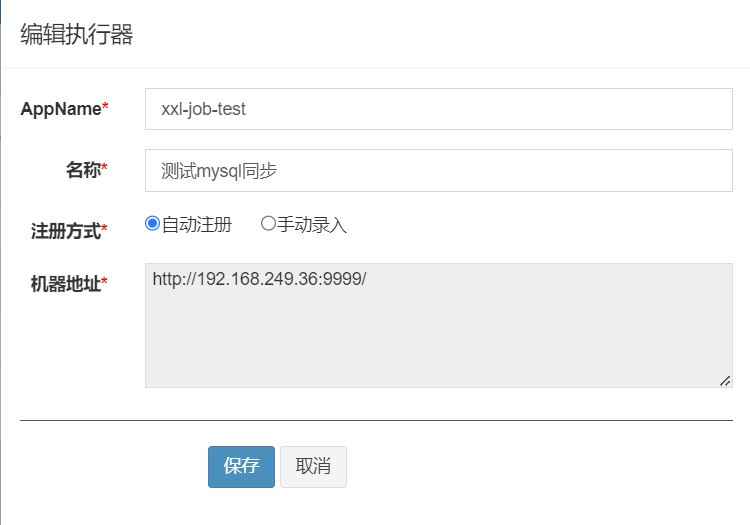
在分布式调度平台新建执行器:

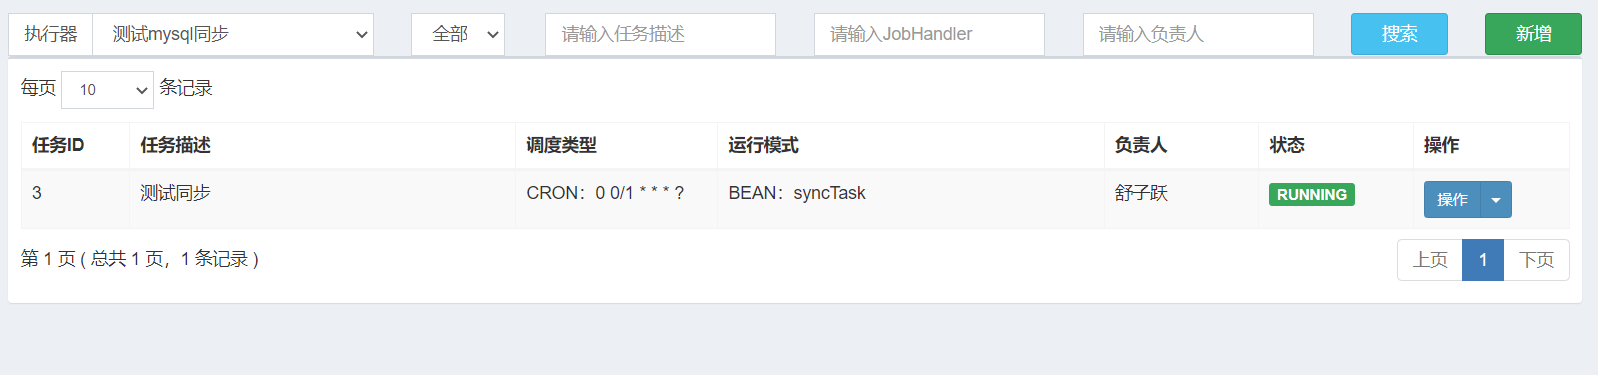
在分布式调度平台新建任务:

成功执行:

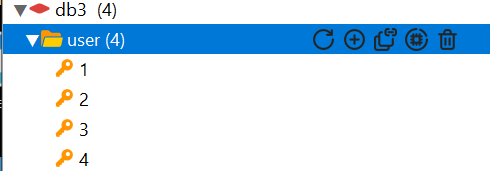
redis中同步了mysql的数据并且每分钟执行一次:
至此快速上手完成


 244
244


 被折叠的 条评论
为什么被折叠?
被折叠的 条评论
为什么被折叠?
 到【灌水乐园】发言


