


 本文详细介绍了一种图片上传至服务器并存储其路径于MySQL数据库的方法。通过使用MyEclipse工具和Java Servlet技术,实现了从用户提交图片到数据库记录的全过程。文章包括数据库连接、实体类定义、数据业务处理及Servlet操作等关键步骤。
一、
最近复习了下以前的知识,其中包括图片上传数据库,并显示在浏览器中!
原理:
打开电脑硬盘,随机获取文件夹中的图片,并把图片保存到服务器中的临时文件夹中,在从临时文件夹中把图片路径保存到数据库中!本文采用的是MYSql数据库,Myeclipse工具。
二、项目基本结构:

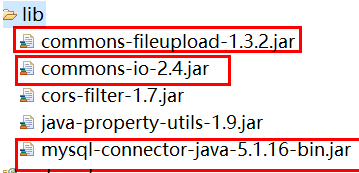
三、jar包:
四、代码块:
1、数据库连接类:
package com.db;

import java.sql.Connection;
import java.sql.DriverManager;

public class DBConnection {
	private static final String Driver = "com.mysql.jdbc.Driver";
	private static final String url="jdbc:mysql://localhost:3306/uploading";
	private static final String user = "root";
	private static final String password = "123456";
	private Connection conn = null;

	public DBConnection() throws Exception { // 进行数据库连接
		try {
			Class.forName(Driver); // 用反射加载数据库驱动
			this.conn = DriverManager.getConnection(url, user, password);
		} catch (Exception e) {
			throw e; // 抛出异常
		}
	}

	public Connection getConnection() {
		return this.conn; // 取得数据库的连接
	}

	public void close() throws Exception { // 关闭数据库
		if (this.conn != null) {
			try {
				this.conn.close(); // 数据库关闭
			} catch (Exception e) {
				throw e;
			}
		}
	}
}
2、实体类bean:
package com.pojo;

public class User {
	private int id;
	private String name;
	private String imgurl;
	public int getId() {
		return id;
	}
	public void setId(int id) {
		this.id = id;
	}
	public String getName() {
		return name;
	}
	public void setName(String name) {
		this.name = name;
	}
	public String getImgurl() {
		return imgurl;
	}
	public void setImgurl(String imgurl) {
		this.imgurl = imgurl;
	}


}
3、数据业务处理类:
package com.service;

import java.sql.Connection;
import java.sql.PreparedStatement;
import java.sql.ResultSet;
import java.util.ArrayList;
import java.util.List;

import com.db.DBConnection;
import com.pojo.User;

public class Userdao  {
	private Connection conn=null;//数据库连接对象
	private PreparedStatement pstmt=null;//数据库操作对象
	private DBConnection db=null;
	public Userdao() throws Exception {
		this.db=new DBConnection();
		this.conn=db.getConnection();
	}
	//添加名称和图片
	public boolean addUser(User user) throws Exception{
		boolean flag=false;
		String sql="insert into uploading(name,imgurl) values(?,?)";
		this.pstmt=this.conn.prepareStatement(sql);
		this.pstmt.setString(1,user.getName());
		this.pstmt.setString(2,user.getImgurl());
		if(this.pstmt.executeUpdate()>0){
			flag=true;
		}
		this.pstmt.close();
		return flag;
	}
	//遍历
	public List<User> findAll() throws Exception{
		List<User> list =new ArrayList<User>();
		String sql="select * from uploading";
		this.pstmt=this.conn.prepareStatement(sql);
		ResultSet rs=this.pstmt.executeQuery();
		while(rs.next()){
			User u=new User();
			u.setId(rs.getInt(1));
			u.setName(rs.getString(2));
			u.setImgurl(rs.getString(3));
			list.add(u);
		}
		this.pstmt.close();
		return list;

	}

}
4、数据库操作类(Servlet)
package com.servlet;

import java.io.File;
import java.io.IOException;
import java.util.List;
import java.util.UUID;

import javax.servlet.ServletException;
import javax.servlet.annotation.WebServlet;
import javax.servlet.http.HttpServlet;
import javax.servlet.http.HttpServletRequest;
import javax.servlet.http.HttpServletResponse;

import org.apache.commons.fileupload.FileItem;
import org.apache.commons.fileupload.FileItemFactory;
import org.apache.commons.fileupload.disk.DiskFileItemFactory;
import org.apache.commons.fileupload.servlet.ServletFileUpload;

import com.pojo.User;
import com.service.Userdao;

@WebServlet(name="Inertm",urlPatterns="/Inertm")

public class Inertm extends HttpServlet {

	protected void doPost(HttpServletRequest req, HttpServletResponse resp)
			throws ServletException, IOException {
		System.out.println("方法开始执行");
		resp.setContentType("application/json;charset=utf-8");
		req.setCharacterEncoding("utf-8");
		resp.setCharacterEncoding("utf-8");
		String name=null;
		// 验证请求是否满足要求(post 请求 / enctype 是否以multipart打头
				boolean isMultipart = ServletFileUpload.isMultipartContent(req);
				// 如果不满足要求就立即结束对该请求的处理
				if (!isMultipart) {
					return;
				}
				try {
					// FileItem 是表单中的每一个元素的封装
					// 创建一个 FileItem 的工厂类
					FileItemFactory factory = new DiskFileItemFactory();
					// 创建一个文件上传处理器(装饰设计模式)
					ServletFileUpload upload = new ServletFileUpload(factory);
					// 解析请求
					List<FileItem> items = upload.parseRequest(req);
					System.out.println(items);

					for (FileItem item : items) {
						// 判断文件类型
						if (item.isFormField()) {
							// 文本类型
							String filename = item.getFieldName();
							if (filename.equals("user")) {
								name = item.getString("UTF-8");
								System.out.println(name);
							}
						} else {
							// 文件类型
							// 获取文件后缀名
							String imgtype = item.getName().substring(item.getName().lastIndexOf("."));
							// 给文件重新命名防止重复
							String imgName = UUID.randomUUID() + imgtype;
							System.out.println();
							String path="D:\\JAVA_2\\Combat\\foryn\\WebRoot\\upload";
							// 将上传的文件保存到服务器
							item.write(new File(path, imgName));

							// 把服务器中的路径添加到数据库中
							String sqlPath=null;
							sqlPath = "upload/" + imgName;
							System.out.println("访问路径:" + sqlPath);
							// 将路径保存到数据库
							User u=new User();
							u.setName(name);
							u.setImgurl(sqlPath);
							Userdao dao=new Userdao();
							boolean flag=dao.addUser(u);
							if(flag){
								resp.getWriter().write("ok");;
							}else{
								resp.getWriter().write("on");;

							}
						}
					}
				} catch (Exception e) {
					e.printStackTrace();
				}

	}
}
5、图片上传提交页(html)
<!DOCTYPE html>
<html>
  <head>
    <title>insert.html</title>

    <meta name="keywords" content="keyword1,keyword2,keyword3">
    <meta name="description" content="this is my page">
    <meta name="content-type" content="text/html; charset=UTF-8">
    <meta http-equiv="Content-type" content="text/html" charset="utf-8"/>

  	<script type="text/javascript" src="Jquery/jquery.min.js"></script>


  </head>

  <body>
    <form action="Inertm"  method="post"   enctype="multipart/form-data">
    		名称:<input type="text" id="user" name="user"><br>
    		图片:<input class="fileInput" id="file" type="file" name="image" />
    		<input type="submit" value="提交" onclick="return upload()"/>
    </form>
	<!-- <script type="text/javascript">
    		function upload(){
    		var username = $("#user").val();
    		var filename = $("#file").val();
    		var url = "http://localhost:8080/foryn/Inertm";
    			$.ajax({
    			url:url,
    			type:"post",
    			dataType:"json",
    			data:{"username":username,"filename":filename},
    			success:function(data){
    				if(data.success){
    					alert("添加成功");

    			}
    			}
    		});
    		}

    	</script> -->
  </body>
</html>
6、显示页面(jsp)
<%@ page language="java" import="java.util.*,com.service.Userdao,com.pojo.User" pageEncoding="utf-8"%>
<%
String path = request.getContextPath();
String basePath = request.getScheme()+"://"+request.getServerName()+":"+request.getServerPort()+path+"/";
%>

<!DOCTYPE HTML PUBLIC "-//W3C//DTD HTML 4.01 Transitional//EN">
<html>
  <head>
    <base href="<%=basePath%>">

    <title>My JSP 'index.jsp' starting page</title>
	<meta http-equiv="pragma" content="no-cache">
	<meta http-equiv="cache-control" content="no-cache">
	<meta http-equiv="expires" content="0">
	<meta http-equiv="keywords" content="keyword1,keyword2,keyword3">
	<meta http-equiv="description" content="This is my page">
	<!--
	<link rel="stylesheet" type="text/css" href="styles.css">
	-->
  </head>

  <body>
   <%
   		Userdao dao = new Userdao();
   		 List<User> list=dao.findAll();
    %>
    <table border="1">
    	<tr>
    		<td>名称</td>
    		<td>图片</td>
    	</tr>
    	<%
    		for(User u:list){
    	 %>
    	<tr>
    		<td><%=u.getName() %></td>
    		<td><img  style="width:50px;height:50px"  src="<%=u.getImgurl()%>"></img></td>
    	</tr>
    	<% }%>
    </table>
  </body>
</html>


 3万+
3万+

 被折叠的 条评论
为什么被折叠?
被折叠的 条评论
为什么被折叠?
 到【灌水乐园】发言


