


 本文详细描述了如何在Ubuntu系统中下载、解压MongoDB5.0.26版本,配置mongodb.conf,添加环境变量,创建mongod.service文件以管理服务,以及设置用户验证和远程连接注意事项。
1、在指定目录下载版本到该目录(这里是/opt/mongodb)(版本这里是5.0.26);
wget https://fastdl.mongodb.org/linux/mongodb-linux-x86_64-ubuntu2004-5.0.26.tgz
(可参考:Linux平台安装MongoDB_w3cschool)
2、解压完成后只有bin目录:需手动添加 /data/db/ (数据存储目录) /log/mongodb.log文件

3、在/etc目录下添加 mongodb.conf文件 具体配置如下
storage:
dbPath: /opt/mongodb/data/db #数据存储目录
journal:
enabled: true
systemLog:
destination: file
logAppend: true
path: /opt/mongodb/log/mongodb.log #日志存储文件目录
net:
port: 27017
bindIp: 0.0.0.0
security:
authorization: disabled #注意:在添加用户之后设置为enabled启用验证
#注意:在最后添加用户之后设置为enabled启用验证
4、系统profile配置
编辑 /etc下面的profile 环境变量 导出mongodb的环境变量配置如下
export MONGODB_HOME=/opt/mongodb
export PATH=$MONGODB_HOME/bin:$PATH
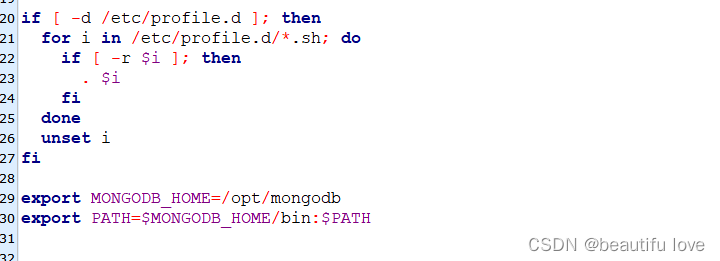
保存后,重启系统配置
source /etc/profile
5、在/etc/systemd/system目录下添加mongod.service文件 (方便启动服务相关配置)
[Unit]
Description=mongodb
After=network.target remote-fs.target nss-lookup.target[Service]
#Type=forking #这个之前连接超时,给干掉
RuntimeDirectory=mongodb
RuntimeDirectoryMode=0751
ExecStart=/opt/mongodb/bin/mongod --config /etc/mongodb.conf
ExecStop=/opt/mongodb/bin/mongod --shutdown --config /etc/mongodb.conf
LimitFSIZE=infinity
LimitCPU=infinity
LimitAS=infinity
LimitNOFILE=64000
LimitNPROC=64000
TimeoutStartSec=300s
PrivateTmp=false[Install]
WantedBy=multi-user.target
注意:这里网上有User=mongodb,加上之后可能会启动失败,可以干掉
修改mongod.service文件后要重新加载配置sudo systemctl daemon-reload
系统配置命令启动
启动服务:
sudo systemctl start mongod
关闭服务
sudo systemctl stop mongod
查看服务状态
sudo systemctl status mongod
启用服务:
sudo systemctl enable mongod
重新加载配置
sudo systemctl daemon-reload
重启:
sudo systemctl restart mongod
重置服务状态:
systemctl reset-failed mongod.service
最后 sudo systemctl start mongod 就可以启动服务了;
使用 sudo systemctl status mongod 查看状态
出现这种就是启动成功了
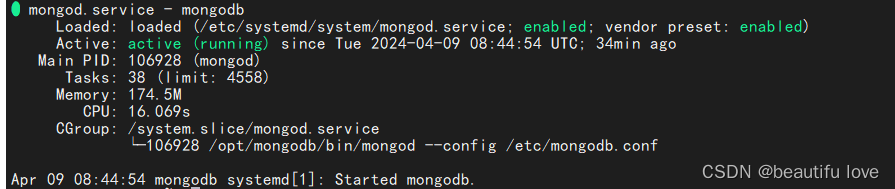
随后使用 mongo 命令 进入mongodb 操作即可了

添加用户后别忘了将mongod.conf文件最后的权限验证设置为enabled
远程连接时注意防火墙是否关闭。


 113
113


 被折叠的 条评论
为什么被折叠?
被折叠的 条评论
为什么被折叠?
 到【灌水乐园】发言


