SSM整合04_改删

修改

点击编辑->弹出修改模态框->点击更新,完成数据修改。

点击修改弹出模态框

  • 写一个模态框
  • 给更新和删除按钮添加class 标识
var editBtn = $("<button></button>").addClass("btn btn-primary btn-sm edit_btn")
                        .append($("<span></span>").addClass("glyphicon glyphicon-pencil")).append("编辑");
                    var delBtn = $("<button></button>").addClass("btn btn-danger btn-sm delete_btn")
                        .append($("<span></span>").addClass("glyphicon glyphicon-trash")).append("删除");

分别为edit_btn和delete_btn

  • 绑定单击事件弹出模态框
    直接这样写绑定不上
$(".edit_btn").click(function () {
                alert("绑定成功")
            })

因为创建按钮之前就绑定了click事件,所以绑定不上,
解决方法:1.在创建按钮的时候绑定2.绑定点击.live(),jquery中的一个方法,可以为后来的元素绑定方法,即使是后面添加也可以绑定上。jquery新版没有live方法,而是使用了on方法进行替代

		$(document).on("click",".edit_btn",function () {
                //查出员工信息,在模态框中显示
                //查出部门信息,在下拉框中显示
                getDepts("#empUpdateModel select");//用于填充下拉框
                $("#empUpdateModel").modal({
                    backdrop: "static"
                })
            })

为了查询员工的属性,在创建员工editBtn的时候给editBtn创建一个属性

//为编辑按钮添加一个自定义属性,标识员工id
editBtn.attr("edit-id",item.empId);

修改绑定事件的方法

$(document).on("click",".edit_btn",function () {
               //查出部门信息,在下拉框中显示
               getDepts("#empUpdateModel select");
               //查出员工信息,在模态框中显示
               getEmp($(this).attr("edit-id"));
               $("#empUpdateModel").modal({
                   backdrop: "static"
               })
           })
           function getEmp(id){
               $.ajax({
                   url:"${APP_PATH}/emp/"+id,
                   type:"GET",
                   success:function (result) {
                       var empData = result.extend.emp;
                       $("#empName_update_static").text(empData.empName);
                       $("#email_update_input").val(empData.email);
                       $("#empUpdateModel input[name=gender]").val([empData.gender]);
                       $("#empUpdateModel select").val([empData.dId]);
                   }
               });
           }
  • 对应ajax对应的服务器端方法
/**查询员工数据*/
   @RequestMapping(value = "/emp/{id}",method = RequestMethod.GET)
   @ResponseBody
   public Msg getEmp(@PathVariable("id") Integer id){
       Emp emp = empService.getEmp(id);
       return Msg.succezz().add("emp",emp);
   }
public Emp getEmp(Integer id) {
       Emp emp = empMapper.selectByPrimaryKey(id);
       return emp;
   }

更新功能实现

  • 前端请求(不直接使用POST请求)
    自己定义一个currentPage用于存放当前页码,在构造分页条的时候给他赋值
    currentPage = result.extend.pageInfo.pageNum;
    这样写HiddenHttpMethodFilter会帮我们将请求从PUT转成POST请求
//点击更新,更新员工信息
            $("#emp_update_btn").click(function () {
                //验证邮箱是否合法
                var email = $("#email_update_input").val();
                var regEmail = /^([a-zA-Z0-9_-])+@([a-zA-Z0-9_-])+(.[a-zA-Z0-9_-])+/
                if(!regEmail.test(email)){
                    alert("邮箱格式非法");
                    return false;
                }
                //发送ajax请求保存更新后的员工数据
                $.ajax({
                    url:"${APP_PATH}/emp/"+$(this).attr("edit-id"),
                    type:"POST",
                    data:$("#empUpdateModel form").serialize()+"&_method=PUT",
                    success:function (result) {
                        //关闭对话框
                        $("#empUpdateModel").modal("hiden");
                        //回到本页面
                        to_page(currentPage);
                    }
                })
            })
  • 后端代码
/** 更新员工*/
    @RequestMapping(value = "/emp/{empId}",method = RequestMethod.PUT)
    @ResponseBody
    public Msg updateEmp(Emp emp){
        empService.updateEmp(emp);
        return Msg.succezz();
    }
	public void updateEmp(Emp emp) {
        empMapper.updateByPrimaryKeySelective(emp);
    }
  • 直接ajax请求使用PUT的话会出现血案
    在这里插入图片描述
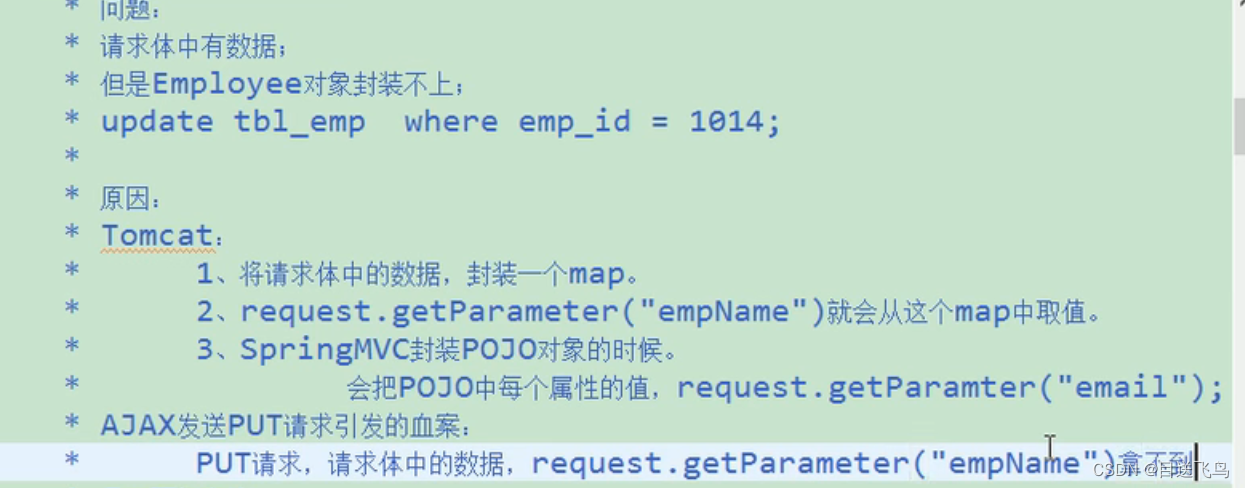
命名请求中有数据,但是Emp对象却封装不上。拿不到的根本原因是Tomcat一看是PUT请求,不会封装请求体中的数据为map,只有POST形式的请求才会封装为map。
    tomcat源码(org.apache.cataliona.connector.Request 3112行左右的parseParameters()方法):
if(!getConnector().isParseBodyMethod(getMethod())){
	success = true;
	return;
}

isParseBodyMethod事务源码

protected boolean isParseBodyMethod(String method){
	return parseBodyMethodSet.contains(method);
}

parseBodyMethodSet实际上默认就是POST。

  • 结局方案
    MVC中有一个过滤器HttpPutFormContentFilter
    spring5.1版本之后HttpPutFormContentFilter已过时,不推荐使用
    新版本的是FormContentFilter,支持PUT, PATCH, 和 DELETE 请求
<filter>
        <filter-name>FormContentFilter</filter-name>
        <filter-class>org.springframework.web.filter.FormContentFilter</filter-class>
    </filter>
    <filter-mapping>
        <filter-name>FormContentFilter</filter-name>
        <url-pattern>/*</url-pattern>
    </filter-mapping>

他的作用,将请求体中的数据解析包装成为一个map,request.getParameter被重写,就会从自己封装的map中取数据

  • 1
    点赞
  • 0
    收藏
    觉得还不错? 一键收藏
  • 0
    评论
SSM是Spring+SpringMVC+MyBatis的缩写,它们分别是流行的Java框架,可以协同作用来实现快速、高效的Web开发。 下面是一个简单的示例,演示如何利用SSM框架来实现增删改查操作: 1. 配置数据源和MyBatis 在Spring的配置文件中,我们需要配置数据源和MyBatis的相关信息。以下是一个示例: ```xml <bean id="dataSource" class="org.apache.commons.dbcp.BasicDataSource"> <property name="driverClassName" value="com.mysql.jdbc.Driver"/> <property name="url" value="jdbc:mysql://localhost:3306/test"/> <property name="username" value="root"/> <property name="password" value="password"/> </bean> <bean id="sqlSessionFactory" class="org.mybatis.spring.SqlSessionFactoryBean"> <property name="dataSource" ref="dataSource"/> <property name="mapperLocations" value="classpath*:mapper/*.xml"/> </bean> <bean class="org.mybatis.spring.mapper.MapperScannerConfigurer"> <property name="basePackage" value="com.example.mapper"/> </bean> ``` 2. 创建实体类和Mapper接口 创建一个实体类,它对应着数据库中的一张表: ```java public class User { private Long id; private String name; private Integer age; // 省略getter和setter方法 } ``` 接着,创建一个Mapper接口,定义对应的增删改查方法: ```java public interface UserMapper { User selectById(Long id); List<User> selectAll(); void insert(User user); void update(User user); void delete(Long id); } ``` 3. 创建Mapper映射文件 在src/main/resources/mapper目录下创建UserMapper.xml文件,定义SQL语句: ```xml <mapper namespace="com.example.mapper.UserMapper"> <select id="selectById" parameterType="java.lang.Long" resultType="com.example.domain.User"> select * from user where id = #{id} </select> <select id="selectAll" resultType="com.example.domain.User"> select * from user </select> <insert id="insert" parameterType="com.example.domain.User"> insert into user(name, age) values(#{name}, #{age}) </insert> <update id="update" parameterType="com.example.domain.User"> update user set name = #{name}, age = #{age} where id = #{id} </update> <delete id="delete" parameterType="java.lang.Long"> delete from user where id = #{id} </delete> </mapper> ``` 4. 创建Service层 创建一个UserService接口,定义对应的增删改查方法: ```java public interface UserService { User selectById(Long id); List<User> selectAll(); void insert(User user); void update(User user); void delete(Long id); } ``` 创建一个UserServiceImpl类,实现UserService接口: ```java @Service public class UserServiceImpl implements UserService { @Autowired private UserMapper userMapper; @Override public User selectById(Long id) { return userMapper.selectById(id); } @Override public List<User> selectAll() { return userMapper.selectAll(); } @Override public void insert(User user) { userMapper.insert(user); } @Override public void update(User user) { userMapper.update(user); } @Override public void delete(Long id) { userMapper.delete(id); } } ``` 5. 创建Controller层 创建一个UserController类,处理用户的HTTP请求: ```java @Controller @RequestMapping("/user") public class UserController { @Autowired private UserService userService; @GetMapping("/{id}") @ResponseBody public User selectById(@PathVariable("id") Long id) { return userService.selectById(id); } @GetMapping("") @ResponseBody public List<User> selectAll() { return userService.selectAll(); } @PostMapping("") @ResponseBody public void insert(@RequestBody User user) { userService.insert(user); } @PutMapping("") @ResponseBody public void update(@RequestBody User user) { userService.update(user); } @DeleteMapping("/{id}") @ResponseBody public void delete(@PathVariable("id") Long id) { userService.delete(id); } } ``` 6. 运行程序 现在,我们可以启动程序,访问http://localhost:8080/user,来获取所有用户的信息;或者访问http://localhost:8080/user/1,来获取ID为1的用户的信息。 当我们使用POST、PUT、DELETE请求时,需要在请求头中添加Content-Type: application/json,以告诉服务器请求数据的格式为JSON。同时,请求体需要传入JSON格式的数据,例如: ```json { "name": "Tom", "age": 20 } ``` 这样就可以实现增删改查功能了。

“相关推荐”对你有帮助么?

  • 非常没帮助
  • 没帮助
  • 一般
  • 有帮助
  • 非常有帮助
提交
评论
添加红包

请填写红包祝福语或标题

红包个数最小为10个

红包金额最低5元

当前余额3.43前往充值 >
需支付:10.00
成就一亿技术人!
领取后你会自动成为博主和红包主的粉丝 规则
hope_wisdom
发出的红包
实付
使用余额支付
点击重新获取
扫码支付
钱包余额 0

抵扣说明:

1.余额是钱包充值的虚拟货币,按照1:1的比例进行支付金额的抵扣。
2.余额无法直接购买下载,可以购买VIP、付费专栏及课程。

余额充值