


一、React基础
1、React是构建用户界面的Javascript库
2、初始化项目命令:npx craete-react-app my-app
3、启动命令:yarn start (或npm start)
4、React.createElement()方法用于创建react元素
创建react元素 (参数:元素名称,元素属性,第三个参数及其后参数都是元素子节点)
5、ReactDOM.render()方法负责渲染react元素到页面中
渲染react元素(参数:要渲染的react元素,页面挂载点)
1、JSX写法

// 使用JSX创建react元素
   const name = 'lilei'
   const title = (
     <h1>你好,{name}</h1>
   )
// 渲染
   ReactDOM.render(title, document.getElementById('root'))
2、JSX条件渲染
场景:loading效果
根据条件渲染特定的JSX结构(可以使用if-else,三元运算符,逻辑与运算符来实现)
// 条件渲染
let isLoading = true
// 1、if-else
const loadData = () => {
  if (isLoading) {
    return <div>loading...</div>
  }
  return <div>加载完成的数据</div>
}
// 2、三元表达式
// const loadData = () => {
//   return isLoading ? <div>loading...</div> : <div>加载完成的数据</div>
// }
// 3、逻辑与运算符
// const loadData = () => {
//   return isLoading && <div>加载完成的数据</div>
// }
const title = (
  <div>条件渲染:{loadData()}</div>
)
ReactDOM.render(title, document.getElementById('root'))
3、JSX的列表渲染
渲染一组数据,应该使用数组的map()方法
渲染列表时应该添加key属性,key属性的值要保证唯一
原则:map()遍历谁,就给谁添加key属性
注意:尽量避免使用索引号作为key
const arr = [{ id: 1, name: 'lilei' }, { id: 2, name: 'hanmeimei' }, { id: 3, name: 'dada' }, { id: 4, name: 'xiaoxiao' }]

const list = (
  <ul>
    {arr.map(item => <li key={item.id}>{item.name}</li>)}
  </ul>
)
ReactDOM.render(list, document.getElementById('root'))
4、JSX样式处理
方法:行内样式和添加className类名
// JSX样式处理
const text = (
  <div className='title' style={{ color: 'red', background: 'pink' }}>JSX样式</div>
)
ReactDOM.render(text, document.getElementById('root'))
二、React组件创建
1、函数组件
(函数名必须以大写字母开头,必须有返回值)
const Hello = () => <div>这是一个组件</div>
ReactDOM.render(<Hello />, document.getElementById('root'))
2、类组件
类名称必须大写字母开头
类组件应该继承React.Component父类,从而可以使用父类中提供的方法或属性
类组件必须提供render()方法
render()方法必须有返回值,表示该组件的结构
// 创建类组件
class Hello extends React.Component {
  render() {
    return (
      <div>这是一个类组件</div>
    )
  }
}
// 渲染组件
ReactDOM.render(<Hello />, document.getElementById('root'))
3、组件抽离
将组件抽离为独立的js文件再引入使用
import React from 'react'
// 创建组件
class Hello extends React.Component {
    render() {
        return (
            <div>这是一个抽离到js文件中的类组件</div>
        )
    }
}
// 导出组件
export default Hello
// 导入组件
import Hello from './conponents/Hello'

// 渲染组件
ReactDOM.render(<Hello />, document.getElementById('root'))
三、React事件处理
1、事件绑定
React事件绑定语法与DOM事件语法相似
语法:on+事件名称={事件处理程序},比如{()=>{}}
注意:React事件采用驼峰命名法,如:onMouseEnter,onFocus
类组件形式写法:
// 事件绑定
class App extends React.Component {
  // 事件处理程序
  handleclick() {
    console.log('点击事件执行了');
  }
  render() {
    return (
      <button onClick={this.handleclick}>点击按钮</button>
    )
  }
}
ReactDOM.render(<App />, document.getElementById('root'))
函数组件形式写法:(函数组件中没有this)
function App() {
  // 事件处理程序
  function handleclick() {
    console.log('点击事件执行了');
  }
  return (
    <button onClick={handleclick}>点击</button>
  )
}
ReactDOM.render(<App />, document.getElementById('root'))
2、事件对象
React中的事件对象叫做合成事件(对象)
事件对象e
阻止浏览器的默认行为 e.preventDefault()
// 事件对象
function App() {
  // 事件处理程序
  function handleclick(e) {
    e.preventDefault()
    console.log('点击事件执行了');
  }
  return (
    <a href='https://www.baidu.com' onClick={handleclick}>点击</a>
  )
}
ReactDOM.render(<App />, document.getElementById('root'))
3、有状态组件和无状态组件
函数组件又叫做无状态组件,类组件又叫做有状态组件
状态(state)即数据
函数组件没有自己的状态,只负责数据展示(静)
类组件有自己的状态,负责更新UI,让页面“动”起来
4、组件中的state和setState
state的基本使用
状态即数据
状态是私有的,只能在组件内部使用
通过this.state来获取状态
class App extends React.Component {
  // constructor() {
  //   super()
  //   // 初始化state
  //   this.state = {
  //     count: 0
  //   }
  // }

  // 简化语法初始化state
  state = {
    count: 0
  }
  render() {
    return (
      <div>计数器:{this.state.count}</div>
    )
  }
}
ReactDOM.render(<App />, document.getElementById('root'))
setState()修改状态
状态是可变的
语法:this.setState({要修改的数据})
注意:不要直接该state中的值,是错误的
setState()作用:1.修改state 2.更新UI
思想:数据驱动视图
class App extends React.Component {
  state = {
    count: 0
  }
  render() {
    return (
      <div>
        <div>计数器:{this.state.count}</div>
        <button onClick={() => {
          this.setState({
            count: this.state.count + 1
          })
        }}>+1</button>
      </div>
    )
  }
}
ReactDOM.render(<App />, document.getElementById('root'))
5、组件中的state和setState()
事件处理程序中this的值为undefined
6、事件绑定this指向
三种方法:箭头函数、Function.prototype.bind()、class的实例方法
箭头函数
class App extends React.Component {
  state = {
    count: 0
  }
  changeCount() {
    this.setState({
      count: this.state.count + 1
    })
  }
  render() {
    return (
      <div>
        <div>计数器:{this.state.count}</div>
        <button onClick={() => { this.changeCount() }}>+1</button>
      </div>
    )
  }
}
ReactDOM.render(<App />, document.getElementById('root'))
Function.prototype.bind()
利用ES5中的bind方法,将事件处理程序中的this与组件实例绑定到一起
class App extends React.Component {
  constructor() {
    super()
    this.changeCount = this.changeCount.bind(this)
  }
  state = {
    count: 0
  }
  changeCount() {
    this.setState({
      count: this.state.count + 1
    })
  }
  render() {
    return (
      <div>
        <div>计数器:{this.state.count}</div>
        <button onClick={this.changeCount}>+1</button>
      </div>
    )
  }
}
ReactDOM.render(<App />, document.getElementById('root'))
class的实例方法
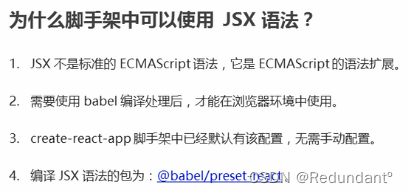
脚手架中babel存在可以直接使用
class App extends React.Component {
  state = {
    count: 0
  }
  changeCount = () => {
    this.setState({
      count: this.state.count + 1
    })
  }
  render() {
    return (
      <div>
        <div>计数器:{this.state.count}</div>
        <button onClick={this.changeCount}>+1</button>
      </div>
    )
  }
}
ReactDOM.render(<App />, document.getElementById('root'))
7、表单处理
受控组件
class App extends React.Component {
  state = {
    txt: ''
  }
  changeTxt = (e) => {
    this.setState({
      txt: e.target.value
    })
  }
  render() {
    return (
      <div>
        <input value={this.state.txt} onChange={this.changeTxt}></input>
      </div>
    )
  }
}
ReactDOM.render(<App />, document.getElementById('root'))
同时处理
class App extends React.Component {
  state = {
    txt: '',
    city: 'bj',
    isChecked: true
  }
  changeHandle = (e) => {
    const target = e.target
    const value = target.type === 'checkbox' ? target.checked : target.value
    const name = target.name
    this.setState({
      [name]: value
    })
  }
  render() {
    return (
      <div>
        <input name="txt" value={this.state.txt} onChange={this.changeHandle}></input>
        <br />
        <select name="city" value={this.state.city} onChange={this.changeHandle}>
          <option value="bj">北京</option>
          <option value="sh">上海</option>
          <option value="gz">广州</option>
        </select>
        <br />
        <input name="isChecked" type="checkbox" checked={this.state.isChecked} onChange={this.changeHandle}></input>
      </div>
    )
  }
}
ReactDOM.render(<App />, document.getElementById('root'))
非受控组件
class App extends React.Component {
  constructor() {
    super()
    // 创建ref
    this.txtRef = React.createRef()
  }
  getTxt = () => {
    console.log('文本框的值为', this.txtRef.current.value);
  }
  render() {
    return (
      <div>
        <input type="text" ref={this.txtRef}></input>
        <button onClick={this.getTxt}>获取文本框的值</button>
      </div>
    )
  }
}
ReactDOM.render(<App />, document.getElementById('root'))
案例:发表评论
效果图:

// 发表评论案例
class Comment extends React.Component {
  state = {
    name: '',
    content: '',
    commentList: []
  }
  // 处理表单元素值
  handleForm = (e) => {
    const { value, name } = e.target
    this.setState({
      [name]: value
    })
  }
  // 发表评论
  handlePublish = () => {
    const { commentList, name, content } = this.state
    // 非空校验
    if (name.trim() === '' || content.trim() === '') {
      alert('请输入评论内容和评论人')
      return
    }
    const newCommentList = [{
      id: Math.random(),
      name: name,
      content: content
    }, ...commentList]
    this.setState({
      name: '',
      content: '',
      commentList: newCommentList
    })
  }
  renderList = () => {
    const { commentList } = this.state
    if (commentList.length === 0) {
      return (
        <div>暂无评论</div>
      )
    }
    return (
      <div>
        {commentList.map(item =>
          <div>
            <h3>评论人:{item.name}</h3>
            <div>评论内容:{item.content}</div>
          </div>
        )}
      </div>
    )
  }
  render() {
    const { name, content } = this.state
    return (
      <div>
        <input name="name" type="text" onChange={this.handleForm} value={name}></input>
        <br />
        <textarea name="content" cols="30" onChange={this.handleForm} rows="10" value={content}></textarea>
        <br />
        <button onClick={this.handlePublish}>发表</button>
        <br />
        <br />
        {this.renderList()}
      </div>
    )
  }
}
ReactDOM.render(<Comment />, document.getElementById('root'))
三、React组件进阶
1、组件的 props
组件是封闭的,要接受外部数据应该通过props来实现
props的作用:接收传递给组件的数据
传递数据:给组件标签添加属性
接收数据:函数组件通过参数props接收参数,类组件通过this.props接收数据
特点:
1、可以给组件传递任意类型的数据(函数,JSX结构)
2、props是只读的对象,只能读取属性的值,无法修改对象
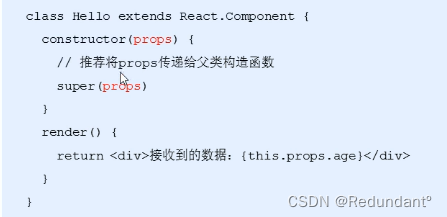
3、注意:实用类组件时,如果写了构造函数,应该将props传递给super(),否则,无法在构造函数中获取到props
函数组件:
const Components = props => {
  console.log(props);
  return (
    <div>
      <div>{props.title}</div>
      <div>{props.count}</div>
    </div>
  )
}
// 传递数据
ReactDOM.render(<Components title="标题" count={1} />, document.getElementById('root'))
类组件:
class Components extends React.Component {
  render() {
    this.props.fn()
    return (
      <div>
        <div>{this.props.title}</div>
        <div>{this.props.count}</div>
        {this.props.tag}
      </div>
    )
  }
}
// 传递数据
ReactDOM.render(<Components title="标题" count={1} fn={() => { console.log('这是一个函数') }} tag={<div>这是一个JSX结构的标签</div>} />, document.getElementById('root'))
2、组件通讯的三种方式
父传子
1、父组件提供要传递的state的数据
2、给子组件标签添加属性,值为state中的数据
3、子组件中通过props接收父组件中传递的传递的数据
// 父传子
class ParentComponents extends React.Component {
  state = {
    title: '这是父组件的标题'
  }
  render() {
    return (
      <div>
        <div>这是子组件:</div>
        <SonComponents title={this.state.title} />
      </div>
    )
  }
}
class SonComponents extends React.Component {
  constructor(props) {
    super(props)
  }
  render() {
    return (
      <div>{this.props.title}</div>
    )
  }
}
ReactDOM.render(<ParentComponents />, document.getElementById('root'))
子传父
思路:利用回调函数,父组件提供回调,子组件调用,将要传递的数据作为回调函数的参数
1、父组件提供一个回调函数(用于接收数据)
2、将该函数作为属性值,传递给子组件
3、子组件通过props调用回调函数
4、将子组件的数据作为参数传递给回调函数
注意:回调函数中this指向问题
// 子传父
class ParentComponents extends React.Component {
    state = {
        msg: ''
    }
    getChildMsg = (data) => {
        this.setState({
            msg: data
        })
    }
    render() {
        return (
            <div>
                <div>父组件:{this.state.msg}</div>
                <ChildComponents getMsg={this.getChildMsg}></ChildComponents>
            </div>
        )
    }
}
class ChildComponents extends React.Component {
    state = { msg: '我是子组件的一条信息' }
    handleClick = () => {
        this.props.getMsg(this.state.msg)
    }
    render() {
        return (
            <button onClick={this.handleClick}>按钮</button>
        )
    }
}
ReactDOM.render(<ParentComponents />, document.getElementById('root'))
兄弟组件
将共享状态提升到最近的公共父组件中,由公共父组件管理这个状态
思想:状态提升
公共父组件职责:1、提供共享状态2、提供操作共享状态的方法
要通讯的子组件只需要通过props接收状态或操作状态的方法

class ParentComponents extends React.Component {
    // 提供共享状态
    state = {
        count: 0
    }
    // 提供修改状态的方法
    changeCount = () => {
        this.setState({
            count: this.state.count + 1
        })
    }
    render() {
        return (
            <div>
                <Child1 count={this.state.count} />
                <Child2 changeCount={this.changeCount} />
            </div>
        )
    }
}
const Child1 = props => {
    return (
        <div>
            <span>计数器:{props.count}</span>
        </div>
    )
}
const Child2 = props => {
    return (
        <div>
            <button onClick={() => { props.changeCount() }}>点击+1</button>
        </div>
    )
}

ReactDOM.render(<ParentComponents />, document.getElementById('root'))
3、props深入
children属性
children属性:表示组件标签的子节点,当组件标签有子节点时,props就会有该属性
children属性与普通的props一样,值可以是任意值(文本,React元素,组件,甚至是函数)
(1)children为文本节点
const App = props => {
    return (
        <div>
            <h1>组件标签的子节点:{props.children}</h1>
        </div>
    )
}
ReactDOM.render(<App>我是子节点</App>, document.getElementById('root'))
(2)children为标签节点
const App = props => {
    return (
        <div>
            <h1>组件标签的子节点:{props.children}</h1>
        </div>
    )
}
ReactDOM.render(<App>
     <p>我是子节点,是一个P标签</p>
</App>, document.getElementById('root'))
(3)children为组件节点
const App = props => {
    return (
        <div>
            <h1>组件标签的子节点:{props.children}</h1>
        </div>
    )
}
const Test = () => (<button>我是一个button组件</button>)
ReactDOM.render(<App>
     <Test></Test>
</App>, document.getElementById('root'))
(4)children为函数节点
const App = props => {
    return (
        <div>
            <h1>组件标签的子节点:{props.children()}</h1>
        </div>
    )
}
ReactDOM.render(<App>
    {
        () => { console.log('这是一个函数子节点') }
    }
</App>, document.getElementById('root'))
props校验
使用步骤:
1、安装包props-types(npm i prop-types / yarn add prop-types)
2、导入prop-types包
3、使用组件名。propTypes={}来给组件的props添加校验规则
4、校验规则通过PropTyprs对象来指定
props校验:允许在创建组件的时候。就指定props的类型、格式等
作用:捕获使用组件时因为props导致的错误,给出明确的错误提示,增加组件的健壮性
import propTypes from 'prop-types'
const App = props => {
    const arr = props.colors
    const lis = arr.map((item, index) => {
        return (<li>{item.name}</li>)
    })
    return <ul>{lis}</ul>
}
// 添加props校验
App.propTypes = {
    colors: propTypes.array
}
ReactDOM.render(<App colors={[{ name: 'red' }, { name: 'blue' }]}></App>, document.getElementById('root'))
约束规则:
1、常见类型:array,bool,func,number,object,string
2、React元素类型:element
3、必填项:isRequired
4、特定结构对象:shape({})
// 添加props校验
// 属性a的类型:数值
// 属性fn的类型:函数(func)并且为必填项
// 属性tag的类型:React元素(element)
// 属性filter的类型:对象({area:'上海',price:1900})
App.proptypes = {
    a: PropTypes.number,
    fn: PropTypes.func.isRequired,
    tag: PropTypes.element,
    filter: PropTypes.shape({
        area: PropTypes.string,
        price: PropTypes.number
    })
}
ReactDOM.render(<App ></App>, document.getElementById('root'))
props的默认值
场景:分页组件 ——》每页显示条数
作用:给props设置默认值,在未传入props时生效
// props的默认值
const App = props => {
console.log(props);
return (
<div>props的默认值:{props.page}</div>
)
}
// 添加props默认值
App.defaultProps = {
page: 1
}
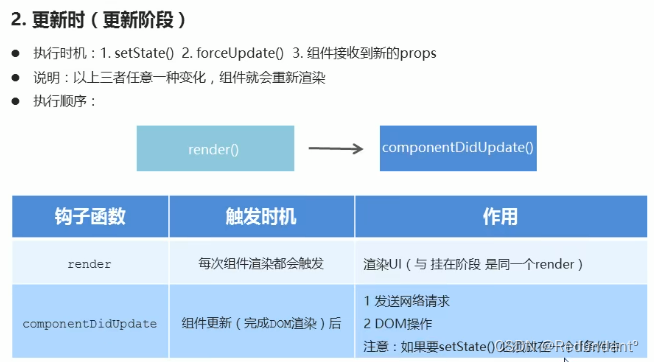
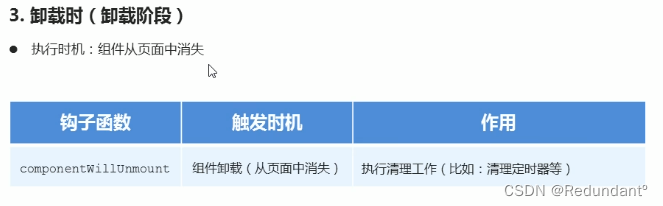
ReactDOM.render(<App page={10} />, document.getElementById('root'))4、组件的生命周期

四、render-props和高阶组件
1、render-props模式
使用步骤:
1、创建Mouse组件,在组件中提供服用的状态逻辑代码(1.状态 2.操作状态的方法)
2、将要复用的状态作为props.render(state)方法的参数,暴露到组件外部
3、使用props.render{}的返回值作为要渲染的内容
class Mouse extends React.Component {
    state = {
        x: 0,
        y: 0
    }
    handleMouseMove = e => {
        this.setState({
            x: e.clientX,
            y: e.clientY,
        })
    }
    componentDidMount() {
        window.addEventListener('mousemove', this.handleMouseMove)
    }
    render() {
        return this.props.render(this.state)

    }
}
class App extends React.Component {
    render() {
        return (
            <div>
                <div>render-props:</div>
                <Mouse render={
                    mouse => {
                        return (
                            <div style={{
                                width: '100px',
                                height: '100px',
                                background: 'pink',
                                position: 'absolute',
                                top: mouse.y - 50,
                                left: mouse.x - 50
                            }}>鼠标位置:{mouse.x}  {mouse.y}</div>
                        )
                    }
                }></Mouse>
            </div>
        )
    }
}
ReactDOM.render(<App />, document.getElementById('root'))
2、render-props模式——children代替render属性(推荐使用)
- 注意:并不是该模式叫render-props就必须使用名为render的prop,实际上可以使用任意名称的prop
- 把prop是一个函数并且告诉组件要渲染什么内容的技术叫做render-props模式
- 推荐:使用children代替render属性
class Mouse extends React.Component {
    state = {
        x: 0,
        y: 0
    }
    handleMouseMove = e => {
        this.setState({
            x: e.clientX,
            y: e.clientY,
        })
    }
    componentDidMount() {
        window.addEventListener('mousemove', this.handleMouseMove)
    }
    render() {
        return this.props.children(this.state)

    }
}
class App extends React.Component {
    render() {
        return (
            <div>
                <div>render-props:</div>
                <Mouse>
                    {
                        mouse => {
                            return (
                                <div style={{
                                    width: '100px',
                                    height: '100px',
                                    background: 'pink',
                                    position: 'absolute',
                                    top: mouse.y - 50,
                                    left: mouse.x - 50
                                }}>鼠标位置:{mouse.x}  {mouse.y}</div>
                            )
                        }
                    }
                </Mouse>
            </div>
        )
    }
}
ReactDOM.render(<App />, document.getElementById('root'))
3、高阶组件
- 高阶组件(HOC)是一个函数,接收要包装的组件,返回增强后的组件
- 高阶组件内部创建一个类组件,在这个类组件中提供复用状态的状态逻辑代码,通过prop将复用的状态传递给被包装组件WrappedComponent
使用步骤:
1、创建一个函数,名称约定以with开头
2、指定函数参数,参数应该以大写字母开头(作为要渲染的组件)
3、在函数内部创建一个类组件,提供复用的状态逻辑代码,并返回
4、再该组件中,渲染参数组件,同时将状态通过prop传递给参数组件
5、调用高阶组件,传入要增强的组件,通过返回值拿到增强后的组件,并将其渲染到页面中
// 创建高阶组件
function withMouse(WrappedComponent) {
    // 该组件提供复用的状态逻辑
    class Mouse extends React.Component {
        // 鼠标状态
        state = {
            x: 0,
            y: 0
        }
        hamdleMousemove = e => {
            this.setState({
                x: e.clientX,
                y: e.clientY
            })
        }
        // 控制鼠标状态的逻辑
        componentDidMount() {
            window.addEventListener('mousemove', this.hamdleMousemove)
        }
        componentWillUnmount() {
            window.removeEventListener('mouseover', this.hamdleMousemove)
        }
        render() {
            return <WrappedComponent {...this.state}></WrappedComponent>
        }
    }
    return Mouse
}
// 用来测试高阶组件
const Position = props => (
    <p>
        鼠标当前位置:(x:{props.x},y:{props.y})
    </p>
)
// 调用高阶组件来增强猫捉老鼠组件
const Cat = mouse => (
    <div style={{
        width: '100px',
        height: '100px',
        background: 'pink',
        position: 'absolute',
        top: mouse.y - 50,
        left: mouse.x - 50
    }}>鼠标位置:{mouse.x}  {mouse.y}</div>
)
const MousePosition = withMouse(Position)
const MouseCat = withMouse(Cat)
class App extends React.Component {
    render() {
        return (
            <div>
                <h1>高阶组件</h1>
                <MousePosition></MousePosition>
                <MouseCat></MouseCat>
            </div>
        )
    }
}
ReactDOM.render(<App />, document.getElementById('root'))
设置displayName
使用高阶组件存在的问题:得到的两个组件名称相同
原因:默认情况下,React使用组件名称作为displayName
解决方式:为高阶组件设置displayName便于调试时区分不同的组件
displayName的作用:用于设置调试信息(React Developer Tools信息)
function withMouse(WrappedComponent) {
    // 该组件提供复用的状态逻辑
    class Mouse extends React.Component {
        // 鼠标状态
        state = {
            x: 0,
            y: 0
        }
        hamdleMousemove = e => {
            this.setState({
                x: e.clientX,
                y: e.clientY
            })
        }
        // 控制鼠标状态的逻辑
        componentDidMount() {
            window.addEventListener('mousemove', this.hamdleMousemove)
        }
        componentWillUnmount() {
            window.removeEventListener('mouseover', this.hamdleMousemove)
        }
        render() {
            return <WrappedComponent {...this.state}></WrappedComponent>
        }
    }
    // 设置displayName
    Mouse.displayName = `WithMouse${getDisplayName(WrappedComponent)}`
    function getDisplayName(WrappedComponent) {
        return WrappedComponent.displayName || WrappedComponent.name || 'component'
    }
    return Mouse
}
传递props
问题:props丢失
原因:高阶组件没有往下传递props
解决方式:渲染WrapperedComponent时,将state和this.props一起传递给组件
function withMouse(WrappedComponent) {
    // 该组件提供复用的状态逻辑
    class Mouse extends React.Component {
        // 鼠标状态
        state = {
            x: 0,
            y: 0
        }
        hamdleMousemove = e => {
            this.setState({
                x: e.clientX,
                y: e.clientY
            })
        }
        // 控制鼠标状态的逻辑
        componentDidMount() {
            window.addEventListener('mousemove', this.hamdleMousemove)
        }
        componentWillUnmount() {
            window.removeEventListener('mouseover', this.hamdleMousemove)
        }
        render() {
            return <WrappedComponent {...this.state} {...this.props}></WrappedComponent>
        }
    }
4、setState()方法说明
更新数据
setState()是异步更新数据的
注意:使用该语法时,后面的setState()不要依赖于前面的setState()
可以多次调用setState(),只会触发一次重新渲染
class App extends React.Component {
    state = {
        count: 1
    }
    handleClick = () => {
        this.setState({
            count: this.state.count + 1
        })
        console.log(this.state.count);
    }
    render() {
        return (
            <div>
                <div>{this.state.count}</div>
                <button onClick={this.handleClick}>点击+1</button>
            </div>
        )
    }
}
ReactDOM.render(<App />, document.getElementById('root'))
推荐语法
推荐:使用setState((state,props)=>{})语法,这种方法也是异步更新state
参数state:表示最新的state
参数 props:表示最新的props(在状态更新后立即执行某个操作,回相当于回调函数)
this.setState((state, props) => {
   return {
       count: state.count + 1
   }
})
class App extends React.Component {
state = {
count: 1
}
handleClick = () => {
this.setState((state, props) => {
return {
count: state.count + 1
}
},
// 状态更新后并且重新渲染后立即执行
() => {
console.log('更新状态完成:' + this.state.count);
})
this.setState((state, props) => {
return {
count: state.count + 1
}
})
}
render() {
return (
<div>
<div>{this.state.count}</div>
<button onClick={this.handleClick}>点击+1</button>
</div>
)
}
}
ReactDOM.render(<App />, document.getElementById('root'))五、组件性能优化
1、减轻state
减轻state:只存储根组件渲染相关的数据(比如:count / 列表数据 / loading等)
注意:不用做渲染的数据不要放在state中,不如定时器id等
对于这种需要在多个方法中用到的数据,应该放在this中
class Hello extends React.Component{
    componentDidMount(){
        this.timerId=setInterval(()=>{},2000)
    }
    componentWillUnmount(){
        clearInterval(this.timerId)
    }
    render(){...}
}
2、避免不必要的重新渲染
组件更新机制:父组件更新也会引起子组件也被更新
问题:子组件没有任何变化时也会重新渲染
如何避免不必要的重新渲染呢?
解决方式:使用钩子函数shouldComponentUpdate(nextProps,nextState)
作用:通过返回值确定该组件是否重新渲染,返回true表示重新渲染,false表示不重新渲染
触发时机:更新阶段的钩子函数,组件重新渲染前执行(shouldComponentUpdate→render)
class Hello extends React.Component{
    shouldComponentUpdate(){
        // 根据条件,决定是否重新渲染组件
        return false
    }
    render(){...}
}
随机数案例
nextState:
class App extends React.Component {
    state = {
        number: 0
    }
    // 因为两次生成的随机数可能相同,如果相同,此时,不需要重新渲染
    shouldComponentUpdate(nextProps, nextState) {
        console.log('最新状态:', nextState, '当前状态:', this.state);
        return nextState.number !== this.state.number
        // if (nextState.number === this.state.number) {
        //     return false
        // }
        // return true
    }
    handleClick = () => {
        this.setState(() => {
            return {
                number: Math.floor(Math.random() * 3)
            }
        })
    }
    render() {
        console.log('执行了render');
        return (
            <div>
                <h1>随机数:{this.state.number}</h1>
                <button onClick={this.handleClick}>重新生成</button>
            </div>
        )
    }
}
ReactDOM.render(<App />, document.getElementById('root'))
nextProps:
class NumberBox extends React.Component {
    // 因为两次生成的随机数可能相同,如果相同,此时,不需要重新渲染
    shouldComponentUpdate(nextProps, nextState) {
        console.log('最新状态:', nextProps, '当前状态:', this.props);
        return nextProps.number !== this.props.number
        // if (nextState.number === this.state.number) {
        //     return false
        // }
        // return true
    }
    render() {
        console.log('执行了render');
        return (
            <div>
                <h1>随机数:{this.props.number}</h1>
            </div>
        )
    }
}
class App extends React.Component {
    state = {
        number: 0
    }
    handleClick = () => {
        this.setState(() => {
            return {
                number: Math.floor(Math.random() * 3)
            }
        })
    }
    render() {
        return (
            <div>
                <NumberBox number={this.state.number}></NumberBox>
                <button onClick={this.handleClick}>重新生成</button>
            </div>
        )
    }
}
ReactDOM.render(<App />, document.getElementById('root'))
六、React路由
1、路由的基本使用
① 安装
npm install react-router-dom
② 导入路由的三个核心组件
import { BrowserRouter as Router, Route, Link } from 'react-router-dom'
③ 使用Router组件包裹整个应用(重要)
const App = () => {
    return (
        <Router>
            <div>React路由基本使用</div>
        </Router>
    )
}
ReactDOM.render(<App />, document.getElementById('root'))
④使用Link组件作为导航菜单(路由入口)
<Link to="/first">页面一</Link>⑤使用Route组件配置路由规则和要展示的组件(路由出口)
新版本React
// 使用Router组件包裹整个应用
const App = () => (
    <Router>
        <div>
            <div>React路由基本使用</div>
            {/* 指定路由入口 */}
            <Link to="/first">页面一</Link>
            {/* 指定路由出口 */}
            <Routes>
                <Route path="/first" element={<First />} />
            </Routes>
        </div>
    </Router>
)

ReactDOM.render(<App />, document.getElementById('root'))
捞版本React

2、常用组件说明
- Rrouter组件:包裹整个应用,一个React应用只需要使用一次
- 两种常用Router:HashRouter和BrowserRouter
- HashRouter:使用URL的哈希值实现(localhost:3000/#/first)
- (推荐)BrowserRouter:使用H5的history API实现(localhost:3000/first)
- Link组件:用于指定导航链接(a标签)
- Route组件:指定路由展示组件相关信息
3、路由的执行过程
- 点击Link组件(a标签),修改了浏览器地址栏中的url
- React路由监听到地址栏url的变化
- React路由内部遍历所有Route组件,使用路由规则(path)与pathname进行匹配
- 当路由规则(path)能够匹配地址栏中的pathname时,就展示该Route组件的内容


 583
583


 被折叠的 条评论
为什么被折叠?
被折叠的 条评论
为什么被折叠?
 到【灌水乐园】发言


