


前言
主要记录多线程的案例,实现定时器和线程池。
一、定时器
定时器相当于开发中的闹钟。
1.标准库中的定时器
标准库中提供一个Timer类,类中的主要方法schedule,schedule包含两个参数,第一个参数是执行的任务代码,第二个参数是延迟时间,单位是毫秒。
代码如下(示例):
public class Demo1 {
    public static void main(String[] args) {
        Timer timer = new Timer();
        timer.schedule(new TimerTask() {
            @Override
            public void run() {
                System.out.println("闹钟1");
            }
        },1000);
        timer.schedule(new TimerTask() {
            @Override
            public void run() {
                System.out.println("闹钟2");
            }
        },2000);
        timer.schedule(new TimerTask() {
            @Override
            public void run() {
                System.out.println("闹钟3");
            }
        },3000);

        System.out.println("闹钟开始");
    }
}
2.实现定时器
根据标准库中的定时器实现一个自己的定时器,主要包括以下几部分:
(1)类似于Timer的类,即定时器;
(2)执行任务的代码;
(3)使用优先级队列存储任务时,需要实现一个比较器。
代码如下(示例):
//表示执行的任务
class MyTimerTask implements Comparable<MyTimerTask> {
    private Runnable runnable;//表示当前要执行的任务
    private long time;//表示任务执行的时间

    public MyTimerTask(Runnable runnable,long delay) {
        this.runnable = runnable;
        this.time = System.currentTimeMillis() + delay;
    }

    public Runnable getRunnable() {
        return runnable;
    }

    public void setRunnable(Runnable runnable) {
        this.runnable = runnable;
    }

    public long getTime() {
        return time;
    }

    public void setTime(long time) {
        this.time = time;
    }

    @Override
    public int compareTo(MyTimerTask o) {
        return (int) (this.time - o.time);
    }
}
class MyTimer {
    private BlockingQueue<MyTimerTask> queue = new PriorityBlockingQueue<>();
    private Object locker = new Object();
    public MyTimer() {
        Thread t = new Thread(() -> {
            while (true) {
                try {
                    //扩大加锁范围。保证take到wait之间是原子操作
                    synchronized (locker) {
                        //取出队首任务
                        MyTimerTask timerTask = queue.take();
                        if(System.currentTimeMillis() >= timerTask.getTime()) {
                            timerTask.getRunnable().run();
                        }else {
                            //时间还没到
                            queue.put(timerTask);
                            //如果锁加在这可能会出现 等待的时间大于新加入task。例如:等待后是两点,新加入的task是一点,所以需要将锁放大
                            locker.wait(timerTask.getTime() - System.currentTimeMillis());
                        }
                    }
                } catch (InterruptedException e) {
                    e.printStackTrace();
                }
            }
        });
        t.start();
    }

    public void schedule(Runnable runnable,long delay) throws InterruptedException {
        MyTimerTask timerTask = new MyTimerTask(runnable,delay);
        queue.put(timerTask);
        synchronized (locker) {
            //notify不会出现在take和wait之间
            locker.notify();
        }
    }
}
public class Demo2 {
    public static void main(String[] args) throws InterruptedException {
        MyTimer myTimer = new MyTimer();
        myTimer.schedule(new Runnable() {
            @Override
            public void run() {
                System.out.println("闹钟开始1s");
            }
        },1000);
        myTimer.schedule(new Runnable() {
            @Override
            public void run() {
                System.out.println("闹钟开始2s");
            }
        },2000);
        myTimer.schedule(new Runnable() {
            @Override
            public void run() {
                System.out.println("闹钟开始3s");
            }
        },3000);
        System.out.println("闹钟开始");
    }
}
二、线程池
线程池是一个工厂模式,线程池可以减少每次启动/销毁线程的损耗。
1.标准库中的线程池
Executors本质是ExecutorService的封装。
代码如下(示例):
public class Demo3 {
    public static void main(String[] args) {
    	//注意不是new
        ExecutorService threadPool = Executors.newCachedThreadPool();
        threadPool.submit(new Runnable() {
            @Override
            public void run() {
                System.out.println("线程池");
            }
        });
    }
}
2.实现线程池
核心操作为 submit, 将任务加入线程池中,使用Runnable描述一个任务,使用BlockingQueue组织所有的任务,构造函数中的m表示指定的最大线程数,当线程数超过m时就不再新增线程。
代码如下(示例):
class MyThreadPool {
    private BlockingQueue<Runnable> queue = new LinkedBlockingQueue<>();
    public void submit(Runnable runnable) throws InterruptedException {
        queue.put(runnable);
    }
    public MyThreadPool(int m) {
        for (int i = 0; i < m; i++) {
            Thread t = new Thread(() -> {
                while (true) {
                    try {
                        Runnable runnable = queue.take();
                        runnable.run();
                    } catch (InterruptedException e) {
                        e.printStackTrace();
                    }

                }
            });
            t.start();
        }
    }
}
public class Demo4 {
    public static void main(String[] args) throws InterruptedException {
        MyThreadPool myThreadPool = new MyThreadPool(10);
        for (int i = 0; i < 1000; i++) {
            int taskId = i;
            myThreadPool.submit(new Runnable() {
                @Override
                public void run() {
                    System.out.println("执行当前任务:"+taskId+" 当前线程:"+Thread.currentThread().getName());
                }
            });
        }
    }
}
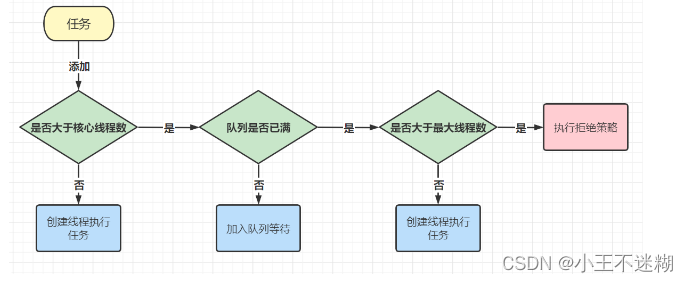
3.线程池的执行流程
(1)当新加入一个任务时,先判断当前线程数是否大于核心线程数,如果结果为 false,则新建线程并执行任务;
(2)如果结果为 true,则判断任务队列是否已满,如果结果为 false,则把任务添加到任务队列中等待线程执行;
(3)如果结果为 true,则判断当前线程数量是否超过最大线程数?如果结果为 false,则新建线程执行此任务;
(4)如果结果为 true,执行拒绝策略。
如何确定线程池的数目?
由于(1)主机的CPU的配置不确定;(2)你的程序的执行特点不确定。工作中实际的处理方案是进行实验验证,针对你的程序进行性能测试,分别给线程池设置成不同的数目:N,1.5N,2N,0.5N 都试试,分别记录每种情况下,你的程序的一些核心性能指标和系统负载情况,最终选择一个你觉得最合适的配置。
4.拒绝策略
AbortPolicy:中止策略,线程池会抛出异常并中止执行此任务;
CallerRunsPolicy:把任务交给添加此任务的线程来执行;
DiscardPolicy:忽略此任务(最新加入的任务);
DiscardOldestPolicy:忽略最先加入队列的任务(最老的任务)。


 342
342


 被折叠的 条评论
为什么被折叠?
被折叠的 条评论
为什么被折叠?
 到【灌水乐园】发言


