


目录
Netflix Eureka基本使用
Netflix Eureka基本使用(★)
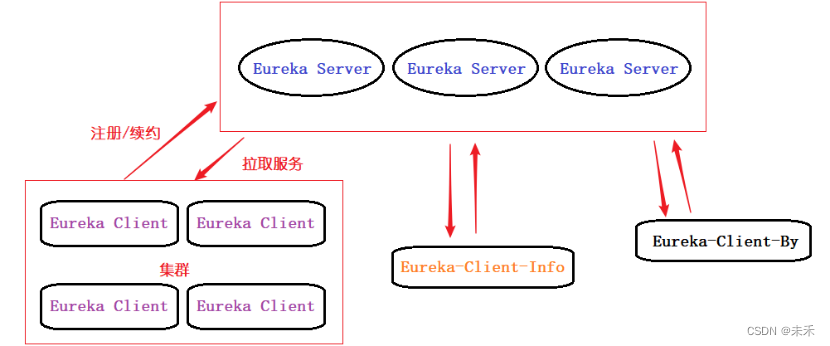
注册中心(Eureka Server)
1.引入组件的启动器(Eureka Server)
<!--Spring Boot的核心启动器,包含了自动配置、日志和YAML-->
<dependency>
    <groupId>org.springframework.boot</groupId>
    <artifactId>spring-boot-starter-web</artifactId>
</dependency>
<dependency>
    <groupId>org.springframework.cloud</groupId>
    <artifactId>spring-cloud-starter-netflix-eureka-server</artifactId>
</dependency>
2.覆盖Eureka Server默认配置(集群)
多个Eureka Server相互注册,组成一个集群
①单机版(SPRINGCLOUD-EUREKA-SERVER)
#端口 默认8761
server.port=8080
#服务名
spring.application.name=eureka-server
#此实例的主机名
eureka.instance.hostname=localhost
#defaultZone不会提示的,此处需要自己写。默认http://localhost:8761/eureka
#defaultZone属性是map(key-value)格式;当key是defaultZone的时候才能被解析。集群
eureka.client.service-url.defaultZone=http://${eureka.instance.hostname}:${server.port}/eureka/

eureka.client.fetch-registry=false
eureka.client.register-with-eureka=false

eureka.server.enable-self-preservation=false
#扫描清理无效节点,默认60*1000毫秒,即60秒
eureka.server.eviction-interval-timer-in-ms=5000
eureka.client.register-with-eureka:false #关闭service-url注册
Eureka Server复制模式是对等复制。当服务启动时会根据service-url地址去进行注册,而当前是单机模式而非集群,service-url的值为自身的路径,这时就会出现自己注册自己的情况,但是自身并没有启动成功,从而就会出现(ConnectException: Connection refused: connect)无法连接的错误,因为默认值是true所以当单机环境下,需要设置为false
②集群版(SPRINGCLOUD-EUREKA-SERVER)
Eureka Server使用集群配置其他Eureka Server的defaultZone的服务地址(复制模式是对等复制)
HostName注册(默认)
默认情况下,Eureka是将服务的HostName(主机名)注册至服务发现中心,如果没有配置dns或者host,则无法通过主机名访问服务
1.不能用localhost
eureka.client.serviceUrl.defaultZone=http://localhost:2222/eureka/
要采用:
#①:
eureka.instance.hostname=serverone
eureka.client.serviceUrl.defaultZone=http://servertwo:2222/eureka/

#②:
eureka.instance.hostname=servertwo
eureka.client.serviceUrl.defaultZone=http://serverone:1111/eureka/
2.配置host
C:\Windows\System32\drivers\etc\hosts
127.0.0.1    serverone
127.0.0.1    servertwo
127.0.0.1    serverthree

配置本机的host文件:当InetUtils找不到合适IP时,会调用JDK的InetAddress.getLocalHost()。该方法会根据本机的hostname解析出对应的IP。所以可以配置本机的hostnam和/etc/hosts文件,直接将本机的主机名映射到有效IP地址
hosts文件是一个用于储存计算机网络中各节点信息的计算机文件。负责将主机名映射到相应的IP地址。hosts文件通常用于补充或取代网络中DNS的功能。和DNS不同的是,计算机的用户可以直接对hosts文件进行控制
3.集群中注册中心的spring.application.name或eureka.instance.appname必须一致
4.开启相互注册
eureka.client.register-with-eureka=true
eureka.client.fetch-registry=true
IP注册
使用IP进行注册只需要在Eureka服务端增加配置:eureka.instance.perferIpAddress=true(preferIpAddress默认false,不开启IP注册)
查看EurekaInstanceConfigBean源码发现。通过preferIpAddress属性可以设置,获取主机名时,返回的IP地址,这样就能通过IP地址来访问相应的服务,而非主机名
(1)getHostName()。preferIpAddress为false返回hostname属性,为true返回ipAddress属性
(2)eureka.instance.ip-address、eureka.instance.prefer-ip-address=true同时设置,优先取ipAddress的配置,不会取hostName的配置
#开启IP注册
eureka.instance.prefer-ip-address=true
#指定IP注册
eureka.instance.ip-address=127.0.0.1

(1)SPRINGCLOUD-EUREKA-SERVER(application.properties)- serverone
serverone、servertwo、serverthree为hosts文件配置或DNS服务器解析
#端口 默认8761
server.port=8070
#服务名
spring.application.name=eureka-server
eureka.instance.appname=${spring.application.name}
#此实例主机名
eureka.instance.hostname=serverone
#是否从服务器拉取注册信息,默认为true
eureka.client.fetch-registry=true
#是否注册到自身服务端,默认为true,高可用需要注册到本身
eureka.client.register-with-eureka=true
#defaultZone不会提示的,此处需要自己写。默认http://localhost:8761/eureka
#defaultZone属性是map(key-value)格式;当key是defaultZone的时候才能被解析。集群
#设置与Eureka Server交互的地址,查询服务和注册服务都需要依赖这个地址。默认是http://localhost:8761/eureka ;多个地址可使用“,”分隔
#service-url用于集群,相互注册。defaultZone为另外的Eureka Server
eureka.client.service-url.defaultZone=http://servertwo:8080/eureka/,http://serverthree:8090/eureka/

#开启自我保护模式(true:开启状态下服务停掉eureka不会立即清除掉宕掉的服务,所以false)。默认true。生产环境需要改为True
eureka.server.enable-self-preservation=false
#扫描清理无效节点,默认60*1000毫秒,即60秒
eureka.server.eviction-interval-timer-in-ms=5000
(2)SPRINGCLOUD-EUREKA-SERVER(application.yml)- servertwo
server:
  port: 8080
spring:
  application:
    name: eureka-server
eureka:
  instance:
    hostname: servertwo
    app-group-name: ${spring.application.name}
  client:
    service-url:
      defaultZone: http://serverone:8070/eureka/,http://serverthree:8090/eureka/
    # 以下两个可省略,默认都为true
    fetch-registry: true
    register-with-eureka: true
  server:
    enable-self-preservation: false
    eviction-interval-timer-in-ms: 5000
(3)SPRINGCLOUD-EUREKA-SERVER(application.yml)- serverthree
server:
  port: 8090
spring:
  application:
    name: eureka-server
eureka:
  instance:
    hostname: serverthree
    app-group-name: ${spring.application.name}
  client:
    service-url:
      defaultZone: http://serverone:8070/eureka/,http://servertwo:8080/eureka/
    # 以下两个可省略,默认都为true
    fetch-registry: true
    register-with-eureka: true
  server:
    enable-self-preservation: false
    eviction-interval-timer-in-ms: 5000
3.在引导类上添加注解,开启相关组件(@EnableEurekaServer)
@SpringBootApplication
@EnableEurekaServer  //声明当前应用是一个Eureka服务中心(注册中心)
public class SpringcloudeurekaApplication {
    public static void main(String[] args) {
        SpringApplication.run(SpringcloudeurekaApplication.class, args);
    }
}
@EnableEurekaServer:开启对EurekaServer的支持(作为Eureka服务端)
4.启动访问
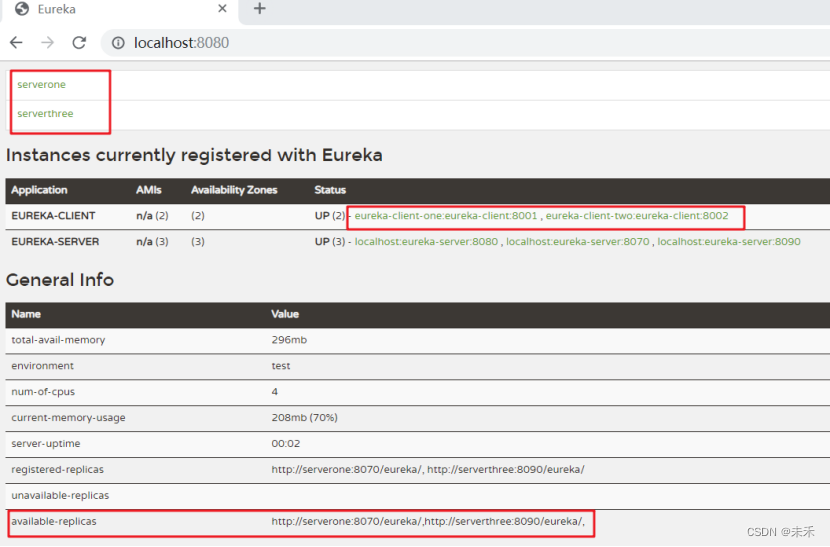
启动服务并访问:启动服务,并访问:http://127.0.0.1:8080

DS Replicas(DS副本)会显示另外两个节点的hostname,然后下面的registered-replicas和available-replicas会显示已注册的和可以使用的另个两个节点
停掉eureka-server1服务作为模拟宕机,访问http://eureka-server1:8070/显示无法访问,http://eureka-server2:8080/正常访问
发生变化之处,如上图标注,eureka-server1宕机后,eureka-server2依旧可以发现eureka-server1,而eureka-server1只是变为unavailable-replicas而已,最终不会影响其他客户端的注册。当eureka-server1启动后,一切自动恢复
服务提供者(Eureka Client Provider)
将本服务注册到Eureka Server
服务提供者,也可作为服务消费者
1.添加客户端启动器(Eureka Client)
<!-- Eureka客户端 -->
<dependency>
    <groupId>org.springframework.cloud</groupId>
    <artifactId>spring-cloud-starter-netflix-eureka-client</artifactId>
</dependency>
2.覆盖Eureka Client默认配置(集群)
多个Eureka Client进程向注册中心注册的Eureka Service Id相同,则被认为是一个集群
如果Eureka集群的节点都在不同的机器上(IP不同),那hostname直接使用那节点所在机器的IP就是了,这样就不会重复
spring.security.basic.enabled=true
spring.security.user.name=用户名
spring.security.user.password=密码
eureka.client.serviceUrl.defaultZone=http://用户名:密码@serverone:8761/eureka/
单机版(SPRINGCLOUD-EUREKA-CLIENT)
#Web访问端口
server.port=8000
#应用名
spring.application.name=eureka-client
#此实例的主机名
eureka.instance.hostname=localhost
#eureka客户需要多长时间发送心跳给eureka服务器,表明它仍然活着。默认为30秒
eureka.instance.lease-renewal-interval-in-seconds=10
#Eureka服务器在接收到实例的最后一次发出的心跳后,需要等待多久才可以将此实例删除,默认为90秒
eureka.instance.lease-expiration-duration-in-seconds=30
#以IP地址注册到服务中心,相互注册使用IP地址
eureka.instance.prefer-ip-address=true
#此实例注册到eureka服务端的唯一的实例ID。
#其组成为${spring.application.name}:${spring.application.instance_id:${random.value}}
eureka.instance.instance-id=${spring.application.name}:${spring.application.instance_id:${random.value}}

#注册中心地址。连接eureka server的地址:将本服务注册到eureka server上(defaultZone)
eureka.client.service-url.defaultZone=http://localhost:8080/eureka
#是否添加到注册中心,默认为true
eureka.client.register-with-eureka=true
#此客户端是否获取eureka服务器注册表上的注册信息,默认为true
eureka.client.fetch-registry=true
#表示eureka client间隔多久去拉取服务器注册信息,默认为30秒
eureka.client.registry-fetch-interval-seconds=20
集群版(SPRINGCLOUD-EUREKA-CLIENT)
(1)SPRINGCLOUD-EUREKA-CLIENT(application.properties)
#Web访问端口
server.port=8001
#应用名
spring.application.name=eureka-client
#此实例的主机名
eureka.instance.hostname=localhost
#eureka客户需要多长时间发送心跳给eureka服务器,表明它仍然活着。默认为30秒
eureka.instance.lease-renewal-interval-in-seconds=10
#Eureka服务器在接收到实例的最后一次发出的心跳后,需要等待多久才可以将此实例删除,默认为90秒
eureka.instance.lease-expiration-duration-in-seconds=30
#以IP地址注册到服务中心,相互注册使用IP地址
eureka.instance.prefer-ip-address=true
#此实例注册到eureka服务端的唯一的实例ID。
#其组成为${spring.application.name}:${spring.application.instance_id:${random.value}}
eureka.instance.instance-id=${spring.application.name}:${spring.application.instance_id:${random.value}}

#注册中心地址。连接eureka server的地址:将本服务注册到eureka server上(defaultZone)
eureka.client.service-url.defaultZone=http://远程主机IP:8070/eureka/,
http://远程主机IP:8080/eureka/,
http://远程主机IP:8090/eureka/
#是否添加到注册中心。默认为true
eureka.client.register-with-eureka=true
#此客户端是否获取eureka服务器注册表上的注册信息。默认为true(服务提供者)
eureka.client.fetch-registry=true
#表示eureka client间隔多久去拉取服务器注册信息。默认为30秒(服务消费者)
eureka.client.registry-fetch-interval-seconds=20
如何没有hosts文件(127.0.0.1 serverone)或DNS服务器解析。eureka.instance.prefer-ip-address必须设为true使用IP注册。否则会报错
(2)SPRINGCLOUD-EUREKA-CLIENT(application.yml)
server:
  port: 8002
spring:
  application:
    name: eureka-client
eureka:
  instance:
appname: ${spring.application.name}
    lease-renewal-interval-in-seconds: 5
    lease-expiration-duration-in-seconds: 10
    hostname: localhost
    prefer-ip-address: true
    instance-id: ${eureka.instance.hostname}:${spring.application.name}:${server.port}
  client:
    service-url:
      defaultZone: http://远程主机IP:8070/eureka/,http://远程主机IP:8080/eureka/,
http://远程主机IP:8090/eureka/
    register-with-eureka: true
    fetch-registry: true
    registry-fetch-interval-seconds: 30
Eureka的服务提供者默认每30s发送一次心跳机制,以告诉Eureak Server目前自己存活。如果90s没有心跳,则认为该提供者已死,但实际开发中90s显然太长,所有需要进行自定义配置
(3)SPRINGCLOUD-EUREKA-CLIENT(application.yml)
server:
  port: 8003
spring:
  application:
    name: eureka-client
eureka:
  instance:
appname: ${spring.application.name}
    lease-renewal-interval-in-seconds: 5
    lease-expiration-duration-in-seconds: 10
    hostname: localhost
    prefer-ip-address: true
    instance-id: ${eureka.instance.hostname}:${spring.application.name}:${server.port}
  client:
    service-url:
      defaultZone: http://远程主机IP:8070/eureka/,http://远程主机IP:8080/eureka/,
http://远程主机IP:8090/eureka/
    register-with-eureka: true
    fetch-registry: true
    registry-fetch-interval-seconds: 30
3.在启动类上开启eureka客户端(@EnableDiscoveryClient)
@SpringBootApplication
@EnableEurekaClient  // 开启Eureka Client客户端
public class SpringcloudeurekaclientApplication {
    public static void main(String[] args) {
        SpringApplication.run(SpringcloudeurekaclientApplication.class, args);
    }
}
@EnableEurekaClient:向Eureka服务中心注册服务(推荐使用)
@EnableDiscoveryClient:如果是其他服务注册中心(consul、zookeeper)
相同点:都能让注册中心Eureka发现,并将该服务注册到注册中心上
不同点:@EnableEurekaClient只适用于Eureka作为注册中心,而@EnableDiscoveryClient可以是其他注册中心(consul、zookeeper)
4.启动访问
启动Eureka Client服务注册客户端。访问Eureka Server监控页面查看
服务消费者(Eureka Client Consumer)
从Eureka Server拉取服务
服务消费者,也可以作为服务提供者。也就是说注册和拉取服务可以集成与一身
1.添加客户端启动器(Eureka Client)
引入依赖,同服务提供方引入的依赖一样
<!-- Eureka客户端 -->
<dependency>
    <groupId>org.springframework.cloud</groupId>
    <artifactId>spring-cloud-starter-netflix-eureka-client</artifactId>
</dependency>
2.覆盖默认配置(application.properties)
修改application.properties配置文件
server:
  port: 8000
spring:
  application:
    name: eureka-client
eureka:
  instance:
appname: ${spring.application.name}
    lease-renewal-interval-in-seconds: 5
    lease-expiration-duration-in-seconds: 10
    hostname: localhost
    prefer-ip-address: true
    instance-id: ${eureka.instance.hostname}:${spring.application.name}:${server.port}
  client:
    service-url:
      defaultZone: http://远程主机IP:8070/eureka/,http://远程主机IP:8080/eureka/,
http://远程主机IP:8090/eureka/
    register-with-eureka: true
    fetch-registry: true
    registry-fetch-interval-seconds: 30
3.服务调用
在Spring Cloud中有两种调用服务时客户端的负载均衡策略:①Ribbon、②Feign
| 调用方式 | 描述 |
|---|---|
| Ribbon | 基于Http端的负载均衡,通过在Configuration中配置RestTemplate来进行调用,可以自定义负载均衡的方式 |
| Feign | 通过本地接口的形式来进行调用服务的。其中Feign中默认引入了Ribbon,在线上开发中,比较倾向用Feign;因为Feign中以接口的形式进行调用服务,看起来简洁,而且Feign中还可以增加熔断器,来进行服务的熔断和降级,防止服务调用中的服务的雪崩 |
(1)RestTemplate
启动器
@SpringBootApplication
@EnableEurekaClient
public class SpringcloudeurekaclientApplication {
    public static void main(String[] args) {
        SpringApplication.run(SpringcloudeurekaclientApplication.class, args);
    }

    @Bean
    @LoadBalanced
    public RestTemplate getRestTemplate() {
        return new RestTemplate();
    }
}
@LoadBalanced标志着RestTemplate是通过Ribbon客户端负载均衡去调用服务提供者集群的。即可以在获取的服务提供者实例列表中,通过Ribbon进行选择某实例,然后调用该服务实例
配置@Bean的是时候需要加@LoadBalanced
给RestTemplate添加负载均衡的注解开启负载均衡;可以理解为RestTemplate = http调用 + 负载均衡
提供服务
@ResponseBody
@RequestMapping("/client")
public String getClientTwo() {
	return forObject;
}
服务消费
@Autowired
private RestTemplate restTemplate;

// 服务消费方在eureka注册中心拉取的服务列表都封装到DiscoveryClient里面
@Autowired
private DiscoveryClient discoveryClient;

@RequestMapping("/test")
public String getClientOne(HttpServletRequest request) {
	List<ServiceInstance> instances = discoveryClient.getInstances("EUREKA-CLIENT");
	// 获取EUREKA-SERVER的第一个实例
	ServiceInstance instance = instances.get(0);
	// 获得主机名、端口
	String url = "http://" + instance.getHost() + ":" + instance.getPort();
	String message = request.getScheme() + "://" + request.getServerName() + ":"  + request.getServerPort() + request.getServletPath();
	message = message + "***" + url;
	return message;
}
(2)Feign
启动器
@SpringBootApplication
@EnableEurekaClient
@EnableFeignClients
public class SpringcloudeurekaclientApplication {
    public static void main(String[] args) {
        SpringApplication.run(SpringcloudeurekaclientApplication.class, args);
    }
}
新建FeignClient接口,并添@FeignClient注解进行远程服务调用
@Component
@FeignClient(value = "service-test")
public interface UserFeignClient {
    @RequestMapping(value = "/{id}", method = RequestMethod.GET)
    public String findById(@PathVariable("id") Long id);
}
(3)远程服务调用测试(Controller)
@RestController
public class ConsumerController {
    @Autowired
    private UserFeignClient userFeignClient;

    @GetMapping("/hello/{name}")
    public String index(@PathVariable("id") Long id) {
        return userFeignClient.findById(id);
    }
}
重启项目,访问Eureka监控页面查看:http://127.0.0.1:10086
发现service-consumer已经注册成功


 1403
1403


 被折叠的 条评论
为什么被折叠?
被折叠的 条评论
为什么被折叠?
 到【灌水乐园】发言


