


前言:
正如题目所说,这一节内容我将记录我在使用ansible这个工具时的心得体会,但是有一点我是比较疑惑的,问过身边的同事,大家都说在学习ansible并用于生产中的这个过程比较简单,不那么折磨人,但为啥经过一段时间的实操,我发现还是无法将相应知识刻在脑子里,至少目前我还无法脱离书本。苦思良久,我给出自己一个暂时性的回复---训练量不够,导致还没有结出量变到质变的这个理想结果。
学习目标:
ansible是最近几年特别火的自动化运维工具,它能够帮助运维人员大大的提高运维效率,举个例子,我在前面几节讲到的httpd服务,当需要在每个节点主机使用httpd服务时,需要一台一台进行下载。但是运用ansible工具,就可以极快的在一台服务器快速下发“任务”,利用这台服务器给每个节点“几乎同时”装上httpd服务。简单来说就是可以通过一台服务器远程批量控制其他服务器。
- 本节将会深入学习一些常用模块,例如ping、yum、firewalld等。
学习内容:
Ansible 目前是运维自动化工具中最简单、容易上手的一款优秀软件, 能够用来管理各种资源。用户可以使用 Ansible 自动部署应用程序, 以此实现 IT 基础架构的全面部署。 例如,借助Ansible, 我们可以轻松地对服务器进行初始化配置、安全基线配置, 以及进行更新和打补丁操作。相较于 Chef、 Puppet、 SaltStack 等 C/S(客户端/服务器) 架构的自动化工具来讲,尽管 Ansible 的性能并不是最好的,但由于它基于 SSH 远程会话协议,不需要客户端程序,只要知道受管主机的账号密码,就能直接用 SSH 协议进行远程控制,因此使用起来优势明显。简单来说就是控制主机可以通过ssh传送python脚本到节点主机。
Ansible 服务本身并没有批量部署的功能,它仅仅是一个框架,真正具有批量部署能力的是其所运行的模块。 Ansible 内置了上千个模块,会在安装 Ansible 时一并安装,通过调用指定的模块,就能实现特定的功能。 Ansible 内置的模块非常丰富,几乎可以满足一切需求, 使用起来也非常简单,一条命令甚至影响上千台主机。 如果需要更高级的功能,也可以运用 Python语言对 Ansible 进行二次开发。
- 学习在系统上部署ansible服务程序并部署主机清单。
- 理解并学会使用ansible服务的常用模块,如表所示。
模块名称 模块作用 ping 检查受控主机是否能够ping通 yum 安装、更新及卸载软件包 yum_repository 管理主机的软件仓库配置文件 template 复制模板文件到受控主机 copy 新建、修改及复制文件 user 创建、修改及删除用户 group 创建、修改及删除用户组 service 启动、关闭及查看服务状态 get_url 从网络中下载文件 file 设置文件权限集创建快捷方式 cron 添加、修改及删除计划服务 command 默认模块--直接执行用户指定的命令 shell 直接执行用户指定的命令(支持特殊字符) debug 输错调试或 报错信息 mount 挂载硬件设备文件 filesystem 格式化硬盘设备文件 lineinfile 通过正则表达式修改文件内容 setup 手机受控主机上的系统集变量信息 firewalld 添加、修改及删除防火墙策略 lvg 管理主机的物理卷及卷组设备 lvol 管理主机上的逻辑卷设备 3.ansible命令常用的语法格式为“ansible 受控主机节点 -m 模块名称 【-a 模块参数】”
4. 在很多情况下,仅仅依靠单个命令或调用单个模块,根本无法满足复杂工作需要。ansible服务允许用户根据需求,在类似于shell脚本的模式下编写自动化运维脚本,然后由程序自动、重复地执行。
5.ansible配置文件以及读取优先级
ANSIBLE_CONFIG变量>当前目录ansible.cfg>家目录下.ansible.cfg>/etc/ansible/ansible.cfg
6.ansible两种下达任务的方式:
(1)ansible ad-doc 任务量较少时使用
(2)ansible playbook 任务量较多时使用
(3)ansible-doc -l //查看ansible功能模块;ansible-doc -l | wc -l //查看ansible功能模块数量
实验产出:
实验一:在控制主机上安装ansible。
[root@control ~]# yum repolist -v  //查询yum状态
[root@control ~]# yum -y install ansible-core ansible-navigator //安装ansible,第一个是核心包,第二个是可以调用容器中模块的包实验二:在普通用户上编写配置文件,这里注意要进行提权,可以使用/etc/ansible/ansible.cfg里面的ansible-config init --disabled -t all > ansible.cfg 或者 ansible-config init > ansible.cfg命令先把模板配置生成到其他位置,然后打开这个ansible.cfg完成内容。
1.编写ansible.cfg配置文件。
[root@control ~]# vim /etc/ansible/ansible.cfg
[root@control ~]# cd /opt
[root@control opt]# ansible-config init --disabled > ansible.cfg
[root@control opt]# ls
ansible.cfg
[root@control opt]# vim ansible.cfg
[defaults]
inventory=/home/alice/ansible/inventory  //主机清单文件
remote_user=alice  //被控主机使用的账户
[privilege_escalation]  //提升权限的配置
become=True   //是否要提权,True就是要提权
become_method=sudo  //提权方式用sudo
become_user=root  //提权时称为root
become_ask_pass=False //提权操作无需密码
2.编写主机清单。
[alice@control ansible]$ vim inventory
[test01]
node1 myvar1="abc"
[test02]
node2
[web]
node3
node4
[test05]
node5
[webtest:children]
web
[web:vars]
myvar2="xyz"
~
实验三:学会使用command模块、shell模块、script模块,可以使用linux常规命令操控被控主机。
(1)command模块演示:
[alice@control ansible]$ ansible node1,node2 -m command -a 'touch /opt/linux.txt' //用command模块向node1、node2主机下达创建文件的指令
node2 | CHANGED | rc=0 >>

node1 | CHANGED | rc=0 >>

[alice@control ansible]$ ansible node1,node2 -m command -a 'ls /opt/linux.txt' 用command模块向node1、node2主机下达c查询文件的指令
node2 | CHANGED | rc=0 >>
/opt/linux.txt
node1 | CHANGED | rc=0 >>
/opt/linux.txt
[alice@control ansible]$ ansible node1,node2 -m command -a 'echo iloveyou > /opt/linux.txt' //由于command模块的能力不足,不支持重定向、管道等特殊操作,可以更换为shell模块
node2 | CHANGED | rc=0 >>
iloveyou > /opt/linux.txt
node1 | CHANGED | rc=0 >>
iloveyou > /opt/linux.txt
[alice@control ansible]$
如图: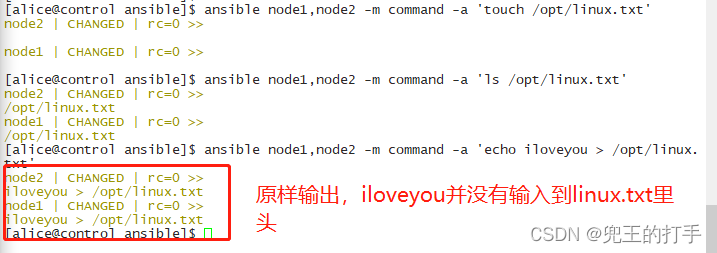
(2)shell模块演示:

使用shell模块创建账户:
[alice@control ansible]$ ansible node1 -m shell -a 'useradd mandouwu' //使用shell模块创建用户mandouwu
node1 | CHANGED | rc=0 >>

[alice@control ansible]$ ansible node1 -m shell -a 'echo wuleihry | passwd --stdin mandouwu'  //给mandouwu这个用户创建密码
node1 | CHANGED | rc=0 >>
Changing password for user mandouwu.
passwd: all authentication tokens updated successfully.
(3)script模块:可以将写好的shell脚本传递到被控主机执行。
a.声明解释器: #!/bin/bash
b.编写注释:#注释是给使用脚本用户看的信息。
c.执行的指令
//在控制器上编写脚本
[alice@control ansible]$ vim linux.sh
#!/bin/bash
#请创建一个账户wulei2并且在/opt下创建一个yyy.txt的文档
useradd wulei2
touch /opt/yyy.txt
[alice@control ansible]$ ansible node1 -m script -a 'linux.sh'
node1 | CHANGED => {
    "changed": true,
    "rc": 0,
    "stderr": "Shared connection to node1 closed.\r\n",
    "stderr_lines": [
        "Shared connection to node1 closed."
    ],
    "stdout": "\r\n",
    "stdout_lines": [
        ""
    ]
}
//回到节点node1查看已创建账户wulei2以及yyy.txt文档
[root@node1 ~]# tail -1 /etc/passwd
wulei2:x:1003:1003::/home/wulei2:/bin/bash
[root@node1 ~]# ls /opt/
abc                            abc.txt    yyy.txt
abc.1726.2023-04-18@02:13:42~  linux.txt
小结,以上几个实验我们学习了command、shell以及script模块,虽然简单易用,但是都不具备有幂等性(任意次执行所产生的影响均与一次执行的影响相同)。
实验四:利用file模块创建文件、目录、链接文件
| file模块参数 | 作用 |
| path | 路径 |
| state | 执行动作,touch是普通文件,directory是目录,link是链接文件,absent是删除 |
| mode | 权限集合 |
| src | 源 |
| dest | 目标 |
| owner | 属主 |
大家可以看看该图,我利用file模块以及常用参数创建、删除了文件,并给相应的文件设置了权限,属主属组等。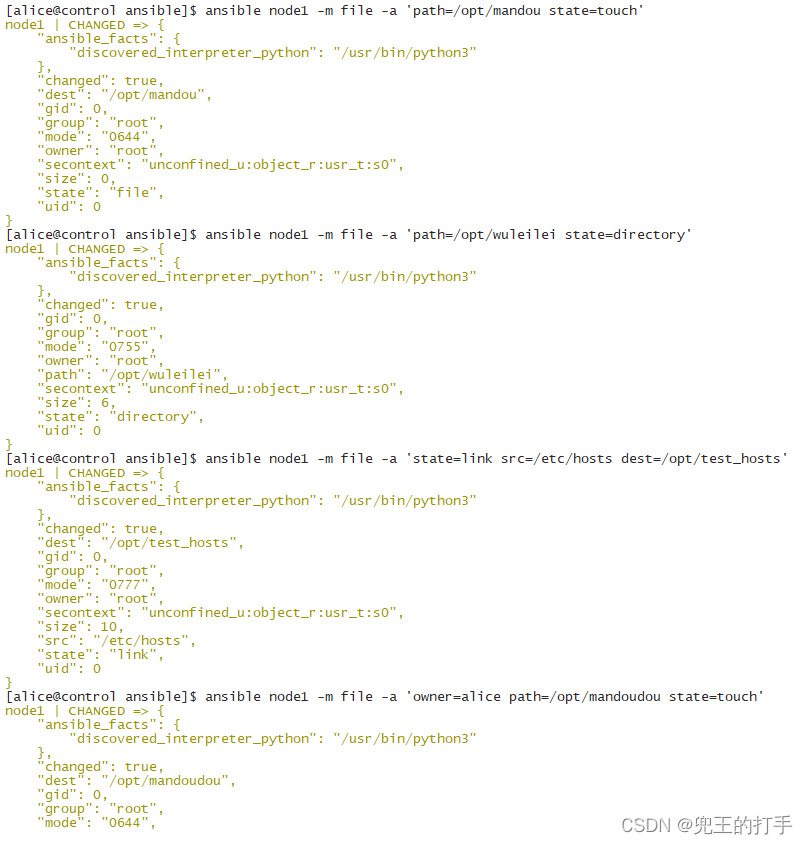
实验五:利用yum_repository模块,可以为被控主机搭建yum仓库
| 常用参数 | 作用 |
| name | 仓库名 |
| description | 描述 |
| file | yum配置文件的名称 |
| baseurl | 软件源 |
| gpgcheck | 软件合法性检测 |
| gpgkey | 如果检测,指定key文件路径 |
| enabled | 1开启。默认开启 |
[alice@control ansible]$ ansible node1 -m yum_repository -a 'name=BaseOS description=BaseOS baseurl=http://172.25.0.254/rhel9/BaseOS gpgcheck=0'
node1 | CHANGED => {
    "ansible_facts": {
        "discovered_interpreter_python": "/usr/bin/python3"
    },
    "changed": true,
    "repo": "BaseOS",
    "state": "present"
}
[alice@control ansible]$ ansible node1 -m yum_repository -a 'name=AppStream description=AppStream baseurl=http://172.25.0.254/rhel9/AppStream gpgcheck=0'
node1 | CHANGED => {
    "ansible_facts": {
        "discovered_interpreter_python": "/usr/bin/python3"
    },
    "changed": true,
    "repo": "AppStream",
    "state": "present"
}
[alice@control ansible]$ ansible node1 -m shell -a 'yum repolist -v |tail -l'
node1 | CHANGED | rc=0 >>
Repo-name          : software stream
Repo-revision      : 1666858692
Repo-updated       : Thu 27 Oct 2022 04:18:12 PM CST
Repo-pkgs          : 5,472
Repo-available-pkgs: 5,367
Repo-size          : 6.7 G
Repo-baseurl       : http://server1.lab0.example.com/rhel9/AppStream
Repo-expire        : 172,800 second(s) (last: Thu 20 Apr 2023 09:50:00 PM CST)
Repo-filename      : /etc/yum.repos.d/STREAM.repo
Total packages: 13,218AppStream                                        22 MB/s | 6.1 MB     00:00
BaseOS                                           33 MB/s | 1.7 MB     00:00
实验六:yum模块,可以用来安装软件包
| 参数 | 作用 |
| name | 指定的软件名 |
| state | present:安装 absent:删除软件包 latest:升级 |
[alice@control ansible]$ ansible node1 -m  yum -a 'name=unzip'
node1 | SUCCESS => {
    "ansible_facts": {
        "discovered_interpreter_python": "/usr/bin/python3"
    },
    "changed": false,
    "msg": "Nothing to do",
    "rc": 0,
    "results": []
}
[alice@control ansible]$ ansible node1 -m yum -a 'state=absent name=unzip'
node1 | CHANGED => {
    "ansible_facts": {
        "discovered_interpreter_python": "/usr/bin/python3"
    },
    "changed": true,
    "msg": "",
    "rc": 0,
    "results": [
        "Removed: unzip-6.0-56.el9.x86_64",
        "Removed: rpmdevtools-9.5-1.el9.noarch",
        "Removed: fonts-srpm-macros-1:2.0.5-7.el9.1.noarch",
        "Removed: zip-3.0-33.el9.x86_64",
        "Removed: python-srpm-macros-3.9-52.el9.noarch",
        "Removed: redhat-rpm-config-196-1.el9.noarch",
        "Removed: go-srpm-macros-3.0.9-9.el9.noarch",
        "Removed: rpm-build-4.16.1.3-17.el9.x86_64"
    ]
}
好像差不多写完了,其实大家看到应该是挺简单的,主要学习了几个模块,大家可以试一试。多练是最重要的,我写这篇文章也是让自己再次记忆一下哈!


 349
349


 被折叠的 条评论
为什么被折叠?
被折叠的 条评论
为什么被折叠?
 到【灌水乐园】发言


