


【微服务全家桶】-高级篇-1-Sentinel
1 初识Sentinel
1.1 雪崩问题
雪崩问题经常发生在同步问题中
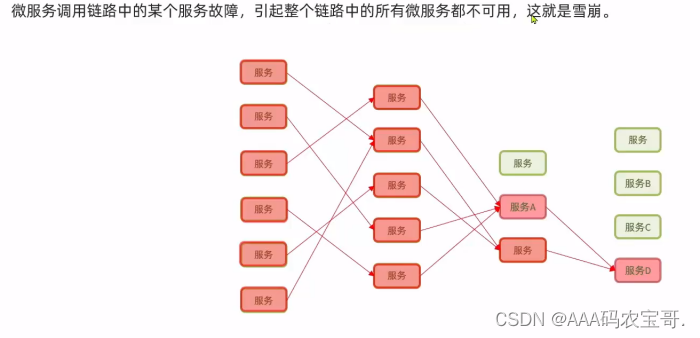
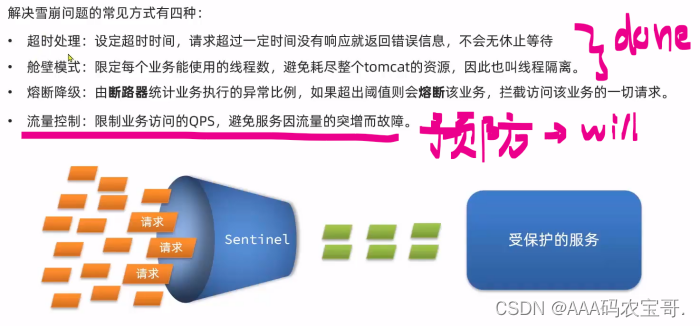
雪崩问题的处理方式
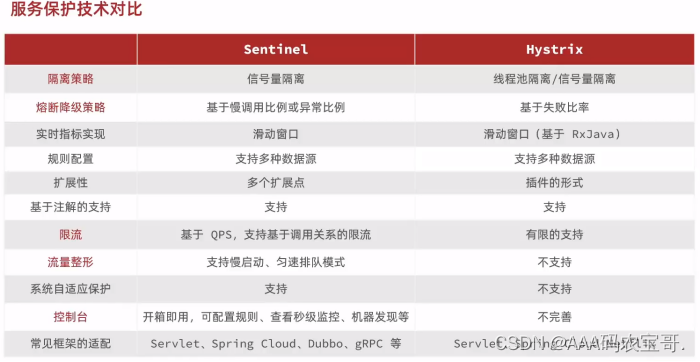
1.2 服务技术
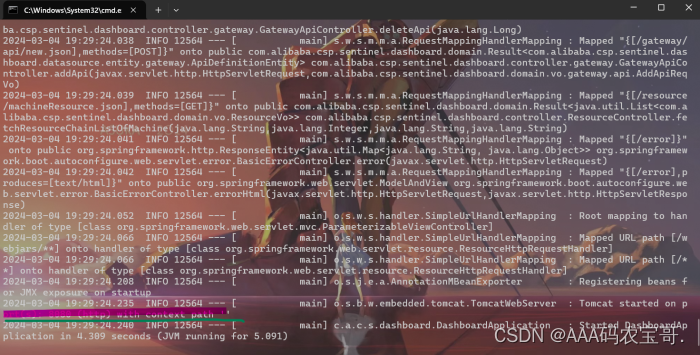
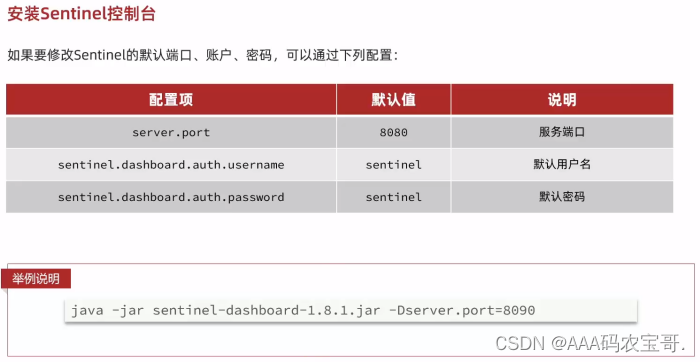
1.3 sentinel安装
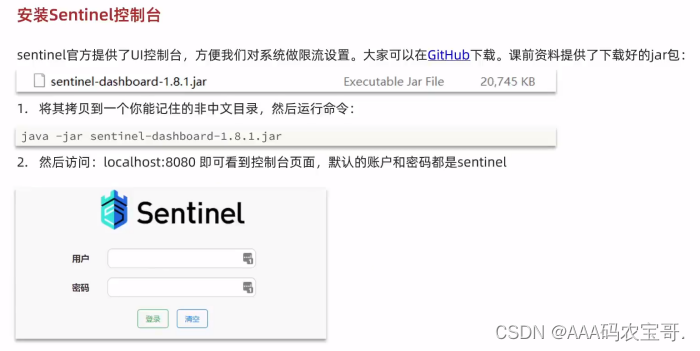
cd D:\Download\BaiDu_download\javaFile
java -jar sentinel-dashboard-1.8.1.jar
账号密码都是sentinel
1.3.1 引入demo
引入cloud-demo
启动nacos
startup.cmd -m standalone
依次启动cloud-demo三个服务
1.3.2 整合Sentinel
在order-service中整合sentinel,并连接控制台
1)引入Sentinel依赖
        <dependency>
            <groupId>com.alibaba.cloud</groupId>
            <artifactId>spring-cloud-starter-alibaba-sentinel</artifactId>
        </dependency>
2)配置控制台地址
server:
  port: 8088
spring:
  datasource:
    url: jdbc:mysql://localhost:3306/cloud_order?useSSL=false
    username: root
    password: 123sjbsjb
    driver-class-name: com.mysql.jdbc.Driver
  application:
    name: orderservice
  cloud:
    nacos:
      server-addr: localhost:8848 # nacos服务地址
#      discovery:
#        namespace: 4d6ce343-9e1b-44df-a90f-2cf2b6b3d177 # dev环境
#        ephemeral: false # 是否是临时实例
    sentinel:
        transport:
            dashboard: localhost:8080 # sentinel控制台地址
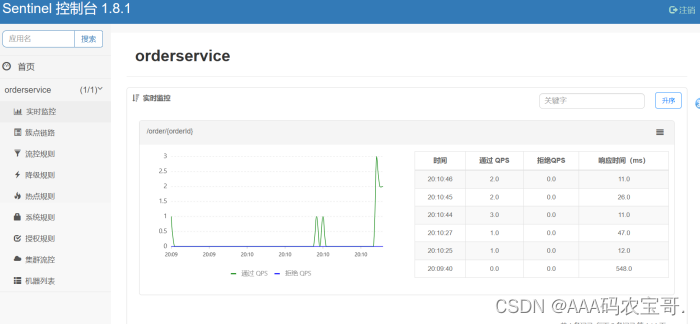
3)访问微服务的任意端点(SpringSVC的Controller的任意一个localhost:8088/order/103),触发sentinel监控
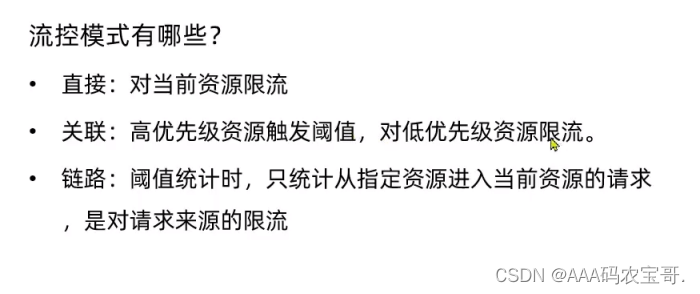
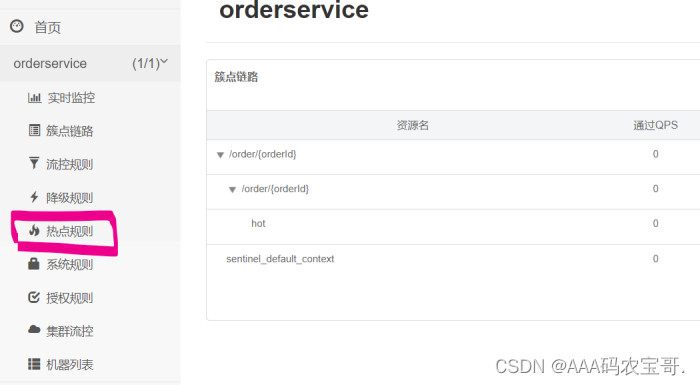
2 限流规则
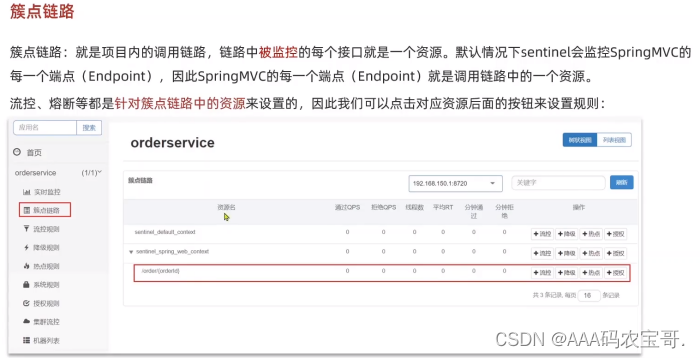
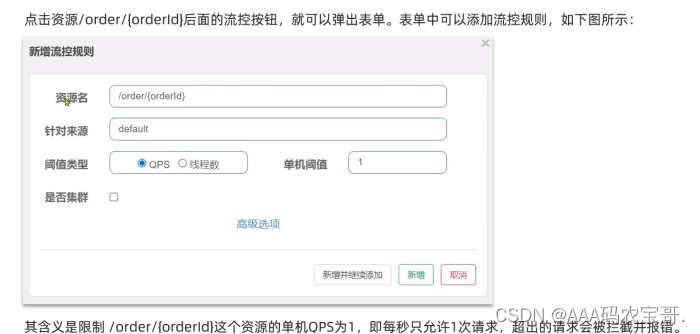
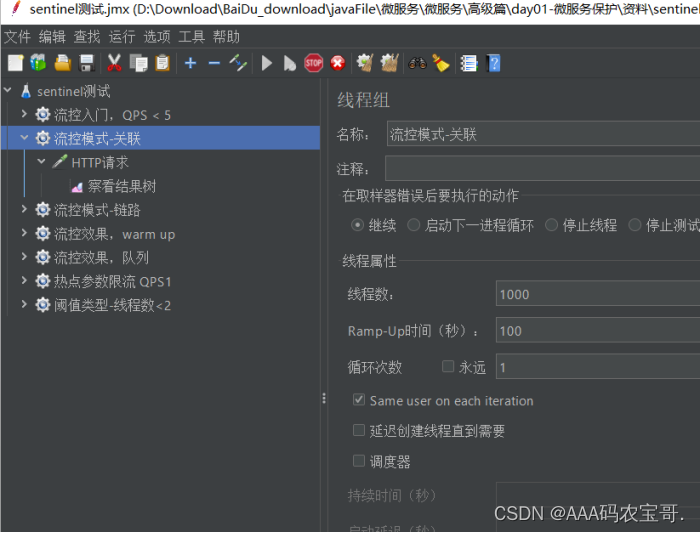
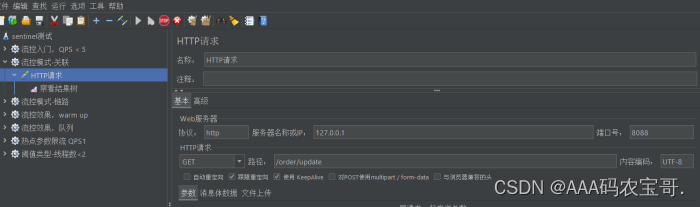
2.1 流控入门案例

data/tencent.nm/micromsg/download
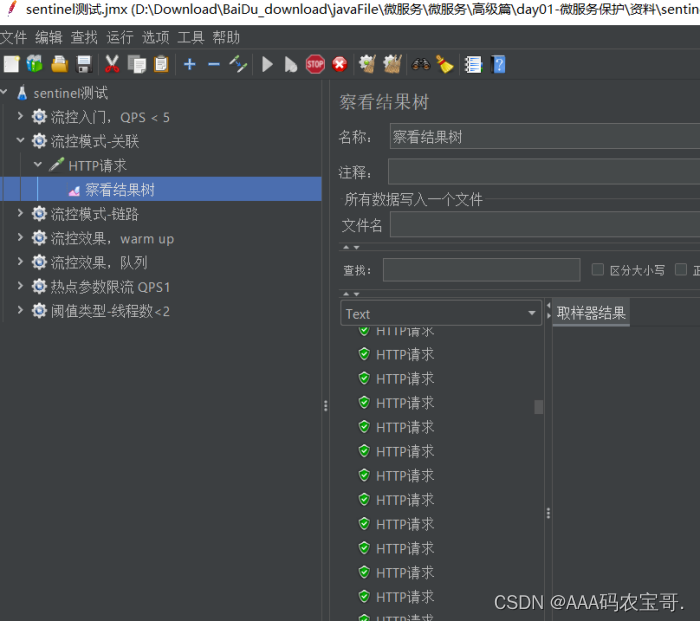
打开JMeter,导入测试计划
[1.2 Jmeter快速入门](res1-微服务保护Sentinel\resource\1.2 Jmeter快速入门.md)

启动测试用例
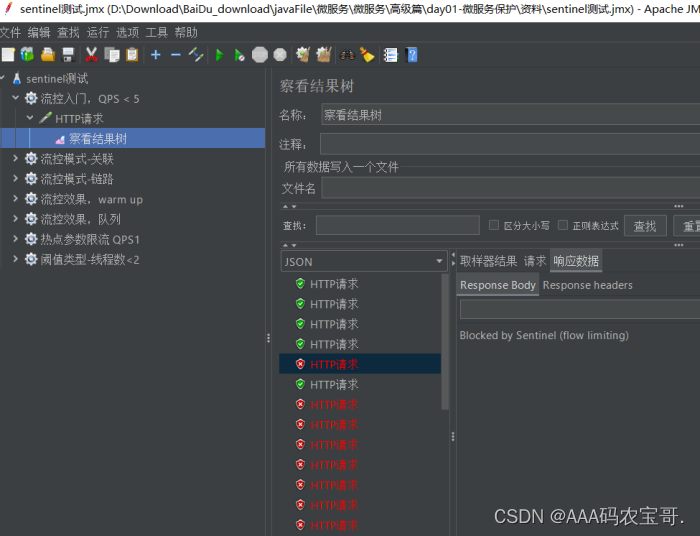
sentinel监视
2.2 高级设置-流控模式
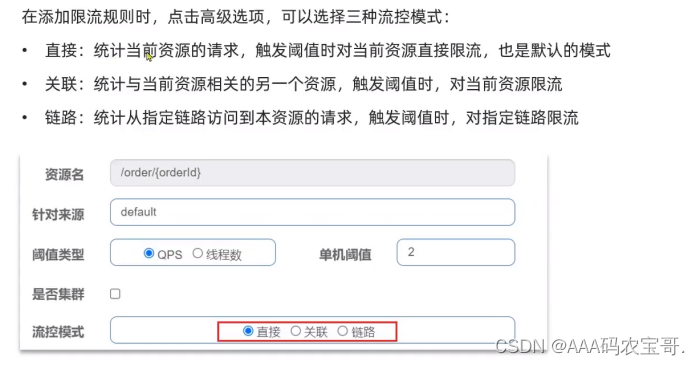
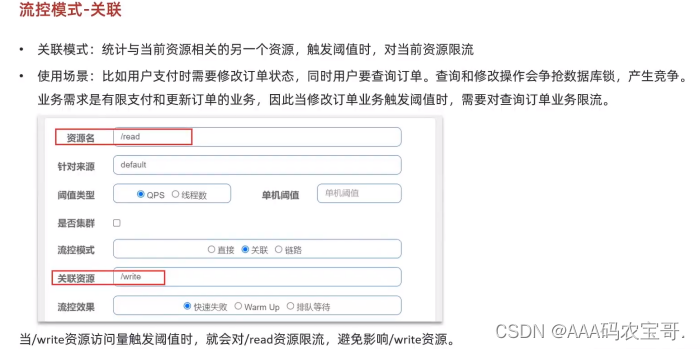
2.2.1 关联模式
案例
在controller中添加方法
    @GetMapping("/query")
    public String query() {
        return "查询订单成功!";
    }

    @GetMapping("/update")
    public String write() {
        return "更新订单成功!";
    }
}
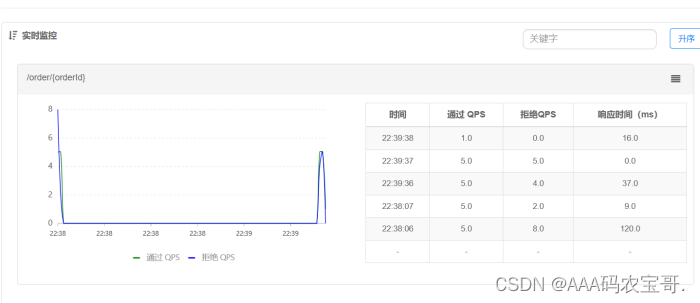
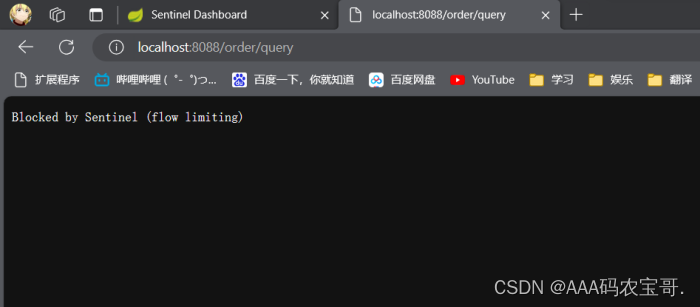
给query添加限流,关联资源是/update,当update触发阈值5的时候,对/query进行限流
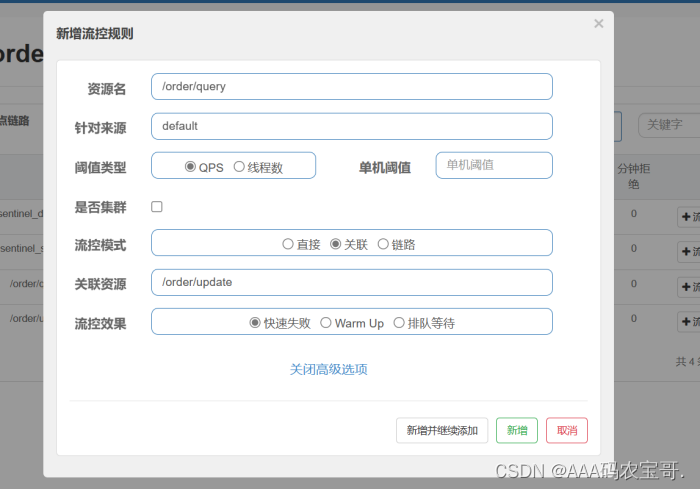
启动测试,/update每秒QPS为10
显示/update访问正常
但如果访问/query,则访问flow limiting
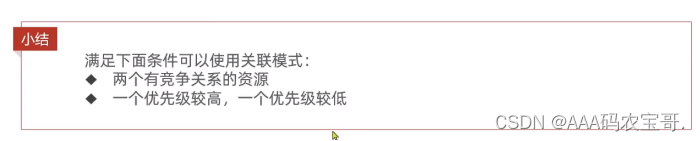
关联模式小结
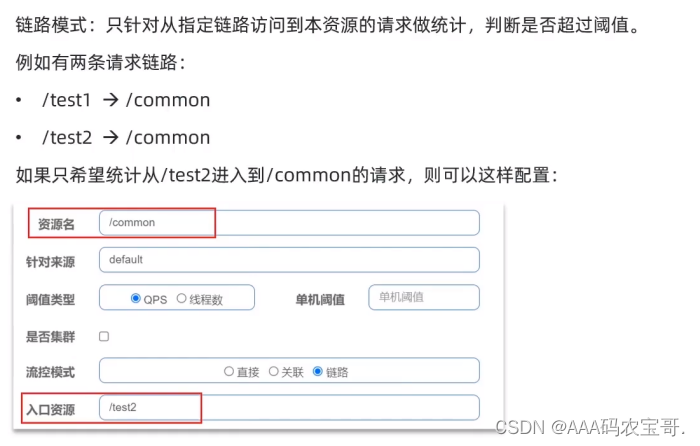
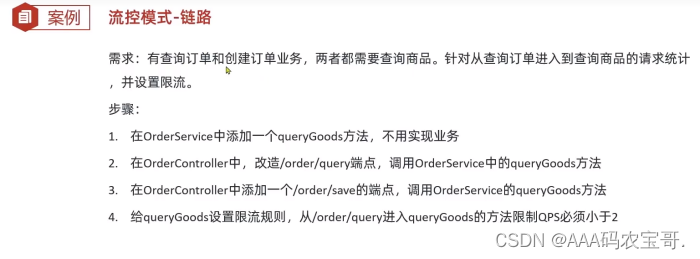
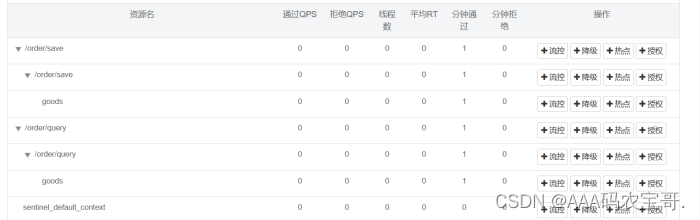
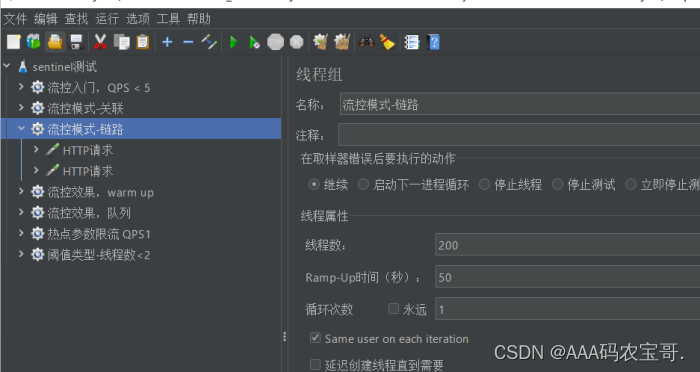
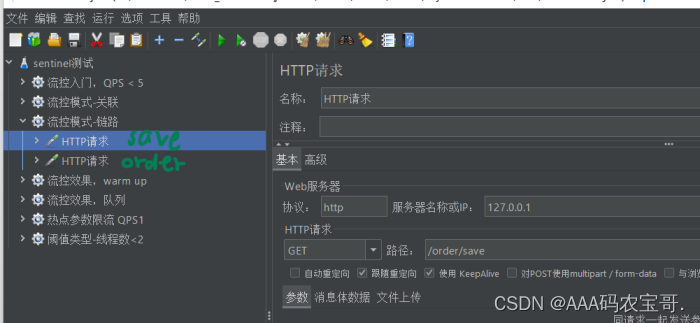
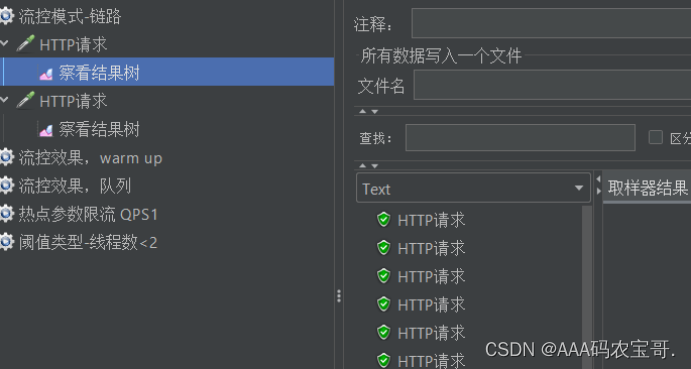
2.2.2 链路模式
案例
1)
    public void queryGoods() {
        System.err.println("查询商品");
    }
2)
    @GetMapping("/query")
    public String queryOrder() {
        // 查询商品
        orderService.queryGoods();
        // 查询订单
        System.out.println("查询订单");
        return "查询订单成功!";
    }

    @GetMapping("/save")
    public String saveOrder() {
        // 查询商品
        orderService.queryGoods();
        // 查询订单
        System.out.println("新增订单");
        return "新增订单成功!";
    }
sentinel默认监控controller方法,不监控service中的,没有被监控则不能配置相应规则,则需要添加注解

    @SentinelResource("goods")
    public void queryGoods() {
        System.err.println("查询商品");
    }
修改yaml文件,关闭context
    sentinel:
      transport:
            dashboard: localhost:8080 # sentinel控制台地址
      web-context-unify: false
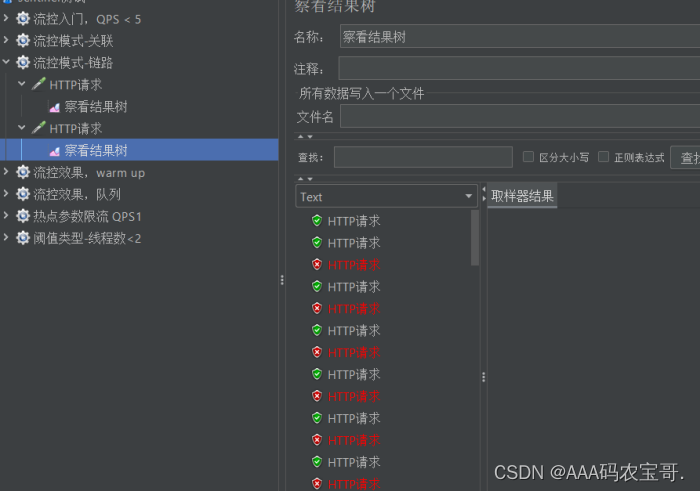
重启服务,两个已经分开
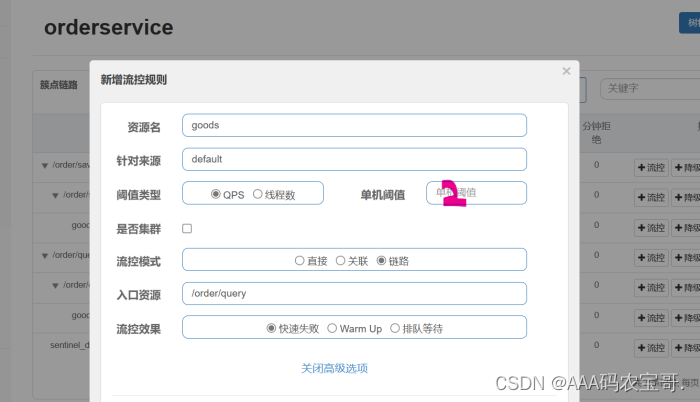
测试
启动,query受影响,save不受影响
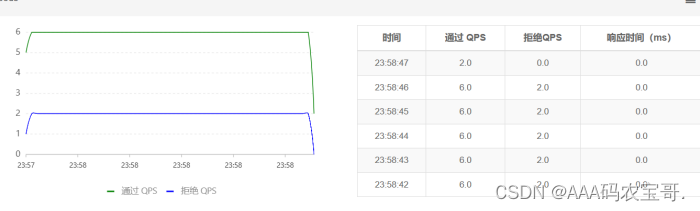
2.3 高级设置-流控效果
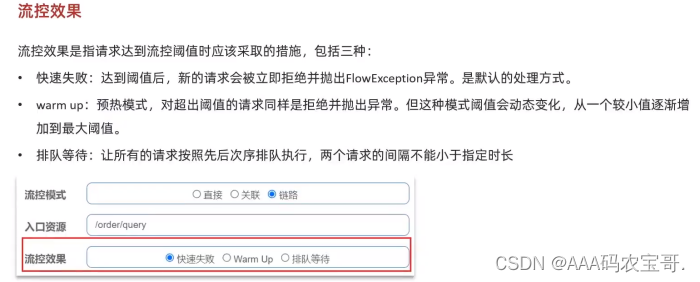
2.3.1 warm up
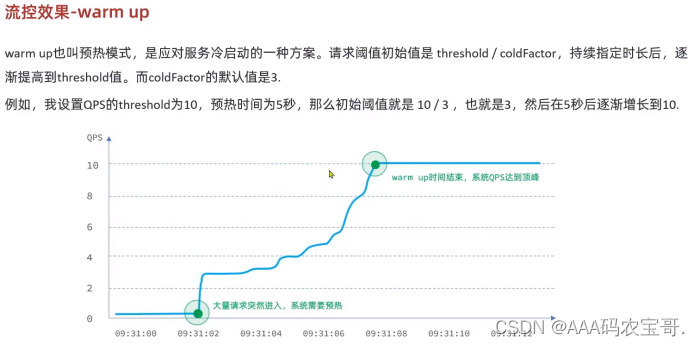
案例


启动,刚开始只有3个能通过,后面就越来越多
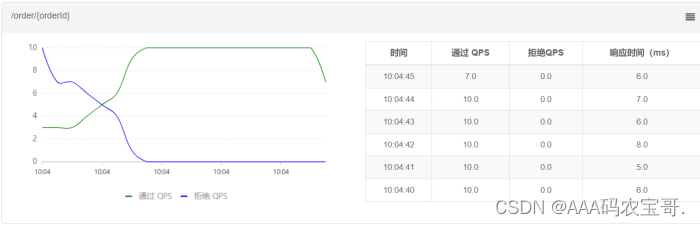
2.3.2 排队等待
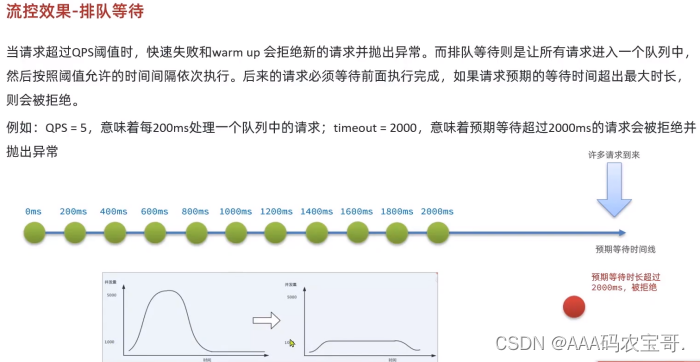
案例

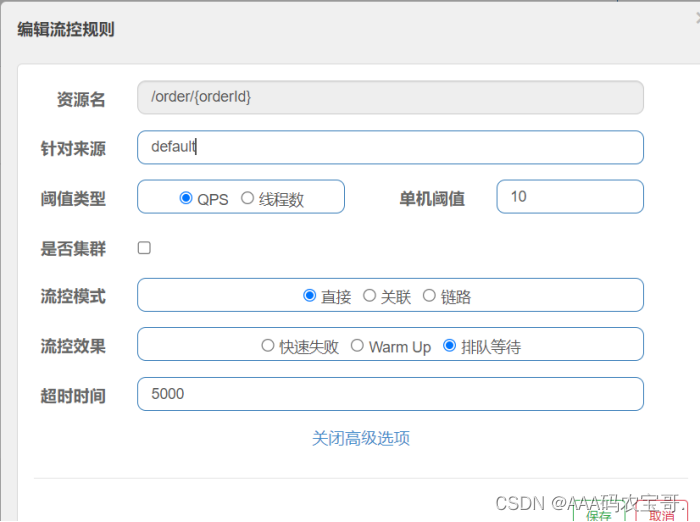
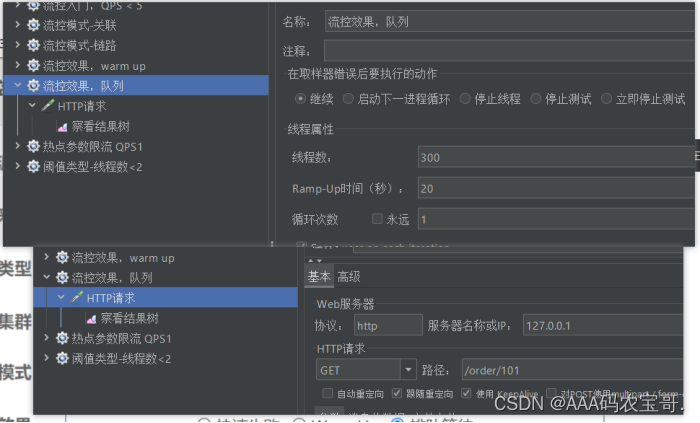
启动,进行流量控制
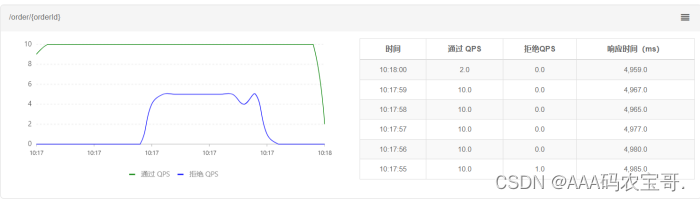
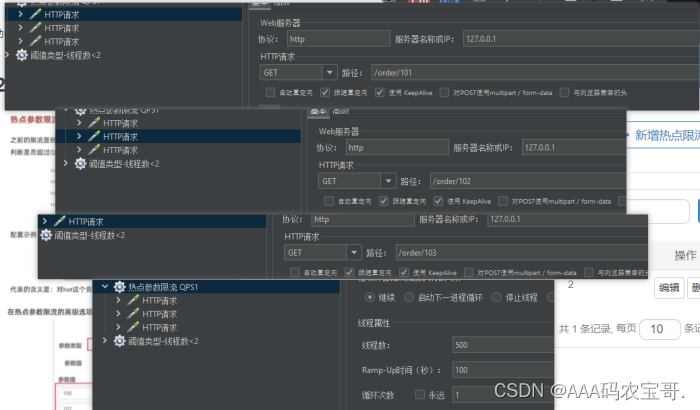
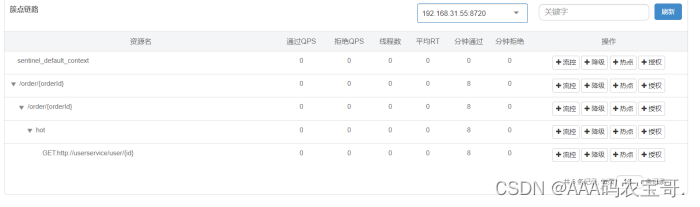
2.3.3 热点参数限流
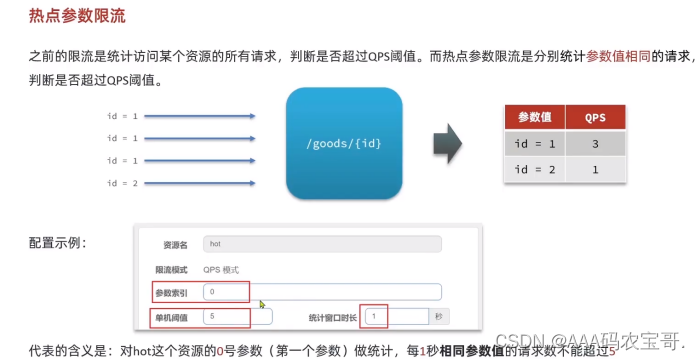
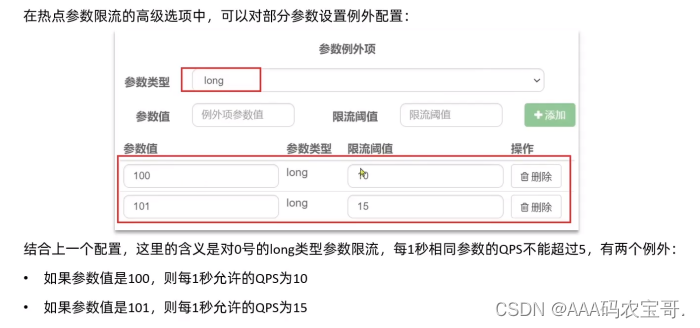
案例
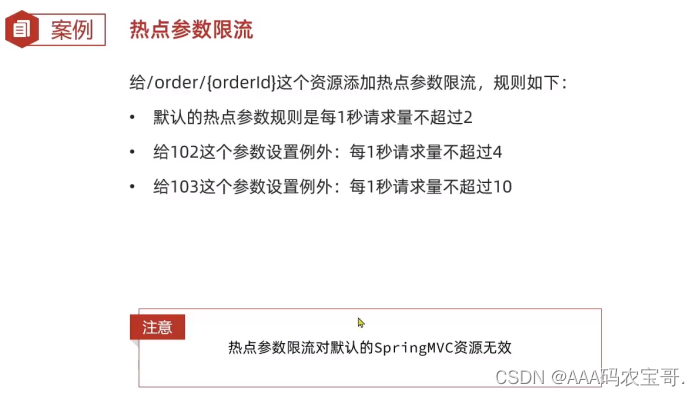
因为热点参数限流对SpringMVC资源无效,所以要为Controller中的queryOrderByUserId方法加注解@SentinelResource(“hot”)
    @SentinelResource("hot")
    @GetMapping("{orderId}")
    public Order queryOrderByUserId(@PathVariable("orderId") Long orderId) {
        // 根据id查询订单并返回
        return orderService.queryOrderById(orderId);
    }

这个
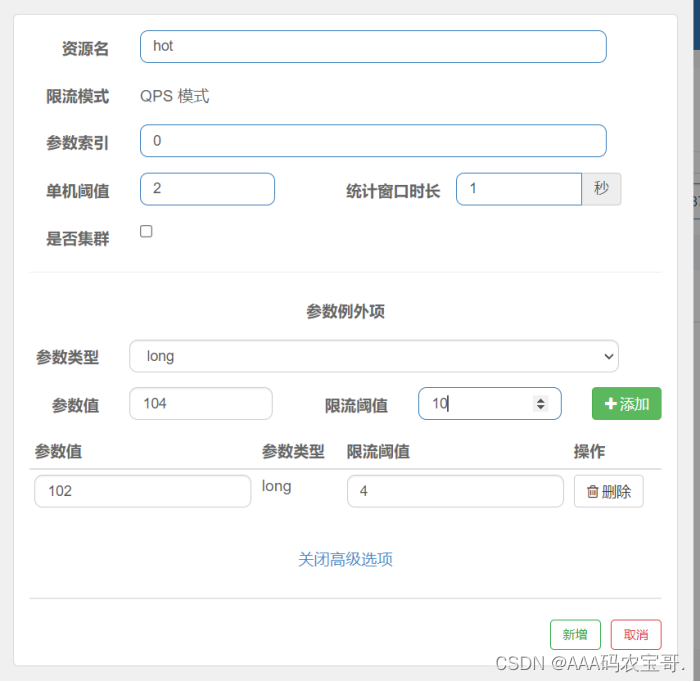
101默认是2 102默认是4 103默认是10

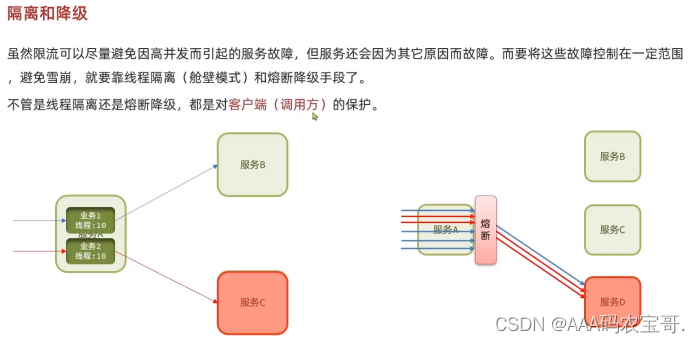
2.4 隔离与降级
2.4.1 Feign整合Sentinel
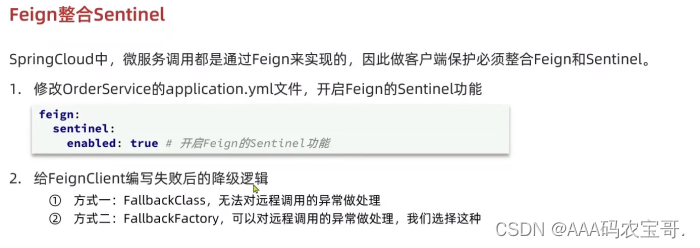
feign:
  httpclient:
    enabled: true # 支持HttpClient的开关
    max-connections: 200 # 最大连接数
    max-connections-per-route: 50 # 单个路径的最大连接数
  sentinel:
    enabled: true # 开启sentinel支持
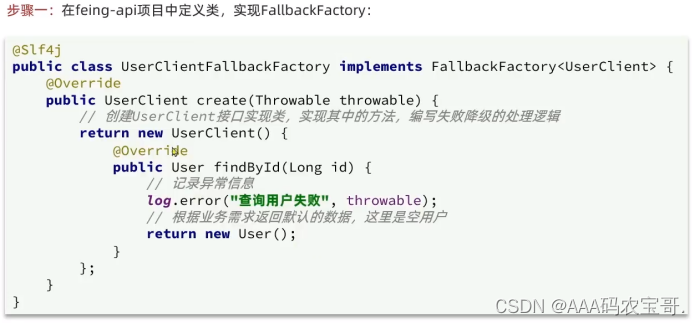
在feign的client包下创建fallback包,并编写UserClientFallbackFactory类
@Slf4j
public class UserClientFallbackFactory implements FallbackFactory<UserClient> {
    @Override
    public UserClient create(Throwable throwable) {
        return new UserClient() {
            @Override
            public User findById(Long id) {
                log.error("远程调用用户服务失败", throwable);
                return new User();
            }
        };
    }
}

注册Bean
public class DefaultFeignConfiguration {
    @Bean
    public Logger.Level logLevel(){
        return Logger.Level.BASIC;
    }

    @Bean
    public UserClientFallbackFactory userClientFallbackFactory(){
        return new UserClientFallbackFactory();
    }
}
使用注解@FeignClient声明UserClient
@FeignClient(value="userservice",fallbackFactory = UserClientFallbackFactory.class)
public interface UserClient {

    @GetMapping("/user/{id}")
    User findById(@PathVariable("id") Long id);
}
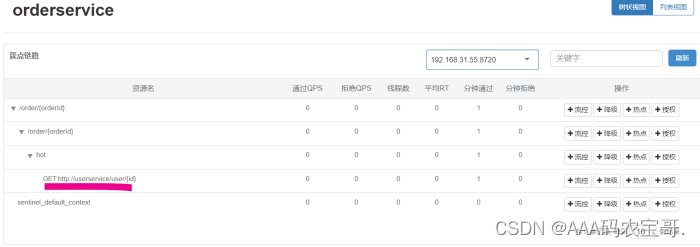
重新启动访问order{id}
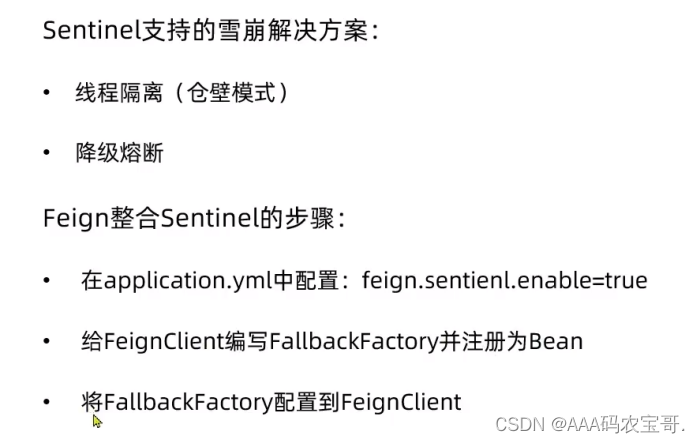
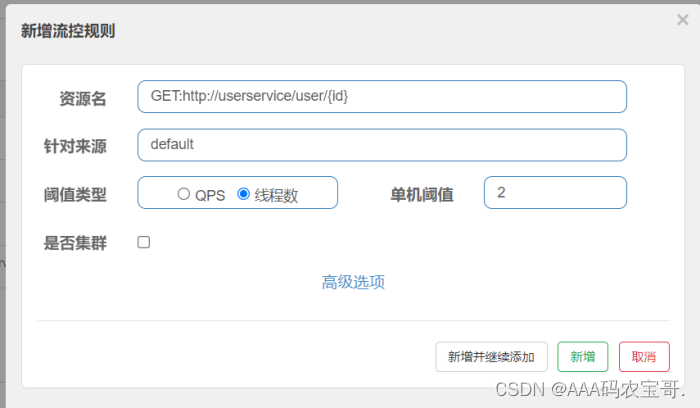
2.4.2 线程隔离

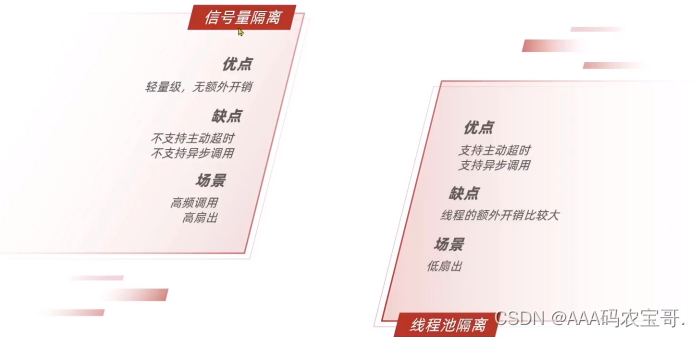
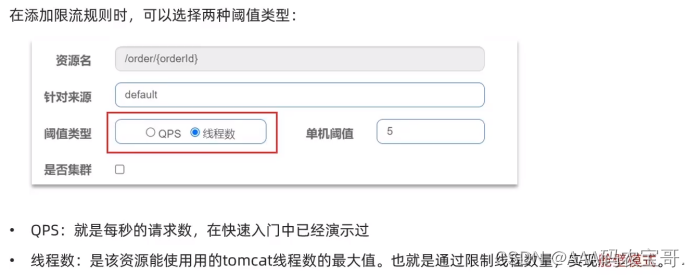
以前使用QPS(每秒并发数)来进行控制,现在使用线程数来控制
案例


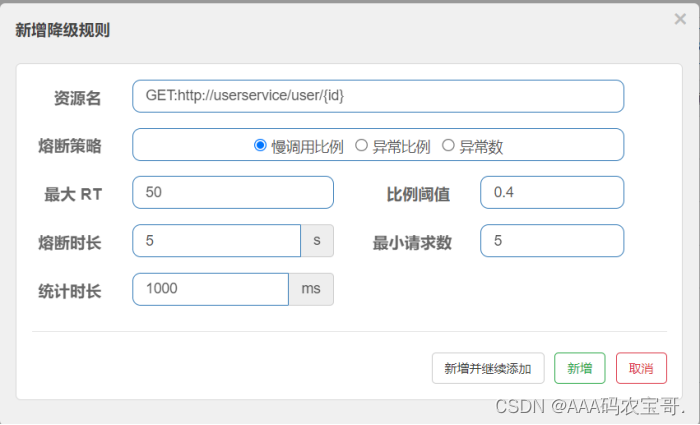
2.4.3 熔断降级
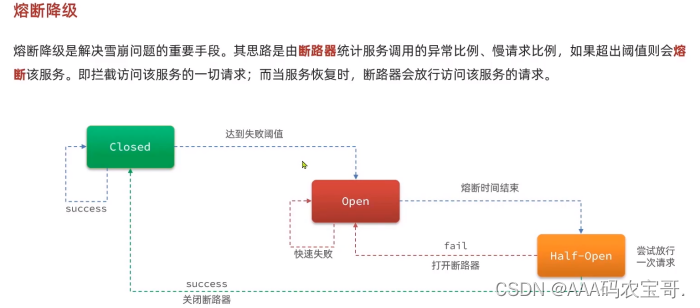
2.4.3.1 慢调用
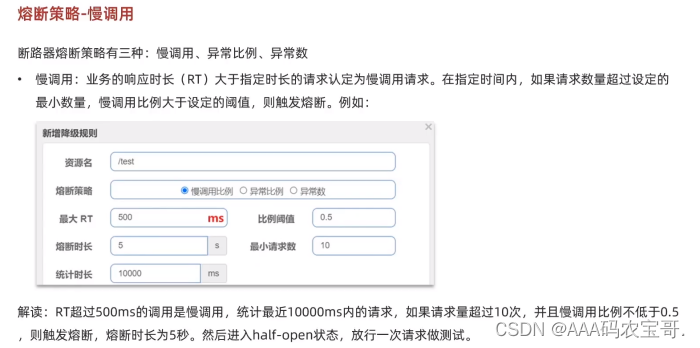
案例
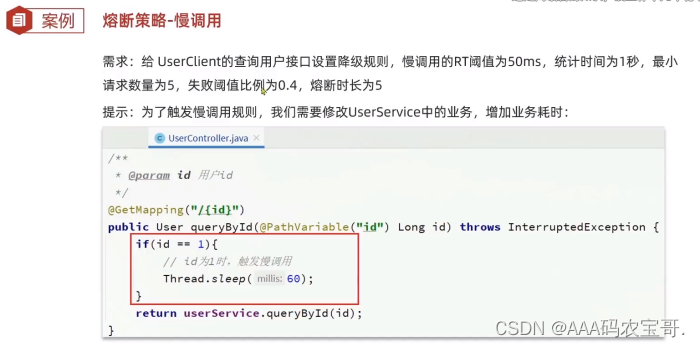
先修改UserService中Controller的业务,满足RT>50ms
    @GetMapping("/{id}")
    public User queryById(@PathVariable("id") Long id,
                          @RequestHeader(value = "Truth", required = false) String truth) throws InterruptedException {
        System.out.println("truth: " + truth);
        if(id == 1){
            Thread.sleep(60);
        }
        return userService.queryById(id);
    }
狂刷五次101,发现返回为null,且调用时间非常短,说明熔断已经生效
{
"id": 101,
"price": 699900,
"name": "Apple 苹果 iPhone 12 ",
"num": 1,
"userId": 1,
"user": {
"id": null,
"username": null,
"address": null
}
}
2.4.3.2 异常比例
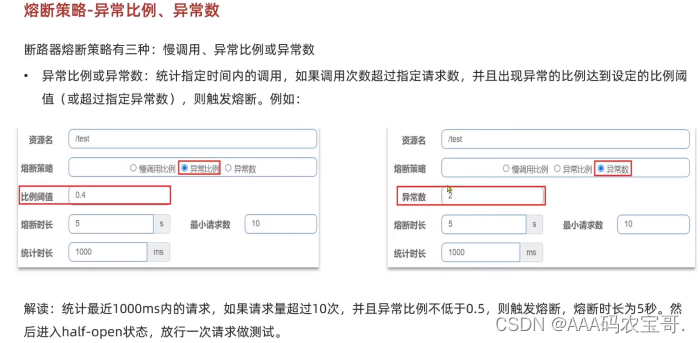
案例
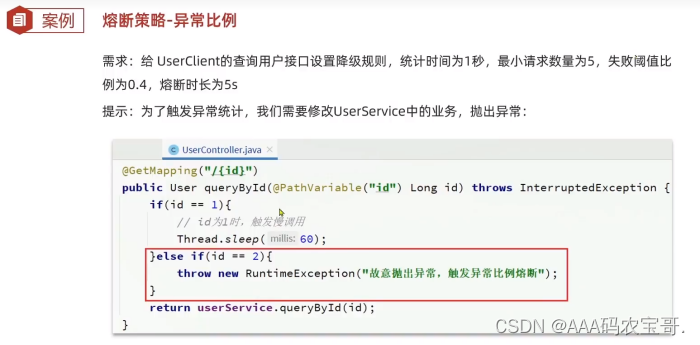
    @GetMapping("/{id}")
    public User queryById(@PathVariable("id") Long id,
                          @RequestHeader(value = "Truth", required = false) String truth) throws InterruptedException {
        System.out.println("truth: " + truth);
        if(id == 1){
            Thread.sleep(60);
        }else if(id == 2){
            throw new RuntimeException("故意抛出异常");
        }
        return userService.queryById(id);
    }
103刚开始从正常访问,刷新五次102,103不能访问,触发熔断
3 授权规则
3.1 授权规则
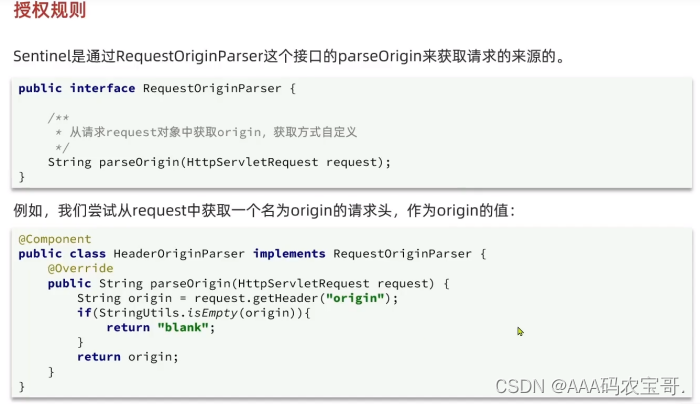
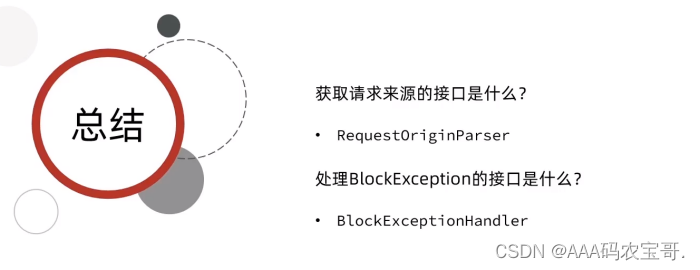
3.1.1 添加请求头分解器
为orderService中创建sentinel包,再创建HeaderOriginParser类,并用@Component注册成Bean
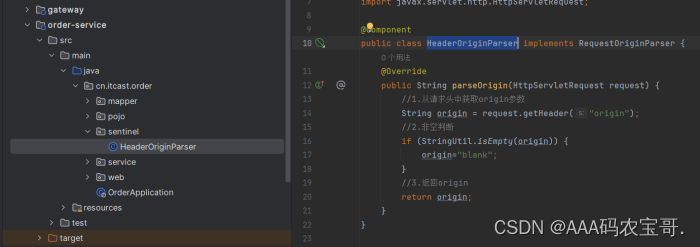
@Component
public class HeaderOriginParser implements RequestOriginParser {
    @Override
    public String parseOrigin(HttpServletRequest request) {
        //1.从请求头中获取origin参数
        String origin = request.getHeader("origin");
        //2.非空判断
        if (StringUtil.isEmpty(origin)) {
            origin="blank";
        }
        //3.返回origin
        return origin;
    }
}
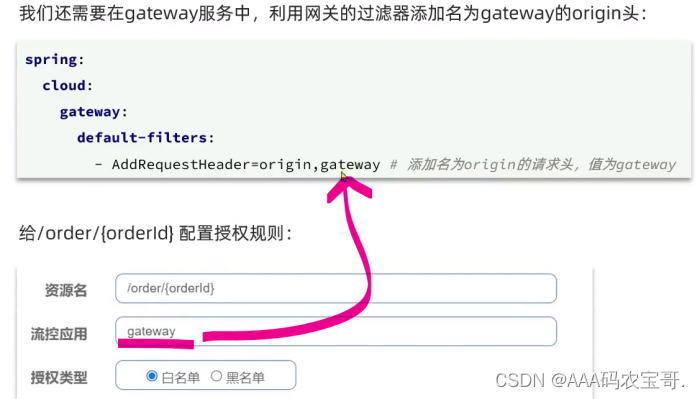
3.1.2 为网关添加请求头
修改Gateway的application.yaml。- AddRequestHeader=origin,gateway
    gateway:
      routes:
        - id: user-service # 路由标示,必须唯一
          uri: lb://userservice # 路由的目标地址
          predicates: # 路由断言,判断请求是否符合规则
            - Path=/user/** # 路径断言,判断路径是否是以/user开头,如果是则符合
        - id: order-service
          uri: lb://orderservice
          predicates:
            - Path=/order/**
      default-filters:
        - AddRequestHeader=Truth,Itcast is freaking awesome!
        - AddRequestHeader=origin,gateway
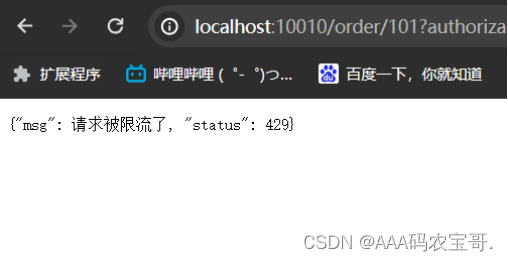
重新启动,为/order/{orderId}添加授权信息
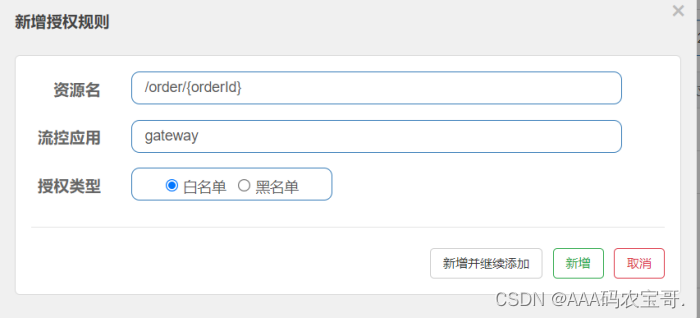
设置授权规则成功,如果通过http://localhost:8088/order/101直接访问,等于绕过网关,自然拒绝访问
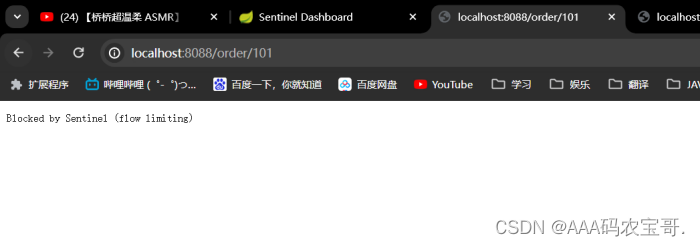
则需要通过网关进行访问,网关端口10010,因为网关中加入了请求参数,则应该通过添加?authorization=admin来进行访问
http://localhost:10010/order/101?authorization=admin

请求—》网关—》OraginParser—》sentinel—》controller
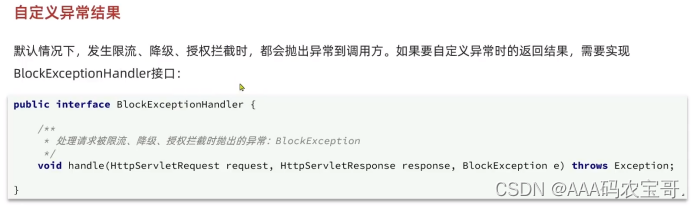
3.2 自定义异常

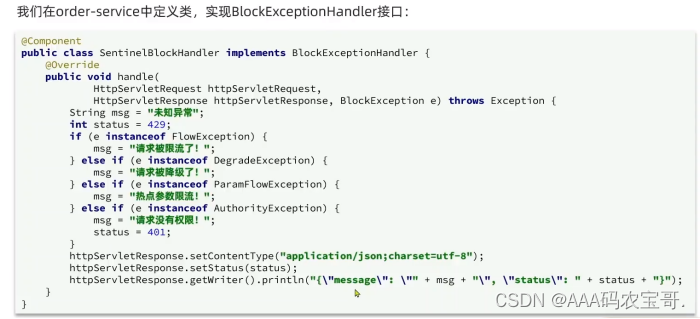
放在cn.itcast.order.sentinel下
@Component
public class SentinelExceptionHandler implements BlockExceptionHandler {
    @Override
    public void handle(HttpServletRequest request, HttpServletResponse response, BlockException e) throws Exception {
        String msg = "未知异常";
        int status = 429;

        if (e instanceof FlowException) {
            msg = "请求被限流了";
        } else if (e instanceof ParamFlowException) {
            msg = "请求被热点参数限流";
        } else if (e instanceof DegradeException) {
            msg = "请求被降级了";
        } else if (e instanceof AuthorityException) {
            msg = "没有权限访问";
            status = 401;
        }

        response.setContentType("application/json;charset=utf-8");
        response.setStatus(status);
        response.getWriter().println("{\"msg\": " + msg + ", \"status\": " + status + "}");
    }
}
将101的流控规则设置成1,访问101,提示被限流
4 规则持久化
4.1 规则管理模式

4.1.1 pull
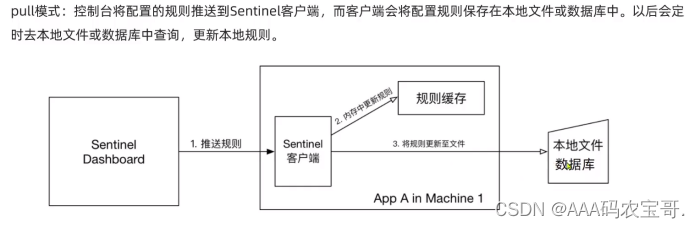
4.1.2 push
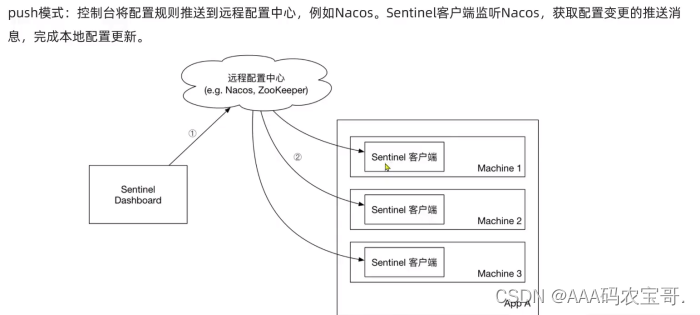
4.1.3 实现push
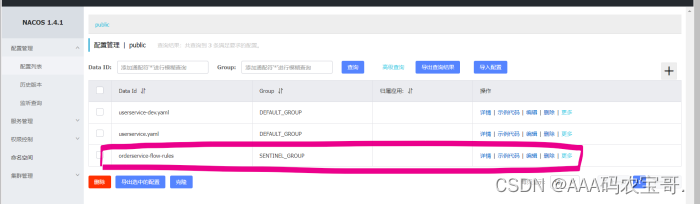
启动持久化jar包,然后访问簇点,清空缓存并重新加载,在-Nacos后加入流控规则
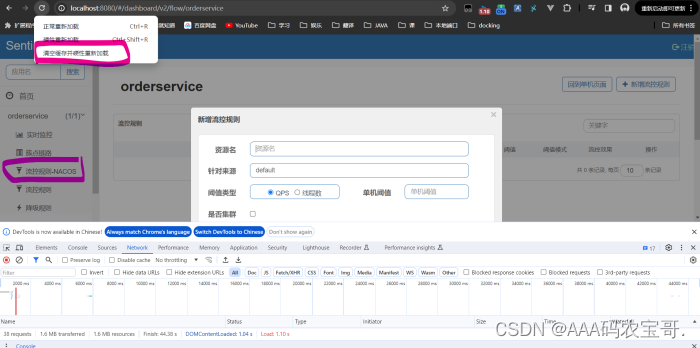
返回Nacos
访问101,则返回
{"msg": 请求被限流了, "status": 429}
为了验证是否持久化
重启微服务,规则依旧存在


 2533
2533


 被折叠的 条评论
为什么被折叠?
被折叠的 条评论
为什么被折叠?
 到【灌水乐园】发言


