


首先我们先安装Zookeeper
修改配置文件,默认是没有的,只给我们提供了一个sample样例,我们复制一份修改一下。
# The number of milliseconds of each tick
tickTime=2000
# The number of ticks that the initial
# synchronization phase can take
initLimit=10
# The number of ticks that can pass between
# sending a request and getting an acknowledgement
syncLimit=5
# the directory where the snapshot is stored.
# do not use /tmp for storage, /tmp here is just
# example sakes.
dataDir=../tmp/zookeeper
# the port at which the clients will connect
clientPort=2181
admin.serverPort=2182
# the maximum number of client connections.
# increase this if you need to handle more clients
#maxClientCnxns=60
#
# Be sure to read the maintenance section of the
# administrator guide before turning on autopurge.
#
# http://zookeeper.apache.org/doc/current/zookeeperAdmin.html#sc_maintenance
#
# The number of snapshots to retain in dataDir
#autopurge.snapRetainCount=3
# Purge task interval in hours
# Set to "0" to disable auto purge feature
#autopurge.purgeInterval=1
dataDir=../tmp/zookeeper:设置我们临时文件存放的目录
clientPort=2181:配置 Zookeeper的端口
admin.serverPort=2182:Zookeeper内部会有一个服务默认占用8080,所以我们要修改一下。当然如果我们用不到8080端口也没必要加这个。

我们开启Zookeeper的服务。

配置Zookeeper的监控
这个可以不进行配置,但是最好配置一下,方便我们查看消费者和服务者。
创建消费者和服务者
1:首先创建一个基础模块
只需要在这个模块里面创建一个接口

2:创建一个服务提供者模块加入依赖
<dependencies>
        <dependency>
            <groupId>org.example</groupId>
            <artifactId>Dubbo-Api</artifactId>
            <version>1.0-SNAPSHOT</version>
        </dependency>

        <dependency>
            <groupId>org.springframework.boot</groupId>
            <artifactId>spring-boot-starter-web</artifactId>
            <version>2.1.7.RELEASE</version>
        </dependency>
        <dependency>
            <groupId>org.apache.dubbo</groupId>
            <artifactId>dubbo-spring-boot-starter</artifactId>
            <version>2.7.3</version>
        </dependency>

        <dependency>
            <groupId>com.github.sgroschupf</groupId>
            <artifactId>zkclient</artifactId>
            <version>0.1</version>
        </dependency>

        <dependency>
            <groupId>org.apache.curator</groupId>
            <artifactId>curator-framework</artifactId>
            <version>2.12.0</version>
        </dependency>
        <dependency>
            <groupId>org.apache.curator</groupId>
            <artifactId>curator-recipes</artifactId>
            <version>2.12.0</version>
        </dependency>

        <dependency>
        <groupId>org.apache.zookeeper</groupId>
        <artifactId>zookeeper</artifactId>
        <version>3.4.14</version>
        <!--排除这个slf4j-log4j12-->
        <exclusions>
            <exclusion>
                <groupId>org.slf4j</groupId>
                <artifactId>slf4j-log4j12</artifactId>
            </exclusion>
        </exclusions>
        </dependency>


    </dependencies>

    <build>
        <plugins>
            <plugin>
                <groupId>org.springframework.boot</groupId>
                <artifactId>spring-boot-maven-plugin</artifactId>
            </plugin>
        </plugins>
    </build>
2:创建基础模块接口的实现类,也就是我们所谓的服务
package com.dongmu.service;
import org.apache.dubbo.config.annotation.Service;
import org.springframework.stereotype.Component;
@Service
@Component
public class HelloServiceImpl implements HelloService {
@Override
public String sayHello() {
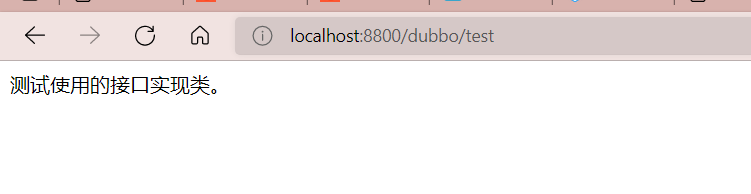
return "测试使用的接口实现类。";
}
}
3:编写配置文件
server:
  port: 8081					  #端口号可以自己改
dubbo:
  application:
    name: Dubbo-Provider  #大写小写都可以 集群名称必须相同
  registry:
    address: 192.168.137.1:2181 #zookeeper的地址 改成自己的即可 我的是linux的
    protocol: zookeeper  # 注册中心的名称  zookeeper(写死)
  monitor:
    protocol: registry    #  确认注册(写死)
  protocol:
    name: dubbo          #  dubbo (写死)
    port: 20880 		   #  集群的话需要改(随意)
    host: 192.168.137.1
    #  protocol:
  #    host:
  scan:
    base-packages: com.dongmu.service
4:编写启动类
package com.dongmu;


import org.apache.dubbo.config.spring.context.annotation.EnableDubbo;
import org.apache.dubbo.config.spring.context.annotation.EnableDubboConfig;
import org.springframework.boot.SpringApplication;
import org.springframework.boot.autoconfigure.SpringBootApplication;

@SpringBootApplication

@EnableDubbo
@EnableDubboConfig
public class ProviderApplication {
    public static void main(String[] args) {

        SpringApplication.run(ProviderApplication.class,args);
    }
}
启动项目,通过监控页面查看,服务成功注册到Zookeeper中

编写消费者模块
1:加入依赖
<?xml version="1.0" encoding="UTF-8"?>
<project xmlns="http://maven.apache.org/POM/4.0.0"
         xmlns:xsi="http://www.w3.org/2001/XMLSchema-instance"
         xsi:schemaLocation="http://maven.apache.org/POM/4.0.0 http://maven.apache.org/xsd/maven-4.0.0.xsd">
    <parent>
        <artifactId>project</artifactId>
        <groupId>org.example</groupId>
        <version>1.0-SNAPSHOT</version>
    </parent>
    <modelVersion>4.0.0</modelVersion>

    <artifactId>Consumer</artifactId>

    <properties>
        <maven.compiler.source>8</maven.compiler.source>
        <maven.compiler.target>8</maven.compiler.target>
    </properties>
    <dependencies>
        <dependency>
            <groupId>org.projectlombok</groupId>
            <artifactId>lombok</artifactId>
            <version>1.18.22</version>
        </dependency>
        <dependency>
            <groupId>org.springframework.boot</groupId>
            <artifactId>spring-boot-starter-test</artifactId>
            <version>2.4.0</version>
        </dependency>

        <dependency>
            <groupId>org.springframework.boot</groupId>
            <artifactId>spring-boot</artifactId>
            <version>2.4.0</version>
        </dependency>

        <dependency>
            <groupId>org.springframework.boot</groupId>
            <artifactId>spring-boot-starter-web</artifactId>
            <version>2.4.0</version>
        </dependency>


        <!--引入dubbo依赖-->
        <dependency>
            <groupId>org.apache.dubbo</groupId>
            <artifactId>dubbo-spring-boot-starter</artifactId>
            <version>2.7.5</version>
        </dependency>
        <!--这个两个是心跳包 用于zookeeper注册中心  查找提供者的心跳-->
        <dependency>
            <groupId>org.apache.curator</groupId>
            <artifactId>curator-framework</artifactId>
            <version>4.1.0</version>
        </dependency>
        <dependency>
            <groupId>org.apache.curator</groupId>
            <artifactId>curator-recipes</artifactId>
            <version>4.1.0</version>
        </dependency>

        <dependency>
            <groupId>org.example</groupId>
            <artifactId>Dubbo-Api</artifactId>
            <version>1.0-SNAPSHOT</version>
        </dependency>


    </dependencies>

</project>
2:创建Controller从远程取服务
package com.dongmu.controller;

import com.dongmu.service.HelloService;
import org.apache.dubbo.config.annotation.Reference;
import org.springframework.web.bind.annotation.GetMapping;
import org.springframework.web.bind.annotation.RestController;

@RestController
public class HelloController {

    @Reference
    private HelloService helloService;

    @GetMapping("dubbo/test")
    public String testHello(){
        return helloService.sayHello();
    }
}
2:编写配置文件
dubbo:
  application:
    name: Dubbo-Consumer         #可以改,改成自己喜欢的即可
  registry:
    address: 127.0.0.1:2181  #改写成自己的即可
    protocol: zookeeper			   #默认写死
  monitor:
    protocol: registry
#  protocol:
#    host: 192.168.137.1

server:
  port: 8800							#一般消费者都是8080
3:主启动类
package com.dongmu;

import org.apache.dubbo.config.spring.context.annotation.EnableDubbo;
import org.springframework.boot.SpringApplication;
import org.springframework.boot.autoconfigure.SpringBootApplication;

@SpringBootApplication
@EnableDubbo
public class ConsumerApplication {
    public static void main(String[] args) {
        SpringApplication.run(ConsumerApplication.class,args);
    }
}
如果我们的服务提供者没有把服务注册到远程,那么消费者是拿不到的,启动就会报错,注入失败。
启动成功我们访问
查看监控页面,消费者消费成功。

参考文章


 996
996


 被折叠的 条评论
为什么被折叠?
被折叠的 条评论
为什么被折叠?
 到【灌水乐园】发言


