


一、pom.xml文件(关键依赖)
<dependency>
    <groupId>org.springframework.boot</groupId>
    <artifactId>spring-boot-starter-security</artifactId>
</dependency>
<dependency>
    <groupId>io.jsonwebtoken</groupId>
    <artifactId>jjwt</artifactId>
    <version>0.9.0</version>
</dependency>
二、application.yml
spring
  security:
  user:
    password: 1234
    name: user
三、SpringSecurity.config配置文件
@Configuration
@EnableGlobalMethodSecurity(prePostEnabled = true)  // 开启注解权限管理
public class SecurityConfig {

    // 自定义jwt解析,将登录者的权限设置到SecurityContextHolder中,其他地方进行设置权限验证
    @Autowired
    private JwtAuthenticationTokenFilter jwtAuthenticationTokenFilter;

    // 认证
    @Autowired
    private AuthenticationEntryPoint authenticationEntryPoint;
    @Autowired
    private AccessDeniedHandler accessDeniedHandler;

    // 这里改变一下密码编码和比对的密码方式
    // 默认方式为将密码编码后,我们需要在密码加{noop}进行比对
    // String encode_pwd = passwordEncoder.encode("123456"); 这样便可以得到加密后的密码
    // 这里我们将它注入容器即可,默认使用当前版本+长度+随机数产生随机盐生成密码,官方推荐使用
    @Bean
    public PasswordEncoder passwordEncoder() {
        return new BCryptPasswordEncoder();
    }

    // 返回AuthenticationManager对象,在认证的时候需要使用到此对象进行认证
    @Autowired
    private AuthenticationConfiguration authenticationConfiguration;
    @Bean
    public AuthenticationManager authenticationManager() throws Exception {
        AuthenticationManager authenticationManager = authenticationConfiguration.getAuthenticationManager();
        return authenticationManager;
    }
    // 定义SpringSecurity不需要拦截的url
    private static final String[] URL_WHITELISTS = {
            "/common/**",
            "/user/login",
            "/user/sendMsg",
            "/doc.html",
            "/webjars/**",
            "/swagger-resources",
            "/v2/api-docs"
    };

    @Bean
    SecurityFilterChain filterChain(HttpSecurity http) throws Exception {
        // 将跨站请求伪造防护关闭,我们使用jwt保证安全
        return http.csrf().disable()
                .sessionManagement().sessionCreationPolicy(SessionCreationPolicy.STATELESS)
                .and() // 下面三个有顺序要求
                // 拦截所有请求
                .authorizeRequests()
                // 放行一些请求,不需要认证
                .antMatchers(URL_WHITELISTS).permitAll()
                // 所有请求需要认证
                .anyRequest().authenticated()
                .and()
                // 配置自定义jwt解析过滤器,在UsernamePasswordAuthenticationFilter之前执行
                .addFilterBefore(jwtAuthenticationTokenFilter, UsernamePasswordAuthenticationFilter.class)
                // 配置异常
                .exceptionHandling()
                // 认证异常,可以自定义返回消息(可以不配)
                .authenticationEntryPoint(authenticationEntryPoint)
//                // 授权异常,可以自定义返回消息(可以不配)
                .accessDeniedHandler(accessDeniedHandler)
                .and()
                // 开启跨域访问
                .cors()
                .and()
                .build();
    }

}
四、LoginController (登录控制)
1、发送短信接口(以手机号为key,验证码为value存入Redis,5分钟过期)
    @PostMapping("/sendMsg")
    public R sendMsg(@RequestBody User user){
        String phone = user.getPhone();
        if(StringUtils.isNotEmpty(phone)){
            String code = ValidateCodeUtils.generateValidateCode(4).toString();
//            调用阿里云的api接口发送验证码(这里没有开通服务,先模拟)

            // 优化,使用Redis缓存验证码,5分钟失效
            redisCache.setCacheObject(phone,code,5,TimeUnit.MINUTES);
            log.info("验证码--->({} --- {})",phone,code);
            return R.success("验证码发送成功,请注意查收");
        }
        return R.error("验证码发送失败");
    }
2、手机号登录(ReidsCache为工具类,自定义SmsAbstractAuthenticationToken与LoginUser,后面看)
    @PostMapping("/login")
    public R login(@RequestBody Map map, HttpServletRequest request) {
        log.info("用户登录--->(map={})",map.toString());
        // 优化:从Redis中获取验证码
        Object code = redisCache.getCacheObject((String) map.get("phone"));
        if(Objects.isNull(code) || !code.equals(map.get("code"))){
            // 在session中查询不到数据,与前端传递的phone不一致
            return R.error("验证码错误");
        }
        // 判断用户是否在数据库存在,不存在则添加
        User userInDB = userService.getOne(new LambdaQueryWrapper<User>().eq(User::getPhone, map.get("phone")));
        if(Objects.isNull(userInDB)){
            userInDB = new User();
            userInDB.setPhone((String) map.get("phone"));
            userInDB.setType(0);
            userInDB.setStatus(1);
            userInDB.setCreateTime(LocalDateTime.now());
            userInDB.setUpdateTime(LocalDateTime.now());
            userService.save(userInDB);
        }
        // 这里权限信息可以去数据库中查询
        LoginUser user = new LoginUser(userInDB, Arrays.asList("ROLE_SMS"));
        // 优化:登录成功,将Redis中验证码删掉
        redisCache.deleteObject(userInDB.getPhone());
        Long userId = userInDB.getId();
        redisCache.setCacheObject("login:"+userId,user,3, TimeUnit.DAYS);
        // 5、返回给客户端JwtToken
        String jwt_token = JwtUtil.createJWT(userId.toString());
        map.put("token",jwt_token);
        map.put("userPhone",userInDB.getPhone());
        return R.success(map);
    }
a、前端点击 获取验证码 ,后端将从 一些api接口发送验证码 接收到,以 手机号 为 key,验证码为 value,存入Redis,过期时间 5分钟,这里展示前端
b、用户填写手机号与接收到的 验证码,发送登录请求
c、后端接收登录请求,从Redis中以前端传递的 手机号 为键进行取值、比对 验证码,取值为空抛异常,取出验证码与前端传递验证码进行比对,验证码比对失败抛异常

d、两者比对成功,判断用户是否在数据库存在,不存在则添加
e、将用户信息和权限信息封装成UserDetails对象(这里使用LoginUser实现了UserDetails), 为什么要自定义UserDetails实现类,RedisCache与JwtUtil工具类等等隔壁获取:
SpringSecurity +Jwt 使用用户名密码登录_独繁华的博客-CSDN博客
f、从Redis当中删除验证码,userId 为key,loginUser(将具有权限信息,用户信息)为value存入Redis
g、生成jwt,将token与用户信息返回给前端
h、前端接收token,设置到请求头,每一次携带token去请求资源
service.interceptors.request.use((config) => {
    // 判断是否存在token,如果存在的话,则每个http header中都加上token
    if (window.localStorage.getItem('token')) {
        config.headers.token = localStorage.getItem('token');
    }
}
i、后端拦截验证token,使用过滤器拦截每一次请求解析token,从Redis中以userId获取用户信息,用户权限,设置到SecurityContext中。
// 自定义认证信息过滤,解析请求中的token信息,放在UsernamePasswordAuthenticationFilter前面,继承只执行一次的filter
@Component
@Slf4j
public class JwtAuthenticationTokenFilter extends OncePerRequestFilter {
    @Autowired
    private RedisCache redisCache;

    @Override
    protected void doFilterInternal(HttpServletRequest request, HttpServletResponse response, FilterChain filterChain) throws ServletException, IOException {

        // 从请求头中获取token信息
        String token = request.getHeader("token");
        log.info("token:{}", token);
        log.info("当前线程名称:{}", Thread.currentThread().getName());
        // 判断token是否为空
        if (!StringUtils.hasText(token)) {
            log.info("token为空");
            // 为空放行
            filterChain.doFilter(request, response);
            // 停止向下执行
            return;
        }
        String id;
        try {
            // 解析token
            Claims claims = JwtUtil.parseJWT(token);
            id = claims.getSubject();
        } catch (Exception e) {
            e.printStackTrace();
            throw new RuntimeException("token非法");
        }
        // 根据键从Redis中获取用户信息
        String redisKey = "login:" + id;
        LoginUser loginUser = redisCache.getCacheObject(redisKey);
        if (Objects.isNull(loginUser)) {
            throw new RuntimeException("登录失败");
        }
        // 获取ip等信息
        WebAuthenticationDetails credentials = new WebAuthenticationDetails(request);
        // 短信登录权限
        SmsAbstractAuthenticationToken smsAbstractAuthenticationToken = new SmsAbstractAuthenticationToken(loginUser.getUser().getPhone(), loginUser, null, credentials, loginUser.getAuthorities());
            SecurityContextHolder.getContext().setAuthentication(smsAbstractAuthenticationToken);
        }
        // 放行
        filterChain.doFilter(request, response);
    }
}j、自定义SmsAbstractAuthenticationToken类继AbstractAuthenticationToken,封装用户信息(自定义UserDetails实现类LoginUser),用户权限,用户ip等信息,设置到SecurityContext中,用户名和密码登录时使用UsernamePasswordAuthenticationToken,封装权限信息,这里贴官方UsernamePasswordAuthenticationToken实现过程,用户名和密码具体认证过程请看:SpringSecurity +Jwt 使用用户名密码登录_独繁华的博客-CSDN博客
public class UsernamePasswordAuthenticationToken extends AbstractAuthenticationToken {

	private static final long serialVersionUID = SpringSecurityCoreVersion.SERIAL_VERSION_UID;
    // UserDetailsService.loadUserByUsername中查询用户信息与权限信息就封装到这个对象中(UserDetails)
	private final Object principal;

	private Object credentials;

	public UsernamePasswordAuthenticationToken(Object principal, Object credentials) {
		super(null);
		this.principal = principal;
		this.credentials = credentials;
		setAuthenticated(false);
	}

	public UsernamePasswordAuthenticationToken(Object principal, Object credentials,
			Collection<? extends GrantedAuthority> authorities) {
		super(authorities);
		this.principal = principal;
		this.credentials = credentials;
		super.setAuthenticated(true);
	}

	@Override
	public Object getCredentials() {
		return this.credentials;
	}

	@Override
	public Object getPrincipal() {
		return this.principal;
	}

	@Override
	public void setAuthenticated(boolean isAuthenticated) throws IllegalArgumentException {
		Assert.isTrue(!isAuthenticated,
				"Cannot set this token to trusted - use constructor which takes a GrantedAuthority list instead");
		super.setAuthenticated(false);
	}

	@Override
	public void eraseCredentials() {
		super.eraseCredentials();
		this.credentials = null;
	}

}
SmsAbstractAuthenticationToken实现
public class SmsAbstractAuthenticationToken extends AbstractAuthenticationToken {

    // 这里返回自定义LoginUser实现UserDetails对象,存入用户信息与权限信息
    private final UserDetails principal;

    private final Object credentials;

    private final WebAuthenticationDetails details;

    private final String phone;

    public SmsAbstractAuthenticationToken(String phone, UserDetails principal, Object credentials,
                                          WebAuthenticationDetails details,
                                          Collection<? extends GrantedAuthority> authorities) {
        super(authorities);
        this.principal = principal;
        this.credentials = credentials;
        this.details = details;
        this.phone = phone;

        // 必须设置
        setAuthenticated(true);
    }

    @Override
    public Object getCredentials() {
        return credentials;
    }

    @Override
    public WebAuthenticationDetails getDetails() {
        return details;
    }

    @Override
    public UserDetails getPrincipal() {
        return principal;
    }

    public String getPhone() {
        return phone;
    }

    @Override
    public String getName() {
        return super.getName();
    }
}
3、授权
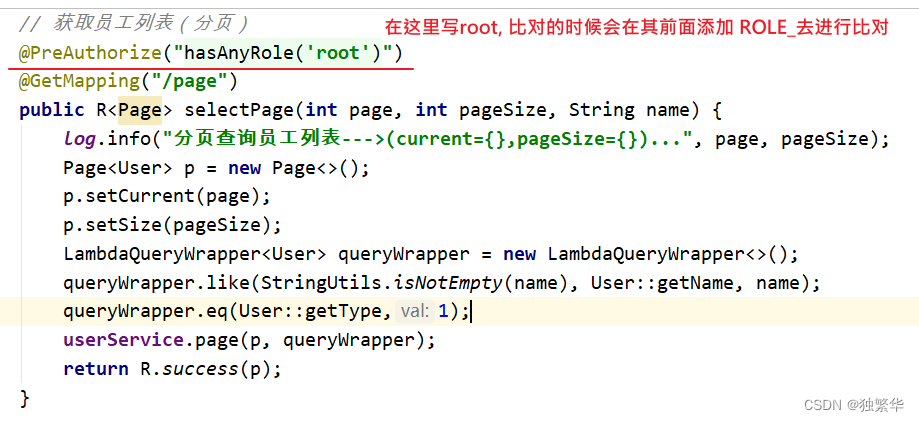
这个接口便需要ROLE_root权限才能访问。


 2万+
2万+


 被折叠的 条评论
为什么被折叠?
被折叠的 条评论
为什么被折叠?
 到【灌水乐园】发言


