RabbitMQ的使用以及整合到SpringBoot中
一、比较:
(1)、传统请求服务器:

(2)、通过MQ去操作数据库:
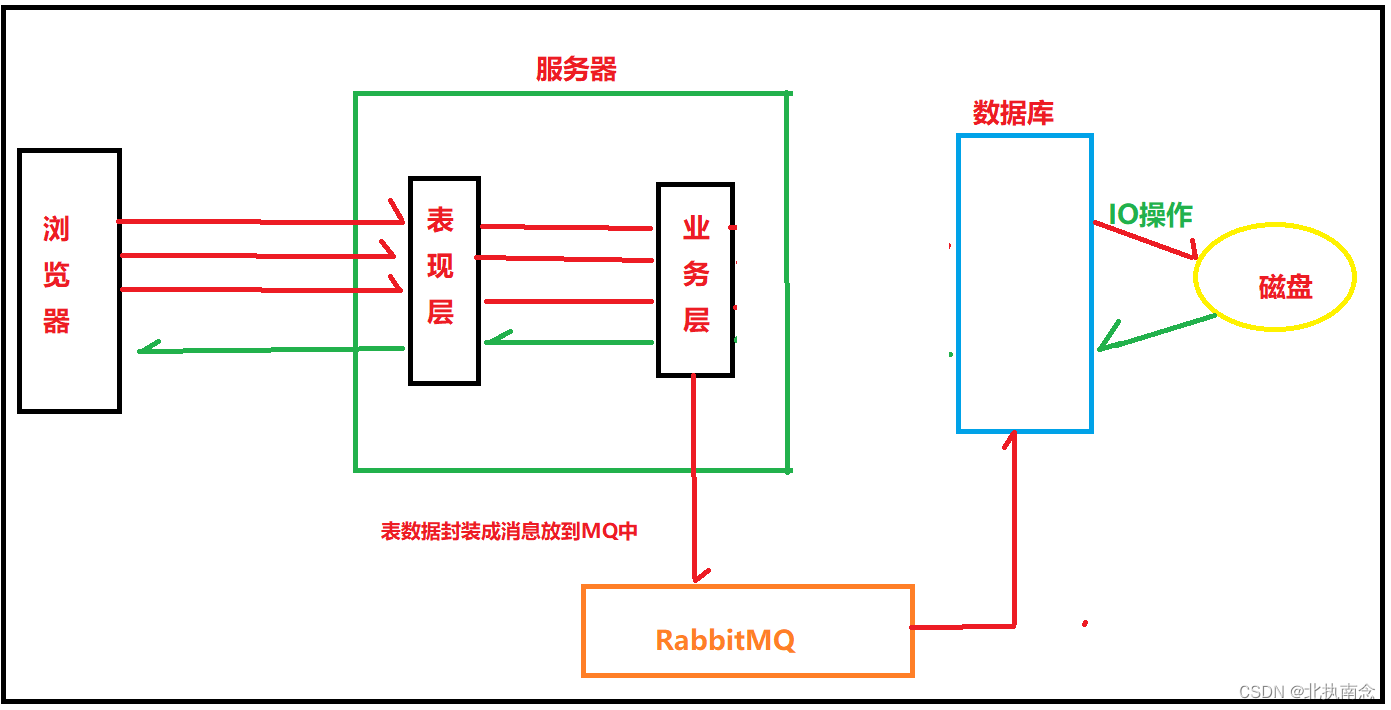
通过MQ去操作数据库,从而达到削峰的效果;
问题现象:
(1)、海量数据;
(2)、高并发;
解决方法:
  其中最为代表的解决方法:流量削峰-----》使用MQ
二、常见的中间件:
前端:nginx
后端数据库:Mycat
消息中间件:RocketMQ  Kafka-----》Kafka应用在大数据领域容易掉消息
三、MQ应用场景:
(1)、异步解耦:
		同步:比如用洗衣机洗衣服的时候,洗衣机洗完衣服了,你才能干别的事。没有洗完,你不能干别的事;
		异步就是洗衣机洗衣服的时候同时我们该干嘛干嘛;
(2)、削峰填谷。

(3)、消息分发。
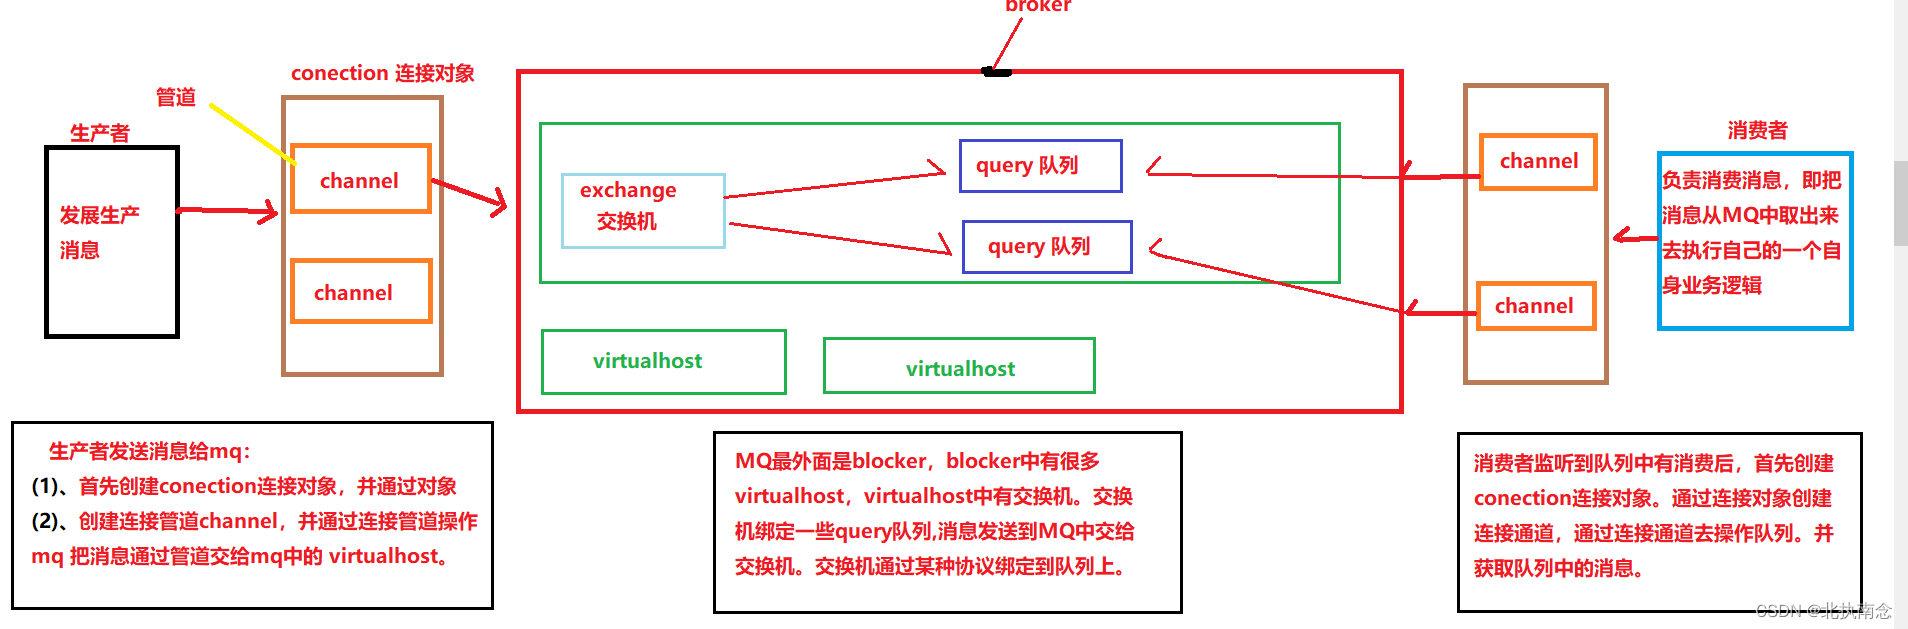
四、RabbitMQ 的组成:
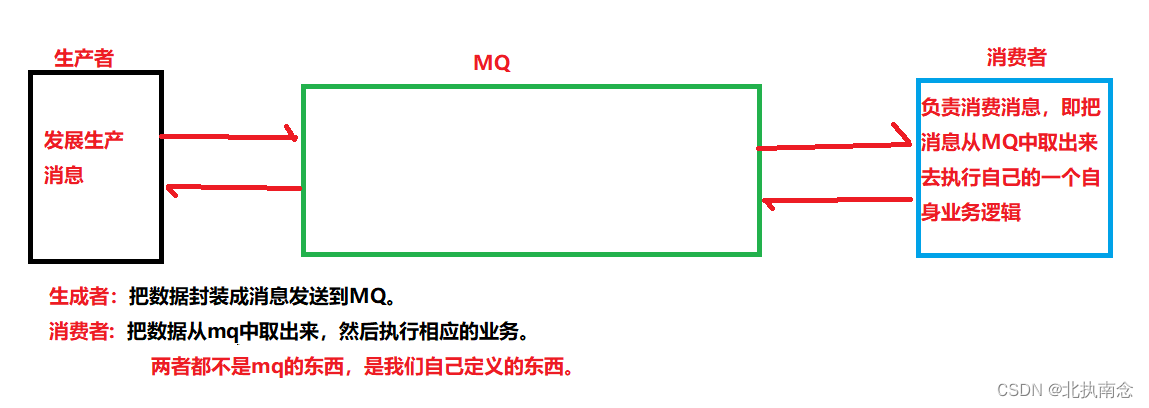
过程:
五、基础使用:
开发中使用:
只需要:
(1)创建生产者----->生产消息
(2)创建消费者---------》消费消息
就可以了
平常使用步骤:
(1)对于生产者:
ConnectionFactory connectionFactory = new ConnectionFactory();
connectionFactory.setHost("localhost");
Connection connection = connectionFactory.newConnection();
Channel channel = connection.createChannel();
channel.queueDeclare("QUEUE_HELLOWORD", false, false, false, null);、
String xiaoxi="这是生成这消息111111";
channel.basicPublish("","QUEUE_HELLOWORD",null,xiaoxi.getBytes());
channel.close();
connection.close();
(2)对于消费者:
ConnectionFactory connectionFactory = new ConnectionFactory();
connectionFactory.setHost("localhost");
Connection connection = connectionFactory.newConnection();
Channel channel = connection.createChannel();
channel.queueDeclare("QUEUE_HELLOWORD", true, false, false, null);、
channel.basicConsume("QUEUE_HELLOWORD", true, new DeliverCallback() {
@Override
public void handle(String s, Delivery delivery) throws IOException {
System.out.printf("接收到消息:"+new String(delivery.getBody()));
channel.basicAck(delivery.getEnvelope().getDeliveryTag(), false);
}
}, new CancelCallback() {
@Override
public void handle(String s) throws IOException {
System.out.println("11111");
}
});
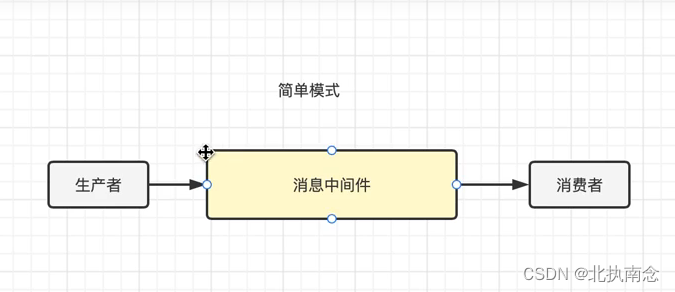
六、MQ常见工作模式:
(1)、简单模式:
生产者:
package cn.js.hello;
import com.rabbitmq.client.Channel;
import com.rabbitmq.client.Connection;
import com.rabbitmq.client.ConnectionFactory;
import java.io.IOException;
import java.util.concurrent.TimeoutException;
public class PermissTest01 {
public static void main(String[] args) throws Exception{
ConnectionFactory connectionFactory = new ConnectionFactory();
connectionFactory.setHost("localhost");
Connection connection = connectionFactory.newConnection();
Channel channel = connection.createChannel();
channel.queueDeclare("QUEUE_HELLOWORD", false, false, false, null);
String xiaoxi="这是生成这消息111111";
channel.basicPublish("","QUEUE_HELLOWORD",null,xiaoxi.getBytes());
channel.close();
connection.close();
System.out.println("消息发送完毕");
}
}
消费者:
package cn.js.hello;
import com.rabbitmq.client.*;
import java.io.IOException;
import java.util.concurrent.TimeoutException;
public class consum {
public static void main(String[] args) throws IOException, TimeoutException {
ConnectionFactory connectionFactory = new ConnectionFactory();
connectionFactory.setHost("localhost");
Connection connection = connectionFactory.newConnection();
Channel channel = connection.createChannel();
channel.queueDeclare("QUEUE_HELLOWORD", false, false, false, null);
channel.basicConsume("QUEUE_HELLOWORD", true, new DeliverCallback() {
@Override
public void handle(String s, Delivery delivery) throws IOException {
System.out.printf("接收到消息:"+new String(delivery.getBody()));
}
}, new CancelCallback() {
@Override
public void handle(String s) throws IOException {
System.out.println("11111");
}
});
}
}
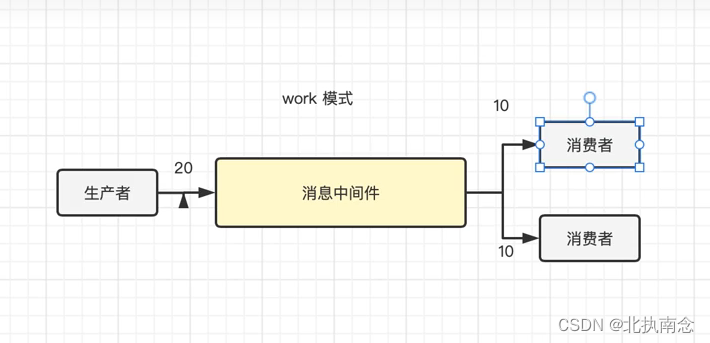
(2)、工作模式(work)
生产者:
package cn.js.work;
import com.rabbitmq.client.Channel;
import com.rabbitmq.client.Connection;
import com.rabbitmq.client.ConnectionFactory;
public class WorkTest01 {
public static void main(String[] args) throws Exception{
ConnectionFactory connectionFactory = new ConnectionFactory();
connectionFactory.setHost("localhost");
Connection connection = connectionFactory.newConnection();
Channel channel = connection.createChannel();
channel.queueDeclare("QUEUE_Work", true, false, false, null);
for(int i=0 ;i<20 ;i++){
String xiaoxi="这是生产者生成的消息"+" "+i;
channel.basicPublish("","QUEUE_Work",null,xiaoxi.getBytes());
}
channel.close();
connection.close();
System.out.println("消息发送完毕");
}
}
消费者1:
package cn.js.work;
import com.rabbitmq.client.*;
import java.io.IOException;
import java.util.concurrent.TimeoutException;
public class consum1 {
public static void main(String[] args) throws IOException, TimeoutException {
ConnectionFactory connectionFactory = new ConnectionFactory();
connectionFactory.setHost("localhost");
Connection connection = connectionFactory.newConnection();
Channel channel = connection.createChannel();
channel.basicQos(1);
channel.queueDeclare("QUEUE_Work", true, false, false, null);
try {
Thread.sleep(2000);
channel.basicConsume("QUEUE_Work", false, new DeliverCallback() {
@Override
public void handle(String s, Delivery delivery) throws IOException {
System.out.println("消费者1:接收到消息:"+new String(delivery.getBody()));
channel.basicAck(delivery.getEnvelope().getDeliveryTag(), false);
}
}, new CancelCallback() {
@Override
public void handle(String s) throws IOException {
System.out.println("11111");
}
});
} catch (InterruptedException e) {
e.printStackTrace();
}
}
}
消费者2:
package cn.js.work;
import com.rabbitmq.client.*;
import java.io.IOException;
import java.util.concurrent.TimeoutException;
public class consum2 {
public static void main(String[] args) throws IOException, TimeoutException {
ConnectionFactory connectionFactory = new ConnectionFactory();
connectionFactory.setHost("localhost");
Connection connection = connectionFactory.newConnection();
Channel channel = connection.createChannel();
channel.basicQos(1);
channel.queueDeclare("QUEUE_Work", true, false, false, null);
try {
Thread.sleep(1000);
channel.basicConsume("QUEUE_Work", true, new DeliverCallback() {
@Override
public void handle(String s, Delivery delivery) throws IOException {
System.out.println("消费者1:接收到消息:"+new String(delivery.getBody()));
}
}, new CancelCallback() {
@Override
public void handle(String s) throws IOException {
System.out.println("11111");
}
});
} catch (InterruptedException e) {
e.printStackTrace();
}
}
}
(3)、订阅模式:
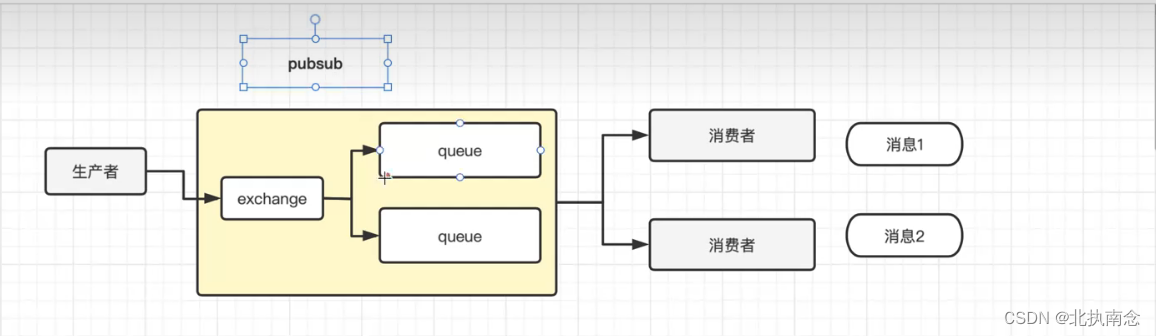
交换机类型:
(1).广播---》fanout
(2).定向-----》Direct
(3).通配符-----》Topic
步骤:
订阅模式与其他模式的区别?
生产者:
在第五步的时候:
创建交换机:
channel.exchangeDeclare("03-pubsub1","fanout");
在发送消息的时候:
给交换机指定名称;
消费者:
前五步与上述生产者的前五步一样,
第六步,创建队列。
String queue = channel.queueDeclare().getQueue();
第七步,绑定队列与交换机。
channel.queueBind(queue,"03-pubsub1","");
queueBind参数:
1.队列名称。
2.交换机名称。
3.路由 KEY 和生产者发消息的第二个参数相同。
或者:
channel.queueDeclare("队列名称",true,false,false,null);
channel.queueBind("队列名称","03-pubsub1","");
两者都是为了创建队列并获取队列名称
生产者:
package cn.js.pubsub3;
import com.rabbitmq.client.Channel;
import com.rabbitmq.client.Connection;
import com.rabbitmq.client.ConnectionFactory;
import com.rabbitmq.client.MessageProperties;
import java.io.IOException;
import java.util.concurrent.TimeoutException;
public class pubsubTest {
public static void main(String[] args) throws IOException, TimeoutException {
ConnectionFactory connectionFactory = new ConnectionFactory();
connectionFactory.setHost("localhost");
Connection connection = connectionFactory.newConnection();
Channel channel = connection.createChannel();
channel.exchangeDeclare("03-pubsub1","fanout");
String xiaoxi="这是生产者生成的消息";
channel.basicPublish("03-pubsub1","", MessageProperties.PERSISTENT_TEXT_PLAIN,xiaoxi.getBytes());
channel.close();
connection.close();
System.out.println("消息发送完毕");
}
}
消费者1:
package cn.js.pubsub3;
import com.rabbitmq.client.*;
import java.io.IOException;
public class consum1 {
public static void main(String[] args) throws Exception {
ConnectionFactory connectionFactory = new ConnectionFactory();
connectionFactory.setHost("localhost");
Connection connection = connectionFactory.newConnection();
Channel channel = connection.createChannel();
channel.exchangeDeclare("03-pubsub1","fanout");
String queue = channel.queueDeclare().getQueue();
channel.queueBind(queue,"03-pubsub1","");
channel.basicConsume(queue, true, new DeliverCallback() {
public void handle(String consumerTag, Delivery message) throws IOException {
System.out.println("消费者 1 消息内容为:" + new String(message.getBody()));
}
}, new CancelCallback() {
public void handle(String consumerTag) throws IOException {
System.out.println("1111");
}
});
}
}
消费者2:
package cn.js.pubsub3;
import com.rabbitmq.client.*;
import java.io.IOException;
import java.util.concurrent.TimeoutException;
public class consum2 {
public static void main(String[] args) throws Exception {
ConnectionFactory connectionFactory = new ConnectionFactory();
connectionFactory.setHost("localhost");
Connection connection = connectionFactory.newConnection();
Channel channel = connection.createChannel();
channel.exchangeDeclare("03-pubsub1","fanout");
String queue = channel.queueDeclare().getQueue();
channel.queueBind(channel.queueDeclare().getQueue(), "QUEUE_propub", "");
channel.queueBind(queue,"03-pubsub1","");
channel.basicConsume(queue, true, new DeliverCallback() {
@Override
public void handle(String s, Delivery delivery) throws IOException {
System.out.println("消费者2:接收到消息:" + new String(delivery.getBody()));
}
}, new CancelCallback() {
@Override
public void handle(String s) throws IOException {
System.out.println("11111");
}
});
}
}
(4)、路由模式:
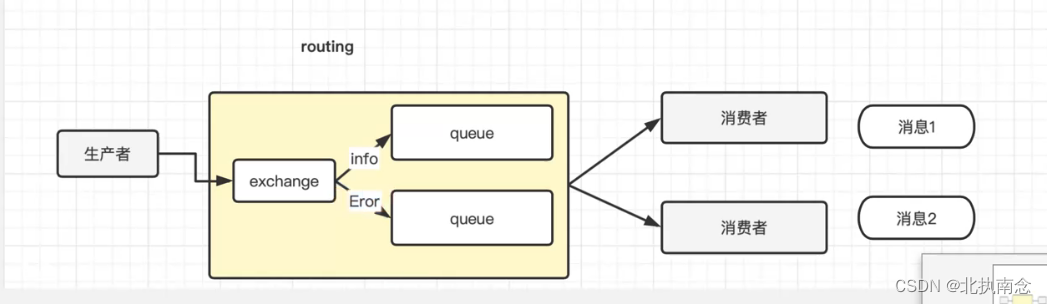
注意:
队列和交换机的绑定已经是不能任意绑定了。而是指定一个路由key只有队列的key和消息的key一致才会接收到消息
交换机类型设置为Direct
步骤和订阅模式相同。:
1.只是在生产者发送消息时指定一个key。
2.消费者绑定队列的时候也配置一个key,两者一样。
3.当两者相同时,消费者才能拿到消息进行消费。
生产者:
package cn.js.Routing;
import com.rabbitmq.client.*;
import java.io.IOException;
import java.util.concurrent.TimeoutException;
public class RoutingTest {
public static void main(String[] args) throws IOException, TimeoutException {
ConnectionFactory connectionFactory = new ConnectionFactory();
connectionFactory.setHost("localhost");
Connection connection = connectionFactory.newConnection();
Channel channel = connection.createChannel();
channel.exchangeDeclare("04-Routing", BuiltinExchangeType.DIRECT);
String xiaoxi="这是Routing生产者生成的消息";
channel.basicPublish("04-Routing","info",null,xiaoxi.getBytes());
channel.close();
connection.close();
System.out.println("消息发送完毕");
}
}
消费者1:
package cn.js.Routing;
import com.rabbitmq.client.*;
import java.io.IOException;
import java.util.concurrent.TimeoutException;
public class Routingconsum01 {
public static void main(String[] args) throws IOException, TimeoutException {
ConnectionFactory connectionFactory = new ConnectionFactory();
connectionFactory.setHost("localhost");
Connection connection = connectionFactory.newConnection();
Channel channel = connection.createChannel();
channel.exchangeDeclare("04-Routing",BuiltinExchangeType.DIRECT);
String queue = channel.queueDeclare().getQueue();
channel.queueBind(queue, "04-Routing", "info");
channel.queueBind(queue, "04-Routing", "error");
channel.queueBind(queue, "04-Routing", "warning");
channel.basicConsume(queue, true, new DeliverCallback() {
public void handle(String consumerTag, Delivery message) throws IOException {
System.out.println("消费者 1 消息内容为:" + new String(message.getBody()));
}
}, new CancelCallback() {
public void handle(String consumerTag) throws IOException {
System.out.println("1111");
}
});
}
}
消费者2:
package cn.js.Routing;
import com.rabbitmq.client.*;
import java.io.IOException;
import java.util.concurrent.TimeoutException;
public class Routingconsum02 {
public static void main(String[] args) throws IOException, TimeoutException {
ConnectionFactory connectionFactory = new ConnectionFactory();
connectionFactory.setHost("localhost");
Connection connection = connectionFactory.newConnection();
Channel channel = connection.createChannel();
channel.exchangeDeclare("04-Routing",BuiltinExchangeType.DIRECT);
String queue = channel.queueDeclare().getQueue();
channel.queueBind(queue, "04-Routing", "error");
channel.queueBind(queue, "04-Routing", "warning");
channel.basicConsume(queue, true, new DeliverCallback() {
public void handle(String consumerTag, Delivery message) throws IOException {
System.out.println("消费者 2 消息内容为:" + new String(message.getBody()));
}
}, new CancelCallback() {
public void handle(String consumerTag) throws IOException {
System.out.println("1111");
}
});
}
}
(4)、通配符模式:
步骤:
1、生产者和路由模式生产者相同,定义一个路由key 交换机类型设置为TOPic 如 emp.save
2、在消费者上绑定队列时,可以使用通配符 如 emp.*
生产者:
package cn.js.Topic;
import com.rabbitmq.client.BuiltinExchangeType;
import com.rabbitmq.client.Channel;
import com.rabbitmq.client.Connection;
import com.rabbitmq.client.ConnectionFactory;
import java.io.IOException;
import java.util.concurrent.TimeoutException;
public class TopicTest {
public static void main(String[] args) throws IOException, TimeoutException {
ConnectionFactory connectionFactory = new ConnectionFactory();
connectionFactory.setHost("localhost");
Connection connection = connectionFactory.newConnection();
Channel channel = connection.createChannel();
channel.exchangeDeclare("05-Topic", BuiltinExchangeType.TOPIC);
String xiaoxi1="这是Routing生产者生成的消息order1.save";
String xiaoxi2="这是Routing生产者生成的消息order1.delete";
String xiaoxi3="这是Routing生产者生成的消息order1.insert";
channel.basicPublish("05-Topic","order1.save",null,xiaoxi1.getBytes());
channel.basicPublish("05-Topic","order1.delete",null,xiaoxi2.getBytes());
channel.basicPublish("05-Topic","order1.insert",null,xiaoxi3.getBytes());
channel.close();
connection.close();
System.out.println("消息发送完毕");
}
}
消费者:
package cn.js.Topic;
import com.rabbitmq.client.*;
import java.io.IOException;
import java.util.concurrent.TimeoutException;
public class Topicconsum01 {
public static void main(String[] args) throws IOException, TimeoutException {
ConnectionFactory connectionFactory = new ConnectionFactory();
connectionFactory.setHost("localhost");
Connection connection = connectionFactory.newConnection();
Channel channel = connection.createChannel();
channel.exchangeDeclare("05-Topic",BuiltinExchangeType.TOPIC);
String queue = channel.queueDeclare().getQueue();
channel.queueBind(queue, "05-Topic", "order1.*");
channel.basicConsume(queue, true, new DeliverCallback() {
public void handle(String consumerTag, Delivery message) throws IOException {
System.out.println("消费者 1 消息内容为:" + new String(message.getBody()));
}
}, new CancelCallback() {
public void handle(String consumerTag) throws IOException {
System.out.println("1111");
}
});
}
}
七、SpringBoot整合MQ
1、步骤(简单模式):
1.导入依赖,配置yml文件
2.生产者:
    SpringBoot已经将MQ封装好了:
       直接使用:
       @Autowired
       private RabbitTemPlate rabbitTemPlate;

       发送消息:
        rabbitTemPlate.convertAndsend();
      convertAndsend中参数:
      1.交换机名称
      2.队列名称
      3.消息内容


3.消费者:
  定义一个消费者类,多个消费者就定义多个消费者类

 @Component
public class QueueListener {

    @RabbitListener(queuesToDeclare = @Queue("boot_queue"))
    public void receiveMsg(String msg, @Header(AmqpHeaders.DELIVERY_TAG) long deliveryTag, Channel channel){
        System.out.println("收到消息:"+msg);
    }
}
生产者:
package cn.js.controller;
import org.springframework.amqp.rabbit.core.RabbitTemplate;
import org.springframework.beans.factory.annotation.Autowired;
import org.springframework.web.bind.annotation.GetMapping;
import org.springframework.web.bind.annotation.PathVariable;
import org.springframework.web.bind.annotation.RequestMapping;
import org.springframework.web.bind.annotation.RestController;
@RestController
@RequestMapping("/get")
public class producerController {
@Autowired
private RabbitTemplate rabbitTemplate;
@GetMapping("/hello/{msg}")
public String HelloTest(@PathVariable("msg") String msg){
System.out.println(msg);
rabbitTemplate.convertAndSend("","hello",msg);
return "发送成功";
}
}
消费者:
package cn.js.compert;
import org.springframework.amqp.rabbit.annotation.Queue;
import org.springframework.amqp.rabbit.annotation.RabbitListener;
import org.springframework.stereotype.Component;
@Component
public class Consumer {
@RabbitListener(queuesToDeclare = @Queue("hello"))
public void consum(String msg){
System.out.println("消费者收到消息:"+msg);
}
}
2、集成工作模式:
步骤:
1.生产者和简单模式一样不用东动
2.消费者中配置yml文件:
    (1).签收模式 (手动签收)
    (2).轮巡分配

    spring.rabbitmq.listener.simple.acknowledge-mode=manual
    spring.rabbitmq.listener.simple.prefetch=1

3.在消费者类中方法上面的参数中添加
@Component
public class Worker {
    @RabbitListener(queuesToDeclare = @Queue("boot_worker"))
      public void receiveMsg(String msg, @Header(AmqpHeaders.DELIVERY_TAG) long deliveryTag, Channel channel) throws IOException {
        System.out.println("工作者1:"+msg);
        channel.basicAck(deliveryTag,false);
    }

}
生产者:
package cn.js.controller;
import org.springframework.amqp.rabbit.core.RabbitTemplate;
import org.springframework.beans.factory.annotation.Autowired;
import org.springframework.web.bind.annotation.GetMapping;
import org.springframework.web.bind.annotation.PathVariable;
import org.springframework.web.bind.annotation.RequestMapping;
import org.springframework.web.bind.annotation.RestController;
@RestController
@RequestMapping("/get")
public class producerController {
@Autowired
private RabbitTemplate rabbitTemplate;
@GetMapping("/work/{msg}")
public String workTest(@PathVariable("msg") String msg){
System.out.println(msg);
for(int i= 0;i<20;i++){
rabbitTemplate.convertAndSend("","boot_worker","msg:"+i);
}
return "发送成功";
}
}
消费者1
package cn.js.compert.work;
import com.rabbitmq.client.Channel;
import org.springframework.amqp.rabbit.annotation.Queue;
import org.springframework.amqp.rabbit.annotation.RabbitListener;
import org.springframework.amqp.support.AmqpHeaders;
import org.springframework.messaging.handler.annotation.Header;
import org.springframework.stereotype.Component;
import java.io.IOException;
@Component
public class workconsum1 {
@RabbitListener(queuesToDeclare = @Queue("boot_worker"))
public void receiveMsg(String msg, @Header(AmqpHeaders.DELIVERY_TAG) long deliveryTag, Channel channel) throws IOException {
System.out.println("工作者1:"+msg);
channel.basicAck(deliveryTag,false);
}
}
消费者2:
package cn.js.compert.work;
import com.rabbitmq.client.Channel;
import org.springframework.amqp.rabbit.annotation.Queue;
import org.springframework.amqp.rabbit.annotation.RabbitListener;
import org.springframework.amqp.support.AmqpHeaders;
import org.springframework.messaging.handler.annotation.Header;
import org.springframework.stereotype.Component;
import java.io.IOException;
@Component
public class workconsum {
@RabbitListener(queuesToDeclare = @Queue("boot_worker"))
public void receiveMsg(String msg, @Header(AmqpHeaders.DELIVERY_TAG) long deliveryTag, Channel channel) throws IOException {
System.out.println("工作者2:"+msg);
channel.basicAck(deliveryTag,false);
}
}
3、集成订阅模式:
步骤:
1.生产者:
指定交换机:定义交换机名称
注意此模式生产者没有队列
2.消费者:
在消费者方法上:
@RabbitListener(bindings = @QueueBinding(value = @Queue,exchange = @Exchange(name = "boot_pubsub",type = "fanout")))
加上:exchange = @Exchange(name = "boot_pubsub",type = "fanout")
生产者:
package cn.js.controller;
import org.springframework.amqp.rabbit.core.RabbitTemplate;
import org.springframework.beans.factory.annotation.Autowired;
import org.springframework.web.bind.annotation.GetMapping;
import org.springframework.web.bind.annotation.PathVariable;
import org.springframework.web.bind.annotation.RequestMapping;
import org.springframework.web.bind.annotation.RestController;
@RestController
@RequestMapping("/get")
public class producerController {
@Autowired
private RabbitTemplate rabbitTemplate;
@GetMapping("/PubSub/{msg}")
public String PubSub(@PathVariable("msg") String msg){
System.out.println(msg);
rabbitTemplate.convertAndSend("PubSub","",msg);
return "发送成功";
}
}
消费者1:
package cn.js.compert.PubSub;
import com.rabbitmq.client.Channel;
import org.springframework.amqp.rabbit.annotation.Exchange;
import org.springframework.amqp.rabbit.annotation.Queue;
import org.springframework.amqp.rabbit.annotation.QueueBinding;
import org.springframework.amqp.rabbit.annotation.RabbitListener;
import org.springframework.amqp.support.AmqpHeaders;
import org.springframework.messaging.handler.annotation.Header;
import org.springframework.stereotype.Component;
@Component
public class PubSubconsum1 {
@RabbitListener(bindings =
@QueueBinding(value = @Queue,exchange = @Exchange(name = "PubSub",type = "fanout")))
public void receiveMsg(String msg, @Header(AmqpHeaders.DELIVERY_TAG)long deliveryTag, Channel channel) throws Exception {
System.out.println("收到消息1:"+msg);
channel.basicAck(deliveryTag,false);
}
}
消费者2:
package cn.js.compert.PubSub;
import com.rabbitmq.client.Channel;
import org.springframework.amqp.rabbit.annotation.Exchange;
import org.springframework.amqp.rabbit.annotation.Queue;
import org.springframework.amqp.rabbit.annotation.QueueBinding;
import org.springframework.amqp.rabbit.annotation.RabbitListener;
import org.springframework.amqp.support.AmqpHeaders;
import org.springframework.messaging.handler.annotation.Header;
import org.springframework.stereotype.Component;
@Component
public class PubSubconsum2 {
@RabbitListener(bindings =
@QueueBinding(value = @Queue,exchange = @Exchange(name = "PubSub",type = "fanout")))
public void receiveMsg(String msg, @Header(AmqpHeaders.DELIVERY_TAG)long deliveryTag, Channel channel) throws Exception {
System.out.println("收到消息2:"+msg);
channel.basicAck(deliveryTag,false);
}
}
4、集成路由模式
步骤:
1.生产者:
1.生产者指定路由Key
2.此模式生产者没有队列,交换机类型设置为Direct
2.消费者:
在消费者方法的注解上指定路由Key要与生产者路由Key相同,也可以配置多个路由key
@RabbitListener(bindings = @QueueBinding(value = @Queue(name = "boot_rounting_queue01"),
exchange = @Exchange(name = "boot_rounting_exchange",type = "direct"),
key = {"error","info"}
))
生产者:
package cn.js.controller;
import org.springframework.amqp.rabbit.core.RabbitTemplate;
import org.springframework.beans.factory.annotation.Autowired;
import org.springframework.web.bind.annotation.GetMapping;
import org.springframework.web.bind.annotation.PathVariable;
import org.springframework.web.bind.annotation.RequestMapping;
import org.springframework.web.bind.annotation.RestController;
@RestController
@RequestMapping("/get")
public class producerController {
@Autowired
private RabbitTemplate rabbitTemplate;
@GetMapping("/Routing/{msg}/{key}")
public String Routing(@PathVariable("msg") String msg,@PathVariable("key") String key){
System.out.println(msg);
System.out.println(key);
rabbitTemplate.convertAndSend("Routing",key,msg);
return "发送成功";
}
}
消费者1:
package cn.js.compert.Routing;
import com.rabbitmq.client.Channel;
import org.springframework.amqp.rabbit.annotation.Exchange;
import org.springframework.amqp.rabbit.annotation.Queue;
import org.springframework.amqp.rabbit.annotation.QueueBinding;
import org.springframework.amqp.rabbit.annotation.RabbitListener;
import org.springframework.amqp.support.AmqpHeaders;
import org.springframework.messaging.handler.annotation.Header;
import org.springframework.stereotype.Component;
import java.io.IOException;
@Component
public class Routingconsum1 {
@RabbitListener(bindings =
@QueueBinding(
value = @Queue,
exchange =@Exchange(value = "Routing",type = "direct"),
key = {"info","error"}))
public void consumer(String msg, @Header(AmqpHeaders.DELIVERY_TAG) long deliveryTag, Channel channel) throws IOException {
System.out.println("消费者 1-消息内容为:" + msg);
channel.basicAck(deliveryTag,true);
}
}
消费者2:
package cn.js.compert.Routing;
import com.rabbitmq.client.Channel;
import org.springframework.amqp.rabbit.annotation.Exchange;
import org.springframework.amqp.rabbit.annotation.Queue;
import org.springframework.amqp.rabbit.annotation.QueueBinding;
import org.springframework.amqp.rabbit.annotation.RabbitListener;
import org.springframework.amqp.support.AmqpHeaders;
import org.springframework.messaging.handler.annotation.Header;
import org.springframework.stereotype.Component;
import java.io.IOException;
@Component
public class Routingconsum2 {
@RabbitListener(bindings =
@QueueBinding(
value = @Queue,
exchange =@Exchange(value = "Routing",type = "direct"),
key = {"info","error"}))
public void consumer(String msg, @Header(AmqpHeaders.DELIVERY_TAG) long deliveryTag, Channel channel) throws IOException {
System.out.println("消费者 2-消息内容为:" + msg);
channel.basicAck(deliveryTag,true);
}
}
5、集成通配符模式
步骤:
1.和路由模式一样,只是在消费者中绑定路由key,是以通配符的方式绑定;
2.交换机类型设置为Topic
生产者:
package cn.js.controller;
import org.springframework.amqp.rabbit.core.RabbitTemplate;
import org.springframework.beans.factory.annotation.Autowired;
import org.springframework.web.bind.annotation.GetMapping;
import org.springframework.web.bind.annotation.PathVariable;
import org.springframework.web.bind.annotation.RequestMapping;
import org.springframework.web.bind.annotation.RestController;
@RestController
@RequestMapping("/get")
public class producerController {
@Autowired
private RabbitTemplate rabbitTemplate;
@GetMapping("/Topic/{msg}/{key}")
public String Topic(@PathVariable("msg") String msg,@PathVariable("key") String key){
System.out.println(msg);
System.out.println(key);
rabbitTemplate.convertAndSend("Topic",key,msg);
return "发送成功";
}
}
消费者1:
package cn.js.compert.Topic;
import com.rabbitmq.client.Channel;
import org.springframework.amqp.rabbit.annotation.Exchange;
import org.springframework.amqp.rabbit.annotation.Queue;
import org.springframework.amqp.rabbit.annotation.QueueBinding;
import org.springframework.amqp.rabbit.annotation.RabbitListener;
import org.springframework.amqp.support.AmqpHeaders;
import org.springframework.messaging.handler.annotation.Header;
import org.springframework.stereotype.Component;
import java.io.IOException;
@Component
public class Topicconsum1 {
@RabbitListener(bindings =
@QueueBinding(
value = @Queue,
exchange =@Exchange(value = "Topic",type = "topic"),
key = {"emp.save"}))
public void receiveMsg(String msg, @Header(AmqpHeaders.DELIVERY_TAG) long deliveryTag, Channel channel) throws IOException {
System.out.println("Topic工作者2:"+msg);
channel.basicAck(deliveryTag,false);
}
}
消费者2:
package cn.js.compert.Topic;
import com.rabbitmq.client.Channel;
import org.springframework.amqp.rabbit.annotation.Exchange;
import org.springframework.amqp.rabbit.annotation.Queue;
import org.springframework.amqp.rabbit.annotation.QueueBinding;
import org.springframework.amqp.rabbit.annotation.RabbitListener;
import org.springframework.amqp.support.AmqpHeaders;
import org.springframework.messaging.handler.annotation.Header;
import org.springframework.stereotype.Component;
import java.io.IOException;
@Component
public class Topicconsum2 {
@RabbitListener(bindings =
@QueueBinding(
value = @Queue,
exchange =@Exchange(value = "Topic",type ="topic"),
key = {"emp.save"}))
public void receiveMsg(String msg, @Header(AmqpHeaders.DELIVERY_TAG) long deliveryTag, Channel channel) throws IOException {
System.out.println("Topic工作者2:"+msg);
channel.basicAck(deliveryTag,false);
}
}
代码地址:
整合代码


 本文详细介绍了RabbitMQ的基本使用,包括如何在SpringBoot中集成RabbitMQ实现简单模式、工作模式、订阅模式和路由模式。通过这些模式展示了消息队列如何处理高并发和海量数据,以及如何进行异步解耦和削峰填谷。文中还给出了详细的代码示例,涵盖了生产者和消费者的创建以及不同模式下的消息发送与接收。


 21万+
21万+

 被折叠的 条评论
为什么被折叠?
被折叠的 条评论
为什么被折叠?
 到【灌水乐园】发言


